FragementTabHost用法
现在市面上app的主流框架大体分为两种:一种是在主界面点击菜单按钮,之后会滑出侧滑菜单,之后进入到各个模块,还有一种是在主界面的下面放置若干个tab按钮,点击按钮,切换到不同的模块。第二种它有两种效果:
效果一:通过手势可以让界面左右滑动,和Android版微信一样(可以通过ViewPage和Fragment实现)
效果二:不能通过手势让界面左右滑动,只能点击下面的Tab按钮,才能切换界面
今天要讲的是第二种中的效果二的实现方式之一FragmentTabHost.FragmentTabHost来自于android.support.v4.app这个包下,继承自TabHost,作为android4.0的控件。直接看代码吧
MainActivity代码如下
    public class MainActivity extends FragmentActivity implements OnTabChangeListener {

    private FragmentTabHost mTabHost;

    @Override
    protected void onCreate(Bundle savedInstanceState) {
        super.onCreate(savedInstanceState);
        setContentView(R.layout.activity_main);
        mTabHost = (FragmentTabHost) findViewById(android.R.id.tabhost);
        //设置替换哪个布局
        mTabHost.setup(this, getSupportFragmentManager(), android.R.id.tabcontent);
        if (android.os.Build.VERSION.SDK_INT > 10) {
            //去除分割线
            mTabHost.getTabWidget().setShowDividers(0);
        }
        initTabs();
    }

    /**
     * 初始化标签
     */
    private void initTabs() {
        MainTab[] tabs = MainTab.values();
        final int size = tabs.length;
        for (int i = 0; i < size; i++) {
            MainTab mainTab = tabs[i];
            TabSpec tab = mTabHost.newTabSpec(getString(mainTab.getResName()));
            //得到每个Item布局
            View indicator = LayoutInflater.from(getApplicationContext())
                    .inflate(R.layout.tab_indicator, null);
            TextView title = (TextView) indicator.findViewById(R.id.tab_title);
            Drawable drawable = this.getResources().getDrawable(
                    mainTab.getResIcon());
            //在文字上方添加图片
            title.
            setCompoundDrawablesWithIntrinsicBounds(null,
                    drawable, null,
                    null);
            title.setText(getString(mainTab.getResName()));
            //设置指示器
            tab.setIndicator(indicator);
            //将Tab按钮添加进Tab选项卡中
            mTabHost.addTab(tab, mainTab.getClz(), null);
        }
    }

    @Override
    public void onTabChanged(String tabId) {
        //获取标签指示器个数
        final int size = mTabHost.getTabWidget().getTabCount();
        for (int i = 0; i < size; i++) {
            View v = mTabHost.getTabWidget().getChildAt(i);
            if (i == mTabHost.getCurrentTab()) {
                v.setSelected(true);
            } else {
                v.setSelected(false);
            }
        }
        supportInvalidateOptionsMenu();
    }
}
注意:MainActivity必须继承FragmentActivity
在这里创建一个enum MainTab,主要用来封装Tab按钮要显示的字符串,图片资源 和要替换的Fragment,代码如下:
    public enum MainTab {

    //参数一:名字  参数二:图片  参数三:Fragment
    ZHICUO(0, R.string.main_tab_name_zhicuo, R.drawable.tab_menu_zhicuo_selector,
            ZhicuoFragment.class),

    QIUSHI(1, R.string.main_tab_name_qiushi, R.drawable.tab_menu_qiushi_selector,
            QiushiFragment.class),

    MESSAGE(2, R.string.main_tab_name_message, R.drawable.tab_menu_message_selector,
            MessageFragment.class),

    MINE(3, R.string.main_tab_name_mine, R.drawable.tab_menu_mine_selector,
            MineFragment.class);

    private int idx;
    private int resName;
    private int resIcon;
    private Class<?> clz;

    private MainTab(int idx, int resName, int resIcon, Class<?> clz) {
        this.idx = idx;
        this.resName = resName;
        this.resIcon = resIcon;
        this.clz = clz;
    }

    public int getIdx() {
        return idx;
    }

    public void setIdx(int idx) {
        this.idx = idx;
    }

    public int getResName() {
        return resName;
    }

    public void setResName(int resName) {
        this.resName = resName;
    }

    public int getResIcon() {
        return resIcon;
    }

    public void setResIcon(int resIcon) {
        this.resIcon = resIcon;
    }

    public Class<?> getClz() {
        return clz;
    }

    public void setClz(Class<?> clz) {
        this.clz = clz;
    }

}
资源文件下values/strings.xml代码如下
    <string name="main_tab_name_zhicuo">知过</string>
    <string name="main_tab_name_qiushi">曝光台</string>
    <string name="main_tab_name_message">消息</string>
    <string name="main_tab_name_mine">我</string>
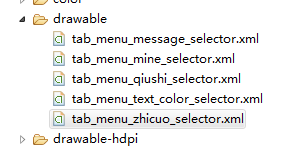
drawable文件夹下新建四个状态选择器

tab_menu_zhicuo_selector.xml代码如下
    <?xml version="1.0" encoding="utf-8"?>
<selector xmlns:android="http://schemas.android.com/apk/res/android">

     <item android:state_pressed="true" android:drawable="@drawable/ic_tab_zhicuo_selected" />
    <item android:state_checked="true" android:drawable="@drawable/ic_tab_zhicuo_selected" />
    <item android:state_selected="true" android:drawable="@drawable/ic_tab_zhicuo_selected" />
    <item android:drawable="@drawable/ic_tab_zhicuo_unselected" />

</selector>
其他三个同tab_menu_zhicuo_selector.xml 类似
图片资源:


activity_main.xml代码如下
    <LinearLayout xmlns:android="http://schemas.android.com/apk/res/android"
    xmlns:tools="http://schemas.android.com/tools"
    android:layout_width="match_parent"
    android:layout_height="match_parent"
    android:background="#fff"
    android:orientation="vertical" >

    <FrameLayout
        android:id="@android:id/tabcontent"
        android:layout_width="match_parent"
        android:layout_height="0dip"
        android:layout_weight="1" />

    <RelativeLayout
        android:layout_width="match_parent"
        android:layout_height="wrap_content"
        android:layout_marginBottom="4dip" >

        <android.support.v4.app.FragmentTabHost
            android:id="@android:id/tabhost"
            android:layout_width="match_parent"
            android:layout_height="wrap_content"
            android:layout_marginTop="4dip" />
    </RelativeLayout>

</LinearLayout>
Tab的Item布局如下
<?xml version="1.0" encoding="utf-8"?>
<RelativeLayout xmlns:android="http://schemas.android.com/apk/res/android"
    android:layout_width="wrap_content"
    android:layout_height="wrap_content" >

    <TextView
        android:id="@+id/tab_title"
        android:layout_width="wrap_content"
        android:layout_height="wrap_content"
        android:layout_gravity="center"
        android:drawableTop="@drawable/ic_tab_zhicuo_selected"
        android:gravity="center"
        android:layout_centerInParent="true"
        android:text="知错"
        android:textColor="@color/txt_tab_selector"
        android:textSize="12sp" />
</RelativeLayout>
在这里我就简单的创建一下四个Fragemnt

ZhicuoFragment代码如下
package com.example.tabhosttest.fragment;
import android.os.Bundle;
import android.support.v4.app.Fragment;
import android.view.LayoutInflater;
import android.view.View;
import android.view.ViewGroup;
import android.widget.TextView;

public class ZhicuoFragment extends Fragment{
    @Override
    public View onCreateView(LayoutInflater inflater, ViewGroup container,
            Bundle savedInstanceState) {

        //简单的写了一个TextView
        TextView tv = new TextView(getActivity());
        tv.setText("知错");
        tv.setTextSize(30);
        return tv;
    }
}
其他三个Fragment同ZhicuoFragment一样,这里我就不重复贴出代码了
完整代码下载
最后
以上就是可靠彩虹最近收集整理的关于FragementTabHost简单用法的全部内容,更多相关FragementTabHost简单用法内容请搜索靠谱客的其他文章。


发表评论 取消回复