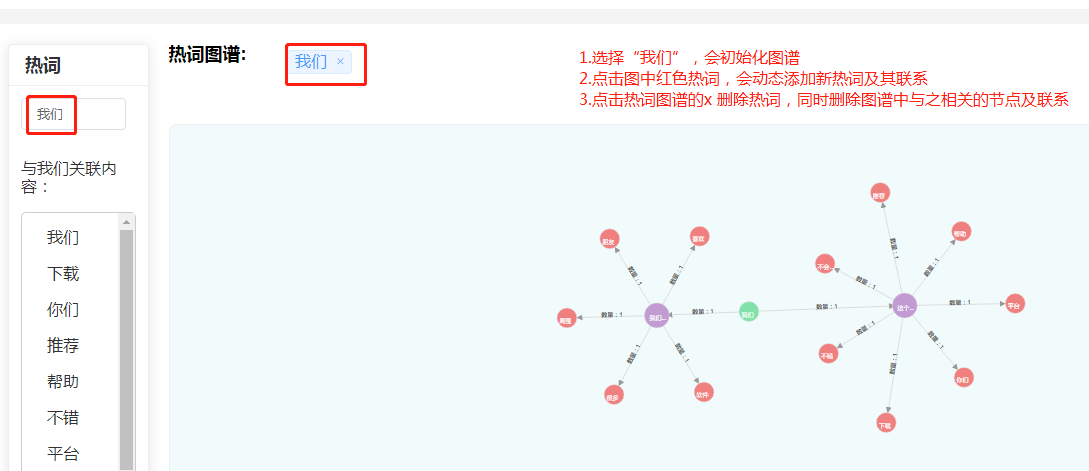
0.写在前面
要实现的功能如图:

1.安装d3
npm install d3 --save-dev2.在页面中引入d3
import * as d3 from 'd3'3.在页面中增加热词tag和类名为container的div元素
<el-col :span="21" class="contans">
  <div class="wordResult">
    <label style="font-size:18px;">热词图谱:</label>
    <ul class="ullist">
      <li v-for="(item,index) in clickWord" :key="index">
        <el-tag closable @close="delWord(item)">{{ item }}</el-tag><span class="listSpan" />
      </li>
    </ul>
    <el-button type="primary" size="small" style="width:65px;height:30px;">生成结论</el-button>
  </div>
  <div class="container" />
</el-col>
4.初始化力导向图
(1)调接口获取nodes和links后走initGraph方法
async getKeyWord(data) {
  const response = await get_keyword(data)
  this.testGraph['nodes'] = response.data.nodes
  this.testGraph['links'] = response.data.links
  this.initGraph(this.testGraph)
},
(2)初始化前先清除上次的图谱 获取的数据存成全局变量
由于要注解,就不把所有代码一次性粘贴上了
如下图,在initGraph方法里,通过d3.select('#the_SVG_ID').remove() 清除上次的图谱;
由于更新图谱时需要往nodes和links数组里添加节点及联系,存成全局变量方便在其他方法里使用。这里需要引入Vue;
import Vue from 'vue'// 存入全局变量
Vue.prototype.$links = links
Vue.prototype.$nodes = nodes
// 引用全局变量
that.$links
that.$nodes下边3块代码分别是添加碰撞力和引力及控制link的长度、在container元素中创建svg元素用来放节点和连线、缩放;
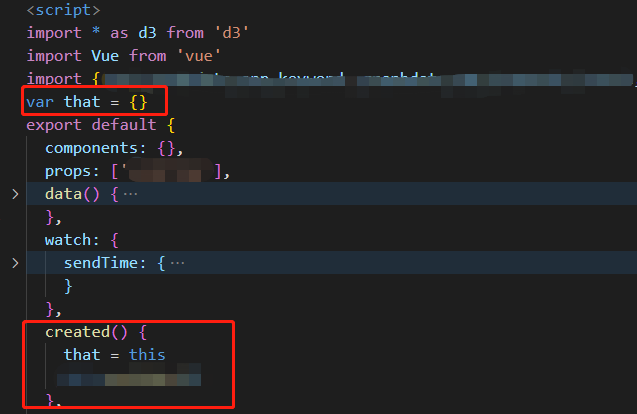
这里应该会注意到 that ,这个that使用的是全局变量,因为点击node节点的箭头函数里this不生效,所以设置了that代替this:

initGraph(data) {
   d3.select('#the_SVG_ID').remove()
   const links = data.links.map(d => Object.create(d))
   const nodes = data.nodes.map(d => Object.create(d))
   Vue.prototype.$links = links
   Vue.prototype.$nodes = nodes

   // .distance(160))  改变link的长度
   that.simulation = d3.forceSimulation(that.$nodes)
     .force('link', d3.forceLink(links).id(d => d.keyword).distance(150))
     .force('collide', d3.forceCollide().radius(() => 90)) //  碰撞力
     .force('charge', d3.forceManyBody().strength(-90)) // 引力
     .force('center', d3.forceCenter(that.width / 2, that.height / 2));

   // 创建svg元素 初始化样式
   const svg = d3.select('.container')
     .append('svg')
     .attr('id', 'the_SVG_ID')
     .attr('viewBox', [0, 0, that.width, that.height])
     .style('width', 1600)
     .style('height', 800)

   // 缩放
   svg.call(d3.zoom().on('zoom', function() {
     g.attr('transform', d3.event.transform)
   }))
}
(3)设置箭头控制方向、svg元素中创建g元素并向其中加入svg_links和linksName
// 两个marker控制箭头方向  stroke-width 箭头粗细  refX 偏移  orient 朝向
const positiveMarker = svg.append('marker')
  .attr('id', 'positiveMarker')
  .attr('orient', 'auto')
  .attr('stroke-width', 2)
  .attr('markerUnits', 'strokeWidth')
  .attr('markerUnits', 'userSpaceOnUse')
  .attr('viewBox', '0 -5 10 10')
  .attr('refX', 26)
  .attr('refY', 0)
  .attr('markerWidth', 12)
  .attr('markerHeight', 12)
  .append('path')
  .attr('d', 'M 0 -5 L 10 0 L 0 5')
  .attr('fill', '#999')
  .attr('stroke-opacity', 0.6)

const negativeMarker = svg.append('marker')
  .attr('id', 'negativeMarker')
  .attr('orient', 'auto')
  .attr('stroke-width', 2)
  .attr('markerUnits', 'strokeWidth')
  .attr('markerUnits', 'userSpaceOnUse')
  .attr('viewBox', '0 -5 10 10')
  .attr('refX', -16)
  .attr('refY', 0)
  .attr('markerWidth', 12)
  .attr('markerHeight', 12)
  .append('path')
  .attr('d', 'M 10 -5 L 0 0 L 10 5')
  .attr('fill', '#999')
  .attr('stroke-opacity', 0.6)

// 在svg中创建g元素 将node和link放在g元素中 更精确
const g = svg.append('g')

// .attr("marker-end","url(#direction)") 添加箭头
that.svg_links = g.append('g')
  .attr('stroke', '#999')
  .attr('stroke-opacity', 0.6)
  .attr('marker-end', 'url(#direction)')
  .selectAll('path')
  .data(that.$links)
  .join('path')
  .attr('stroke-width', d => Math.sqrt(d.value))
  .attr('id', function(d) {
    if (typeof (d.source) === 'object') {
      return d.source.keyword + '_' + d.relationship + '_' + d.target.keyword
    } else {
      return d.source + '_' + d.relationship + '_' + d.target
    }
  })

// linksName 连线上的文字 text-anchor 锚点 startOffset 开始偏移  这两个属性实现居中
that.linksName = g.append('g')
  .selectAll('text')
  .data(that.$links)
  .join('text')
  // .attr('x', 70)
  // .attr('y', 60)
  .style('text-anchor', 'middle')
  .style('fill', '#595959')
  .style('font-size', '12px')
  .style('font-weight', 'bold')
  .append('textPath')
  .attr(
    'xlink:href', function(d) {
      if (typeof (d.source) === 'object') {
        return '#' + d.source.keyword + '_' + d.relationship + '_' + d.target.keyword
      } else {
        return '#' + d.source + '_' + d.relationship + '_' + d.target
      }
    }
  )
  .attr('startOffset', '50%')
  // .attr('dx', 10)
  // .attr('dy', 10)
  .text(function(d) {
    if (d.count) {
      return '数量:' + d.count
    } else {
      return '数量:' + 1
    }
  })
(4)向g元素中添加svg_nodes 点击节点时向热词列表添加热词并调接口获取该节点相关图谱
如下图:点击节点时,先判断热词列表里有没有该节点,并且group为2(评论)也不添加;
获取的新nodes和links肯定有重复的,所以需要判断是否重复;
最后添加到全局变量that.$nodes和that.$links中,并调updateGraph方法动态更新图谱
that.svg_nodes = g.append('g')
  .attr('stroke', '#fff')
  .attr('stroke-width', 1.5)
  .selectAll('circle')
  .data(that.$nodes)
  .join('circle')
  .attr('r', function(d) {
    if (d.group === 2) {
      return 25
    } else {
      return 20
    }
  })
  .attr('class', 'node')
  .attr('fill', that.color)
  // 点击元素获取对应信息
  .on('click', function(d, i) {
    that.isTrue = false
    that.wordData = []
    that.clickWord.map((item,index) =>{
      if(d.group === 2){
        return
      }else if(that.clickWord.indexOf(d.keyword) != -1){
        return
      }else{
        that.clickWord.push(d.keyword)
      }
    })
    // 根据人名d.keyword 查询到对应的link联系
    const data = {
      'word': d.keyword,
      'start_time': that.start_time,
      'end_time': that.end_time
    }
    get_keyword(data)
      .then(function(res) {
        if (res.status) {
          res.data.nodes.map(item => {
            let flag = true
            for (var j = 0; j < that.$nodes.length; j++) {
              if (that.$nodes[j].keyword === item.keyword) {
                flag = false
                break
              }
            }
            if (flag) {
              that.$nodes.push(item)
            }
          })
          res.data.links.map(item1 => {
            let flag = true
            for (var j = 0; j < that.$links.length; j++) {
              if (that.$links[j].target.keyword === item1.source === d.keyword) {
                that.$links.splice(j, 1)
              }
              if (that.$links[j].source.keyword === item1.source) {
                flag = false
                break
              }
            }
            if (flag) {
              that.$links.push(item1)
            }
          })
          that.updateGraph(d.keyword)
        }
      })
      .catch(function(err) {
        console.log(err)
      })
  })
  .call(that.drag(that.simulation))

that.svg_nodes.append('title')
  .text(function(d) {
    return d.keyword
  })
(5)向g元素中添加节点名称nodesName 设置力图布局
设置力图布局这里就用到了两个箭头常量:#positiveMarker #negativeMarker
// nodesName title显示在node下方
that.nodesName = g.append('g')
  .selectAll('text')
  .data(that.$nodes)
  .join('text')
  .text(function(d) {
    if (d.keyword.length > 2) {
      return d.keyword.slice(0, 2) + '...'
    } else {
      return d.keyword
    }
  })
  // .attr('dx', function() {
  //   return this.getBoundingClientRect().width / 2 * (-1)
  // })
  .attr('dx', -15)
  .attr('dy', 10)
  .attr('class', 'nodeName')

// 力图布局
that.simulation.on('tick', () => {
  that.svg_links
    .attr('d', function(d) {
      if (d.source.x < d.target.x) {
        return 'M' + d.source.x + ' ' + d.source.y + 'L' + d.target.x + ' ' + d.target.y
      } else {
        return 'M' + d.target.x + ' ' + d.target.y + 'L' + d.source.x + ' ' + d.source.y
      }
    })
    .attr('marker-end', function(d) {
      if (d.source.x < d.target.x) {
        return 'url(#positiveMarker)'
      } else {
        return null
      }
    })
    .attr('marker-start', function(d) {
      if (d.source.x < d.target.x) {
        return null
      } else {
        return 'url(#negativeMarker)'
      }
    })

  that.svg_nodes
    .attr('cx', d => d.x)
    .attr('cy', d => d.y)

  that.nodesName
    .attr('x', d => d.x)
    .attr('y', d => d.y)
})
5.动态更新图谱方法
在点击图谱中的某个热词时,会先调接口获取与之相关的热词及联系,然后再调这个updateGraph方法
(1)遍历节点将点击节点改变填充颜色 遍历连线改变箭头方向
如下图:在这个更新图谱方法中,首先先去遍历所有节点,截取其id,判断哪个包含点击的热词,将其填充颜色改成绿色;
上步完成,就是遍历所有连线,将之前的评论与你点击的热词间的连线删掉,因为新的关系出来,连线箭头会改变
updateGraph(keyword){
  var sel = d3.select(that.svg_nodes)._groups[0][0]._groups[0]
  sel.map((item,index) =>{
    let tempArr = []
    tempArr = item.innerHTML.split('<title>')
    const newStr = tempArr.join('')
    let tempArr1 = []
    tempArr1 = newStr.split('</title>')
    const newStr1 = tempArr1.join('')
    if(newStr1.length < 20 && item.__data__.group == 1){
      if(newStr1.indexOf(keyword) != -1){
        sel[index].style.fill = '#82E0AA'
      }
    }
  })

  that.svg_links._groups[0].map((item,index) =>{
    if(item.id.slice(0,15).indexOf('app_keyword') != -1){
      return
    }else{
      let uid = item.id.substring(item.id.length - 5)
      if(uid.indexOf(keyword) != -1){
        d3.select(that.svg_links._groups[0][index]).remove()
      }
    }
  })
}
(2)向初始节点数组中添加新节点 点击节点再次调用更新图谱方法
如下图:在点击节点的方法中,先遍历所有连线,判断点击的节点是否不是之前评论相连的节点,并且是新的评论相连节点
如果两个条件都满足,再做一下限制,之前点过的节点和group为2即为评论的节点都不能再点击
最后和初始化里一样,先调接口获取点击的节点相关联的热词和联系,再调updateGraph方法
that.svg_nodes = that.svg_nodes
  .data(that.$nodes)
  .enter()
  .append('circle')
  .attr('r', function(d) {
    if (d.group === 2) {
      return 25
    } else {
      return 20
    }
  })
  .attr('fill', that.color)
  .attr('class', 'node')
  .merge(that.svg_nodes)
  .on('click', function(d, i) {
    for(var i=0;i<that.svg_links._groups[0].length;i++){
      let newId = that.svg_links._groups[0][i].id.split('_fenci_')[0]
      let isTrue = newId.indexOf(that.clickWord[0]) != -1
      let newId1 = that.svg_links._groups[0][i].id.split('_fenci_')[1]
      let isTrue1 = newId.indexOf(d.keyword) != -1
      if(!isTrue && isTrue1){
        that.clickWord.map((item,index) =>{
          if(d.group === 2){
            return
          }else if(that.clickWord.indexOf(d.keyword) != -1){
            return
          }else{
            that.clickWord.push(d.keyword)
          }
        })
        // 根据人名d.keyword 查询到对应的link联系
        const data = {
          'word': d.keyword,
          'start_time': that.start_time,
          'end_time': that.end_time
        }
        get_keyword(data)
          .then(function(res) {
            if (res.status) {
              res.data.nodes.map(item => {
                let flag = true
                for (var j = 0; j < that.$nodes.length; j++) {
                  if (that.$nodes[j].keyword === item.keyword) {
                    flag = false
                    break
                  }
                }
                if (flag) {
                  that.$nodes.push(item)
                }
              })
              res.data.links.map(item1 => {
                let flag = true
                for (var j = 0; j < that.$links.length; j++) {
                  if (that.$links[j].target.keyword === item1.source === d.keyword) {
                    that.$links.splice(j, 1)
                  }
                  if (that.$links[j].source.keyword === item1.source) {
                    flag = false
                    break
                  }
                }
                if (flag) {
                  that.$links.push(item1)
                }
              })
              that.updateGraph(d.keyword)
            }
          })
          .catch(function(err) {
            console.log(err)
          })
      }
    }
  })
  .call(that.drag(that.simulation))
(3)添加新节点名称、新连线、新连线名称 并重新启动simulation
that.svg_nodes.append('title')
  .text(function(d) {
    return d.keyword
  })

// nodesName title显示在node下方
that.nodesName = that.nodesName
  .data(that.$nodes)
  .enter()
  .append('text')
  .merge(that.nodesName)
  .text(function(d) {
    if (d.keyword.length > 2) {
      return d.keyword.slice(0, 2) + '...'
    } else {
      return d.keyword
    }
  })
  .attr('dx', -10)
  .attr('dy', 8)
  .attr('class', 'nodeName')

that.svg_links = that.svg_links
  .data(that.$links)
  .enter()
  .append('path')
  .attr('stroke', '#999')
  .attr('stroke-opacity', 0.6)
  .attr('stroke-width', d => Math.sqrt(d.value))
  .attr('marker-end', 'url(#direction)')
  .attr('id', function(d) {
    if (typeof (d.source) === 'object') {
      return d.source.keyword + '_' + d.relationship + '_' + d.target.keyword
    } else {
      return d.source + '_' + d.relationship + '_' + d.target
    }
  })
  .merge(that.svg_links)

// linksName 连线上文字
that.linksName = that.linksName
  .data(that.$links)
  .enter()
  .append('text')
  .style('text-anchor', 'middle')
  .style('fill', 'black')
  .style('font-size', '10px')
  .style('font-weight', 'bold')
  .append('textPath')
  .attr(
    'xlink:href', function(d) {
      if (typeof (d.source) === 'object') {
        return '#' + d.source.keyword + '_' + d.relationship + '_' + d.target.keyword
      } else {
        return '#' + d.source + '_' + d.relationship + '_' + d.target
      }
    }
  )
  .attr('startOffset', '50%')
  .merge(that.linksName)
  .text(function(d) {
    if (d.count) {
      return '数量:' + d.count
    } else {
      return '数量:' + 1
    }
  })

that.simulation.nodes(that.$nodes)
that.simulation.force('link').links(that.$links)
that.simulation.alpha(1).restart()
6.删除选词
这里根据需求,设置的是当删除的是第一个选词的话,会清空图谱,删除其他的再去判断
如下图:在删除其他选词时,会先循环选词数组,如果删除的选词与数组的某一个相同则删除,
然后遍历links数组,如果某个连线的id前几个词包含选词数组某个词则也跟着删除;
这里的意思就是,当删除的那个词后边的词是由你删除的词散开的词,则跟着删除,否则不删
最后就是遍历选词数组剩余的词,如果是第一个还走 initGraph 方法;否则走 updateGraph 方法
// 删除选词结果
delWord(val) {
  if (val == that.clickWord[0]) {
    d3.select('#the_SVG_ID').remove()
    that.clickWord = []
    that.isTrue = false
    that.wordValue = ''
    that.wordData = []
    that.wordFuzzyData = []
  }else{
    for(var i=1;i<that.clickWord.length;i++){
      if(val == that.clickWord[i]){
        that.clickWord.splice(i, 1)
        that.svg_links._groups[0].map(item =>{
          if(typeof(that.clickWord[i]) != 'undefined'){
            let uid = ''
            if(that.clickWord[i].length > 2){
              uid = item.id.substring(0,4)
            }else{
              uid = item.id.substring(0,2)
            }
            if(uid.indexOf(that.clickWord[i]) != -1){
              that.clickWord.splice(i,1)
            }
          }
        })
      }
    }
  }
  that.clickWord.map((item,index) =>{
    if(index == 0){
      const data = {
        'word': item,
        'start_time': this.start_time,
        'end_time': this.end_time
      }
      this.getKeyWord(data)
    }
    if(index != 0){
      const data = {
        'word': item,
        'start_time': that.start_time,
        'end_time': that.end_time
      }
      get_graphdata_app_keyword(data)
        .then(function(res) {
          if (res.status) {
            res.data.nodes.map(item2 => {
              let flag = true
              for (var j = 0; j < that.$nodes.length; j++) {
                if (that.$nodes[j].keyword === item2.keyword) {
                  flag = false
                  break
                }
              }
              if (flag) {
                that.$nodes.push(item2)
              }
            })
            res.data.links.map(item3 => {
              let flag = true
              for (var j = 0; j < that.$links.length; j++) {
                if (that.$links[j].target.keyword === item3.source === item) {
                  that.$links.splice(j, 1)
                }
                if (that.$links[j].source.keyword === item3.source) {
                  flag = false
                  break
                }
              }
              if (flag) {
                that.$links.push(item3)
              }
            })
            that.updateGraph(item)
          }
        })
        .catch(function(err) {
          console.log(err)
        })
    }
  })
},
(本文完)
最后
以上就是无限百褶裙最近收集整理的关于52.在vue中使用d3创建力导向图并动态新增、删除节点及联系的全部内容,更多相关52内容请搜索靠谱客的其他文章。


发表评论 取消回复