**********记录第一次在Ubtunu系统下部署KubeEdge架构的步骤,并为中间遇到的问题进行解答并进行的记录(面向对Ubtunu操作系统命令不熟悉的小白) *************
以下是我在是在VM软件里构建两台Ubtunu22.04虚拟机关于KubeEdge相关配置:
| 系统 | 节点IP | 虚拟机网络配置 | Keadm | 安装配置 |
| Ubuntu22.04 | 192.168.229.4(mater0、云端结点) | NAT | 1.12.0 | Docker、kubelet、kubeadm、kubectl、Kuboard(可视化环境,可有可无) |
| Ubuntu22.04 | 192.168.229.3(node0、边缘端节点) | NAT | 1.12.0 | Docker、kubelet、kubectl、kubeadm |
首先——你需要在VM虚拟机上成功安装两台Ubuntu22.04系统
按照步骤下载完成后,你需要对网络进行相关配置。由于系统是刚刚安装完成,虚拟机的IP地址分配方式默认为:DHCP,为了后续结点间能够方便通信,建议将IP地址设为静态IP。
进入终端后,你需编辑网络配置文件(22.04版本系统与1.17.0前的版本在某些地方有些许不同)/etc/netplan/01-network-manager-all.yaml,你需要下载vim编辑器,使用命令:apt install vim进行下载
云端虚拟机网络配置如下,边缘端类似:
# Let NetworkManager manage all devices on this system
network:
  ethernets:
   ens33:      #网卡
      dhcp4: no  #关闭动态分配
      addresses: [192.168.229.4/24]   ##IP地址
      optional: true
      routes:
        - to: default
          via: 192.168.229.254   ##网关
      nameservers:
              addresses: [114.114.114.114,8.8.8.8,192.168.229.254]
  version: 2
  renderer: NetworkManager
关于修改主机名字,可编辑文件/etc/hostname,便可对主机名字进行修改,使用命令reboot重启系统,主机名字便被更改。
若想查看ip地址配置是否正确,你需要下载网络工具net-tools,才能用ifconfig查看ip地址是否配置正确,命令如下:
apt install net-tools配置完成后,需要重新连接一下网络:
netplan apply在KubeEdge的配置中,我们需要对以下几个应用进行关闭:
1. 永久禁用SELinux :
vim /etc/sysconfig/selinux
SELINUX=disabled
临时禁用SELinux(让容器可以对主机的文件系统进行读操作):setenforce 0
2. 关闭swap(保证kubelet能够正常工作)
临时关闭:swapoff -a
永久关闭:vim /etc/fstab #注释掉swap分区(#/dev/mapper/centos-swap swap,别的博主注释的,我的系统中并没有,因而就选择临时关闭swap分区,不要胡乱注释)
3. 关闭防火墙
配置国内镜像:
方法1(采用这个博主的方法,成功安装):
首先备份原来的软件源:
cp /etc/apt/sources.list /etc/apt/sources.list.bak配置文件vim /etc/apt/sources.list(来源清华大学软件开源镜像站:根据系统版本进行粘贴,一下是22.04版本系统ubuntu | 镜像站使用帮助 | 清华大学开源软件镜像站 | Tsinghua Open Source Mirror)
# 默认注释了源码镜像以提高 apt update 速度,如有需要可自行取消注释
deb https://mirrors.tuna.tsinghua.edu.cn/ubuntu/ jammy main restricted universe multiverse
# deb-src https://mirrors.tuna.tsinghua.edu.cn/ubuntu/ jammy main restricted universe multiverse
deb https://mirrors.tuna.tsinghua.edu.cn/ubuntu/ jammy-updates main restricted universe multiverse
# deb-src https://mirrors.tuna.tsinghua.edu.cn/ubuntu/ jammy-updates main restricted universe multiverse
deb https://mirrors.tuna.tsinghua.edu.cn/ubuntu/ jammy-backports main restricted universe multiverse
# deb-src https://mirrors.tuna.tsinghua.edu.cn/ubuntu/ jammy-backports main restricted universe multiverse
deb https://mirrors.tuna.tsinghua.edu.cn/ubuntu/ jammy-security main restricted universe multiverse
# deb-src https://mirrors.tuna.tsinghua.edu.cn/ubuntu/ jammy-security main restricted universe multiverse
# 预发布软件源,不建议启用
# deb https://mirrors.tuna.tsinghua.edu.cn/ubuntu/ jammy-proposed main restricted universe multiverse
# deb-src https://mirrors.tuna.tsinghua.edu.cn/ubuntu/ jammy-proposed main restricted universe multiverse
然后执行更新:
apt update安装docker:
apt install docker.io 使用docker --version可查看docker安装成功与否,一下是我的版本:
Docker version 20.10.12, build 20.10.12-0ubuntu4
方法2:
centos7系统安装docker可参照以下链接,Ubuntu也可参照以下链接,二者相似,只有少部分命令不太相同,配置Docker开机自启动命令的方法也在以下博主写的方法中
Centos7离线安装Docker - 知乎 (zhihu.com)
安装K8S(Kubernetes):
在安装K8S我主要根据以下博主进行配置,我会在以下对流程简单进行简单阐述,参考的博主连接如下:(20条消息) KubeEdge环境搭建(支持网络插件flannel)_Jasonix的博客-CSDN博客
(20条消息) linux安装部署k8s(kubernetes)和解决遇到的坑_beyond阿亮的博客-CSDN博客_k8s linux内核版本
由于kubeadm官方文档不适用于国内网络,因而博主采用的以下步骤安装kubeadm(我也按照博主的步骤去安装k8s):
步骤1:安装https:
sudo apt-get update && sudo apt-get install -y apt-transport-https步骤2:安装curl,为步骤三做准备:
apt install curl步骤3:使用阿里云镜像:
curl https://mirrors.aliyun.com/kubernetes/apt/doc/apt-key.gpg | apt-key add -步骤4:修改kubernetes.list文件,执行以下命令即可:
 cat <<EOF >/etc/apt/sources.list.d/kubernetes.list
        deb https://mirrors.aliyun.com/kubernetes/apt/ kubernetes-xenial main
        EOF
步骤5:更新apt-get的配置:
apt-get update步骤6:安装最新版的kubelet,kubeadm,kubectl三个k8s的核心组件:
apt-get install kubelet kubeadm kubectl安装指定版本的:
apt install kubelet=1.22.15-00 kubectl=1.22.15-00 kubeadm=1.22.15-00初始化Master节点(Node节点不需要进行配置):
其中--apiserver-advertise-address=192.168.0.5 为master点的IP地址,–image-repository指定了阿里云镜像仓库
kubeadm init --image-repository=registry.aliyuncs.com/google_containers --apiserver-advertise-address=192.168.229.4 --pod-network-cidr=10.244.0.0/16 --kubernetes-version=v1.22.15以下便是以上两个博主遇到的问题和解决办法,由于每人在配置过程中总会有些纰漏,因而建议最好学会看错误,并找到错误原因,然后利用网络去解决问题。
#报错一: [ERROR Swap]: running with swap on is not supported. Please disable swap
#报错如下: 如果没关闭swap, 需要关闭swap 或者使用 --ignore-preflight-errors=swap
W0525 15:17:52.768575   19864 configset.go:348] WARNING: kubeadm cannot validate component configs for API groups [kubelet.config.k8s.io kubeproxy.config.k8s.io]
[init] Using Kubernetes version: v1.19.3
[preflight] Running pre-flight checks
        [WARNING SystemVerification]: this Docker version is not on the list of validated versions: 20.10.2. Latest validated version: 19.03
error execution phase preflight: [preflight] Some fatal errors occurred:
        [ERROR Swap]: running with swap on is not supported. Please disable swap
[preflight] If you know what you are doing, you can make a check non-fatal with `--ignore-preflight-errors=...`
To see the stack trace of this error execute with --v=5 or higher
#报错二:等待时间超时,The HTTP call equal to 'curl -sSL http://localhost:10248/healthz' failed with error: Get "http://localhost:10248/healthz": dial tcp [::1]:10248: connect: connection refused
报错如下:
[kubelet-check] The HTTP call equal to 'curl -sSL http://localhost:10248/healthz' failed with error: Get "http://localhost:10248/healthz": dial tcp [::1]:10248: connect: connection refused.
[kubelet-check] It seems like the kubelet isn't running or healthy.
[kubelet-check] The HTTP call equal to 'curl -sSL http://localhost:10248/healthz' failed with error: Get "http://localhost:10248/healthz": dial tcp [::1]:10248: connect: connection refused.
[kubelet-check] It seems like the kubelet isn't running or healthy.
[kubelet-check] The HTTP call equal to 'curl -sSL http://localhost:10248/healthz' failed with error: Get "http://localhost:10248/healthz": dial tcp [::1]:10248: connect: connection refused.
        Unfortunately, an error has occurred:
                timed out waiting for the condition
        This error is likely caused by:
                - The kubelet is not running
                - The kubelet is unhealthy due to a misconfiguration of the node in some way (required cgroups disabled)
方法1:
#添加文件: 主要是这个配置:--cgroup-driver=systemd
vim /etc/systemd/system/kubelet.service.d/10-kubeadm.conf
# Note: This dropin only works with kubeadm and kubelet v1.11+
[Service]
Environment="KUBELET_KUBECONFIG_ARGS=--bootstrap-kubeconfig=/etc/kubernetes/bootstrap-kubelet.conf --kubeconfig=/etc/kubernetes/kubelet.conf"
Environment="KUBELET_CONFIG_ARGS=--config=/var/lib/kubelet/config.yaml"
Environment="KUBELET_SYSTEM_PODS_ARGS=--pod-manifest-path=/etc/kubernetes/manifests"
Environment="KUBELET_NETWORK_ARGS=--network-plugin=cni --cni-conf-dir=/etc/cni/net.d --cni-bin-dir=/opt/cni/bin"
Environment="KUBELET_DNS_ARGS=--cluster-dns=10.96.0.10 --cluster-domain=cluster.local"
Environment="KUBELET_AUTHZ_ARGS=--authorization-mode=Webhook --client-ca-file=/etc/kubernetes/pki/ca.crt"
#Environment="KUBELET_CADVISOR_ARGS=--cadvisor-port=0"
Environment="KUBELET_CGROUP_ARGS=--cgroup-driver=systemd"
Environment="KUBELET_EXTRA_ARGS=--fail-swap-on=false"
Environment="KUBELET_CERTIFICATE_ARGS=--rotate-certificates=true --cert-dir=/var/lib/kubelet/pki"
#Environment="KUBELET_EXTRA_ARGS=--v=2 --fail-swap-on=false --pod-infra-container-image=k8s.gcr.io/pause-amd64:3.1"
# This is a file that "kubeadm init" and "kubeadm join" generates at runtime, populating the KUBELET_KUBEADM_ARGS variable dynamically
EnvironmentFile=-/var/lib/kubelet/kubeadm-flags.env
# This is a file that the user can use for overrides of the kubelet args as a last resort. Preferably, the user should use
# the .NodeRegistration.KubeletExtraArgs object in the configuration files instead. KUBELET_EXTRA_ARGS should be sourced from this file.
#EnvironmentFile=-/etc/sysconfig/kubelet
ExecStart=
ExecStart=/usr/bin/kubelet $KUBELET_KUBECONFIG_ARGS $KUBELET_CONFIG_ARGS $KUBELET_KUBEADM_ARGS $KUBELET_SYSTEM_PODS_ARGS $KUBELET_NETWORK_ARGS $KUBELET_DNS_ARGS $KUBELET_AUTHZ_ARGS $KUBELET_CADVISOR_ARGS $KUBELET_CGROUP_ARGS $KUBELET_CERTIFICATE_ARGS $KUBELET_EXTRA_ARGS
#成功, 打印如下信息表示成功:
W0511 11:11:24.998096   15272 configset.go:348] WARNING: kubeadm cannot validate component configs for API groups [kubelet.config.k8s.io kubeproxy.config.k8s.io]
[init] Using Kubernetes version: v1.19.3
[preflight] Running pre-flight checks
        [WARNING SystemVerification]: this Docker version is not on the list of validated versions: 20.10.6. Latest validated version: 19.03
        [WARNING Hostname]: hostname "k8s-master" could not be reached
        [WARNING Hostname]: hostname "k8s-master": lookup k8s-master on 100.125.1.250:53: no such host
[preflight] Pulling images required for setting up a Kubernetes cluster
[preflight] This might take a minute or two, depending on the speed of your internet connection
[preflight] You can also perform this action in beforehand using 'kubeadm config images pull'
[certs] Using certificateDir folder "/etc/kubernetes/pki"
[certs] Generating "ca" certificate and key
[certs] Generating "apiserver" certificate and key
[certs] apiserver serving cert is signed for DNS names [k8s-master kubernetes kubernetes.default kubernetes.default.svc kubernetes.default.svc.cluster.local] and IPs [10.1.0.1 192.168.0.147]
[certs] Generating "apiserver-kubelet-client" certificate and key
[certs] Generating "front-proxy-ca" certificate and key
[certs] Generating "front-proxy-client" certificate and key
[certs] Generating "etcd/ca" certificate and key
[certs] Generating "etcd/server" certificate and key
[certs] etcd/server serving cert is signed for DNS names [k8s-master localhost] and IPs [192.168.0.5 127.0.0.1 ::1]
[certs] Generating "etcd/peer" certificate and key
[certs] etcd/peer serving cert is signed for DNS names [k8s-master localhost] and IPs [192.168.0.5 127.0.0.1 ::1]
[certs] Generating "etcd/healthcheck-client" certificate and key
[certs] Generating "apiserver-etcd-client" certificate and key
[certs] Generating "sa" key and public key
[kubeconfig] Using kubeconfig folder "/etc/kubernetes"
[kubeconfig] Writing "admin.conf" kubeconfig file
[kubeconfig] Writing "kubelet.conf" kubeconfig file
[kubeconfig] Writing "controller-manager.conf" kubeconfig file
[kubeconfig] Writing "scheduler.conf" kubeconfig file
[kubelet-start] Writing kubelet environment file with flags to file "/var/lib/kubelet/kubeadm-flags.env"
[kubelet-start] Writing kubelet configuration to file "/var/lib/kubelet/config.yaml"
[kubelet-start] Starting the kubelet
[control-plane] Using manifest folder "/etc/kubernetes/manifests"
[control-plane] Creating static Pod manifest for "kube-apiserver"
[control-plane] Creating static Pod manifest for "kube-controller-manager"
[control-plane] Creating static Pod manifest for "kube-scheduler"
[etcd] Creating static Pod manifest for local etcd in "/etc/kubernetes/manifests"
[wait-control-plane] Waiting for the kubelet to boot up the control plane as static Pods from directory "/etc/kubernetes/manifests". This can take up to 4m0s
[apiclient] All control plane components are healthy after 16.501683 seconds
[upload-config] Storing the configuration used in ConfigMap "kubeadm-config" in the "kube-system" Namespace
[kubelet] Creating a ConfigMap "kubelet-config-1.19" in namespace kube-system with the configuration for the kubelets in the cluster
[upload-certs] Skipping phase. Please see --upload-certs
[mark-control-plane] Marking the node k8s-master as control-plane by adding the label "node-role.kubernetes.io/master=''"
[mark-control-plane] Marking the node k8s-master as control-plane by adding the taints [node-role.kubernetes.io/master:NoSchedule]
[bootstrap-token] Using token: rt0fpo.4axz6cd6eqpm1ihf
[bootstrap-token] Configuring bootstrap tokens, cluster-info ConfigMap, RBAC Roles
[bootstrap-token] configured RBAC rules to allow Node Bootstrap tokens to get nodes
[bootstrap-token] configured RBAC rules to allow Node Bootstrap tokens to post CSRs in order for nodes to get long term certificate credentials
[bootstrap-token] configured RBAC rules to allow the csrapprover controller automatically approve CSRs from a Node Bootstrap Token
[bootstrap-token] configured RBAC rules to allow certificate rotation for all node client certificates in the cluster
[bootstrap-token] Creating the "cluster-info" ConfigMap in the "kube-public" namespace
[kubelet-finalize] Updating "/etc/kubernetes/kubelet.conf" to point to a rotatable kubelet client certificate and key
[addons] Applied essential addon: CoreDNS
[addons] Applied essential addon: kube-proxy
Your Kubernetes control-plane has initialized successfully!
To start using your cluster, you need to run the following as a regular user:
  mkdir -p $HOME/.kube
  sudo cp -i /etc/kubernetes/admin.conf $HOME/.kube/config
  sudo chown $(id -u):$(id -g) $HOME/.kube/config
You should now deploy a pod network to the cluster.
Run "kubectl apply -f [podnetwork].yaml" with one of the options listed at:
  https://kubernetes.io/docs/concepts/cluster-administration/addons/
Then you can join any number of worker nodes by running the following on each as root:
kubeadm join 192.168.0.5:6443 --token rt0fpo.4axz6.....m1ihf
    --discovery-token-ca-cert-hash sha256:ac20e89e8bf43b56......516a41305c1c1fd5c7
————————————————
版权声明:本文为CSDN博主「beyond阿亮」的原创文章,遵循CC 4.0 BY-SA版权协议,转载请附上原文出处链接及本声明。
原文链接:https://blog.csdn.net/yinjl123456/article/details/117962625
方法2:vim创建一个文件/etc/docker/daemon.json,将docker驱动配置改为systemd
里面输入:
{
"exec-opts": ["native.cgroupdriver=systemd"]
}
重启docker和kubelet
sudo systemctl daemon-reload
sudo systemctl restart docker
sudo systemctl restart kubelet
再次运行kubeadm reset和刚才命令,出现成功提示,而后提示这三个命令:
mkdir -p $HOME/.kube
sudo cp -i /etc/kubernetes/admin.conf $HOME/.kube/config
sudo chown $(id -u):$(id -g) $HOME/.kube/config
如果是root用户需再运行
export KUBECONFIG=/etc/kubernetes/admin.conf
安装插件flannel(CNI)
下载flannel的配置文件
wget https://raw.githubusercontent.com/flannel-io/flannel/master/Documentation/kube-flannel.yml 下载下来后,复制一份kube-flannel-cloud.yaml修改其中:
在93行左右改名为kube-flannel-cloud-ds
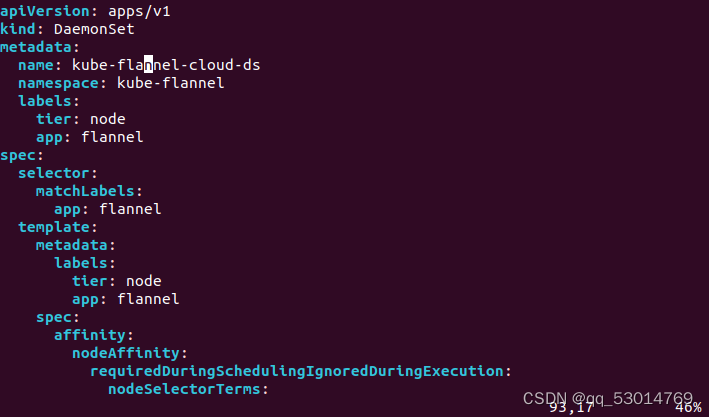
在118行添加:
- key: node-role.kubernetes.io/agent
operator: DoesNotExist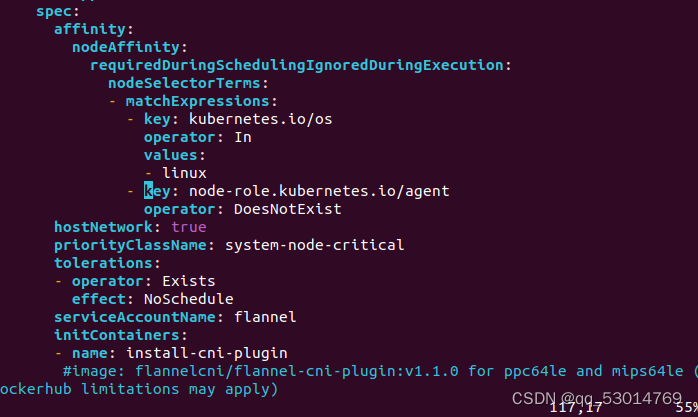
而后应用配置文件:
kubectl apply -f kube-flannel-cloud.yaml 再次复制一份kube-flannel-edge.yaml修改其中:
在93行左右改名为kube-flannel-edge-ds
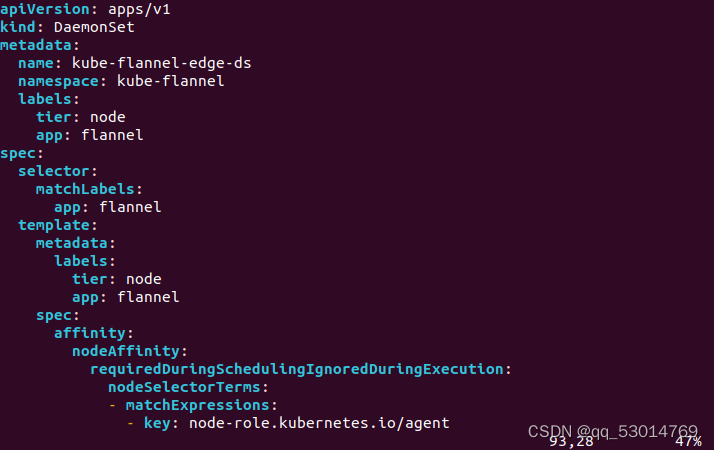
在118行左右添加如下,由于边缘节点架构为arm64,因而修改linux为arm64
- key: node-role.kubernetes.io/agent
operator: Exists
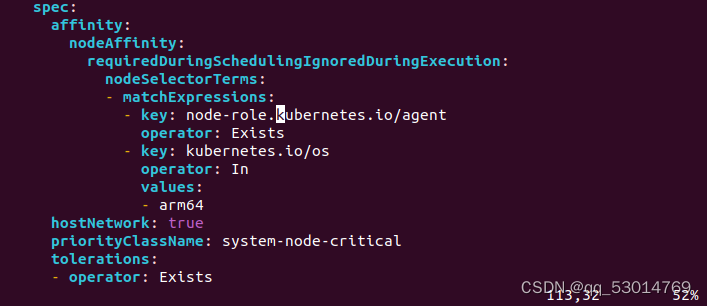
在161行左右添加一行参数- --kube-api-url=http://127.0.0.1:10550
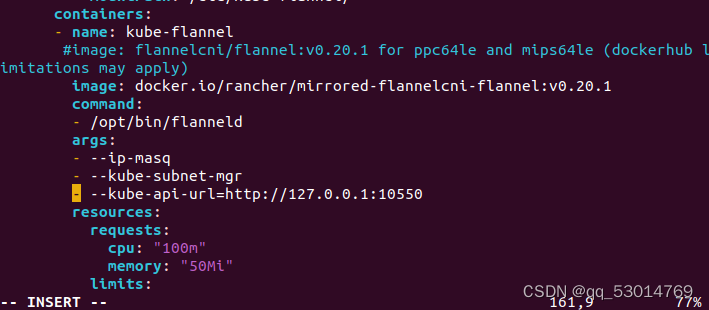
最后应用配置文件kubectl apply -f kube-flannel-edge.yaml
查看k8s集群节点 kubectl get nodes,状态已经变为ready:

CLOUD节点配置(master节点):
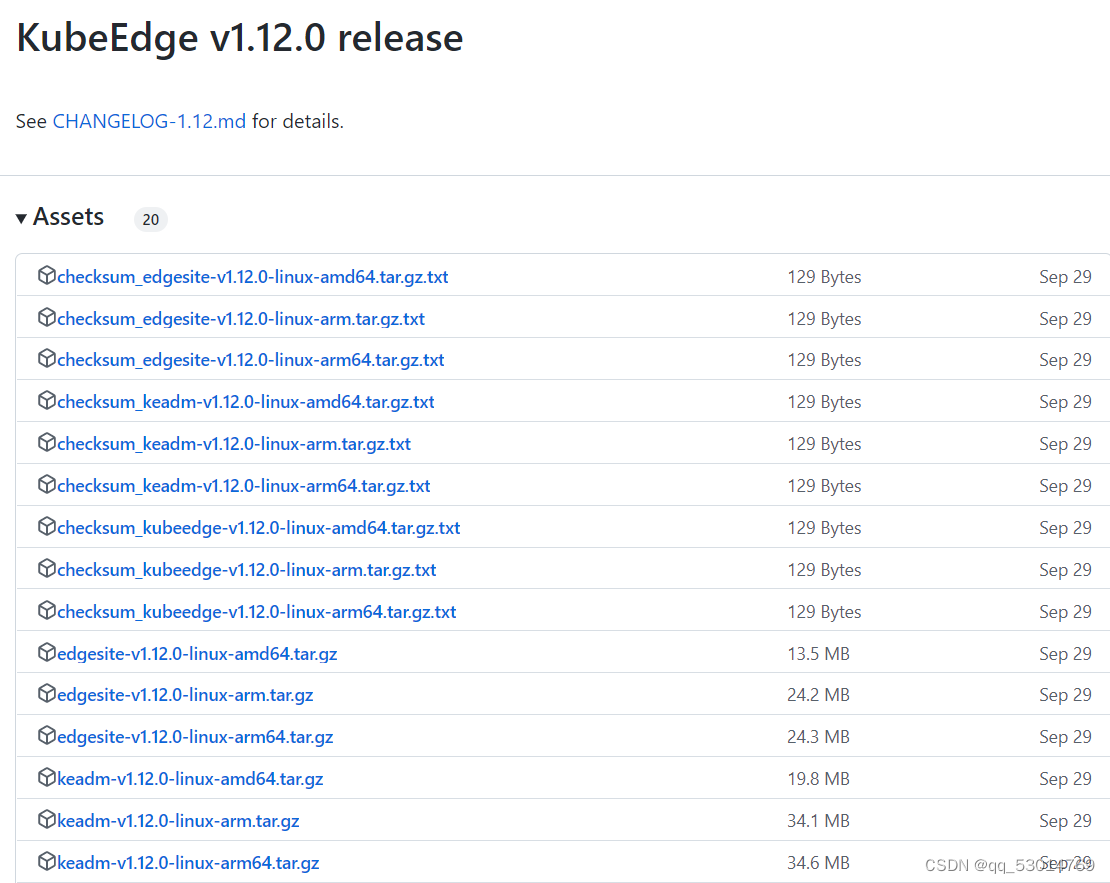
进入GitHub的release页面复制keadm的下载地址:由于系统是ubuntu 22.04amd64,下载时需选择amd64wget https://github.com/kubeedge/kubeedge/releases/download/v1.12.0/keadm-v1.12.0-linux-amd64.tar.gz
解压下载的文件:
tar -zxvf keadm-v1.12.0-linux-amd64.tar.gz然后进入解压后的目录
cd keadm-v1.12.0-linux-amd64/keadm/有可能出现的问题: execute keadm command failed: timed out waiting for the condition(我也遇到过)
解决办法:
1. 由于cloudcore没有污点容忍,默认master节点是不部署应用的,可以用下面的命令查看污点,其中master0为节点NAME
kubectl describe nodes master0 | grep Taints如下是没有污点的情况
![]()
若<none>处有参数node-role.kubernetes.io/master-Noschedule,则需要进行污点删除操作,具体如下:
kubectl taint node master0 node-role.kubernetes.io/master-而后重启keadm:
./keadm reset并启动cloudcore服务:
./keadm init --set cloudCore.modules.dynamicController.enable=true查看kubeedge命名空间里的pods,可以看到cloudcore成功运行。
kubectl get pods -n kubeedge
查看cloudcore启动情况:
ps aux|grep cloudcore查看 cloudcore启动状态:
systemctl status cloudcore通过./keadm gettoken获得token,我的如下(每人均不相同):
c16bca94a5d9a54bdc9ae1c524cc856f9cc677f8acbb0d3eace8809b3aec70be.eyJhbGciOiJIUzI1NiIsInR5cCI6IkpXVCJ9.eyJleHAiOjE2NjgzMjYzMzJ9.UEmBczH52xLLHDm9OXqz0DliE5KjvnQ1EsUfOufUE3g设置cloudcore自启动配置,请参照以下链接:Linux安装kubeedge_亲测成功 - 知乎 (zhihu.com)
以下不是必要操作,在后面操作有可能会遇到问题需要重启云端才能得到解决,以下是重启云端的方法:
首先查看cloudcore的进程ID:
ps aux|grep cloudcore杀死进程:
kill -9 进程号启动cloudcore:
systemctl start cloudcoreEdge结点配置:
下载并安装好docker、kubelet、kubectl、kubeadm
同上下载keadm压缩包,并进行解压,然后进行相应目录,执行命令:
./keadm join --cloudcore-ipport=192.168.229.4:10000 --token=c16bca94a5d9a54bdc9ae1c524cc856f9cc677f8acbb0d3eace8809b3aec70be.eyJhbGciOiJIUzI1NiIsInR5cCI6IkpXVCJ9.eyJleHAiOjE2NjgzMjYzMzJ9.UEmBczH52xLLHDm9OXqz0DliE5KjvnQ1EsUfOufUE3g在cloud端master主机上可以通过命令,查看边缘端结点node是否加入:
kubectl get nodes -o wide二者应为Ready状态,由于只开了云端虚拟机,边缘节点处为NotReady。

边缘节点无法加入到云端问题及解决办法:
若发现节点在master主机上无法查到,我们需要查看边缘端日志
journalctl -u edgecore.service -xe问题便在打印出来的日志中err:后的部分,我在这方面踩了许多坑,以下尽可能把遇到的问题和解决方法陈列出来:一定要学会自己看日志,找出错误,并借助网络针对性解决错误!!!!
问题1:Docker中Cgroup Driver的问题,一般err后出现Cgroup就有很大几率就是这个问题了,这其实是docker默认的驱动为systemd,而k8s默认驱动为Cgroup,所以无法启动。
解决办法:一种解决方法是修改/etc/docker/daemon.json,把 "exec-opts": ["native.cgroupdriver=systemd"]删掉(不要把大括号删掉,不然docker无法启动),重启docker。
#重新加载配置文件
systemctl daemon-reload
#重启docker
systemctl restart docker
第二种办法是:./keadm join --help(没用过,不知道情况如何),具体可以看下面第一个连接。
问题2: Error: failed to get edge certificate from the cloudcore, error: Get "https://cluster-endpoint:10000,这个问题是因为我将云端IP,用一个名称表示
解决办法:将cluster-endpoint改为192.168.229.4便可,其中为10000为云端端口,可以通过netstat -apth命令查看当前所有开放端口,后面有端口类型,可以看是否属于cloudcore。
在你认为你解决完问题后,你需要再次尝试将边缘端结点加入到cloudcore,再次执行命令
./keadm join --cloudcore-ipport=192.168.229.4:10000 --token=c16bca94a5d9a54bdc9ae1c524cc856f9cc677f8acbb0d3eace8809b3aec70be.eyJhbGciOiJIUzI1NiIsInR5cCI6IkpXVCJ9.eyJleHAiOjE2NjgzMjYzMzJ9.UEmBczH52xLLHDm9OXqz0DliE5KjvnQ1EsUfOufUE3g此时会出现错误,可根据错误提示进行操作,我这一般首先提示我edgecoer存在正在运行的进程,需要将edgecore进程删除,再进行操作:
使用命令查看进程:
ps aux|grep edgecore而后使用命令 进行删除:
kill -9 进程号再次输入,提示我/etc/kubeedge文件夹不是空的,需要清空,由于里面既有文件也有目录,我选择命令:rm -r /etc/kubeedge/文件名(需要一个个删除)清空 /etc/kubeedge文件夹。而后,再次输入连接命令,会弹出mqtt容器已经存在之类的问题,错误里会有多余的容器号。
停止容器:
docker stop 容器号删除容器:
docker rm 容器号参考文档:(20条消息) KubeEdge环境搭建(支持网络插件flannel)_Jasonix的博客-CSDN博客(20条消息) KubeEdge环境搭建(支持网络插件flannel)_Jasonix的博客-CSDN博客(20条消息) KubeEdge环境搭建(支持网络插件flannel)_Jasonix的博客-CSDN博客
(20条消息) linux安装部署k8s(kubernetes)和解决遇到的坑_beyond阿亮的博客-CSDN博客_k8s linux内核版本
Linux安装kubeedge_亲测成功 - 知乎 (zhihu.com)
最后
以上就是外向电灯胆最近收集整理的关于从零开始——在Ubuntu22.04系统中部署KubeEdge架构首先——你需要在VM虚拟机上成功安装两台Ubuntu22.04系统配置国内镜像:安装K8S(Kubernetes):初始化Master节点(Node节点不需要进行配置):安装插件flannel(CNI) CLOUD节点配置(master节点):Edge结点配置: 边缘节点无法加入到云端问题及解决办法:的全部内容,更多相关从零开始——在Ubuntu22内容请搜索靠谱客的其他文章。


发表评论 取消回复