文章目录
- 简介
- Kubeadm部署Kubernetes
- k8s 集群安装
- kubeadm
- Linux 环境准备
- 准备三个Linux虚拟机系统
- 设置 Linux 环境(三个节点都执行)
- Kubernetes安装具体步骤
- 所有节点安装 Docker、kubeadm、kubelet、kubectl
- 先安装 docker
- 再安装 kubeadm,kubelet 和 kubectl
- 部署 k8s-master
- 入门操作 kubernetes 集群
- 部署tomcat并暴露nginx访问
- Ingress
- 安装 KubeSphere
- 简介
- 安装前提环境
- 安装 helm(master 节点执行)
- 安装 OpenEBS(master 执行)
- 最小化安装 kubesphere
- 安装 DevOps 功能组件
- 建立多租户系统
- 创建 Wordpress 应用
简介
Kubernetes 简称 k8s。是用于自动部署,扩展和管理容器化应用程序的开源系统。
中文官网:https://kubernetes.io/zh/
中文社区:https://www.kubernetes.org.cn/
官方文档:https://kubernetes.io/zh/docs/home/
社区文档:http://docs.kubernetes.org.cn/
KubeSphere 中文官网: https://kubesphere.com.cn/
Kubernetes整体架构:
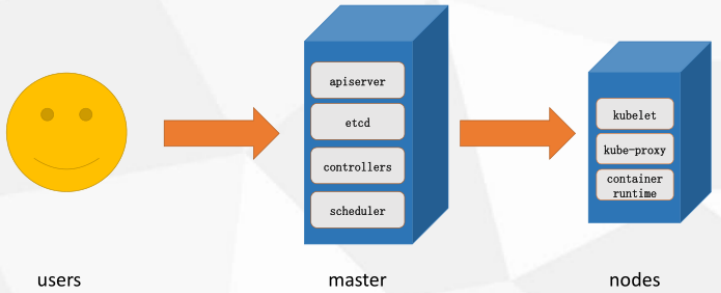
Kubeadm部署Kubernetes
k8s 集群安装
按照视频一步一步操作,需要用到的命令如下。
kubeadm
kubeadm 是官方社区推出的一个用于快速部署 kubernetes 集群的工具。
Linux 环境准备
准备三个Linux虚拟机系统
使用 vagrant 快速创建三个虚拟机。
虚拟机启动前先设置 virtualbox 的主机网络。
现全部统一为 192.168.56.1,以后所有虚拟机都是 56.x 的 ip 地址。
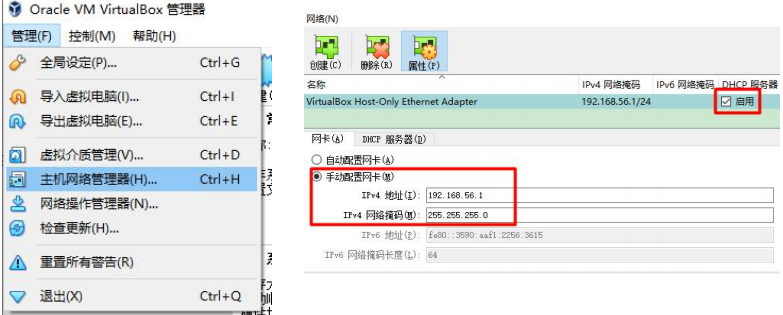
创建三个虚拟机:
使用提供的 vagrant 文件,复制到非中文无空格目录下,运行 vagrant up 命令创建虚拟机。
创建过程很慢,亲测第一次初始化经历了大概3个小时。第二次初始化5分钟。
Vagrant.configure("2") do |config|
   (1..3).each do |i|
        config.vm.define "k8s-node#{i}" do |node|
            # 设置虚拟机的Box
            node.vm.box = "centos/7"
            # 设置虚拟机的主机名
            node.vm.hostname="k8s-node#{i}"
            # 设置虚拟机的IP
            node.vm.network "private_network", ip: "192.168.56.#{99+i}", netmask: "255.255.255.0"
            # 设置主机与虚拟机的共享目录
            # node.vm.synced_folder "~/Documents/vagrant/share", "/home/vagrant/share"
            # VirtaulBox相关配置
            node.vm.provider "virtualbox" do |v|
                # 设置虚拟机的名称
                v.name = "k8s-node#{i}"
                # 设置虚拟机的内存大小
                v.memory = 2048
                # 设置虚拟机的CPU个数
                v.cpus = 4
            end
        end
   end
end
主机名: k8s-node1、k8s-node2、k8s-node3。
IP地址: 192.168.56.100、192.168.56.101、192.168.56.102。
cmd 进入三个虚拟机,开启 root 的密码访问权限。
进入虚拟机命令: vagrant ssh k8s-node1
切换到root: su root
root密码: vagrant
vi /etc/ssh/sshd_config
修改 PasswordAuthentication yes
重启服务: service sshd restart
设置好 NAT 网络(三个节点都设置)
需要新建一个NAT网络。
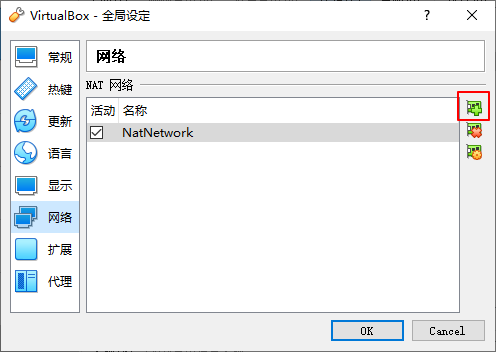
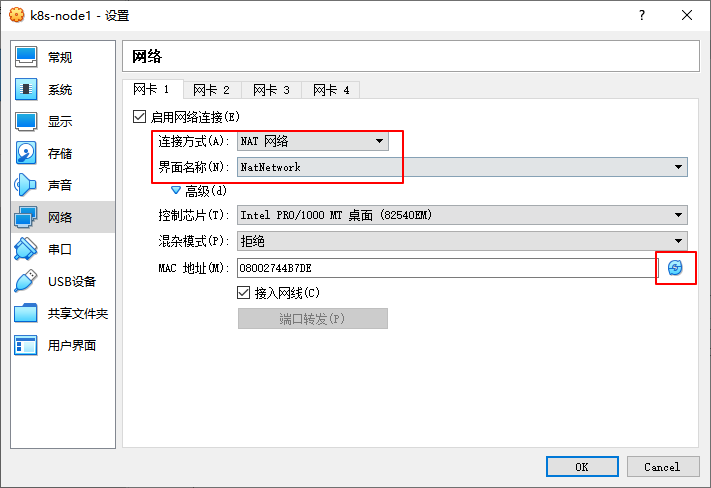
设置 Linux 环境(三个节点都执行)
关闭防火墙:
systemctl stop firewalld
systemctl disable firewalld
关闭 selinux:
# 永久,需要重启才能生效
sed -i 's/enforcing/disabled/' /etc/selinux/config
# 临时
setenforce 0
验证
[root@k8s-node1 ~]# cat /etc/selinux/config

# This file controls the state of SELinux on the system.
# SELINUX= can take one of these three values:
#     disabled - SELinux security policy is enforced.
#     permissive - SELinux prints warnings instead of disabled.
#     disabled - No SELinux policy is loaded.
SELINUX=disabled
# SELINUXTYPE= can take one of three values:
#     targeted - Targeted processes are protected,
#     minimum - Modification of targeted policy. Only selected processes are protected.
#     mls - Multi Level Security protection.
SELINUXTYPE=targeted
关闭 swap:
# 永久,需要重启才能生效
sed -ri 's/.*swap.*/#&/' /etc/fstab
# 临时
swapoff -a
验证
[root@k8s-node1 ~]# cat /etc/fstab

#
# /etc/fstab
# Created by anaconda on Thu Apr 30 22:04:55 2020
#
# Accessible filesystems, by reference, are maintained under '/dev/disk'
# See man pages fstab(5), findfs(8), mount(8) and/or blkid(8) for more info
#
UUID=1c419d6c-5064-4a2b-953c-05b2c67edb15 /                       xfs     defaults        0 0
#/swapfile none swap defaults 0 0
[root@k8s-node1 ~]#

[root@k8s-point1 ~]# free -g
              total        used        free      shared  buff/cache   available
Mem:              1           0           1           0           0           1
Swap:             0           0           0
[root@k8s-point1 ~]#
添加主机名与 IP 对应关系:
cat >> /etc/hosts << EOF
10.0.2.1 k8s-node1
10.0.2.2 k8s-node2
10.0.2.3 k8s-node3
EOF
将桥接的 IPv4 流量传递到 iptables 的链:
cat > /etc/sysctl.d/k8s.conf << EOF
net.bridge.bridge-nf-call-ip6tables = 1
net.bridge.bridge-nf-call-iptables = 1
EOF

# 生效
sysctl --system
时间同步(可选):
yum install ntpdate -y
ntpdate time.windows.com
疑难问题: 遇见提示是只读的文件系统,运行如下命令
mount -o remount rw /
到这里可以先备份下虚拟机。
Kubernetes安装具体步骤
所有节点安装 Docker、kubeadm、kubelet、kubectl
Kubernetes 默认 CRI(容器运行时)为 Docker,因此先安装 Docker。
以下步骤三个节点都需要执行。
先安装 docker
1、卸载系统之前的 docker:
sudo yum remove docker
	docker-client
	docker-client-latest
	docker-common
	docker-latest
	docker-latest-logrotate
	docker-logrotate
	docker-engine
2、安装 Docker-CE:
安装必须的依赖:
sudo yum install -y yum-utils
	device-mapper-persistent-data
	lvm2
设置 docker repo 的 yum 位置:
sudo yum-config-manager
	--add-repo
	https://download.docker.com/linux/centos/docker-ce.repo
安装 docker,以及 docker-cli:
sudo yum install -y docker-ce docker-ce-cli containerd.io
3、配置 docker 加速:
sudo mkdir -p /etc/docker
sudo tee /etc/docker/daemon.json <<-'EOF'
{
	"registry-mirrors": ["https://82m9ar63.mirror.aliyuncs.com"]
}
EOF

sudo systemctl daemon-reload
sudo systemctl restart docker
4、启动 docker & 设置 docker 开机自启:
systemctl enable docker
5、添加阿里云 yum 源:
cat > /etc/yum.repos.d/kubernetes.repo << EOF
[kubernetes]
name=Kubernetes
baseurl=https://mirrors.aliyun.com/kubernetes/yum/repos/kubernetes-el7-x86_64
enabled=1
gpgcheck=0
repo_gpgcheck=0
gpgkey=https://mirrors.aliyun.com/kubernetes/yum/doc/yum-key.gpg
https://mirrors.aliyun.com/kubernetes/yum/doc/rpm-package-key.gpg
EOF
再安装 kubeadm,kubelet 和 kubectl
yum install -y kubelet-1.17.3 kubeadm-1.17.3 kubectl-1.17.3
# 开机自启
systemctl enable kubelet
systemctl start kubelet
查看有没有安装:
yum list installed | grep kubelet
yum list installed | grep kubeadm
yum list installed | grep kubectl
查看安装的版本:
kubelet --version
此时应该重启一下centos。 reboot
到这里可以先备份下虚拟机。
部署 k8s-master
1、master 节点拉取镜像
将k8s资料上传到node1节点。
安装上传下载工具:yum install lrzsz -y
设置执行权限:chmod 700 master_images.sh
运行文件安装镜像:./master_images.sh
验证
[root@k8s-node1 k8s]# docker images
REPOSITORY                                                                    TAG       IMAGE ID       CREATED       SIZE
registry.cn-hangzhou.aliyuncs.com/google_containers/kube-proxy                v1.17.3   ae853e93800d   2 years ago   116MB
registry.cn-hangzhou.aliyuncs.com/google_containers/kube-apiserver            v1.17.3   90d27391b780   2 years ago   171MB
registry.cn-hangzhou.aliyuncs.com/google_containers/kube-controller-manager   v1.17.3   b0f1517c1f4b   2 years ago   161MB
registry.cn-hangzhou.aliyuncs.com/google_containers/kube-scheduler            v1.17.3   d109c0821a2b   2 years ago   94.4MB
registry.cn-hangzhou.aliyuncs.com/google_containers/coredns                   1.6.5     70f311871ae1   2 years ago   41.6MB
registry.cn-hangzhou.aliyuncs.com/google_containers/etcd                      3.4.3-0   303ce5db0e90   2 years ago   288MB
registry.cn-hangzhou.aliyuncs.com/google_containers/pause                     3.1       da86e6ba6ca1   4 years ago   742kB
[root@k8s-node1 k8s]#
2、master 节点初始化
选定一个master节点执行,注意命令中的ip地址。
kubeadm init
--apiserver-advertise-address=10.0.2.15
--image-repository registry.cn-hangzhou.aliyuncs.com/google_containers
--kubernetes-version v1.17.3
--service-cidr=10.96.0.0/16
--pod-network-cidr=10.244.0.0/16
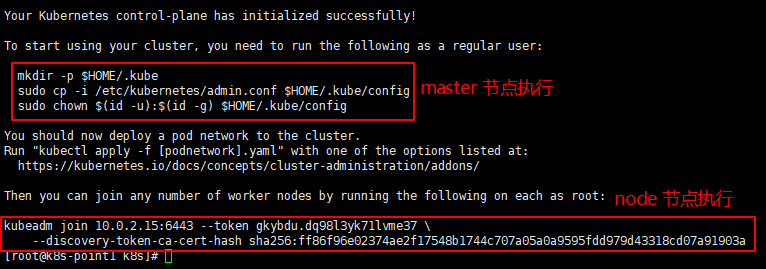
2、master 节点执行
3、master 节点安装 Pod 网络插件
kube-flannel.yml 文件在 k8s 资料中。
kubectl apply -f kube-flannel.yml
[root@k8s-node1 k8s]# kubectl get node
NAME        STATUS   ROLES    AGE   VERSION
k8s-node1   Ready    master   44m   v1.17.3
4、node 节点执行
当 master 状态为 Ready 。才能在 node 节点执行。
接下来把 node 节点加入Kubernetes master中,在Node机器上执行。
kubeadm join 10.0.2.15:6443 --token uva840.53zc7trjqzm8et40
    --discovery-token-ca-cert-hash sha256:18c9e8d2dddf9211ab1f97c8394f7d2956275bf3b4edb45da78bfe47e5befe53
若出现预检查错误:
在命令最后面加上:–ignore-preflight-errors=all
查看所有名称空间的 pods:
[root@k8s-node1 k8s]# kubectl get nodes
NAME        STATUS   ROLES    AGE   VERSION
k8s-node1   Ready    master   11m   v1.17.3
k8s-node2   Ready    <none>   99s   v1.17.3
k8s-node3   Ready    <none>   95s   v1.17.3

[root@k8s-node1 k8s]# kubectl get pods --all-namespaces
NAMESPACE     NAME                                READY   STATUS    RESTARTS   AGE
kube-system   coredns-7f9c544f75-gbfdl            1/1     Running   0          11m
kube-system   coredns-7f9c544f75-h8sxd            1/1     Running   0          11m
kube-system   etcd-k8s-node1                      1/1     Running   0          11m
kube-system   kube-apiserver-k8s-node1            1/1     Running   0          11m
kube-system   kube-controller-manager-k8s-node1   1/1     Running   0          11m
kube-system   kube-flannel-ds-amd64-cl8vs         1/1     Running   0          11m
kube-system   kube-flannel-ds-amd64-dtrvb         1/1     Running   0          2m17s
kube-system   kube-flannel-ds-amd64-stvhc         1/1     Running   1          2m13s
kube-system   kube-proxy-dsvgl                    1/1     Running   0          11m
kube-system   kube-proxy-lhjqp                    1/1     Running   0          2m17s
kube-system   kube-proxy-plbkb                    1/1     Running   0          2m13s
kube-system   kube-scheduler-k8s-node1            1/1     Running   0          11m
至此我们的k8s环境就搭建好了。
到这里可以先备份下虚拟机。
入门操作 kubernetes 集群
1、部署一个 tomcat
kubectl create deployment tomcat6 --image=tomcat:6.0.53-jre8
获取到 tomcat 信息:
[root@k8s-node1 k8s]# kubectl get pods -o wide
NAME                       READY   STATUS    RESTARTS   AGE   IP           NODE        NOMINATED NODE   READINESS GATES
tomcat6-5f7ccf4cb9-7dx6c   1/1     Running   0          37s   10.244.1.2   k8s-node2   <none>           <none>
[root@k8s-node1 k8s]#
2、暴露端口访问
kubectl expose deployment tomcat6 --port=80 --target-port=8080 --type=NodePort
Pod 的 80 映射容器的 8080;service 会代理 Pod 的 80

访问:http://192.168.56.100:30849/
3、动态扩容测试
kubectl get deployment
应用升级 kubectl set image (–help 查看帮助)
扩容: kubectl scale --replicas=3 deployment tomcat6
扩容了多份,所有无论访问哪个 node 的指定端口,都可以访问到 tomcat6
部署tomcat并暴露nginx访问
#####################################
kubectl create deployment tomcat6 --image=tomcat:6.0.53-jre8 --dry-run -o yaml > tomcat6-deployment.yaml
vi tomcat6-deployment.yaml
apiVersion: apps/v1
kind: Deployment
metadata:
  labels:
    app: tomcat6
  name: tomcat6
spec:
  replicas: 3
  selector:
    matchLabels:
      app: tomcat6
  template:
    metadata:
      labels:
        app: tomcat6
    spec:
      containers:
      - image: tomcat:6.0.53-jre8
        name: tomcat

#####################################
[root@k8s-node1 ~]# kubectl apply -f tomcat6-deployment.yaml
deployment.apps/tomcat6 created
[root@k8s-node1 ~]# kubectl get all
NAME                           READY   STATUS    RESTARTS   AGE
pod/tomcat6-5f7ccf4cb9-6b4c9   1/1     Running   0          19s
pod/tomcat6-5f7ccf4cb9-sjlzh   1/1     Running   0          19s
pod/tomcat6-5f7ccf4cb9-vjd6t   1/1     Running   0          19s

NAME                 TYPE        CLUSTER-IP   EXTERNAL-IP   PORT(S)   AGE
service/kubernetes   ClusterIP   10.96.0.1    <none>        443/TCP   129m

NAME                      READY   UP-TO-DATE   AVAILABLE   AGE
deployment.apps/tomcat6   3/3     3            3           19s

NAME                                 DESIRED   CURRENT   READY   AGE
replicaset.apps/tomcat6-5f7ccf4cb9   3         3         3       19s
[root@k8s-node1 ~]#
#####################################
[root@k8s-node1 ~]# kubectl expose deployment tomcat6 --port=80 --target-port=8080 --type=NodePort --dry-run -o yaml
apiVersion: v1
kind: Service
metadata:
  labels:
    app: tomcat6
  name: tomcat6
spec:
  ports:
  - port: 80
    protocol: TCP
    targetPort: 8080
  selector:
    app: tomcat6
  type: NodePort
status:
  loadBalancer: {}
[root@k8s-node1 ~]#
#####################################
[root@k8s-node1 ~]# vi tomcat6-deployment.yaml

    app: tomcat6
  name: tomcat6
spec:
  replicas: 3
  selector:
    matchLabels:
      app: tomcat6
  template:
    metadata:
      labels:
        app: tomcat6
    spec:
      containers:
      - image: tomcat:6.0.53-jre8
        name: tomcat
---
apiVersion: v1
kind: Service
metadata:
  labels:
    app: tomcat6
  name: tomcat6
spec:
  ports:
  - port: 80
    protocol: TCP
    targetPort: 8080
  selector:
    app: tomcat6
  type: NodePort
#####################################
[root@k8s-node1 ~]# kubectl delete deployment.apps/tomcat6
deployment.apps "tomcat6" deleted
[root@k8s-node1 ~]# kubectl get all
NAME                 TYPE        CLUSTER-IP   EXTERNAL-IP   PORT(S)   AGE
service/kubernetes   ClusterIP   10.96.0.1    <none>        443/TCP   133m
[root@k8s-node1 ~]#
#####################################

[root@k8s-node1 ~]# kubectl apply -f tomcat6-deployment.yaml
deployment.apps/tomcat6 created
service/tomcat6 created
[root@k8s-node1 ~]#

[root@k8s-node1 ~]# kubectl get all
NAME                           READY   STATUS    RESTARTS   AGE
pod/tomcat6-5f7ccf4cb9-dqd5v   1/1     Running   0          34s
pod/tomcat6-5f7ccf4cb9-jn9wr   1/1     Running   0          34s
pod/tomcat6-5f7ccf4cb9-v9v6h   1/1     Running   0          34s

NAME                 TYPE        CLUSTER-IP     EXTERNAL-IP   PORT(S)        AGE
service/kubernetes   ClusterIP   10.96.0.1      <none>        443/TCP        141m
service/tomcat6      NodePort    10.96.210.80   <none>        80:32625/TCP   34s

NAME                      READY   UP-TO-DATE   AVAILABLE   AGE
deployment.apps/tomcat6   3/3     3            3           34s

NAME                                 DESIRED   CURRENT   READY   AGE
replicaset.apps/tomcat6-5f7ccf4cb9   3         3         3       34s
[root@k8s-node1 ~]#

[root@k8s-node1 k8s]# kubectl get all
NAME                           READY   STATUS    RESTARTS   AGE
pod/tomcat6-5f7ccf4cb9-7dx6c   1/1     Running   0          4m26s

NAME                 TYPE        CLUSTER-IP   EXTERNAL-IP   PORT(S)   AGE
service/kubernetes   ClusterIP   10.96.0.1    <none>        443/TCP   17m

NAME                      READY   UP-TO-DATE   AVAILABLE   AGE
deployment.apps/tomcat6   1/1     1            1           4m26s

NAME                                 DESIRED   CURRENT   READY   AGE
replicaset.apps/tomcat6-5f7ccf4cb9   1         1         1       4m26s
[root@k8s-node1 k8s]# kubectl delete deployment.apps/tomcat6
deployment.apps "tomcat6" deleted
[root@k8s-node1 k8s]# kubectl get pods -o wide
No resources found in default namespace.
访问地址:http://192.168.56.102:32625/
Ingress
#####################################
[root@k8s-node1 k8s]# kubectl apply -f ingress-controller.yaml
namespace/ingress-nginx created
configmap/nginx-configuration created
configmap/tcp-services created
configmap/udp-services created
serviceaccount/nginx-ingress-serviceaccount created
clusterrole.rbac.authorization.k8s.io/nginx-ingress-clusterrole created
role.rbac.authorization.k8s.io/nginx-ingress-role created
rolebinding.rbac.authorization.k8s.io/nginx-ingress-role-nisa-binding created
clusterrolebinding.rbac.authorization.k8s.io/nginx-ingress-clusterrole-nisa-binding created
daemonset.apps/nginx-ingress-controller created
service/ingress-nginx created
#####################################
[root@k8s-node1 k8s]# kubectl get pods --all-namespaces
NAMESPACE       NAME                                READY   STATUS    RESTARTS   AGE
default         tomcat6-5f7ccf4cb9-dqd5v            1/1     Running   0          10m
default         tomcat6-5f7ccf4cb9-jn9wr            1/1     Running   0          10m
default         tomcat6-5f7ccf4cb9-v9v6h            1/1     Running   0          10m
ingress-nginx   nginx-ingress-controller-jpd4h      1/1     Running   0          2m11s
ingress-nginx   nginx-ingress-controller-tgvmg      1/1     Running   0          2m11s
kube-system     coredns-7f9c544f75-gsk9k            1/1     Running   0          150m
kube-system     coredns-7f9c544f75-lw6xd            1/1     Running   0          150m
kube-system     etcd-k8s-node1                      1/1     Running   0          150m
kube-system     kube-apiserver-k8s-node1            1/1     Running   0          150m
kube-system     kube-controller-manager-k8s-node1   1/1     Running   0          150m
kube-system     kube-flannel-ds-amd64-9jx56         1/1     Running   1          132m
kube-system     kube-flannel-ds-amd64-fgq9x         1/1     Running   1          132m
kube-system     kube-flannel-ds-amd64-w7zwd         1/1     Running   0          141m
kube-system     kube-proxy-g95bd                    1/1     Running   0          150m
kube-system     kube-proxy-w627h                    1/1     Running   1          132m
kube-system     kube-proxy-xcssd                    1/1     Running   0          132m
kube-system     kube-scheduler-k8s-node1            1/1     Running   0          150m
[root@k8s-node1 k8s]#
#####################################
[root@k8s-node1 k8s]# vi ingress-tomcat6.yaml
apiVersion: extensions/v1beta1
kind: Ingress
metadata:
  name: web
spec:
  rules:
  - host: tomcat6.atguigu.com
    http:
      paths:
        - backend:
           serviceName: tomcat6
           servicePort: 80

[root@k8s-node1 k8s]# kubectl apply -f ingress-tomcat6.yaml
error: error parsing ingress-tomcat6.yaml: error converting YAML to JSON: yaml: line 11: found character that cannot start any token
这个问题是因为yaml文件不支持tab制表符。
yaml语法不支持制表符,用空格代替就行。
冒号后面需要跟着空格,看看是不是缺少了空格。
最后发现是 serviceName 那行前面有个 tab ,用空格代替就行。

[root@k8s-node1 k8s]# kubectl apply -f ingress-tomcat6.yaml
ingress.extensions/web created
#####################################
[root@k8s-node1 k8s]# kubectl get pods -o wide
NAME                       READY   STATUS    RESTARTS   AGE   IP           NODE        NOMINATED NODE   READINESS GATES
tomcat6-5f7ccf4cb9-dqd5v   1/1     Running   0          40m   10.244.2.8   k8s-node2   <none>           <none>
tomcat6-5f7ccf4cb9-jn9wr   1/1     Running   0          40m   10.244.1.7   k8s-node3   <none>           <none>
tomcat6-5f7ccf4cb9-v9v6h   1/1     Running   0          40m   10.244.2.7   k8s-node2   <none>           <none>
[root@k8s-node1 k8s]#
#####################################
配置windows hosts,ip地址是 node2或node3
192.168.56.101 tomcat6.atguigu.com

最后直接使用域名访问:tomcat6.atguigu.com
安装 KubeSphere
简介
KubeSphere 是一款面向云原生设计的开源项目,在目前主流容器调度平台 Kubernetes 之 上构建的分布式多租户容器管理平台,提供简单易用的操作界面以及向导式操作方式,在降 低用户使用容器调度平台学习成本的同时,极大降低开发、测试、运维的日常工作的复杂度。
默认的 dashboard 没啥用,我们用 kubesphere 可以打通全部的 devops 链路。
Kubesphere 集成了很多套件,集群要求较高
中文文档:https://kubesphere.com.cn/docs/
https://kubesphere.io/
Kuboard 也很不错,集群要求不高
https://kuboard.cn/support/
安装前提环境
1、安装前提条件
https://v2-1.docs.kubesphere.io/docs/zh-CN/installation/prerequisites/
helm下载: https://github.com/helm/helm/releases/tag/v2.16.2
2、安装前提环境
docker+k8s+kubesphere:helm与tiller安装
安装 helm(master 节点执行)
安装 helm2
Helm 是 Kubernetes 的包管理器。包管理器类似于我们在 Ubuntu 中使用的 apt、Centos 中使用的 yum 或者 Python 中的 pip 一样,能快速查找、下载和安装软件包。Helm 由客 户端组件 helm 和服务端组件 Tiller 组成, 能够将一组 K8S 资源打包统一管理, 是查找、共 享和使用为 Kubernetes 构建的软件的最佳方式。
这里建议安装 Helm 2.16.2 版本。
1、使用二进制包安装 helm 客户端
wget https://get.helm.sh/helm-v2.16.2-linux-amd64.tar.gz
tar -zxvf helm-v2.16.2-linux-amd64.tar.gz
cd linux-amd64
cp -a helm /usr/local/bin/
2、设置命令行自动补全
echo "source <(helm completion bash)" >> ~/.bashrc
3、安装 tiller 服务端
vi helm-rbac.yaml

apiVersion: v1
kind: ServiceAccount
metadata:
  name: tiller
  namespace: kube-system
---
apiVersion: rbac.authorization.k8s.io/v1
kind: ClusterRoleBinding
metadata:
  name: tiller
roleRef:
  apiGroup: rbac.authorization.k8s.io
  kind: ClusterRole
  name: cluster-admin
subjects:
  - kind: ServiceAccount
    name: tiller
    namespace: kube-system

执行:
kubectl apply -f helm-rbac.yaml
结果如下:
[root@k8s-point1 k8s]# kubectl apply -f helm-rbac.yaml
serviceaccount/tiller created
clusterrolebinding.rbac.authorization.k8s.io/tiller created
4、初始化 tiller
helm init --service-account tiller --tiller-image=registry.cn-hangzhou.aliyuncs.com/google_containers/tiller:v2.16.2 --stable-repo-url http://mirror.azure.cn/kubernetes/charts
结果如下:
[root@k8s-point1 k8s]# helm init --service-account tiller --tiller-image=registry.cn-hangzhou.aliyuncs.com/google_containers/tiller:v2.16.2 --stable-repo-url http://mirror.azure.cn/kubernetes/charts
Creating /root/.helm
Creating /root/.helm/repository
Creating /root/.helm/repository/cache
Creating /root/.helm/repository/local
Creating /root/.helm/plugins
Creating /root/.helm/starters
Creating /root/.helm/cache/archive
Creating /root/.helm/repository/repositories.yaml
Adding stable repo with URL: http://mirror.azure.cn/kubernetes/charts
Adding local repo with URL: http://127.0.0.1:8879/charts
$HELM_HOME has been configured at /root/.helm.

Tiller (the Helm server-side component) has been installed into your Kubernetes Cluster.

Please note: by default, Tiller is deployed with an insecure 'allow unauthenticated users' policy.
To prevent this, run `helm init` with the --tiller-tls-verify flag.
For more information on securing your installation see: https://docs.helm.sh/using_helm/#securing-your-helm-installation

[root@k8s-point1 k8s]# helm version
Client: &version.Version{SemVer:"v2.16.2", GitCommit:"bbdfe5e7803a12bbdf97e94cd847859890cf4050", GitTreeState:"clean"}
Server: &version.Version{SemVer:"v2.16.2", GitCommit:"bbdfe5e7803a12bbdf97e94cd847859890cf4050", GitTreeState:"clean"}
[root@k8s-point1 k8s]#
初始化问题解决
helm初始化报错“https://kubernetes-charts.storage.googleapis.com/index.yaml : 403 Forbidden”
kubernetes之helm安装报错“https://kubernetes-charts.storage.googleapis.com“ is not a valid chart repositor
执行:
kubectl -n kube-system get pods|grep tiller
结果如下:
验证tiller是否安装成功
[root@node151 ~]# kubectl -n kube-system get pods|grep tiller
tiller-deploy-797955c678-nl5nv             1/1     Running   0          50m

监控查看
执行:watch kubectl get pod -n kube-system -o wide
结果如下:
NAME                                       READY   STATUS    RESTARTS   AGE     IP              NODE	  NOMINATED NODE   READINESS GATES
calico-kube-controllers-589b5f594b-ckfgz   1/1     Running   1          7h22m   10.20.235.4     node153   <none>           <none>
calico-node-msd6f                          1/1     Running   1          7h22m   192.168.5.152   node152   <none>           <none>
calico-node-s9xf6                          1/1     Running   2          7h22m   192.168.5.151   node151   <none>           <none>
calico-node-wcztl                          1/1     Running   1          7h22m   192.168.5.153   node153   <none>           <none>
coredns-7f9c544f75-gmclr                   1/1     Running   2          9h	10.20.223.67    node151   <none>           <none>
coredns-7f9c544f75-t7jh6                   1/1     Running   2          9h	10.20.235.3     node153   <none>           <none>
etcd-node151                               1/1     Running   4          9h	192.168.5.151   node151   <none>           <none>
kube-apiserver-node151                     1/1     Running   6          9h	192.168.5.151   node151   <none>           <none>
kube-controller-manager-node151            1/1     Running   5          9h	192.168.5.151   node151   <none>           <none>
kube-proxy-5t7jg                           1/1     Running   3          9h	192.168.5.151   node151   <none>           <none>
kube-proxy-fqjh2                           1/1     Running   2          8h	192.168.5.152   node152   <none>           <none>
kube-proxy-mbxtx                           1/1     Running   2          8h	192.168.5.153   node153   <none>           <none>
kube-scheduler-node151                     1/1     Running   5          9h	192.168.5.151   node151   <none>           <none>
tiller-deploy-797955c678-nl5nv             1/1     Running   0          40m     10.20.117.197   node152   <none>           <none>

可以看见tiller服务启动
命令集合:
helm version
kubectl get pods -n kube-system
kubectl get pod --all-namespaces
kubectl get all --all-namespaces | grep tiller
kubectl get all -n kube-system -l app=helm -o name|xargs kubectl delete -n kube-system
watch kubectl get pod -n kube-system -o wide
安装 OpenEBS(master 执行)
安装 OpenEBS 创建 LocalPV 存储类型
Error: failed to download “stable/openebs“ (hint: running helm repo update may help)
kubectl get node -o wide

确认 master 节点是否有 Taint,如下看到 master 节点有 Taint。
注意下主机名。
kubectl describe node k8s-node1 | grep Taint

去掉 master 节点的 Taint:
注意下主机名。
kubectl taint nodes k8s-node1 node-role.kubernetes.io/master:NoSchedule-

下面开始 安装 OpenEBS
kubectl create ns openebs

helm install --namespace openebs --name openebs stable/openebs --version 1.5.0

[root@k8s-node1 k8s]# kubectl get pods --all-namespaces
NAMESPACE     NAME                                           READY   STATUS    RESTARTS   AGE
kube-system   coredns-7f9c544f75-gbfdl                       1/1     Running   0          132m
kube-system   coredns-7f9c544f75-h8sxd                       1/1     Running   0          132m
kube-system   etcd-k8s-node1                                 1/1     Running   0          132m
kube-system   kube-apiserver-k8s-node1                       1/1     Running   0          132m
kube-system   kube-controller-manager-k8s-node1              1/1     Running   0          132m
kube-system   kube-flannel-ds-amd64-cl8vs                    1/1     Running   0          132m
kube-system   kube-flannel-ds-amd64-dtrvb                    1/1     Running   0          123m
kube-system   kube-flannel-ds-amd64-stvhc                    1/1     Running   2          123m
kube-system   kube-proxy-dsvgl                               1/1     Running   0          132m
kube-system   kube-proxy-lhjqp                               1/1     Running   0          123m
kube-system   kube-proxy-plbkb                               1/1     Running   0          123m
kube-system   kube-scheduler-k8s-node1                       1/1     Running   0          132m
kube-system   tiller-deploy-6588db4955-68f64                 1/1     Running   0          78m
openebs       openebs-admission-server-5cf6864fbf-j6wqd      1/1     Running   0          60m
openebs       openebs-apiserver-bc55cd99b-gc95c              1/1     Running   0          60m
openebs       openebs-localpv-provisioner-85ff89dd44-wzcvc   1/1     Running   0          60m
openebs       openebs-ndm-6qcqk                              1/1     Running   0          60m
openebs       openebs-ndm-fl54s                              1/1     Running   0          60m
openebs       openebs-ndm-g5jdq                              1/1     Running   0          60m
openebs       openebs-ndm-operator-87df44d9-h9cpj            1/1     Running   1          60m
openebs       openebs-provisioner-7f86c6bb64-tp4js           1/1     Running   0          60m
openebs       openebs-snapshot-operator-54b9c886bf-x7gn4     2/2     Running   0          60m
[root@k8s-node1 k8s]#

[root@k8s-node1 k8s]# kubectl get sc
NAME                        PROVISIONER                                                RECLAIMPOLICY   VOLUMEBINDINGMODE      ALLOWVOLUMEEXPANSION   AGE
openebs-device              openebs.io/local                                           Delete          WaitForFirstConsumer   false                  60m
openebs-hostpath            openebs.io/local                                           Delete          WaitForFirstConsumer   false                  60m
openebs-jiva-default        openebs.io/provisioner-iscsi                               Delete          Immediate              false                  60m
openebs-snapshot-promoter   volumesnapshot.external-storage.k8s.io/snapshot-promoter   Delete          Immediate              false                  60m
[root@k8s-node1 k8s]#
#####################################

[root@k8s-node1 k8s]# kubectl patch storageclass openebs-hostpath -p '{"metadata": {"annotations":{"storageclass.kubernetes.io/is-default-class":"true"}}}'
storageclass.storage.k8s.io/openebs-hostpath patched

[root@k8s-node1 k8s]# kubectl get sc
NAME                         PROVISIONER                                                RECLAIMPOLICY   VOLUMEBINDINGMODE      ALLOWVOLUMEEXPANSION   AGE
openebs-device               openebs.io/local                                           Delete          WaitForFirstConsumer   false                  69m
openebs-hostpath (default)   openebs.io/local                                           Delete          WaitForFirstConsumer   false                  69m
openebs-jiva-default         openebs.io/provisioner-iscsi                               Delete          Immediate              false                  69m
openebs-snapshot-promoter    volumesnapshot.external-storage.k8s.io/snapshot-promoter   Delete          Immediate              false                  69m
[root@k8s-node1 k8s]#
#####################################
至此,OpenEBS 的 LocalPV 已作为默认的存储类型创建成功。由于在文档开头手动去掉 了 master 节点的 Taint,我们可以在安装完 OpenEBS 后将 master 节点 Taint 加上,避 免业务相关的工作负载调度到 master 节点抢占 master 资源。
[root@k8s-node1 k8s]# kubectl taint nodes k8s-node1 node-role.kubernetes.io=master:NoSchedule
node/k8s-node1 tainted
[root@k8s-node1 k8s]#
#####################################
到这里可以先备份下虚拟机。
最小化安装 kubesphere
在 Kubernetes 安装 KubeSphere 安装文档:
https://v2-1.docs.kubesphere.io/docs/zh-CN/installation/install-on-k8s/
用到的yaml配置来源:
https://gitee.com/learning1126/ks-installer/blob/master/kubesphere-minimal.yaml#
vi kubesphere-minimal.yaml
---
apiVersion: v1
kind: Namespace
metadata:
  name: kubesphere-system

---
apiVersion: v1
data:
  ks-config.yaml: |
    ---

    persistence:
      storageClass: ""

    etcd:
      monitoring: False
      endpointIps: 192.168.0.7,192.168.0.8,192.168.0.9
      port: 2379
      tlsEnable: True

    common:
      mysqlVolumeSize: 20Gi
      minioVolumeSize: 20Gi
      etcdVolumeSize: 20Gi
      openldapVolumeSize: 2Gi
      redisVolumSize: 2Gi

    metrics_server:
      enabled: False

    console:
      enableMultiLogin: False  # enable/disable multi login
      port: 30880

    monitoring:
      prometheusReplicas: 1
      prometheusMemoryRequest: 400Mi
      prometheusVolumeSize: 20Gi
      grafana:
        enabled: False

    logging:
      enabled: False
      elasticsearchMasterReplicas: 1
      elasticsearchDataReplicas: 1
      logsidecarReplicas: 2
      elasticsearchMasterVolumeSize: 4Gi
      elasticsearchDataVolumeSize: 20Gi
      logMaxAge: 7
      elkPrefix: logstash
      containersLogMountedPath: ""
      kibana:
        enabled: False

    openpitrix:
      enabled: False

    devops:
      enabled: False
      jenkinsMemoryLim: 2Gi
      jenkinsMemoryReq: 1500Mi
      jenkinsVolumeSize: 8Gi
      jenkinsJavaOpts_Xms: 512m
      jenkinsJavaOpts_Xmx: 512m
      jenkinsJavaOpts_MaxRAM: 2g
      sonarqube:
        enabled: False
        postgresqlVolumeSize: 8Gi

    servicemesh:
      enabled: False

    notification:
      enabled: False

    alerting:
      enabled: False

kind: ConfigMap
metadata:
  name: ks-installer
  namespace: kubesphere-system

---
apiVersion: v1
kind: ServiceAccount
metadata:
  name: ks-installer
  namespace: kubesphere-system

---
apiVersion: rbac.authorization.k8s.io/v1
kind: ClusterRole
metadata:
  creationTimestamp: null
  name: ks-installer
rules:
- apiGroups:
  - ""
  resources:
  - '*'
  verbs:
  - '*'
- apiGroups:
  - apps
  resources:
  - '*'
  verbs:
  - '*'
- apiGroups:
  - extensions
  resources:
  - '*'
  verbs:
  - '*'
- apiGroups:
  - batch
  resources:
  - '*'
  verbs:
  - '*'
- apiGroups:
  - rbac.authorization.k8s.io
  resources:
  - '*'
  verbs:
  - '*'
- apiGroups:
  - apiregistration.k8s.io
  resources:
  - '*'
  verbs:
  - '*'
- apiGroups:
  - apiextensions.k8s.io
  resources:
  - '*'
  verbs:
  - '*'
- apiGroups:
  - tenant.kubesphere.io
  resources:
  - '*'
  verbs:
  - '*'
- apiGroups:
  - certificates.k8s.io
  resources:
  - '*'
  verbs:
  - '*'
- apiGroups:
  - devops.kubesphere.io
  resources:
  - '*'
  verbs:
  - '*'
- apiGroups:
  - monitoring.coreos.com
  resources:
  - '*'
  verbs:
  - '*'
- apiGroups:
  - logging.kubesphere.io
  resources:
  - '*'
  verbs:
  - '*'
- apiGroups:
  - jaegertracing.io
  resources:
  - '*'
  verbs:
  - '*'
- apiGroups:
  - storage.k8s.io
  resources:
  - '*'
  verbs:
  - '*'
- apiGroups:
  - admissionregistration.k8s.io
  resources:
  - '*'
  verbs:
  - '*'

---
kind: ClusterRoleBinding
apiVersion: rbac.authorization.k8s.io/v1
metadata:
  name: ks-installer
subjects:
- kind: ServiceAccount
  name: ks-installer
  namespace: kubesphere-system
roleRef:
  kind: ClusterRole
  name: ks-installer
  apiGroup: rbac.authorization.k8s.io

---
apiVersion: apps/v1
kind: Deployment
metadata:
  name: ks-installer
  namespace: kubesphere-system
  labels:
    app: ks-install
spec:
  replicas: 1
  selector:
    matchLabels:
      app: ks-install
  template:
    metadata:
      labels:
        app: ks-install
    spec:
      serviceAccountName: ks-installer
      containers:
      - name: installer
        image: kubesphere/ks-installer:v2.1.1
        imagePullPolicy: "Always"
[root kubesphere-master-2 ~/ks-installer/scripts]## 在kuberntes上安装最小化KubeSphere
[root@k8s-node1 k8s]# kubectl version
Client Version: version.Info{Major:"1", Minor:"17", GitVersion:"v1.17.3", GitCommit:"06ad960bfd03b39c8310aaf92d1e7c12ce618213", GitTreeState:"clean", BuildDate:"2020-02-11T18:14:22Z", GoVersion:"go1.13.6", Compiler:"gc", Platform:"linux/amd64"}
Server Version: version.Info{Major:"1", Minor:"17", GitVersion:"v1.17.3", GitCommit:"06ad960bfd03b39c8310aaf92d1e7c12ce618213", GitTreeState:"clean", BuildDate:"2020-02-11T18:07:13Z", GoVersion:"go1.13.6", Compiler:"gc", Platform:"linux/amd64"}
[root@k8s-node1 k8s]#
###################################
安装kubernetes:
[root@k8s-node1 k8s]# kubectl apply -f kubesphere-minimal.yaml
namespace/kubesphere-system unchanged
configmap/ks-installer created
serviceaccount/ks-installer unchanged
clusterrole.rbac.authorization.k8s.io/ks-installer configured
clusterrolebinding.rbac.authorization.k8s.io/ks-installer unchanged
deployment.apps/ks-installer configured

[root@k8s-node1 k8s]# kubectl get pod --all-namespaces
NAMESPACE           NAME                                           READY   STATUS    RESTARTS   AGE
kube-system         coredns-7f9c544f75-gbfdl                       1/1     Running   0          156m
kube-system         coredns-7f9c544f75-h8sxd                       1/1     Running   0          156m
kube-system         etcd-k8s-node1                                 1/1     Running   0          155m
kube-system         kube-apiserver-k8s-node1                       1/1     Running   0          155m
kube-system         kube-controller-manager-k8s-node1              1/1     Running   0          155m
kube-system         kube-flannel-ds-amd64-cl8vs                    1/1     Running   0          155m
kube-system         kube-flannel-ds-amd64-dtrvb                    1/1     Running   0          146m
kube-system         kube-flannel-ds-amd64-stvhc                    1/1     Running   2          146m
kube-system         kube-proxy-dsvgl                               1/1     Running   0          156m
kube-system         kube-proxy-lhjqp                               1/1     Running   0          146m
kube-system         kube-proxy-plbkb                               1/1     Running   0          146m
kube-system         kube-scheduler-k8s-node1                       1/1     Running   0          155m
kube-system         tiller-deploy-6588db4955-68f64                 1/1     Running   0          101m
kubesphere-system   ks-installer-75b8d89dff-57jvq                  1/1     Running   0          58s
openebs             openebs-admission-server-5cf6864fbf-j6wqd      1/1     Running   0          84m
openebs             openebs-apiserver-bc55cd99b-gc95c              1/1     Running   2          84m
openebs             openebs-localpv-provisioner-85ff89dd44-wzcvc   1/1     Running   2          84m
openebs             openebs-ndm-6qcqk                              1/1     Running   0          84m
openebs             openebs-ndm-fl54s                              1/1     Running   0          84m
openebs             openebs-ndm-g5jdq                              1/1     Running   0          84m
openebs             openebs-ndm-operator-87df44d9-h9cpj            1/1     Running   1          84m
openebs             openebs-provisioner-7f86c6bb64-tp4js           1/1     Running   1          84m
openebs             openebs-snapshot-operator-54b9c886bf-x7gn4     2/2     Running   1          84m
[root@k8s-node1 k8s]#

检查安装日志:这里会很慢,亲测大概等了五分钟。
kubectl logs -n kubesphere-system $(kubectl get pod -n kubesphere-system -l app=ks-install -o jsonpath='{.items[0].metadata.name}') -f
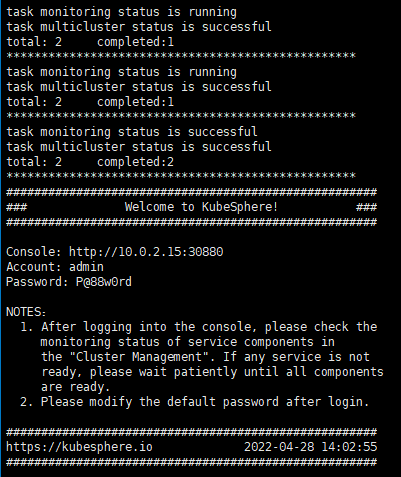
访问地址:http://192.168.56.100:30880
Account: admin
Password: P@88w0rd
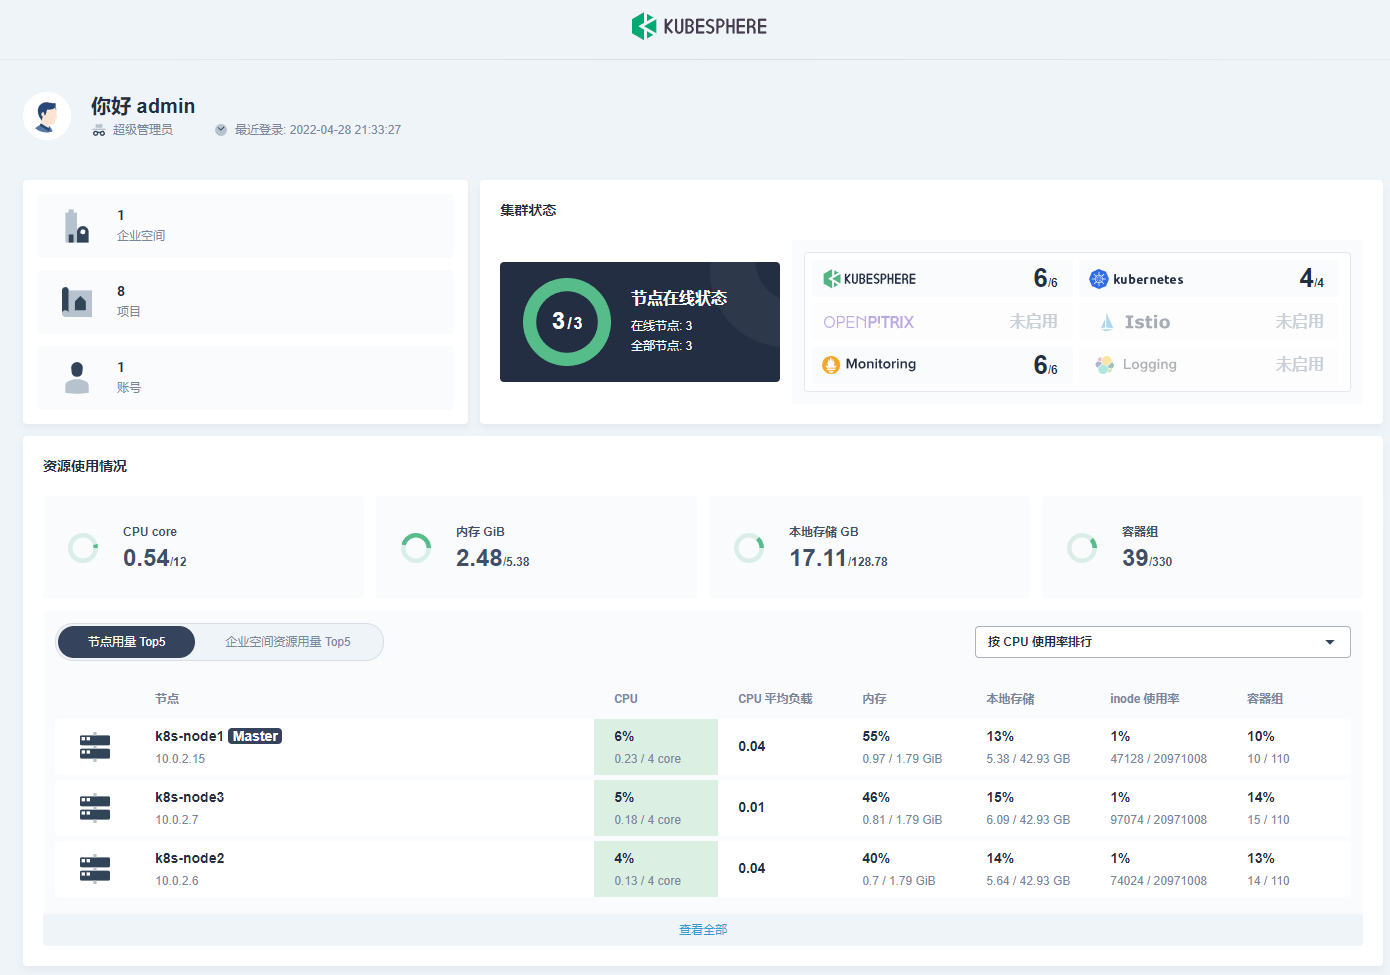
到这里可以先备份下虚拟机。
安装 DevOps 功能组件
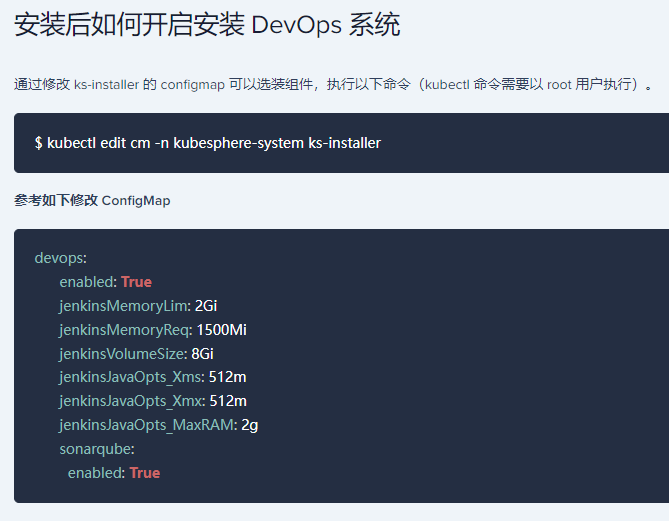
1、安装后如何开启安装 DevOps 系统
https://v2-1.docs.kubesphere.io/docs/zh-CN/installation/install-devops/
# 开启安装 DevOps 系统
[root@k8s-node1 ~]# kubectl edit cm -n kubesphere-system ks-installer
configmap/ks-installer edited
[root@k8s-node1 ~]#

# 查看安装日志,大概需要20分钟
kubectl logs -n kubesphere-system $(kubectl get pod -n kubesphere-system -l app=ks-install -o jsonpath='{.items[0].metadata.name}') -f
开启Devops后,发现有几个pod异常
建立多租户系统
多租户管理快速入门
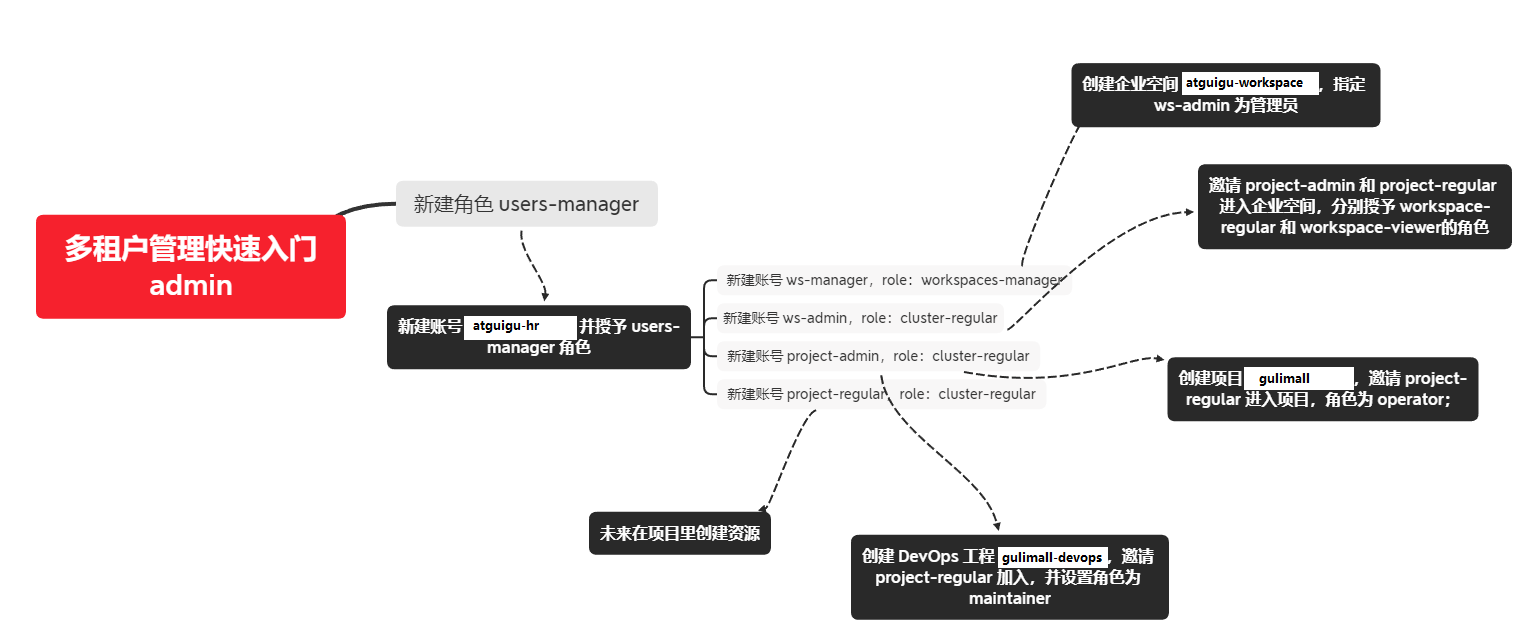
1、新建一个角色 user-manager
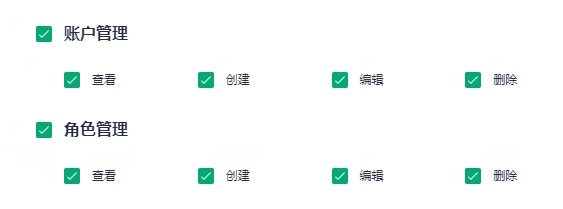
2、新建一个账号 atguigu-hr 并赋予 user-manager 角色

3、登录 atguigu-hr 账号,新建各种账号
atguigu-hr 账号 专门用来创建用户和角色。

4、登录 ws-manager 账号,创建一个企业空间
ws-manager 账号 专门用来创建企业空间。

指定 ws-admin 账号作为管理员。

5、登录 ws-admin 账号,邀请成员

6、登录 project-admin 账号,创建一个项目

邀请成员。

7、登录 project-admin 账号,创建一个 DevOps 工程

邀请成员。

创建 Wordpress 应用
创建 Wordpress 应用并发布至 Kubernetes
1、创建 MySQL 密钥
2、创建 WordPress 密钥

3、创建两个存储卷

4、创建应用
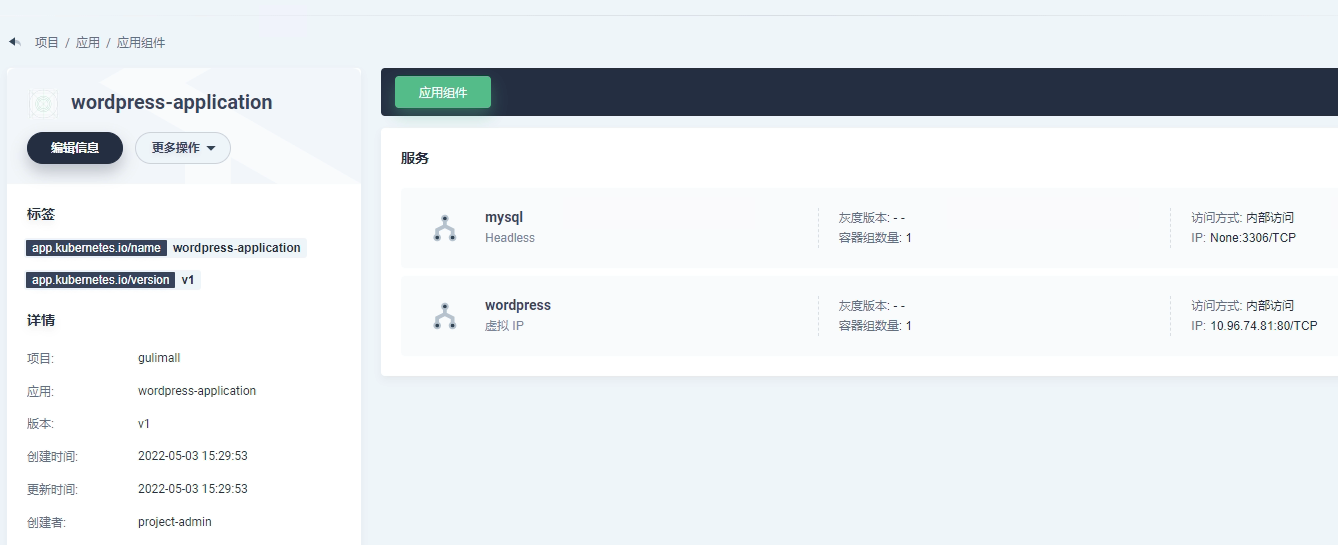
5、外网访问
最后
以上就是勤劳老虎最近收集整理的关于k8s 集群部署简介Kubeadm部署Kubernetesk8s 集群安装Linux 环境准备Kubernetes安装具体步骤入门操作 kubernetes 集群Ingress安装 KubeSphere建立多租户系统创建 Wordpress 应用的全部内容,更多相关k8s内容请搜索靠谱客的其他文章。


发表评论 取消回复