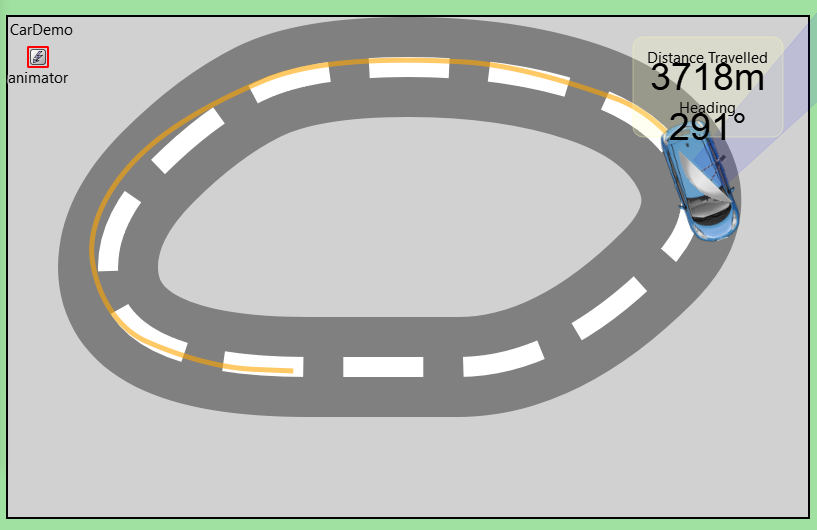
在NED文件中如果涉及到图的定义,在canvas示例中的代码如下:
network CarDemo
{
parameters:
@display("bgb=800,500");
@figure[road] (type=polygon; points=100,200, 200,100, 300,50, 500,50, 650,100, 700,200, 600,300, 500,350, 400,350, 200,350, 100,300; smooth=true; lineWidth=60; zoomLineWidth=true; lineColor=grey);
@figure[paint](type=polygon; points=100,200, 200,100, 300,50, 500,50, 650,100, 700,200, 600,300, 500,350, 400,350, 200,350, 100,300; smooth=true; lineWidth=3; zoomLineWidth=true; lineColor=white; lineStyle=dashed);
@figure[trail](type=polyline; lineWidth=5; lineOpacity=0.6; lineColor=orange);
@figure[car](type=image; image="car-top-view"; pos=0,0; anchor=c);
@figure[car.antenna](type=image; image="antenna"; pos=-10,-40; anchor=nw);
@figure[car.antenna.beam](type=path; path="M 10 0 L 10 -20 L 1200 -100 L 1200 100 L 10 20 Z"; fillColor=blue; fillOpacity=0.1; lineColor=blue; lineOpacity=0.1);
@figure[status](type=group; transform=translate(700,20));
// or, for non-zooming status area: @figure[status](type=panel; pos=700,20);
@figure[status.bg](type=rectangle; pos=0,0; size=150,100; anchor=n; cornerRadius=10; fillColor=#fafdb9; fillOpacity=0.2; lineColor=#fafdb9; lineOpacity=0.4);
@figure[status.distanceTitle](type=text; pos=0,20; text="Distance Travelled"; anchor=center);
@figure[status.distance](type=text; pos=0,40; text="0m"; anchor=center; font=Arial,22);
@figure[status.headingTitle](type=text; pos=0,70; text="Heading"; anchor=center);
@figure[status.heading](type=text; pos=0,90; text="0"; anchor=center; font=Arial,22);
submodules:
animator: CarAnimator;
}
其中@figure的定义表示一个图,
在c++中可以引用:
void CarAnimator::initialize()
{
timeStep = 1;
// 步长,步长 * 车速 = 一次移动距离
speed = 2;
// 车速
heading = 0;
// 车头角度
angularSpeed = 0;
// 转向速度
targetPointIndex = 0;
// 记录公路数据的索引
distanceTravelled = 0;
// 总里程
cCanvas *canvas = getParentModule()->getCanvas();
canvas->setAnimationSpeed(50.0, this);
// 取得公路的参数,
road = check_and_cast<cPolygonFigure *>(canvas->getFigure("road"));
// 拖尾数据,缺少点,需要在运动时候计算
trail = check_and_cast<cPolylineFigure *>(canvas->getFigure("trail"));
// 图形,@figure[car](type=image; image="car-top-view"; pos=0,0; anchor=c);
car = check_and_cast<cImageFigure *>(canvas->getFigure("car"));
// 天线的图形 @figure[car.antenna](type=image; image="antenna"; pos=-10,-40; anchor=nw);
antenna = check_and_cast<cFigure *>(canvas->getFigureByPath("car.antenna"));
// 右侧显示行驶距离文本
distanceDisplay = check_and_cast<cTextFigure *>(canvas->getFigureByPath("status.distance"));
// 右侧显示行驶的车头角度
headingDisplay = check_and_cast<cTextFigure *>(canvas->getFigureByPath("status.heading"));
// 获取下一点的数据
loc = road->getPoint(targetPointIndex);
// 引擎内部监控各个变量
WATCH(timeStep);
WATCH(loc.x);
WATCH(loc.y);
WATCH(speed);
WATCH(heading);
WATCH(angularSpeed);
WATCH(targetPointIndex);
WATCH(distanceTravelled);
refresh();
// 设置下次事件
scheduleAt(simTime(), new cMessage());
}
void CarAnimator::refresh() const
{
double t = (simTime() - lastStep) / timeStep;
ASSERT(t >= 0);
ASSERT(t <= 1);
// 车转向
cFigure::Transform carTr;
carTr.rotate(heading + angularSpeed * t);
// 车移动
double distance = speed * t;
carTr.translate(loc.x + distance * cos(heading), loc.y + distance * sin(heading));
car->setTransform(carTr);
// 天线转向
cFigure::Transform antTr;
antTr.rotate(-2 * simTime().dbl()*M_PI/180);
antenna->setTransform(antTr);
// 设置状态信息
char buf[20];
sprintf(buf, "%.0fm", distanceTravelled);
distanceDisplay->setText(buf);
int degrees = -int(heading*180/M_PI);
degrees = degrees - 360 * (int)floor(degrees / 360.0);
sprintf(buf, "%dxC2xB0", degrees);
headingDisplay->setText(buf);
}
void CarAnimator::refreshDisplay() const
{
// 其实,如果注释了这一句,也能运行,因为每个消息到达时候都进行了一个运动计算。
// 但是,注释后,明显会发生顿挫感,主要是因为:?
refresh();
}
void CarAnimator::handleMessage(cMessage *msg)
{
// 一次移动距离 =
步长,步长 * 车速
double distance = speed * timeStep.dbl();
// 根据角度更新当前位置
loc.x += distance * cos(heading);
loc.y += distance * sin(heading);
// 计算下一个目标的方向
Point target = road->getPoint(targetPointIndex);
Point vectorToTarget = target - loc;
// 距离小于某个数,则认为到了,
if (vectorToTarget.getLength() < 50)
// reached
targetPointIndex = (targetPointIndex+1) % road->getNumPoints();
double targetDirection = atan2(vectorToTarget.y, vectorToTarget.x);
double diff = targetDirection - heading;
while (diff < -M_PI)
diff += 2*M_PI;
while (diff > M_PI)
diff -= 2*M_PI;
// ,计算车头角度
heading += angularSpeed * timeStep.dbl();
// 以1/30的相差角度作为一次转向速度,转向
angularSpeed = diff / 30;
distanceTravelled += distance;
refresh();
// tail作为一个队列使用,多了就弹出一个,少了就添加
trail->addPoint(loc);
if (trail->getNumPoints() > 500)
trail->removePoint(0);
lastStep = simTime();
scheduleAt(simTime() + timeStep, msg);
}
其中,@figure的类型有如下几种:
| @fifigure type | C++ class | 中文含义 |
| line | cLineFigure | 直线 |
| arc | cArcFigure | 弧线 |
| polyline | cPolylineFigure | 折线 |
| rectangle | cRectangleFigure | 矩形 |
| oval | cOvalFigure | 椭圆 |
| ring | cRingFigure | 圆环 |
| pieslice | cPieSliceFigure | 饼图部分 |
| polygon | cPolygonFigure | 多边形 |
| path | cPathFigure | 路径 |
| text | cTextFigure | 路径 |
| label | cLabelFigure | 文本标签 |
| image | cImageFigure | 图像 |
| icon | cIconFigure | 图标 |
| pixmap | cPixmapFigure | 位图 |
| group | cGroupFigure | 组 |
每个图由一组属性参数来定义,属性的类型如下表:
| 类型 | 值定义格式 | 备注 |
| bool | true 或者false. |
|
| int | 整数 |
|
| double | 实数 |
|
| double01 | 在[0,1]之间的实数 | 比如透明度,不透明度 |
| degrees | 表示温度的实数 |
|
| string | 字符串 | 如果它包含逗号、分号、右括号或其他影响解析的字符,需要使用引号括起来 |
| Anchor | c, center, n, e, s, w, nw, ne, se, sw, start, middle, or end. | text fifigures只能用后三个 |
| Arrowhead : CapStyle | none, simple, triangle, or barbed. butt, square, or round. | 箭头 |
| Color :
| A color in HTML format (#rrggbb), a color in HSB format (@hhssbb), or a valid SVG color name.
|
|
| Dimensions : | width, height | Size given as width and height. |
| FigureType : | 各种内置图类型 | Register_Figure() |
| FillRule | evenodd or nonzero.
|
|
| Font | typeface, size, style
| All three items are optional. size is the font size in points. style is space-sparated list of zero or more of the following words: normal, bold, italic, underline.
|
| ImageName : | 文件名 | The name of an image. |
| Interpolation | none, fast, or best |
|
| JoinStyle | bevel, miter, or round |
|
| LineStyle | solid, dotted, or dashed |
|
| Point | x, y | 一个点 |
| Point2 | x1, y1, x2, y2 | 2个点 |
| PointList | x1, y1, x2, y2, x3, y3... | 点列表 |
| Rectangle | x, y, width, height | 矩形,左上角,长宽 |
| TagList | tag1, tag2, tag3... |
|
| Tint | Color, double01 | Specififies tint color and the amount of tinting for images. |
| Transform | translate(x, y), rotate(deg), rotate(deg, centerx, centery), scale(s), scale(sx, sy), scale(s, centerx, centery), scale(sx, sy, centerx, centery), skewx(coeff), skewx(coeff, centery), skewy(coeff), skewy(coeff, centerx), matrix(a, b, c, d, t1, t2)
| 一个或者多个转换组成的步骤列表 |
由上面表格的各种类型的属性一起可以定义某个图。不同的图包含的属性不同:
| 类型:父类 | 值格式定义 | 备注 |
| (fifigure) :
| type=<FigureType>; visible=<bool>; tags=<TagList>; childZ=<int>;transform=<Transform>; | 基类 |
| (abstractLine) : fifigure
| lineColor=<Color>; lineStyle=<LineStyle>; lineWidth=<double>; lineOpacity=<double>; capStyle=<CapStyle>; startArrowhead=<Arrowhead>; endArrowhead=<Arrowhead>; zoomLineWidth=<bool>; | 抽象类 |
| line : abstractLine | points=<Point2> | 直线 |
| arc : abstractLine | bounds=<Rectangle> pos=<Point>; size=<Dimensions>; anchor=<Anchor>; startAngle=<degrees>; endAngle=<degrees> | 弧线 |
| polyline : abstractLine | points=<PointList>; smooth=<bool>; joinstyle=<JoinStyle> | 折线 |
| (abstractShape) : fifigure
| lineColor=<Color>; fillColor=<Color>; lineStyle=<LineStyle>; lineWidth=<double>; lineOpacity=<double01>; fillOpacity=<double01>; zoomLineWidth=<bool> | 图形类 |
| rectangle : abstractShape
| bounds=<Rectangle> pos=<Point>; size=<Dimensions>; anchor=<Anchor>; cornerRadius=<double>|<Dimensions> | 矩形 |
| oval : abstractShape
| bounds=<Rectangle> pos=<Point>; size=<Dimensions>; anchor=<Anchor>
| 椭圆 |
| ring : abstractShape
| bounds=<Rectangle> pos=<Point>; size=<Dimensions>; anchor=<Anchor>; innerSize=<Dimensions>
| 圆环 |
| pieslice : abstractShape
| bounds=<Rectangle> pos=<Point>; size=<Dimensions>; anchor=<Anchor>; startAngle=<degrees>; endAngle=<degrees>
| 饼图部分 |
| polygon : abstractShape
| points=<PointList>; smooth=<bool>; joinStyle=<JoinStyle>; fillRule=<FillRule>
| 多边形 |
| path : abstractShape
| path=<string>; offset=<Point>; joinStyle=<JoinStyle>; capStyle=<CapStyle>; fillRule=<FillRule> | 路径 |
| (abstractText) : figure
| pos=<Point>; anchor=<Anchor> text=<string>; font=<Font>; opacity=<double01>; color=<Color>;
| 抽象文字 |
| label : abstractText
| angle=<degrees>;
| 标签 |
| text : abstractText
|
| 文本框 |
| (abstractImage) : figure
| bounds=<Rectangle> pos=<Point>; size=<Dimensions>; anchor=<Anchor>; interpolation=<Interpolation>; opacity=<double01>; tint=<Tint>
| 抽象图片 |
| image : abstractImage | image=<ImageName>
| 图像 |
| icon : abstractImage | image=<ImageName> | 图标 |
| pixmap : abstractImage | resolution=<Dimensions> | 位图 |
最后
以上就是老实胡萝卜最近收集整理的关于omnet++ 之canvas示例 在NED 文件中演示 @figure 用法的全部内容,更多相关omnet++内容请搜索靠谱客的其他文章。


发表评论 取消回复