本文以一个简单的模型为例讲述Embeded Coder生成的C代码的架构。
模型
模型如下图,名为test.
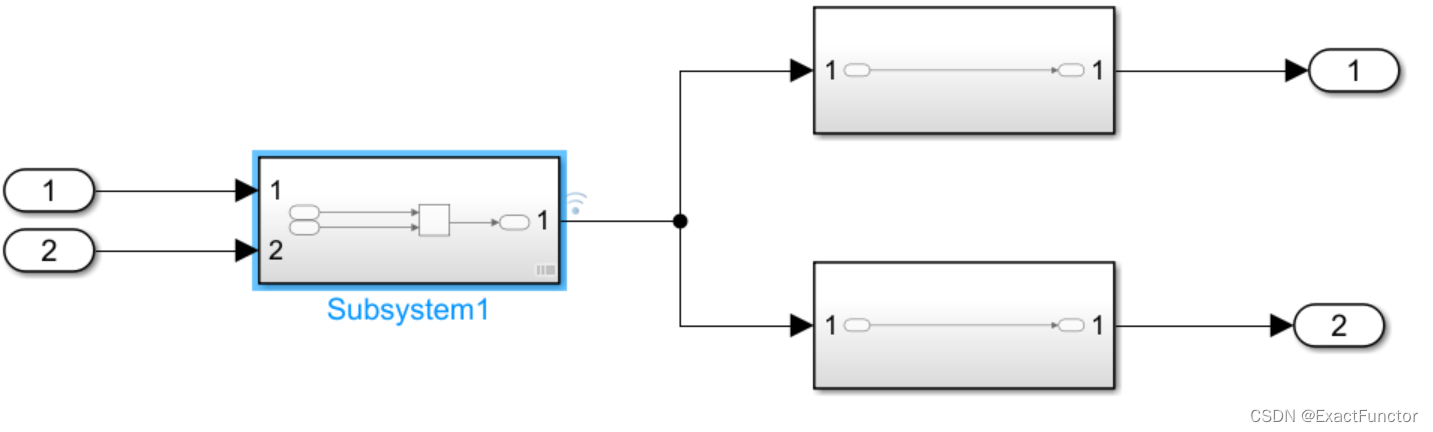
其中Subsystem1中为与门,其它2个子系统的输入端和输出端直接相连。之后用Embeded Coder生成C代码,选择64位Windows系统作为运行环境。
生成的文件
生成2个头文件: rtwtypes.h, test.h.
2个源文件: ert_main.c, test.c
rtwtypes.h定义一些类型,如int16_T. 不细说这个头文件。下面讲解其它文件。
test.h
typedef struct tag_RTM RT_MODEL;

/* External inputs (root inport signals with default storage) */
typedef struct {
  boolean_T In1;                       /* '<Root>/In1' */
  boolean_T In2;                       /* '<Root>/In2' */
} ExtU;

/* External outputs (root outports fed by signals with default storage) */
typedef struct {
  boolean_T Out1;                      /* '<Root>/Out1' */
  boolean_T Out2;                      /* '<Root>/Out2' */
} ExtY;

/* Real-time Model Data Structure */
struct tag_RTM {
  const char_T * volatile errorStatus;
};
将输入、输出的数据用结构体封装起来。
test.c
#include "test.h"

/* External inputs (root inport signals with default storage) */
ExtU rtU;

/* External outputs (root outports fed by signals with default storage) */
ExtY rtY;

/* Real-time model */
static RT_MODEL rtM_;
RT_MODEL *const rtM = &rtM_;

/* Model step function */
void test_step(void)
{
  boolean_T rtb_LogicalOperator;

  /* Logic: '<S1>/Logical Operator' incorporates:
   *  Inport: '<Root>/In1'
   *  Inport: '<Root>/In2'
   */
  rtb_LogicalOperator = (rtU.In2 && rtU.In1);

  /* Outport: '<Root>/Out1' */
  rtY.Out1 = rtb_LogicalOperator;

  /* Outport: '<Root>/Out2' */
  rtY.Out2 = rtb_LogicalOperator;
}

/* Model initialize function */
void test_initialize(void)
{
  /* (no initialization code required) */
  rtU.In1 = 1;
  rtU.In2 = 1;
}
rtM_ 是运行时数据,这个例子中只存储了字符串errorStatus. initialize函数中原来是空的,里面的初始化的代码可以自己加上去,当作初始化输入。 step函数是运行中的每一步。
ert_main.c
这是主函数所在源文件。代码如下
#include <stddef.h>
#include <stdio.h>            /* This example main program uses printf/fflush */
#include "test.h"                      /* Model's header file */


void rt_OneStep(void);
void rt_OneStep(void)
{
  static boolean_T OverrunFlag = false;

  /* Disable interrupts here */

  /* Check for overrun */
  if (OverrunFlag) {
    rtmSetErrorStatus(rtM, "Overrun");
    return;
  }

  OverrunFlag = true;

  /* Save FPU context here (if necessary) */
  /* Re-enable timer or interrupt here */
  /* Set model inputs here */

  /* Step the model */
  test_step();

  /* Get model outputs here */

  /* Indicate task complete */
  OverrunFlag = false;

  /* Disable interrupts here */
  /* Restore FPU context here (if necessary) */
  /* Enable interrupts here */
}

/*
 * The example "main" function illustrates what is required by your
 * application code to initialize, execute, and terminate the generated code.
 * Attaching rt_OneStep to a real-time clock is target specific.  This example
 * illustrates how you do this relative to initializing the model.
 */
int_T main(int_T argc, const char *argv[])
{
  /* Unused arguments */
  (void)(argc);
  (void)(argv);

  /* Initialize model */
  test_initialize();


  fflush((NULL));
  int i = 0;
  while (rtmGetErrorStatus(rtM) == (NULL) && i <= 5)
  {
    rt_OneStep();
     ++i;
     printf("%d %un", i, rtY.Out1);
  }

  /* Disable rt_OneStep here */
  return 0;
}
代码中原本有很多注释,while循环是空的。现在我在while循环中加了控制循环次数的变量i,以及调用rt_OneStep函数,这个函数是test_step()函数的封装。函数中使用静态变量OverrunFlag,确保在多线程中,不会同时运行多个test_step().
最后
以上就是醉熏美女最近收集整理的关于Simulink Embeded Coder生成的C代码解析的全部内容,更多相关Simulink内容请搜索靠谱客的其他文章。
本图文内容来源于网友提供,作为学习参考使用,或来自网络收集整理,版权属于原作者所有。


发表评论 取消回复