物联网实训仿真系统
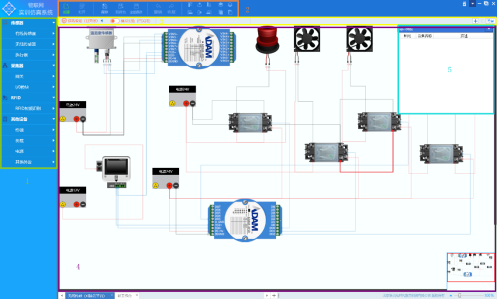
1. 产品外观

2.产品功能
①设备面板:设备组件分类齐全,如传感器、执行器、网关、电源、RFID射频设备、终端、其他外设等,帮助学生了解物联网常见组网设备。
②控制面板: 可新建、保存、另存、打开、删除仿真文件,可撤销恢复操作,可编辑排版连线。支持反复练习操作。
③功能面板:可设置连线上报路径,并上报连线数据。可根据模拟传感器数据模拟实验。
④ 工作面板:拖拉设备设计仿真连线,设备虚拟传感数据设置、串口配置、网关配置等,可通过上位机或者云平台与实际设备联调。
⑤消息面板:实时查看传感器数据和执行器状态数据、采集器接收和发送数据。
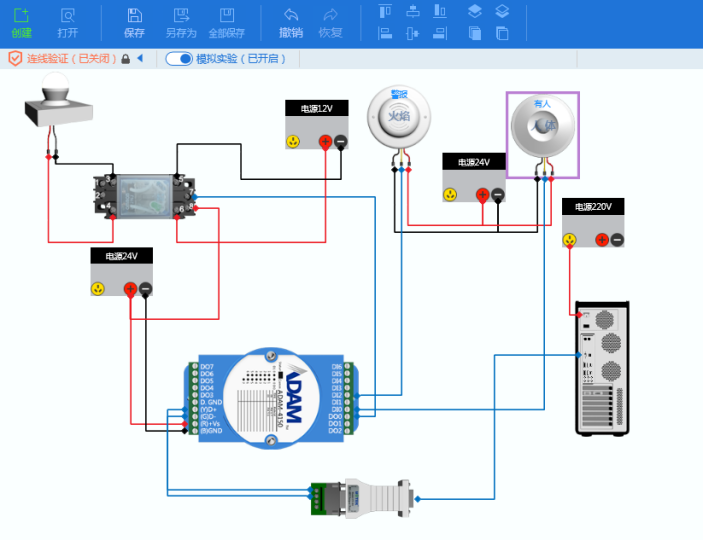
3.产品案例:智慧路灯+获取有线传感器数据

Android程序开发
1. 布局文件
<?xml version="1.0" encoding="utf-8"?>
<LinearLayout xmlns:android="http://schemas.android.com/apk/res/android"
    xmlns:app="http://schemas.android.com/apk/res-auto"
    xmlns:tools="http://schemas.android.com/tools"
    android:layout_width="match_parent"
    android:layout_height="match_parent"
    android:orientation="vertical">
    <LinearLayout
        android:layout_width="match_parent"
        android:layout_height="wrap_content"
        android:orientation="horizontal"
        android:layout_weight="1">

        <TextView
            android:layout_weight="1"
            android:layout_width="0dp"
            android:layout_height="wrap_content"
            android:gravity="center"
            android:text="人体传感器"
            android:textSize="20sp" />
        <TextView
            android:id="@+id/tv_person"
            android:layout_weight="1"
            android:layout_width="0dp"
            android:layout_height="wrap_content"
            android:hint="用于显示是否有人"
            android:gravity="center"
            android:textSize="20sp" />
    </LinearLayout>


    <LinearLayout
        android:layout_width="match_parent"
        android:layout_height="wrap_content"
        android:orientation="horizontal"
        android:layout_weight="1">

        <TextView
            android:layout_weight="1"
            android:layout_width="0dp"
            android:layout_height="match_parent"
            android:gravity="center"
            android:text="火焰传感器"
            android:textSize="20sp" />
        <ImageView
            android:id="@+id/img_fire"
            android:layout_width="wrap_content"
            android:layout_height="wrap_content"
            android:background="@drawable/fire"
            android:visibility="invisible"/>
    </LinearLayout>

    <LinearLayout
        android:layout_width="match_parent"
        android:layout_height="wrap_content"
        android:orientation="horizontal"
        android:layout_weight="1">

        <Button
            android:onClick="open"
            android:layout_weight="1"
            android:layout_width="0dp"
            android:layout_height="wrap_content"
            android:text="开启"/>

        <Button
            android:onClick="close"
            android:layout_weight="1"
            android:layout_width="0dp"
            android:layout_height="wrap_content"
            android:text="关闭"/>
    </LinearLayout>


</LinearLayout>
2. 导入新大陆提供的库armeabi/libuart.so和Analog4150Library.jar
3. 代码段
package com.example.kevin.sally;

import android.os.Bundle;
import android.os.Handler;
import android.support.v7.app.AppCompatActivity;
import android.view.View;
import android.widget.ImageView;
import android.widget.TextView;

import com.example.analoglib.Analog4150ServiceAPI;

public class MainActivity extends AppCompatActivity {

    private TextView tv_person;
    private ImageView img_fire;
    private ADAM4150 adam4150;

    @Override
    protected void onCreate(Bundle savedInstanceState) {
        super.onCreate(savedInstanceState);
        setContentView(R.layout.activity_main);

        tv_person = findViewById(R.id.tv_person);
        img_fire = findViewById(R.id.img_fire);
        img_fire.setVisibility(View.VISIBLE);

        adam4150 = new ADAM4150(1, 0, 3);

        mHandler.postDelayed(mRunnable, ms);

    }

    @Override
    protected void onDestroy() {
        super.onDestroy();
        adam4150.closeADAMPort();
    }

    public void open(View view) {
        //Toast.makeText(MainActivity.this, "开的按钮被点击了", Toast.LENGTH_LONG).show();
        adam4150.openFan1();
    }


    public void close(View view) {
        //Toast.makeText(MainActivity.this, "关的按钮被点击了", Toast.LENGTH_LONG).show();
        adam4150.closeFan1();
    }

    private int ms = 300;//每300毫秒运行一次
    private Handler mHandler = new Handler(); //声明一个Handler对象
    private Runnable mRunnable = new Runnable() { //声明一个Runnable对象

    @Override
    public void run() {

        mHandler.postDelayed(mRunnable, ms); //设置 多少秒后执行
        //如果为真 则显示有人,反之显示无人
        tv_person.setText(adam4150.getPerson()? "有人":"无人");
        //如果为真 则设置火焰图片,反之隐藏火焰图片
        if(adam4150.getFire()){
            img_fire.setVisibility(View.VISIBLE);
        }else{
            img_fire.setVisibility(View.INVISIBLE);
        }
        //发送ADAM4150请求
        Analog4150ServiceAPI.send4150();
    }

    };
}
其中ADAM4150为封装好的类。
编译发布到新大陆的平板之后,连接串口测试。
最后
以上就是开放冥王星最近收集整理的关于新大陆培训之(一)物联网实训仿真系统 + Android程序开发的全部内容,更多相关新大陆培训之(一)物联网实训仿真系统内容请搜索靠谱客的其他文章。
本图文内容来源于网友提供,作为学习参考使用,或来自网络收集整理,版权属于原作者所有。


发表评论 取消回复