本篇文章带大家深入了解一下angular的状态管理器NgRx,介绍一下NgRx的使用方法,希望对大家有所帮助!

NgRx 是 Angular 应用中实现全局状态管理的 Redux 架构解决方案。【相关教程推荐:《angular教程》】
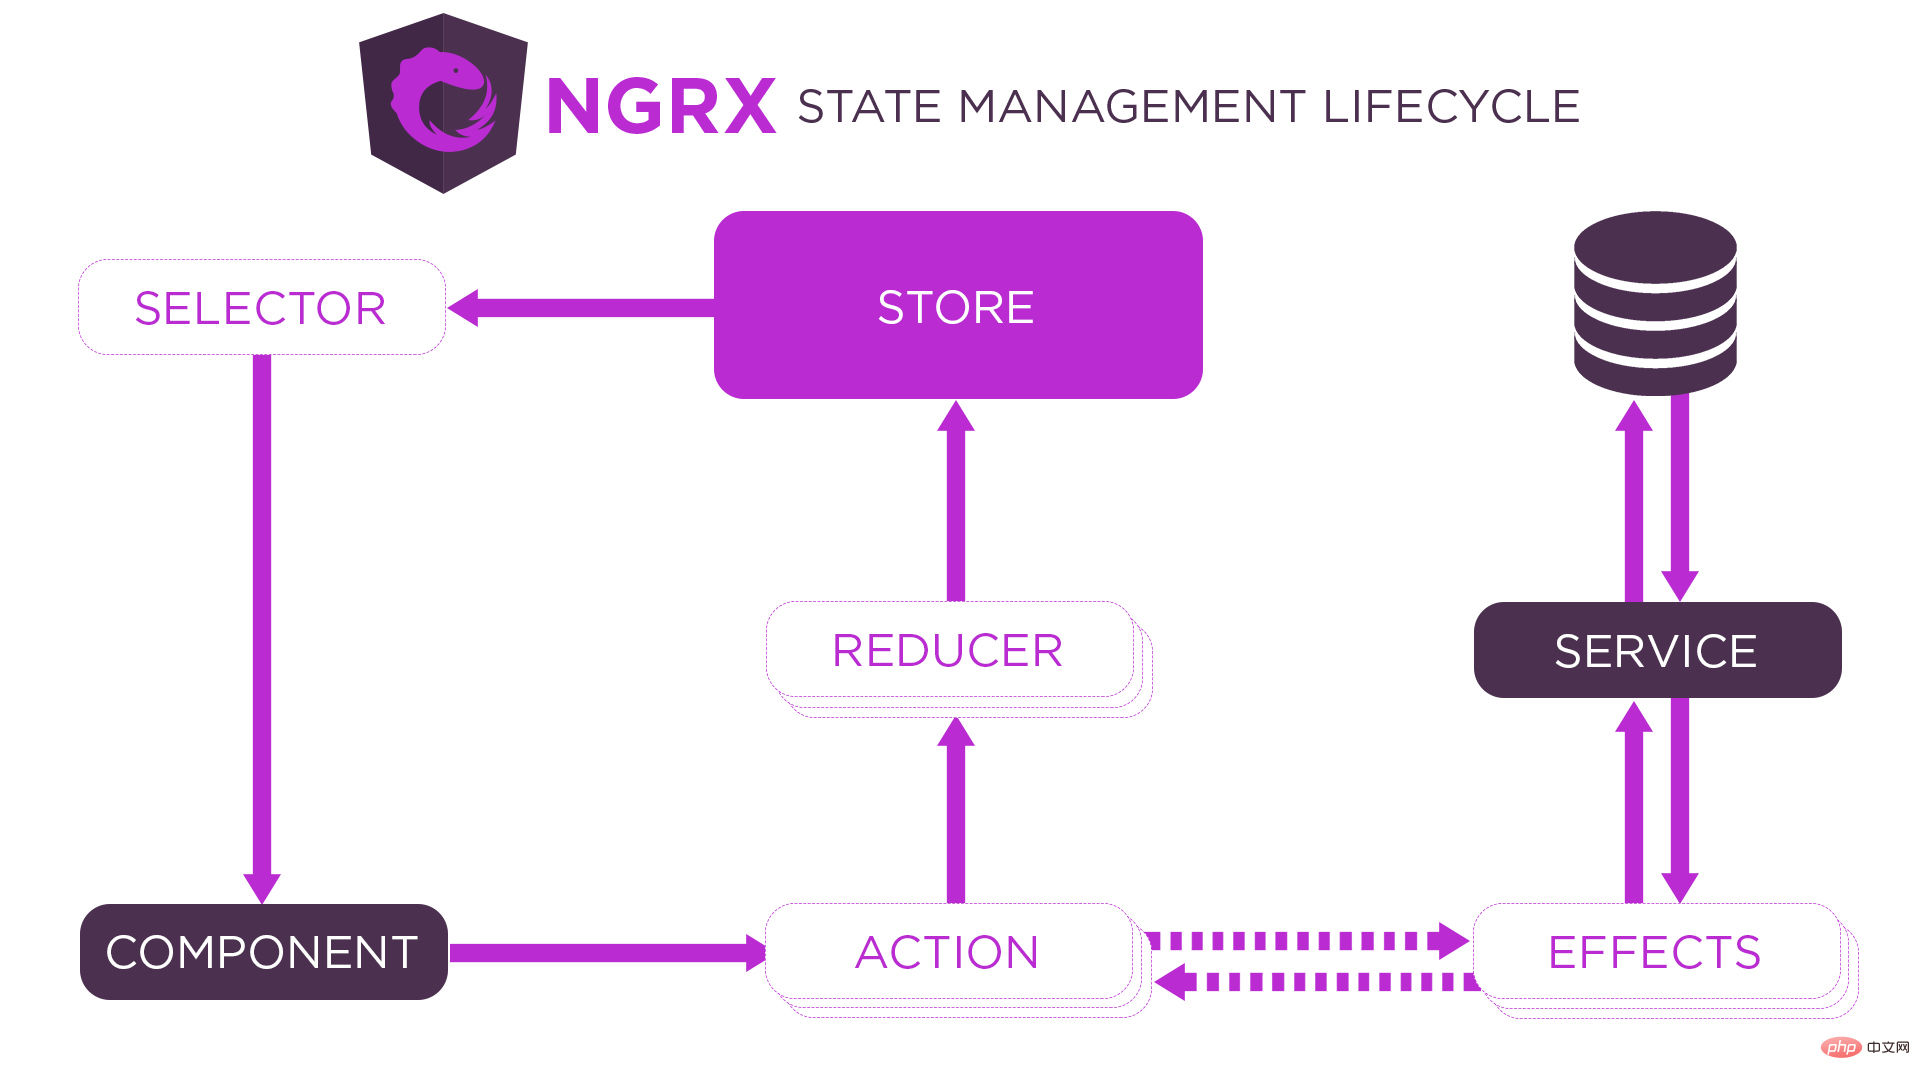
@ngrx/store:全局状态管理模块
@ngrx/effects:处理副作用
@ngrx/store-devtools:浏览器调试工具,需要依赖 Redux Devtools Extension
@ngrx/schematics:命令行工具,快速生成 NgRx 文件
@ngrx/entity:提高开发者在 Reducer 中操作数据的效率
@ngrx/router-store:将路由状态同步到全局 Store
快速开始
1、下载 NgRx
npm install @ngrx/store @ngrx/effects @ngrx/entity @ngrx/router-store @ngrx/store-devtools @ngrx/schematics
2、配置 NgRx CLI
ng config cli.defaultCollection @ngrx/schematics
// angular.json
"cli": {
  "defaultCollection": "@ngrx/schematics"
}登录后复制
3、创建 Store
ng g store State --root --module app.module.ts --statePath store --stateInterface AppState
4、创建 Action
ng g action store/actions/counter --skipTests
import { createAction } from "@ngrx/store"

export const increment = createAction("increment")
export const decrement = createAction("decrement")登录后复制
5、创建 Reducer
ng g reducer store/reducers/counter --skipTests --reducers=../index.ts
import { createReducer, on } from "@ngrx/store"
import { decrement, increment } from "../actions/counter.actions"

export const counterFeatureKey = "counter"

export interface State {
  count: number
}

export const initialState: State = {
  count: 0
}

export const reducer = createReducer(
  initialState,
  on(increment, state => ({ count: state.count + 1 })),
  on(decrement, state => ({ count: state.count - 1 }))
)登录后复制
6、创建 Selector
ng g selector store/selectors/counter --skipTests
import { createFeatureSelector, createSelector } from "@ngrx/store"
import { counterFeatureKey, State } from "../reducers/counter.reducer"
import { AppState } from ".."

export const selectCounter = createFeatureSelector<AppState, State>(counterFeatureKey)
export const selectCount = createSelector(selectCounter, state => state.count)登录后复制
7、组件类触发 Action、获取状态
import { select, Store } from "@ngrx/store"
import { Observable } from "rxjs"
import { AppState } from "./store"
import { decrement, increment } from "./store/actions/counter.actions"
import { selectCount } from "./store/selectors/counter.selectors"

export class AppComponent {
  count: Observable<number>
  constructor(private store: Store<AppState>) {
    this.count = this.store.pipe(select(selectCount))
  }
  increment() {
    this.store.dispatch(increment())
  }
  decrement() {
    this.store.dispatch(decrement())
  }
}登录后复制
8、组件模板显示状态
<button (click)="increment()">+</button>
<span>{{ count | async }}</span>
<button (click)="decrement()">-</button>登录后复制
Action Payload
1、在组件中使用 dispatch 触发 Action 时传递参数,参数最终会被放置在 Action 对象中。
this.store.dispatch(increment({ count: 5 }))登录后复制2、在创建 Action Creator 函数时,获取参数并指定参数类型。
import { createAction, props } from "@ngrx/store"
export const increment = createAction("increment", props<{ count: number }>())登录后复制
export declare function props<P extends object>(): Props<P>;
登录后复制3、在 Reducer 中通过 Action 对象获取参数。
export const reducer = createReducer(
  initialState,
  on(increment, (state, action) => ({ count: state.count + action.count }))
)登录后复制
MetaReducer
metaReducer 是 Action -> Reducer 之间的钩子,允许开发者对 Action 进行预处理 (在普通 Reducer 函数调用之前调用)。
function debug(reducer: ActionReducer<any>): ActionReducer<any> {
  return function (state, action) {
    return reducer(state, action)
  }
}

export const metaReducers: MetaReducer<AppState>[] = !environment.production
  ? [debug]
  : []登录后复制
Effect
需求:在页面中新增一个按钮,点击按钮后延迟一秒让数值增加。
1、在组件模板中新增一个用于异步数值增加的按钮,按钮被点击后执行 increment_async 方法
<button (click)="increment_async()">async</button>
登录后复制2、在组件类中新增 increment_async 方法,并在方法中触发执行异步操作的 Action
increment_async() {
  this.store.dispatch(increment_async())
}登录后复制
3、在 Action 文件中新增执行异步操作的 Action
export const increment_async = createAction("increment_async")登录后复制4、创建 Effect,接收 Action 并执行副作用,继续触发 Action
ng g effect store/effects/counter --root --module app.module.ts --skipTests
Effect 功能由 @ngrx/effects 模块提供,所以在根模块中需要导入相关的模块依赖
import { Injectable } from "@angular/core"
import { Actions, createEffect, ofType } from "@ngrx/effects"
import { increment, increment_async } from "../actions/counter.actions"
import { mergeMap, map } from "rxjs/operators"
import { timer } from "rxjs"

// createEffect
// 用于创建 Effect, Effect 用于执行副作用.
// 调用方法时传递回调函数, 回调函数中返回 Observable 对象, 对象中要发出副作用执行完成后要触发的 Action 对象
// 回调函数的返回值在 createEffect 方法内部被继续返回, 最终返回值被存储在了 Effect 类的属性中
// NgRx 在实例化 Effect 类后, 会订阅 Effect 类属性, 当副作用执行完成后它会获取到要触发的 Action 对象并触发这个 Action

// Actions
// 当组件触发 Action 时, Effect 需要通过 Actions 服务接收 Action, 所以在 Effect 类中通过 constructor 构造函数参数的方式将 Actions 服务类的实例对象注入到 Effect 类中
// Actions 服务类的实例对象为 Observable 对象, 当有 Action 被触发时, Action 对象本身会作为数据流被发出

// ofType
// 对目标 Action 对象进行过滤.
// 参数为目标 Action 的 Action Creator 函数
// 如果未过滤出目标 Action 对象, 本次不会继续发送数据流
// 如果过滤出目标 Action 对象, 会将 Action 对象作为数据流继续发出

@Injectable()
export class CounterEffects {
  constructor(private actions: Actions) {
    // this.loadCount.subscribe(console.log)
  }
  loadCount = createEffect(() => {
    return this.actions.pipe(
      ofType(increment_async),
      mergeMap(() => timer(1000).pipe(map(() => increment({ count: 10 }))))
    )
  })
}登录后复制
Entity
1、概述
Entity 译为实体,实体就是集合中的一条数据。
NgRx 中提供了实体适配器对象,在实体适配器对象下面提供了各种操作集合中实体的方法,目的就是提高开发者操作实体的效率。
2、核心
1、EntityState:实体类型接口
/*
	{
		ids: [1, 2],
		entities: {
			1: { id: 1, title: "Hello Angular" },
			2: { id: 2, title: "Hello NgRx" }
		}
	}
*/
export interface State extends EntityState<Todo> {}登录后复制
2、createEntityAdapter: 创建实体适配器对象
3、EntityAdapter:实体适配器对象类型接口
export const adapter: EntityAdapter<Todo> = createEntityAdapter<Todo>()
// 获取初始状态 可以传递对象参数 也可以不传
// {ids: [], entities: {}}
export const initialState: State = adapter.getInitialState()登录后复制
3、实例方法
https://ngrx.io/guide/entity/adapter#adapter-collection-methods
4、选择器
// selectTotal 获取数据条数
// selectAll 获取所有数据 以数组形式呈现
// selectEntities 获取实体集合 以字典形式呈现
// selectIds 获取id集合, 以数组形式呈现
const { selectIds, selectEntities, selectAll, selectTotal } = adapter.getSelectors();登录后复制
export const selectTodo = createFeatureSelector<AppState, State>(todoFeatureKey)
export const selectTodos = createSelector(selectTodo, selectAll)
登录后复制Router Store
1、同步路由状态
1)引入模块
import { StoreRouterConnectingModule } from "@ngrx/router-store"

@NgModule({
  imports: [
    StoreRouterConnectingModule.forRoot()
  ]
})
export class AppModule {}登录后复制
2)将路由状态集成到 Store
import * as fromRouter from "@ngrx/router-store"

export interface AppState {
  router: fromRouter.RouterReducerState
}
export const reducers: ActionReducerMap<AppState> = {
  router: fromRouter.routerReducer
}登录后复制
2、创建获取路由状态的 Selector
// router.selectors.ts
import { createFeatureSelector } from "@ngrx/store"
import { AppState } from ".."
import { RouterReducerState, getSelectors } from "@ngrx/router-store"

const selectRouter = createFeatureSelector<AppState, RouterReducerState>(
  "router"
)

export const {
  // 获取和当前路由相关的信息 (路由参数、路由配置等)
  selectCurrentRoute,
  // 获取地址栏中 # 号后面的内容
  selectFragment,
  // 获取路由查询参数
  selectQueryParams,
  // 获取具体的某一个查询参数 selectQueryParam('name')
  selectQueryParam,
  // 获取动态路由参数
  selectRouteParams,
 	// 获取某一个具体的动态路由参数 selectRouteParam('name')
  selectRouteParam,
  // 获取路由自定义数据
  selectRouteData,
  // 获取路由的实际访问地址
  selectUrl
} = getSelectors(selectRouter)登录后复制
// home.component.ts
import { select, Store } from "@ngrx/store"
import { AppState } from "src/app/store"
import { selectQueryParams } from "src/app/store/selectors/router.selectors"
export class AboutComponent {
constructor(private store: Store<AppState>) {
this.store.pipe(select(selectQueryParams)).subscribe(console.log)
}
}登录后复制
最后
以上就是犹豫野狼最近收集整理的关于angular学习之详解状态管理器NgRx的全部内容,更多相关angular学习之详解状态管理器NgRx内容请搜索靠谱客的其他文章。


发表评论 取消回复