文章目录
- 一、概念
- 二、使用Spring Initalizr来快速创建web项目
- 三、探究其中的奥妙
- 1. pom文件
- 1.1版本控制
- 1.2启动器
- 2.主程序类
- 3.总结
一、概念
我们知道,Spring的组件代码是轻量级的,ssm这三大框架用来开发web应用现在已经是流行的趋势,但是从前面的ssm的环境搭建就知道,ssm的配置是重量级的。具体ssm整合的内容可以参阅ssm整合,这不难发现问题,配置太复杂了。
而SpringBoot就是来解决这个问题的,SpringBoot的官网有这么一句话:
Spring Boot makes it easy to create stand-alone, production-grade Spring based Applications that you can “just run”.
Spring Boot是用来简化Spring应用开发的一个框架,这个框架的优点是零配置。
二、使用Spring Initalizr来快速创建web项目
环境说明:
- idea2020
- jdk14
- Spring Boot 2.2.6.RELEASE
![[外链图片转存失败,源站可能有防盗链机制,建议将图片保存下来直接上传(img-pjrr0mml-1587388204661)(c:usersfour and tendesktop笔记javaspring boot1.png)]](https://img-blog.csdnimg.cn/20200420211035206.png?x-oss-process=image/watermark,type_zmfuz3pozw5nagvpdgk,shadow_10,text_ahr0chm6ly9ibg9nlmnzzg4ubmv0l3dlaxhpbl80ndcwnjy0nw==,size_16,color_ffffff,t_70)
![[外链图片转存失败,源站可能有防盗链机制,建议将图片保存下来直接上传(img-ic4mwruf-1587388204664)(c:usersfour and tendesktop笔记javaspring boot2.png)]](https://img-blog.csdnimg.cn/20200420211045558.png?x-oss-process=image/watermark,type_zmfuz3pozw5nagvpdgk,shadow_10,text_ahr0chm6ly9ibg9nlmnzzg4ubmv0l3dlaxhpbl80ndcwnjy0nw==,size_16,color_ffffff,t_70)
![[外链图片转存失败,源站可能有防盗链机制,建议将图片保存下来直接上传(img-q0akfrhw-1587388204665)(c:usersfour and tendesktop笔记javaspring boot3.png)]](https://img-blog.csdnimg.cn/20200420211058575.png?x-oss-process=image/watermark,type_zmfuz3pozw5nagvpdgk,shadow_10,text_ahr0chm6ly9ibg9nlmnzzg4ubmv0l3dlaxhpbl80ndcwnjy0nw==,size_16,color_ffffff,t_70)
完成以上步骤,便创建好了一个Spring Boot项目。使用Spring Boot的快速向导来创建,等工程创建完毕会自动创建以下目录,然后编写Controller代码

这些目录和我们使用maven来创建项目大致一样,只是多了一些目录
com.springboot.controller.helloController
/**
* author by four and ten
* create by 2020/4/20 15:03
*/
public class helloController {
@ResponseBody
@RequestMapping("/hello")
public String hello(){
return "hello springBoot";
}
}
然后直接在HelloApplication中直接运行main方法!控制台输出:

这里发现在SpringBoot2.x日志里没有记录地址映射信息,是因为Spring Boot2.x对日志进行了大的变动,可以在主配置文件中提高日志记录的级别:
logging.level.web=trace

在浏览器上访问:localhost:8080/hello
那么完成以上步骤就完成了一个Spring Boot的web项目的构建,这实在是太简单了,要是之前的ssm项目,还要编写许多配置文件,而这些SpringBoot都帮我们做好了。
但是这里有个非常需要注意的点:我们编写的Controller要放在主配置类所在包下或者子包下,这样Controller才能被扫描到,也就是说我们编写的代码要想被扫描到必须要放在
com.springboot包或者子包下。这个是新手最容易犯的错误(我就之前犯了很多次这种错)
三、探究其中的奥妙
1. pom文件
1.1版本控制
其实我们可以发现,使用SpringBoot向导来创建工程和直接使用maven来创建工程本直是一样的,只不过在使用向导创建的时候,会让我们选择什么工程,可以勾选web等等,这样SpringBoot就会帮我们导入相关的依赖,下面我们看看pom文件
<parent>
<groupId>org.springframework.boot</groupId>
<artifactId>spring-boot-starter-parent</artifactId>
<version>2.2.6.RELEASE</version>
<relativePath/> <!-- lookup parent from repository -->
</parent>
<groupId>com.springboot</groupId>
<artifactId>hello</artifactId>
<version>0.0.1-SNAPSHOT</version>
<name>hello</name>
<description>Demo project for Spring Boot</description>
<properties>
<java.version>1.8</java.version>
</properties>
<dependencies>
<dependency>
<groupId>org.springframework.boot</groupId>
<artifactId>spring-boot-starter-web</artifactId>
</dependency>
<dependency>
<groupId>org.springframework.boot</groupId>
<artifactId>spring-boot-starter-test</artifactId>
<scope>test</scope>
<exclusions>
<exclusion>
<groupId>org.junit.vintage</groupId>
<artifactId>junit-vintage-engine</artifactId>
</exclusion>
</exclusions>
</dependency>
</dependencies>
可以看到该pom文件导入了一个父项目
 <parent>
<groupId>org.springframework.boot</groupId>
<artifactId>spring-boot-starter-parent</artifactId>
<version>2.2.6.RELEASE</version>
<relativePath/> <!-- lookup parent from repository -->
</parent>
点进这个父项目,发现又是一个父项目:
<parent>
<groupId>org.springframework.boot</groupId>
<artifactId>spring-boot-dependencies</artifactId>
<version>2.2.6.RELEASE</version>
<relativePath>../../spring-boot-dependencies</relativePath>
</parent>
再点进这个项目里,发现里面有一个properties标签

里面是管理Spring Boot的所有项目的版本,也就是说Spring Boot是在这里控制项目所需的应用的版本,有我们之前的aspectj、mysql、junit等等
1.2启动器
回到pom文件,发现还导入了一个依赖
<dependency>
<groupId>org.springframework.boot</groupId>
<artifactId>spring-boot-starter-web</artifactId>
</dependency>
启动器官方文档,在官方文档里可以看到启动器的具体描述:
Starters are a set of convenient dependency descriptors that you can include in your application. You get a one-stop shop for all the Spring and related technologies that you need without having to hunt through sample code and copy-paste loads of dependency descriptors. For example, if you want to get started using Spring and JPA for database access, include the
spring-boot-starter-data-jpadependency in your project.
翻译过来的意思就是说启动器是一组方便的依赖关系描述符,提供了简化企业级开发绝大多数场景的starter pom(启动器),只要引入了相应场景的starter pom,相关技术的绝大部分配置将会消除(自动配置),从而简化我们开发。例如:我们需要web项目,那么导入了spring-boot-starter-web。官方文档里还提到一些命名规则:spring-boot-starter-*,启动器都是这么命名的
2.主程序类
HelloApplication是我们使用向导时自动为我们创建的:
@SpringBootApplication
public class HelloApplication {
public static void main(String[] args) {
SpringApplication.run(HelloApplication.class, args);
}
}
- SpringBootApplication:标注一个主程序类,说明这是一个Spring Boot应用,SpringBoot就应该运行这个类的main方法来启动SpringBoot应用;
然后打开这个注解:
org.springframework.boot.autoconfigure.SpringBootApplication:
@Target(ElementType.TYPE)
@Retention(RetentionPolicy.RUNTIME)
@Documented
@Inherited
//Spring Boot的配置类
@SpringBootConfiguration
//开启自动配置功能
@EnableAutoConfiguration
@ComponentScan(excludeFilters = { @Filter(type = FilterType.CUSTOM, classes = TypeExcludeFilter.class),
@Filter(type = FilterType.CUSTOM, classes = AutoConfigurationExcludeFilter.class) })
public @interface SpringBootApplication {
(1)、SpringBootConfiguration:Spring Boot的配置类,标注在那个类上说明这是一个配置类打开SpringBootConfiguration注解,会发现Spring中很熟悉的一个注解:Configuration
org.springframework.boot.SpringBootConfiguration
@Target({ElementType.TYPE})
@Retention(RetentionPolicy.RUNTIME)
@Documented
@Configuration
public @interface SpringBootConfiguration {
@AliasFor(
annotation = Configuration.class
)
boolean proxyBeanMethods() default true;
}
(2)、EnableAutoConfiguration这个注解:开启自动配置的功能,
@Target(ElementType.TYPE)
@Retention(RetentionPolicy.RUNTIME)
@Documented
@Inherited
//自动配置包
@AutoConfigurationPackage
//Spring的底层注解
@Import(AutoConfigurationImportSelector.class)
public @interface EnableAutoConfiguration {
- AutoConfigurationPackage:自动配置包,将主配置类(@SpringBootApplication标注的类)的所在包及下面所有子包里面的所有组件扫描到Spring容器;
@Target(ElementType.TYPE)
@Retention(RetentionPolicy.RUNTIME)
@Documented
@Inherited
@Import(AutoConfigurationPackages.Registrar.class)
public @interface AutoConfigurationPackage {
}
- Import(AutoConfigurationImportSelector.class):给容器导入组件的选择器,可以在AutoConfigurationImportSelector的getAutoConfigurationEntry方法上打上一个断点那么查看configurations这个list集合的内容:

可以看到导入的这些组件的名字均为xxxAutoConfigurtion,看这个名字应该是xxx的自动配置,那么就是在这里Spring Boot给我们导入该场景所需要的所有配置。在调用getAutoConfigurationEntry方法的时候调用了getCandidateConfigurations方法

打开这个方法:
	protected List<String> getCandidateConfigurations(AnnotationMetadata metadata, AnnotationAttributes attributes) {
List<String> configurations = SpringFactoriesLoader.loadFactoryNames(getSpringFactoriesLoaderFactoryClass(),
getBeanClassLoader());
Assert.notEmpty(configurations, "No auto configuration classes found in META-INF/spring.factories. If you "
+ "are using a custom packaging, make sure that file is correct.");
return configurations;
}
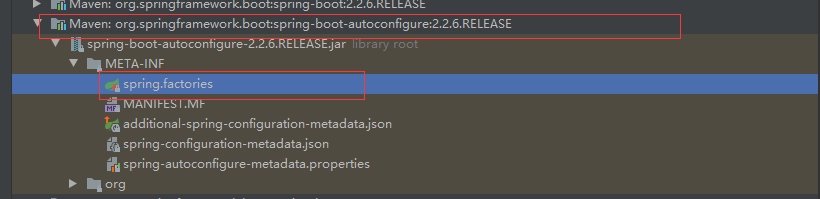
那么可以看到configurations这个组件的容器是通过SpringFactoriesLoader.loadFactoryNames方法来获取的,然后一直顺下去点开里面的方法,发现
public static final String FACTORIES_RESOURCE_LOCATION = "META-INF/spring.factories";
Spring Boot在启动的时候从类路径下的META-INF/spring.factories中获取EnableAutoConfiguration的值,将这个文件的值作为自动配置类导入到容器中,自动配置类生效
3.总结
经过上面的源代码流程分析,画了一个简图

最后
以上就是从容咖啡最近收集整理的关于SpringBoot2.x(JDK14)入门源码浅析(一)的全部内容,更多相关SpringBoot2内容请搜索靠谱客的其他文章。


发表评论 取消回复