<span style="color:#777777">title: Hexo 搭配 GitHub 建立博客, 选用 nexT 主题
date: 2021-04-26 19:21:20
categories:
  - [兴趣, 网站, 博客]
tags:
  - Hexo
  - Git
password:
top: 100
typora-root-url: ..
</span>
整理网上的Next优化方法,外加写一份文章
感觉博客还行,不再羡慕别人的主题了
特效全开,跟开了吃鸡一样,电脑呼呼的
看了下建站时间,花了23天整,为了一个工具,感觉血亏
我的博客 机械细胞 (jxxb.top)
Hexo 博客搭建
Hexo是一款基于Node.js的静态博客框架,依赖少易于安装使用,可以方便的生成静态网页托管在GitHub上.
因为Hexo的创建者是台湾人,对中文的支持很友好,可以选择中文进行查看。
官网: hexo官网
<!-- more -->
安装 Git
pass
参考:
-
Git - Book (git-scm.com)
-
超详细Git 安装教程(Windows)eno_yang的博客-CSDN博客git安装
Git 代码备份
主要是一些为源文件备份的代码,用于git push
npm install -g hexo-cli
hexo init MyBlog
cd MyBlog
npm install
hexo generate
hexo server
.
git config --global user.name "yourname"
git config --global user.email "youremail"
git config user.name
git config user.email
ssh-keygen -t rsa -C "youremail"
ssh -T git@github.com
.
deploy:
  type: git
  repo: <repository url> #https://bitbucket.org/JohnSmith/johnsmith.bitbucket.io
  branch: [branch]
  message: [message]
npm install hexo-deployer-git --save
hexo clean
hexo generate
hexo deploy
.
git branch newbranch
git branch
git checkout newbranch
git add .
git commit -a
git status
git checkout source
git merge newbranch
git diff
git push -u origin source
git branch -D newbranch
.
git init
git add .
git commit -m "20210423手动push"
git branch -M source
git remote add origin https://github.com/Liuzh25/Liuzh25.github.io.git
git push -u origin source
git push origin source --force
.
git branch -a
git push origin --delete new
安装nodejs
pass
参考:
-
Node.js 中文网
安装hexo
选择准备安装的目录,打开git bash,输入
<span style="color:#333333">//全局安装
<span style="color:#3300aa">npm</span> install <span style="color:#0000cc">-g</span> hexo-cli
//查看一下版本
hexo <span style="color:#0000cc">-v</span>
//初始化hexo, 即创建<span style="color:#aa1111">"myblog"</span>文件夹并添加相关文件
hexo init myblog//创建文件夹
<span style="color:#3300aa">cd</span> myblog //进入这个myblog文件夹
<span style="color:#3300aa">npm</span> install//添加相关文件
hexo g//生成文件
hexo s//本地浏览</span>打开hexo的服务,在浏览器输入localhost:4000就可以看到你生成的博客了。
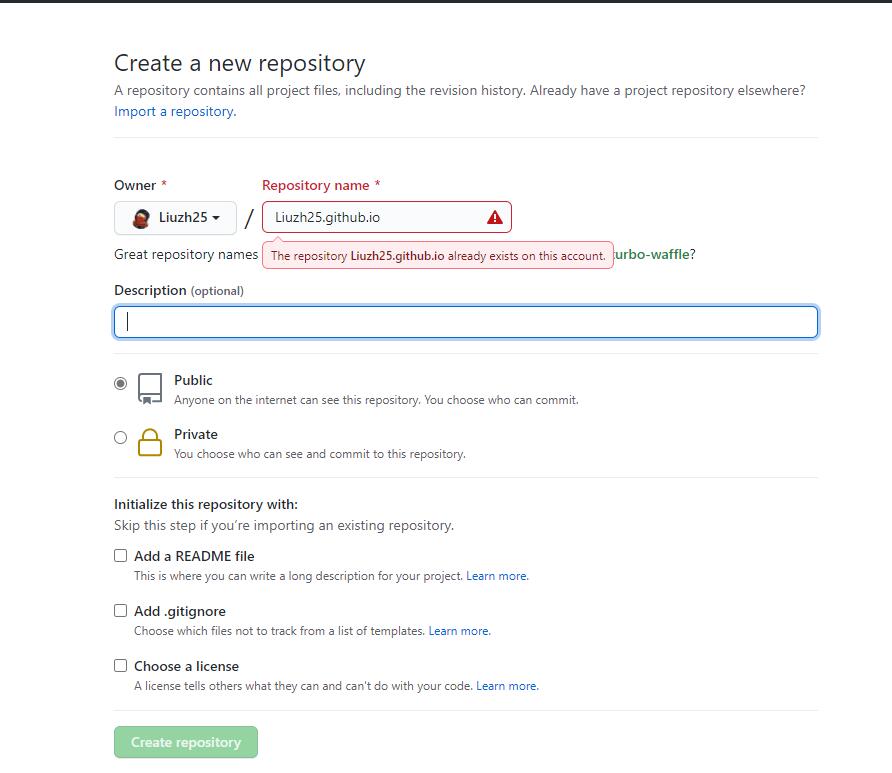
GitHub创建个人仓库
创建一个和你用户名相同的仓库,后面加.github.io,只有这样,将来要部署到GitHub page的时候,才会被识别.
生成SSH添加到GitHub
ssh,简单来讲,就是一个秘钥,其中,id_rsa是你这台电脑的私人秘钥,不能给别人看的,id_rsa.pub是公共秘钥,可以随便给别人看。把这个公钥放在GitHub上,这样当你链接GitHub自己的账户时,它就会根据公钥匹配你的私钥,当能够相互匹配时,才能够顺利的通过git上传你的文件到GitHub上。
打开git bash,输入
<span style="color:#333333"><span style="color:#3300aa">git</span> config <span style="color:#0000cc">--global</span> user.name <span style="color:#aa1111">"yourname"</span>
<span style="color:#3300aa">git</span> config <span style="color:#0000cc">--global</span> user.email <span style="color:#aa1111">"youremail"</span></span>
这里的yourname输入你的GitHub用户名,youremail输入你GitHub的邮箱。这样GitHub才能知道你是不是对应它的账户。
检查一下你有没有输对
<span style="color:#333333"><span style="color:#3300aa">git</span> config user.name
<span style="color:#3300aa">git</span> config user.email</span>
创建SSH,一路回车即可
<span style="color:#333333">ssh-keygen <span style="color:#0000cc">-t</span> rsa <span style="color:#0000cc">-C</span> <span style="color:#aa1111">"youremail"</span></span>打开C:Users用户.sshid_rsa.pub, 复制内容
在github的用户设置里,找到SSH and GPG keys,点击New SSH key
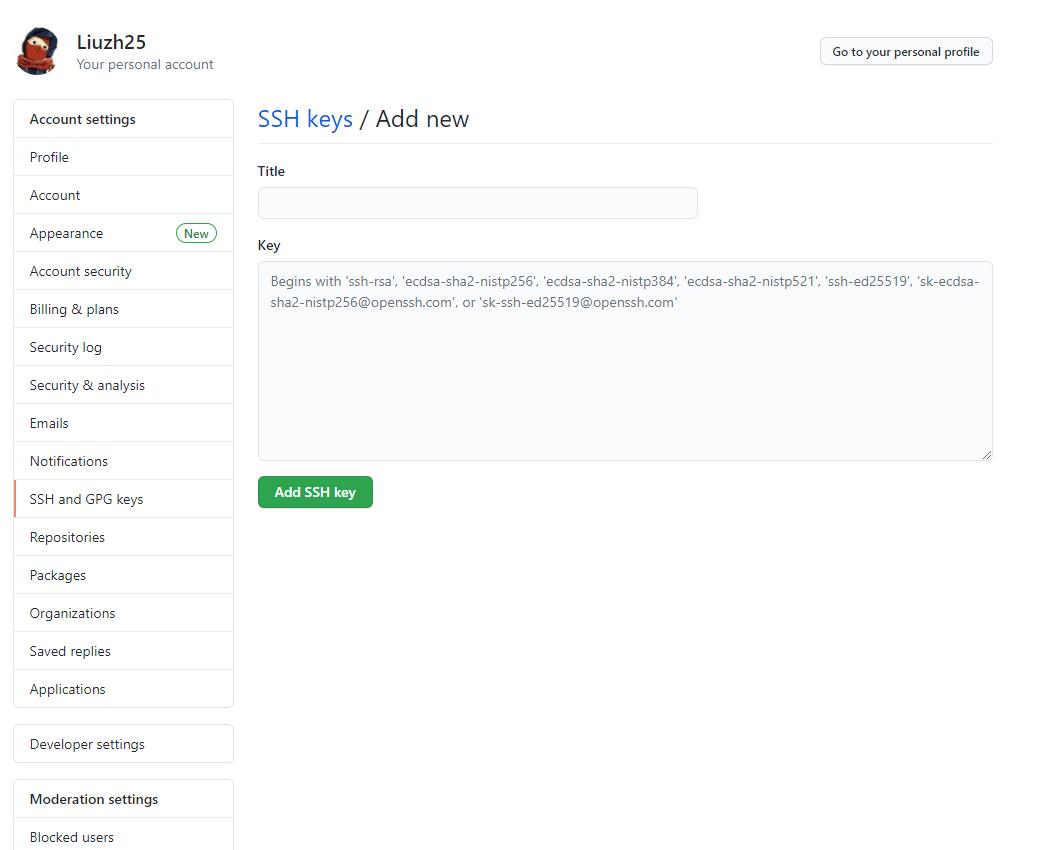
Title随意,将复制内容填入Key,点击New SSH key
查看是否成功
<span style="color:#333333"><span style="color:#3300aa">ssh</span> <span style="color:#0000cc">-T</span> <span style="color:#3300aa">git</span>@github.com</span>参考:
-
hexo史上最全搭建教程Fangzh的技术博客-CSDN博客hexo
将hexo部署到GitHub
打开myblog文件夹下的站点配置文件_config.yml
找到代码并修改
<span style="color:#333333"><span style="color:#221199">deploy</span><span style="color:#555555">:</span>
<span style="color:#221199">  type</span><span style="color:#555555">: </span>git
<span style="color:#221199">  repo</span><span style="color:#555555">: </span>https<span style="color:#555555">:</span>//github.com/YourgithubName/YourgithubName.github.io.git
<span style="color:#221199">  branch</span><span style="color:#555555">: </span>master</span>
repo: 仓库名,可直接在你创建的仓库复制,有三种,复制后粘贴即可
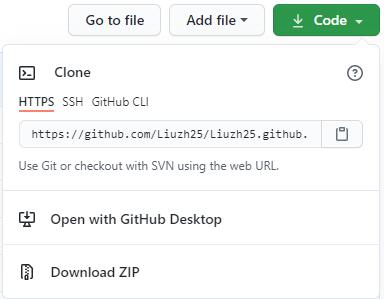
branch:准备部署的分支,一般使用main,可随意填写
如下为我的配置
<span style="color:#333333"><span style="color:#aa5500"># Deployment</span>
<span style="color:#aa5500">## Docs: https://hexo.io/docs/one-command-deployment</span>
<span style="color:#221199">deploy</span><span style="color:#555555">:</span>
<span style="color:#221199">  type</span><span style="color:#555555">: </span>git
<span style="color:#221199">  repo</span><span style="color:#555555">: </span>git@github.com<span style="color:#555555">:</span>Liuzh25/Liuzh25.github.io.git,main</span>
安装deploy-git ,也就是部署的命令,这样你才能用命令部署到GitHub
<span style="color:#333333"><span style="color:#3300aa">npm</span> install hexo-deployer-git <span style="color:#0000cc">--save</span></span>部署命令
<span style="color:#333333">hexo clean
hexo generate
hexo deploy</span>
其中 hexo clean清除了你之前生成的东西,也可以不加。 hexo generate 顾名思义,生成静态文章,可以用 hexo g缩写 hexo deploy 部署文章,可以用hexo d缩写
注意第一次deploy时可能要你输入username和password。
等待
进入 http://yourname.github.io ,如果显示为空白,而不是404,说明你已经部署成功,请等待1-4小时
设置个人域名(了解)
注册一个阿里云账户,在阿里云上买一个域名
实名认证
在域名控制台点解析进去
添加如下

即将www.jxxb.top和jxxb.top均指向yourname.github.io
不推荐指向IP地址
然后,修改github仓库设置如下
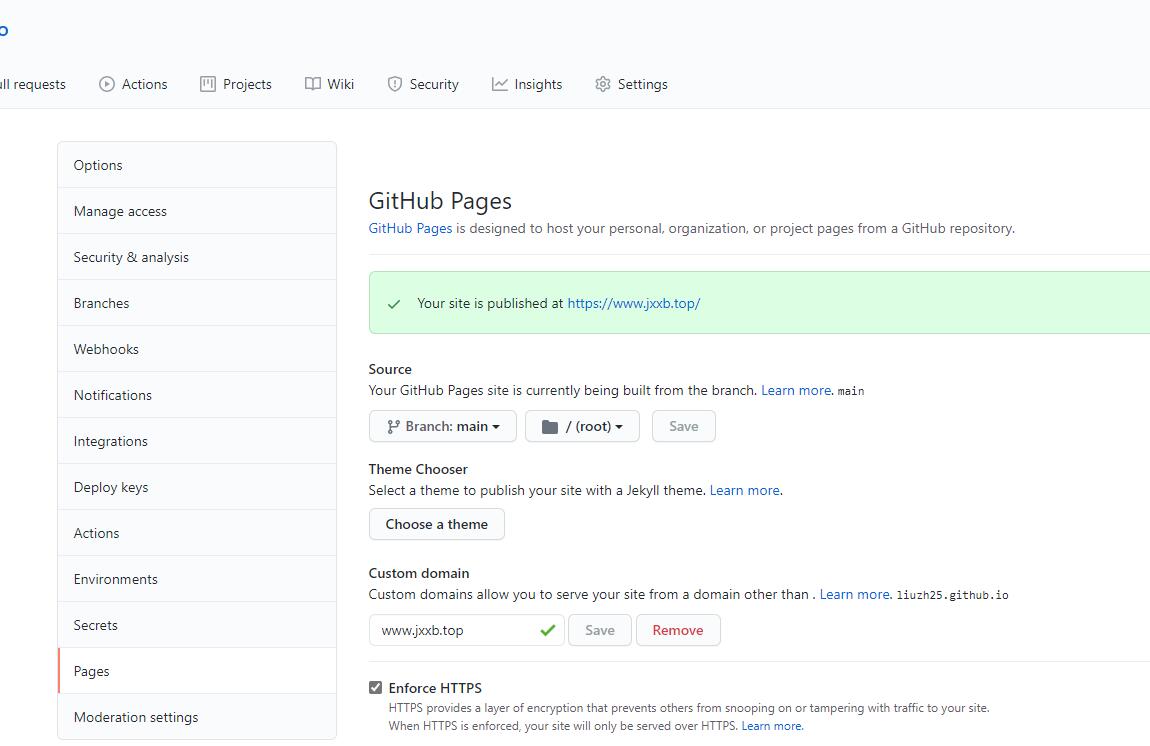
最后一步
<span style="color:#333333">hexo clean
hexo g
hexo d</span>
写文章
Hexo支持makedown语言,这是一种轻量级的标记语言,类似于html,为你的文章添加文字格式及图片,音频,链接等,文件名后缀.md
语法可在Markdown 中文网或者Markdown 教程 | 菜鸟教程查看
推荐使用Typora文本编辑器
在git bash输入下列代码
<span style="color:#333333">hexo new abc</span>即在myblogsource_posts文件夹下创建abc.md文件并预先输入信息
使用文本编辑器或者记事本打开编辑即可
编辑完毕,部署至网页
<span style="color:#333333">hexo clean
hexo g
hexo d</span>
参考:
-
Markdown 中文网
-
Typora官网
安装NexT
安装「主题」
在 /myblog 启动Git bash
<span style="color:#333333">git clone https://github.com/theme-next/hexo-theme-next themes/next</span>
启用「主题」
编辑 站点配置文件 _config.yml (位于根目录)
<span style="color:#333333">theme: next</span>将Hexo 站点配置文件(/_config.yml)与 NexT主题配置文件(/themes/next/_config.yml)备份
将主题配置文件独立出来
hexo-next的更新不够人性化,且 Hexo 站点配置文件(/_config.yml)与 NexT主题配置文件(/themes/next/_config.yml)的割裂使得配置时体验也不算太好
因此现在有四种配置方法,参考官方文档DATA-FILES.md
-
直接在Hexo 站点配置文件和NexT主题配置文件内编写
优点: 当在本地预览(
hexo s)时,更改后可实时查看,不需要再操作git bash(退出本地预览并再次进入) -
NexT主题配置文件内
override: false(默认),从站点配置文件和主题配置文件中复制你需要更改的条目至/myblog/source/_data/next.yml,如果没有就新建,通常是没有的.缺点: 某些插件只能从站点配置文件读取选项
-
NexT主题配置文件内
override: false改为true,将主题配置文件中全部内容复制到next.yml,在Hexo 站点配置文件和next.yml内编写 -
确认
next.yml文件不存在,存在要删除或改名,然后将站点配置文件和主题配置文件中复制的你需要更改的条目,即方法2的内容向右移两个空格,在这些参数最上方添加一行theme_config:,放置于站点配置文件末尾.如下# Deployment ## Docs: https://hexo.io/docs/one-command-deployment deploy: type: git repo: git@github.com:Liuzh25/Liuzh25.github.io.git,main theme_config: # 自定义文件 custom_file_path: #head: source/_data/head.swig #header: source/_data/header.swig #sidebar: source/_data/sidebar.swig #postMeta: source/_data/post-meta.swig #postBodyEnd: source/_data/post-body-end.swig #footer: source/_data/footer.swig #bodyEnd: source/_data/body-end.swig #variable: source/_data/variables.styl #mixin: source/_data/mixins.styl style: source/_data/styles.styl # --------------------------------------------------------------- # 网站信息设置 # --------------------------------------------------------------- # 头像 favicon: small: /uploads/favicon-16x16-next.png medium: /uploads/favicon-32x32-next.png推荐使用方法2或4,这里我使用的方法2,并且只将主题配置文件复制到
next.yml
参考:
-
hexo-theme-next/DATA-FILES.md at master · theme-next/hexo-theme-next
编辑站点配置文件
编辑下列代码如下所示
<span style="color:#333333"># Site
title: 机械细胞
subtitle: 三十功名尘与土,八千里路云和月
description: 三十功名尘与土,八千里路云和月
keywords: 个人,博客
author: 谨礼
language: zh-CN
timezone: Asia/Shanghai

# URL
## Set your site url here. For example, if you use GitHub Page, set url as 'https://username.github.io/project'
url: https://www.jxxb.top</span>
参考:
-
Hexo+NexT(二):Hexo站点配置详解_Guide2IT-CSDN博客
-
hexo config.yml站点配置文件说明猫狗记-CSDN博客
博客个性化初试
GitHub Corners「图标角」
粘贴代码到themes/next/layout/_layout.swig文件中(放在<div class="headband"></div>的下面),并把href改为你的github地址,将style="fill:#151513; color:#fff改为你喜欢的颜色.
最新版本NexT主题支持GitHub Corners
编辑 主题配置文件 _config.yml(复制到next.yml,方法2)
<span style="color:#333333"># GitHub corner.
github_banner:
  enable: true
  permalink: https://github.com/Liuzh25
  title: 欢迎访问我的GitHub主页</span>
编辑后发现在网页右上角,且颜色为黑白色,准备更改
按F12后如下图
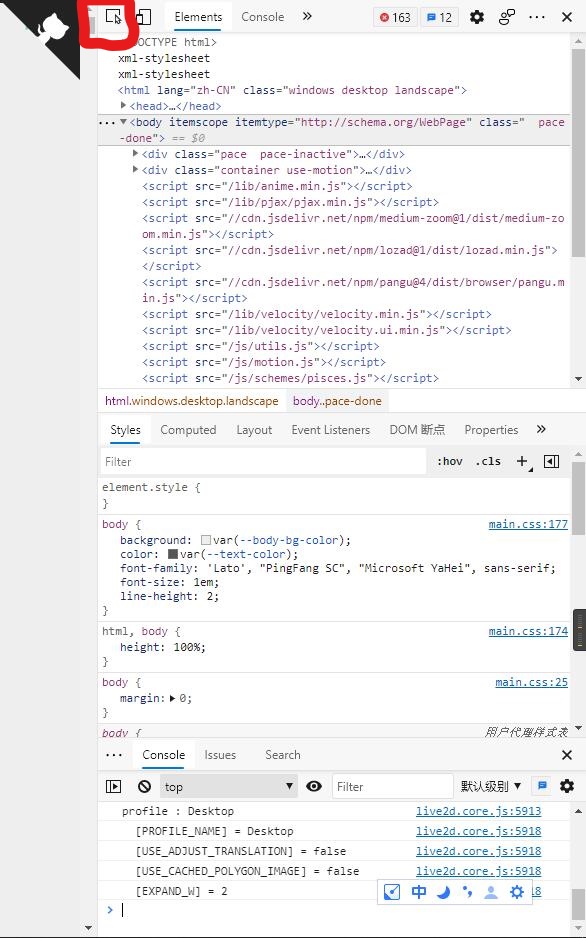
用红圈内按键指向GitHub Corners,显示如下
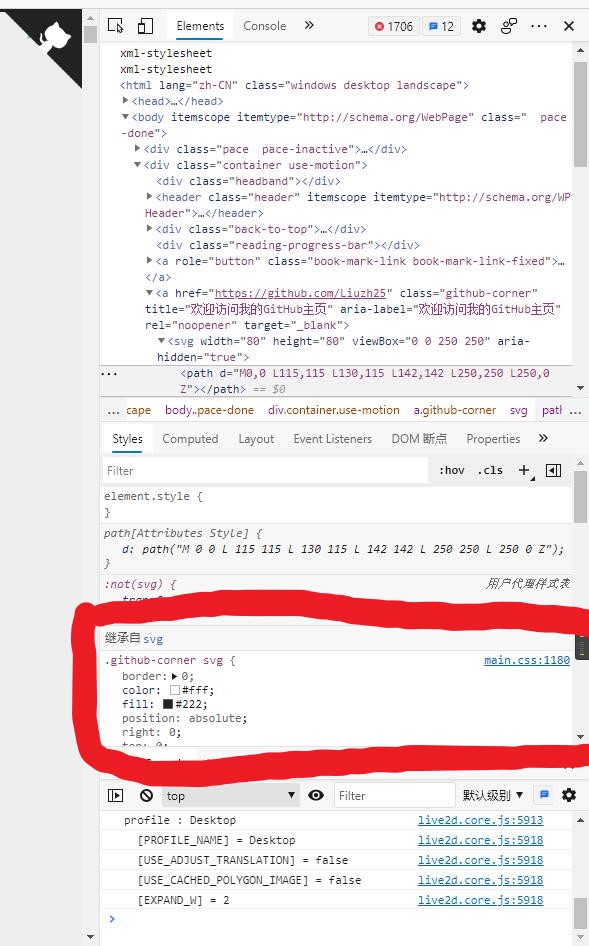
点击mian.css:1180,打开mian.css,复制如下代码
<span style="color:#333333">.github-corner svg {
  border: 0;
  color: #fff;
  fill: #222;
  position: absolute;
  right: 0;
  top: 0;
  z-index: 1000;
}</span>
打开GitHub Corners (tholman.com),对比代码,会发现右边和左边的区别是
<span style="color:#333333">- right: 0;
+ left: 0;
+ transform: scale(-1, 1);</span>编辑/myblog/source/_data/styles.styl文件添加下列代码
<span style="color:#333333">.github-corner svg {
  border: 0;
  color: #fff;
  fill: #FD6C6C;
  position: absolute;
  left: 0;
  transform: scale(-1, 1);
  top: 0;
  z-index: 1000;
}</span>将主题配置文件内style代码注释#去掉.(复制到next.yml,方法2)
<span style="color:#333333">custom_file_path:
  #head: source/_data/head.swig
  #header: source/_data/header.swig
  #sidebar: source/_data/sidebar.swig
  #postMeta: source/_data/post-meta.swig
  #postBodyEnd: source/_data/post-body-end.swig
  #footer: source/_data/footer.swig
  #bodyEnd: source/_data/body-end.swig
  #variable: source/_data/variables.styl
  #mixin: source/_data/mixins.styl
  style: source/_data/styles.styl</span>


参考:
-
GitHub Corners (tholman.com)
-
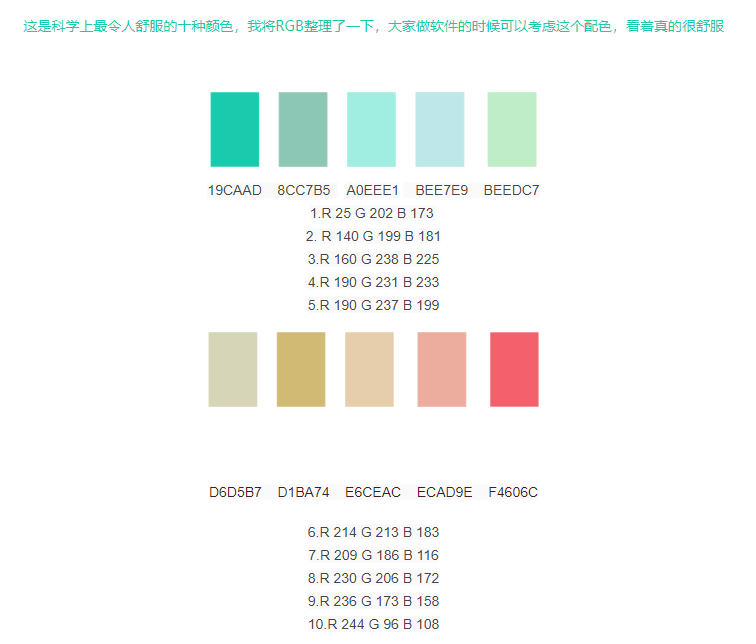
科学上最令人舒服的十种颜色(RGB)
-
Color Hex Color Codes
图标角延伸知识
使用F12找到对应的css文件,并在/_data/styles.styl文件内重写,用于个性化自己的网站
参考:
-
基于Hexo搭建个人博客——进阶篇(从入门到入土) | ookamiAntD's Blog
编辑NexT主题配置文件
设置「网站标签图标」和「页脚」
在/myblog/source下创建文件夹,将16x16及32x32的任意图像格式文件放入,并在代码内填写路径
亦可以使用链接
图标的使用方法请阅读下一条
编辑 主题配置文件 _config.yml(复制到next.yml,方法2)
<span style="color:#333333"># ---------------------------------------------------------------
# 网站信息设置
# ---------------------------------------------------------------

# 头像
favicon:
  small: /uploads/favicon-16x16-next.png
  medium: /uploads/favicon-32x32-next.png
  #apple_touch_icon: /images/apple-touch-icon-next.png
  #safari_pinned_tab: /images/logo.svg
  #android_manifest: /images/manifest.json
  #ms_browserconfig: /images/browserconfig.xml

# 页脚
footer:
  # 指定网站设置的日期,如果没有定义,则使用当前时间.
  since: 2021

  # 图标,位于时间和版权信息之间.
  icon:
    name: fab fa-ravelry
    # 如果你想要动画图标,设置它为true.
    animated: true
    # 改变图标的颜色,使用十六进制代码.
    color: "#dada1"
  # 如果没有定义,将在Hexo主配置中使用' author '.
  copyright: 机械细胞

  # 控制(由 Hexo 强力驱动)是否显示
  powered: false

#版权信息
creative_commons:
  license: by-nc-sa
  sidebar: true
  post: true
  language: deed.zh</span>
图标的选用
NexT 默认使用 Font Awesome 库作为 icon 库,美中不足的是,有一些中国的社交网站的图标在 Font Awesome 库中并没有提供,包括我们熟悉的哔哩哔哩、豆瓣、简书等等。所以如果想使用这些图标,就需要我们使用本地图标进行手动添加。
首先,在 阿里巴巴矢量图标库 之类的网站找到你需要的图标,下载 SVG 格式文件。在/myblog/source新建文件夹,并放入.
编辑 source/_data/styles.styl文件,编辑代码
示例代码
.fa-ravelry {
  background: url(iconfont/ravelry.svg);
  background-position: 50% 75%;
  background-repeat: no-repeat;
  height: 1rem;
  width: 1rem;
}
//
.fa-home{
  background: url(/iconfont/home-orange.svg);
  background-position: 50% 75%;
  background-repeat: no-repeat;
  height: 1rem;
  width: 1rem;
}
//
.fa-about{
  background: url(/iconfont/about-purple.svg);
  background-position: 50% 75%;
  background-repeat: no-repeat;
  height: 1rem;
  width: 1rem;
}
//
.fa-commonweal{
  background: url(/iconfont/commonweal-green.svg);
  background-position: 50% 75%;
  background-repeat: no-repeat;
  height: 1rem;
  width: 1rem;
}
//
.fa-archive{
  background: url(/iconfont/archive-blue.svg);
  background-position: 50% 75%;
  background-repeat: no-repeat;
  height: 1rem;
  width: 1rem;
}
//
.fa-tags{
  background: url(/iconfont/tags.svg);
  background-position: 50% 75%;
  background-repeat: no-repeat;
  height: 1rem;
  width: 1rem;
}
//
.fa-categories{
  background: url(/iconfont/categories.svg);
  background-position: 50% 75%;
  background-repeat: no-repeat;
  height: 1rem;
  width: 1rem;
}
//
.fa-github{
  background: url(/iconfont/github.svg);
  background-position: 50% 75%;
  background-repeat: no-repeat;
  height: 1rem;
  width: 1rem;
}
//
.fa-email{
  background: url(/iconfont/email.svg);
  background-position: 50% 75%;
  background-repeat: no-repeat;
  height: 1rem;
  width: 1rem;
}
//
.fa-qq{
  background: url(/iconfont/qq.svg);
  background-position: 50% 75%;
  background-repeat: no-repeat;
  height: 1rem;
  width: 1rem;
}
//
.fa-baidu{
  background: url(/iconfont/baidu.svg);
  background-position: 50% 75%;
  background-repeat: no-repeat;
  height: 1rem;
  width: 1rem;
}
//
.fa-qqduihua{
  background: url(/iconfont/qqduihua.svg);
  background-position: 50% 75%;
  background-repeat: no-repeat;
  height: 1rem;
  width: 1rem;
}
//
.fa-zhihu{
  background: url(/iconfont/zhihu.svg);
  background-position: 50% 75%;
  background-repeat: no-repeat;
  height: 1rem;
  width: 1rem;
}
//
.fa-bilibili{
  background: url(/iconfont/bilibili.svg);
  background-position: 50% 75%;
  background-repeat: no-repeat;
  height: 1rem;
  width: 1rem;
}
//
.fa-csdn{
  background: url(/iconfont/csdn.svg);
  background-position: 50% 75%;
  background-repeat: no-repeat;
  height: 1rem;
  width: 1rem;
}
//
.fa-gitee{
  background: url(/iconfont/gitee.svg);
  background-position: 50% 75%;
  background-repeat: no-repeat;
  height: 1rem;
  width: 1rem;
}
//
.fa-leetcode{
  background: url(/iconfont/leetcode.svg);
  background-position: 50% 75%;
  background-repeat: no-repeat;
  height: 1rem;
  width: 1rem;
}
//
.fa-link{
  background: url(/iconfont/link.svg);
  background-position: 50% 75%;
  background-repeat: no-repeat;
  height: 1rem;
  width: 1rem;
}
//
.fa-video{
  background: url(/iconfont/video.svg);
  background-position: 50% 75%;
  background-repeat: no-repeat;
  height: 1rem;
  width: 1rem;
}
//
.fa-music{
  background: url(/iconfont/music.svg);
  background-position: 50% 75%;
  background-repeat: no-repeat;
  height: 1rem;
  width: 1rem;
}
//
.fa-photo{
  background: url(/iconfont/photo.svg);
  background-position: 50% 75%;
  background-repeat: no-repeat;
  height: 1rem;
  width: 1rem;
}
//
.fa-book{
  background: url(/iconfont/book.svg);
  background-position: 50% 75%;
  background-repeat: no-repeat;
  height: 1rem;
  width: 1rem;
}将主题配置文件内custom_file_path:style代码注释#去掉.(如果你之前没有这么做)
最后一步,引用.
<span style="color:#333333">name: fab fa-ravelry</span>Font Awesome 的图标引用方式有fa,fab,fad,far,fal等,每种类型可能有相应图标,也可能没有所以如果出现图标叠加,请换引用方式或者图标名,推荐更改图标名.fa-xxx,其中,fa-不能省略,可能出错,我暂时不会改
参考:
-
阿里巴巴矢量图标库
-
Hexo + NexT 通过自定义样式添加 Bilibili 图标_R先生一天不学习就浑身难受-CSDN博客
-
Hexo博客之优雅使用阿里iconfont图标_小康博客-CSDN博客
-
Hexo-使用阿里iconfont图标
设置「布局风格」
编辑 主题配置文件 _config.yml(复制到next.yml,方法2)
将你需用启用的scheme前面注释 # 去除即可。
<span style="color:#333333"># ---------------------------------------------------------------
# 布局设置
# ---------------------------------------------------------------

# 布局
#scheme: Muse
#scheme: Mist
#scheme: Pisces
scheme: Gemini</span>
添加「菜单项」
fab后面的图标是我自己下载并添加的,参考条目8
badges控制的是归档,标签,分类旁边是否显示统计数
若要添加自定义菜单项,直接插入,并在/themes/next/languages/zh_CN中添加对应代码
编辑 主题配置文件 _config.yml(复制到next.yml,方法2)
<span style="color:#333333"># ---------------------------------------------------------------
# 菜单设置
# ---------------------------------------------------------------

# 菜单
# 格式: `Key: /link/ || icon`
menu:
  home: / || fab fa-home
  tags: /tags/ || fab fa-tags
  categories: /categories/ || fab fa-categories
  archives: /archives/ || fab fa-archive
  videos: /videos/ || fab fa-video
  music: /music/ || fab fa-music
  photos: /photos/ || fab fa-photo
  books: /videos/ || fab fa-book
  #schedule: /schedule/ || fab fa-calendar
  #sitemap: /sitemap.xml || fab fa-sitemap
  commonweal: /404/ || fab fa-commonweal
  about: /about/ || fab fa-about

# 启用/禁用菜单图标/项目徽章.
menu_settings:
  icons: true
badges: true</span>编辑zh-CN.yml
<span style="color:#333333">menu:
  home: 首页
  archives: 归档
  categories: 分类
  tags: 标签
  music: 音乐
  videos: 视频
  books: 图书
  photos: 照片
  about: 关于
  search: 搜索
  schedule: 日程表
  sitemap: 站点地图
  commonweal: 公益 404</span>
设置「侧栏」
-
侧栏位置
-
侧栏头像
-
添加社交链接
-
添加友链
-
侧边栏目录设置
编辑 主题配置文件 _config.yml(复制到next.yml,方法2)
<span style="color:#333333"># ---------------------------------------------------------------
# 侧边栏设置
# ---------------------------------------------------------------

sidebar:
  # 侧栏位置.
  position: left
  #position: right

  # 自定义侧栏宽度,默认如下:Muse | Mist: 320  Pisces | Gemini: 240
  #width: 300

  # 侧栏顶部填充像素.
  padding: 18
  # 侧栏与菜单栏和文档的像素偏移
  offset: 12

# 侧栏头像
avatar:
  url: /uploads/avatar.jpeg
  # 头像显示圆形.
  rounded: true
  # 鼠标放置时头像旋转.
  rotated: true

# 日志/分类/标签在侧边栏.
site_state: false

# 社交链接
# 格式: `关键字: 链接 || 图标名`
social:
  GitHub: https://github.com/Liuzh25 || fa fa-github
  E-Mail: 786189861@qq.com || fa fa-email
  QQ: tencent://message/?uin=1095652242 || fa fa-qq
  QQ对话: tencent://Message/?Uin=786189861&websiteName=www.oicqzone.com&Menu=yes || fa fa-qqduihua
  CSDN: https://blog.csdn.net/qq_37828104 || fa fa-csdn
  码云: https://gitee.com/Liuzh25 || fab fa-gitee
  力扣: https://leetcode-cn.com/u/liuzh25/ || fab fa-leetcode
  哔哩哔哩: https://space.bilibili.com/500942397 || fab fa-bilibili
  知乎: https://www.zhihu.com/people/jin-li-22-85 || fa fa-zhihu
  百度: http://www.baidu.com || fab fa-baidu

# `enable` 控制是否显示图标 ,`icons_only` 控制是否隐藏关键字, `transition` 暂时不懂.
social_icons:
  enable: true
  icons_only: false
  transition: false

# 友情链接
links_settings:
  icon: fab fa-link
  title: 友情链接
  # 链接排列方式
  #layout: block
  layout: inline

links:
  野生程序员: http://www.yscxy.net/
  又见苍岚: https://www.zywvvd.com/
  小丁的个人博客: https://tding.top/
  Moorez: http://shenzekun.cn/
  橘子味雪糕: https://www.liuxianl.com/

# 侧边栏目录
toc:
  enable: fasle
  # 自动添加列表号到toc.
  number: false
  # 标题过长换行.
  wrap: false
  # 所有目录全部显示.
  expand_all: false
  # 最大标题深度.
  max_depth: 6</span>
最后
以上就是内向睫毛最近收集整理的关于Hexo-Next 博客搭建 Hexo 博客搭建安装NexT博客个性化初试编辑NexT主题配置文件博客配置进阶参考问题的全部内容,更多相关Hexo-Next内容请搜索靠谱客的其他文章。
![[Java实战]Squaretest单元测试生成利器...一天生成所有简单单元测试...[新手开箱可用]](https://www.shuijiaxian.com/files_image/reation/bcimg5.png)


发表评论 取消回复