版权声明:authored by zzubqh https://blog.csdn.net/qq_36810544/article/details/81094469
均匀流形近似和投影(UMAP/uniform manifold approximation and projection)一种类似于t-SNE的数据降维算法,至于算法思想那是另外一篇文章了,这里只说怎么使用和如何做预测。
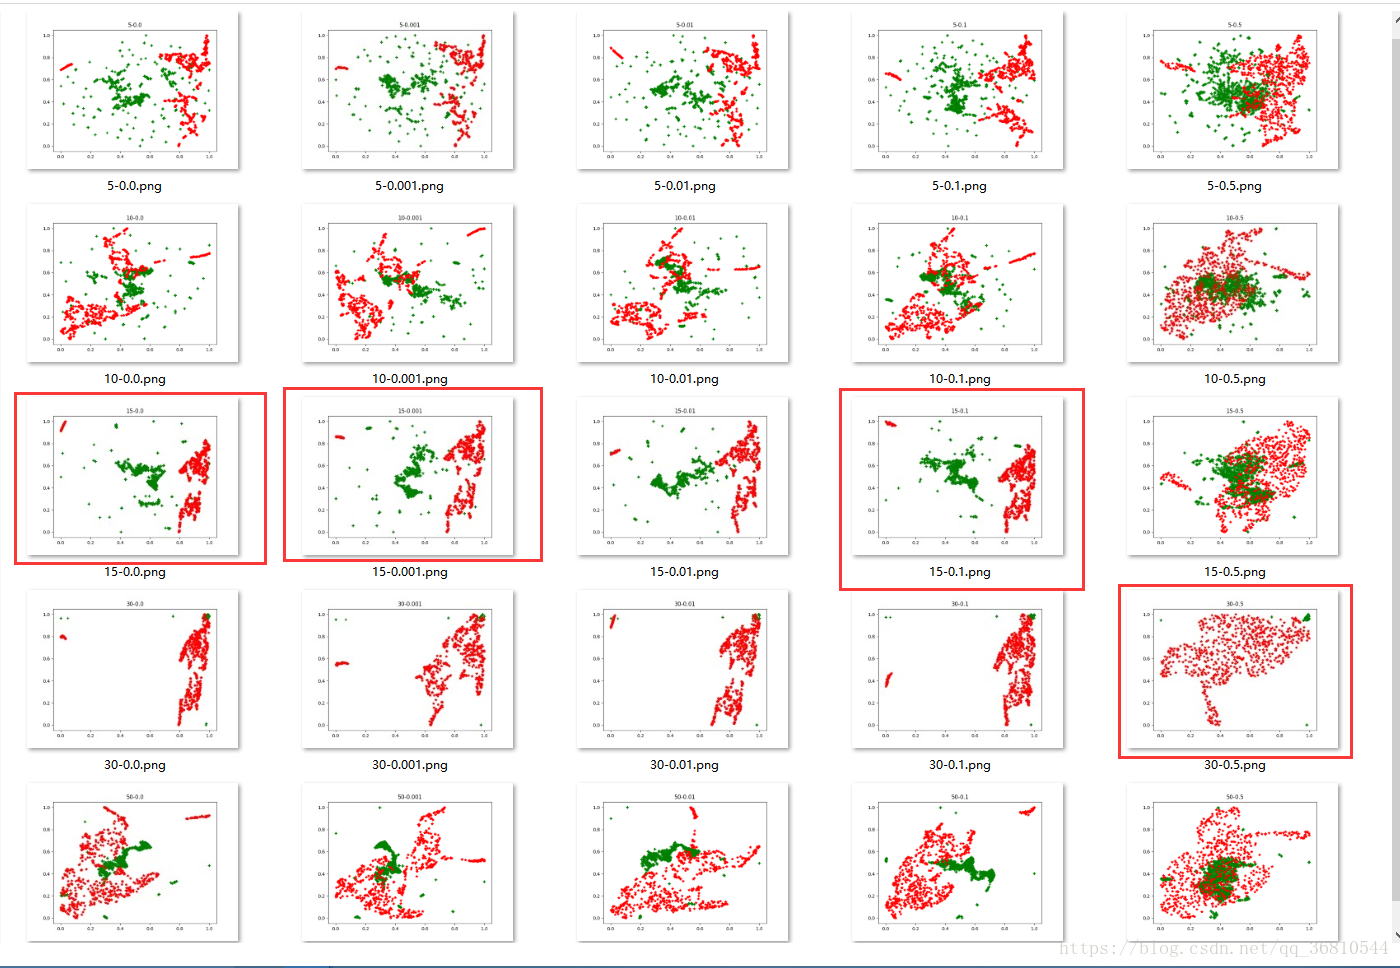
t-SNE和UMAP应该说是目前最好的降维算法了,能最大程度的保留原始数据的特征同时大幅度的降低特征维数,但是有个问题就是,使用UMAP或tSNE算法更倾向于观察原始数据降维后的分布,没法做预测,就是对于新的单条测试数据就没法直接使用UMAP使其特征维数降到指定的维数了!下面是我使用UMAP对一个3300 * 72的数据集的降维结果,可以明显的看到在邻居数取15,距离取0,0.001,0.1的时候 两类已经很明显的分开了,所以使用UMAP特征作为分类依据是可行的。

UMAP处理代码:
import umap
def show_umap(self):
nomale_features, abnomale_features = self.load_feature()
neighbours = [5, 10, 15, 30, 50]
distances = [0.000, 0.001, 0.01, 0.1, 0.5]
for neighbour in neighbours:
for dis in distances:
title = str(neighbour) + '-' + str(dis)
self.show_umap_item(nomale_features, abnomale_features, neighbour, dis, title)
def show_umap_item(self, nomale_features, abnomale_features, nneighbor, distance, title):
embedding_nomal = self.get_scaled_umap_embeddings(np.array(nomale_features), nneighbor, distance)
embedding_abnomal = self.get_scaled_umap_embeddings(np.array(abnomale_features), nneighbor, distance)
plt.figure()
plt.plot(embedding_nomal.T[0], embedding_nomal.T[1], 'g+')
plt.plot(embedding_abnomal.T[0], embedding_abnomal.T[1], 'r*')
plt.title(title)
png_path = os.path.join(self.feature_dir_path + r'umap_featuredisplay', title + '.png')
plt.savefig(png_path)
def get_scaled_umap_embeddings(self, features, neighbour, distance):
umap_model = umap.UMAP(n_neighbors=neighbour,
min_dist=distance,
metric='correlation',
verbose=True)
embedding = umap_model.fit_transform(features)
scaler = MinMaxScaler()
scaler.fit(embedding)
return scaler.transform(embedding)
辣么重点来了,如果有新数据来了,如何使用UMAP降维呢?这里使用ANN做umap的编码器,其实本质就是做了一个非线性的函数回归,拟合一个从72d数据到2d数据的非线性函数。取neighbour = 30,distance = 0.1 计算数据集在umap算法下的映射,得到一个只有2d特征的数据集,令X为原始数据,Y为映射后的数据,则训练一个ANN使得输出是拟合umaps算法下的结果。
# -*- coding: utf-8 -*-
#-------------------------------------------------------------------------------
# Name: EmbeddingHelper
# Purpose: 创建UMPA回归网络,提供数据降维
#
# Author: BQH
#
# Created: 2018-07-12
# Copyright: (c) Administrator 2018
# Licence: <your licence>
#-------------------------------------------------------------------------------
import random
import tensorflow as tf
import numpy as np
keep_prob = tf.placeholder(tf.float32)
hidden1_size = 128
hidden2_size = 64
learning_rate=0.001
input_size = 72
output_size = 2
X = tf.placeholder(tf.float32, shape=(None, input_size))
Y = tf.placeholder(tf.float32, shape=(None, output_size))
def ann_net(w_alpha=0.01, b_alpha=0.1):
# 隐藏层_1
w_1 = tf.Variable(w_alpha * tf.random_normal(shape=(input_size, hidden1_size)))
b_1 = tf.Variable(b_alpha * tf.random_normal(shape=[hidden1_size]))
hidden1_output = tf.nn.tanh(tf.add(tf.matmul(X, w_1), b_1))
hidden1_output = tf.nn.dropout(hidden1_output, keep_prob)
# 隐藏层_2
shp = hidden1_output.get_shape()
w_2 = tf.Variable(w_alpha * tf.random_normal(shape=(shp[1].value, hidden2_size)))
b_2 = tf.Variable(b_alpha * tf.random_normal(shape=[hidden2_size]))
hidden2_output = tf.nn.tanh(tf.add(tf.matmul(hidden1_output, w_2), b_2))
hidden2_output = tf.nn.dropout(hidden2_output, keep_prob)
# 输出层
shp = hidden2_output.get_shape()
w_output = tf.Variable(w_alpha * tf.random_normal(shape=(shp[1].value, output_size)))
b_output = tf.Variable(b_alpha * tf.random_normal(shape=[output_size]))
output = tf.nn.tanh(tf.add(tf.matmul(hidden2_output, w_output), b_output))
return output
# 训练自编码器
# 输入:原始特征数据
# 目标:已训练好的umap/tsne模型数据
def fit(feature, umap_data):
output = ann_net()
loss = tf.reduce_mean(tf.pow(tf.subtract(output, Y), 2))
optimizer = tf.train.GradientDescentOptimizer(learning_rate = learning_rate).minimize(loss)
with tf.device('/cpu:0'):
saver = tf.train.Saver()
with tf.Session(config=tf.ConfigProto(device_count={'cpu':0})) as sess:
sess.run(tf.global_variables_initializer())
step = 0
ckpt = tf.train.get_checkpoint_state('models/')
if ckpt and ckpt.model_checkpoint_path:
saver.restore(sess, ckpt.model_checkpoint_path)
print("Model restored.")
while True:
batch_x, batch_y = get_next_batch(feature, umap_data)
_, loss_ = sess.run([optimizer, loss], feed_dict={X: batch_x, Y: batch_y, keep_prob: 0.75 })
if step % 500 == 0:
print("第%s步,loss = %s" %(step, loss_))
# 每1000 step计算一次准确率
if step % 1000 == 0 and step != 0:
batch_x_test, batch_y_test = get_next_batch(mfcc_feature, umap_data, 64)
correct_pred = tf.subtract(output, Y)
predict = sess.run(correct_pred, feed_dict={X: batch_x_test, Y: batch_y_test, keep_prob: 1.})
acc = np.sum([1 if item[0] < 0.01 and item[1] < 0.01 else 0 for item in predict])
acc = acc / len(batch_y_test)
print("第{0}步,训练准确率为:{1}%".format(step, acc * 100))
if loss_ < 0.005:
saver.save(sess, "models/umap_embedding.model", global_step=step)
break
if step % 10000 == 0:
saver.save(sess, "models/umap_embedding.model", global_step=step)
step += 1
def get_next_batch(feature, umap_data, batch_size=128):
index = []
for i in range(batch_size):
index.append(random.randint(0, umap_data.shape[0] - 1))
batch_x = [feature[i] for i in index]
batch_y = [umap_data[i] for i in index]
return batch_x, batch_y
# 输入:数据的原始特征,size: n x 72
# 输出:umap降维后数据,size: n x 2
def transform(input_data):
output = ann_net()
with tf.device('/cpu:0'):
saver = tf.train.Saver()
with tf.Session(config=tf.ConfigProto(device_count={'cpu': 0})) as sess:
sess.run(tf.global_variables_initializer())
ckpt = tf.train.get_checkpoint_state('models/')
if ckpt and ckpt.model_checkpoint_path:
saver.restore(sess, ckpt.model_checkpoint_path)
print("Model restored.")
predict = sess.run(output,feed_dict={X:input_data,keep_prob: 1.})
return predict
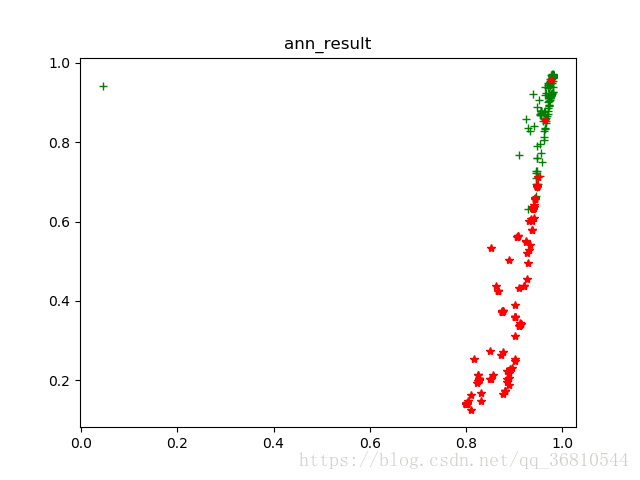
训练结束后,使用测试集的数据经过ANN降维后做图:

与第一张里的 n =30 ,dis =0.1比较,模式一样,证明ANN已经很好的拟合了umap,但是如果用这个结果分类就有点困难了,分类的话还是得用第一张里框出来的那几张图的参数效果会好很多,这个仅仅是做个ANN的测试
最后
以上就是会撒娇巨人最近收集整理的关于UMAP全连接神经网络做编码器的全部内容,更多相关UMAP全连接神经网络做编码器内容请搜索靠谱客的其他文章。


发表评论 取消回复