使用Nexus搭建Maven私服(三)-基本属性介绍及本地项目配置上传引用私服
Repositories主要属性及其作用介绍

(1)Reposiroty:仓库名称
(2)Type:仓库类型
-- Hosted Reposiroty:本地仓库类型,一般作为内部项目的发布仓库
-- Proxy Repository:代理仓库,一般用于代理远程仓库,如代理远程的Maven中心仓库
-- Virtual Repository:虚拟仓库
-- Reposiroty Group:仓库组,可以合并上面所有类型仓库,主要用作简化仓库管理
(3)Policy:策略
-- Release:发布仓库,一般用于发布稳定版本的构件
-- Snapshots:资源快照仓库,一般用于发布在开发中相对不稳定的构件
(4)Reposiroty Path:仓库路径
本地项目配置引用私服
手动上传第三方构件到远程仓库(3rd party)
(1)准备测试jar,写一个简单用于计算数独的java项目,并达成jar包,名称为game-sudoku.jar
package cn.game.sudoku;

import java.util.ArrayList;
import java.util.HashSet;
import java.util.List;
import java.util.Set;

public class Sudoku {
	private int[][] arr;

	public int[][] getArr() {
		return arr;
	}

	public void setArr(int[][] arr) {
		this.arr = arr;
	}

	public void computeSudokuSolution() {
		long startTime = System.currentTimeMillis();    //获取开始时间
		Set<Integer> colhs0 = new HashSet<Integer>();
		Set<Integer> colhs1 = new HashSet<Integer>();
		Set<Integer> colhs2 = new HashSet<Integer>();
		Set<Integer> colhs3 = new HashSet<Integer>();
		Set<Integer> colhs4 = new HashSet<Integer>();
		Set<Integer> colhs5 = new HashSet<Integer>();
		Set<Integer> colhs6 = new HashSet<Integer>();
		Set<Integer> colhs7 = new HashSet<Integer>();
		Set<Integer> colhs8 = new HashSet<Integer>();
		List<Set<Integer>> colhsList = new ArrayList<>();
		colhsList.add(colhs0);
		colhsList.add(colhs1);
		colhsList.add(colhs2);
		colhsList.add(colhs3);
		colhsList.add(colhs4);
		colhsList.add(colhs5);
		colhsList.add(colhs6);
		colhsList.add(colhs7);
		colhsList.add(colhs8);
		for(int i = 0;i < arr.length;i++) {
			int col = arr[i].length;
			for(int j = 0;j < col;j++) {
				for(int k = 0;k < col;k++) {
					if(arr[k][j] != 0) {
						colhsList.get(j).add(arr[k][j]);
					}
				}
			}
		}

		List<List<Integer>> tempListList = new ArrayList<List<Integer>>();
		for(int i = 0;i < arr.length;i++) {
			int col = arr[i].length;
			// 设置每行临时数组
			List<Integer> tempList = new ArrayList<Integer>();
			for(int k = 1;k < col + 1;k++) {
				boolean flag = false;
				for(int j = 0;j < col;j++) {
					// 设置行
					if(k == arr[i][j]) {
						flag = true;
					}

				}
				if(!flag) {
					tempList.add(k);
				}
			}
			tempListList.add(tempList);

			// 打印每行临时数组
			//System.out.println(tempList.toString());
			Set<Integer> hs = new HashSet<Integer>();
			for(int j = 0;j < col;j++) {
				if(arr[i][j] != 0) {
					hs.add(arr[i][j]);
				}
			}

			//System.out.println(ConvertString(arr[i]));

		}
		List<int[][]> resAllRowList = new ArrayList<>();
		List<int[][]> resAllRowListTemp = new ArrayList<>();
		boolean breakFlag = false;
		for(int l = 0; l < arr.length;l++) {
			if(breakFlag) {
				break;
			}
			if(resAllRowListTemp != null && resAllRowListTemp.size() > 0) {
				resAllRowList.clear();
				for(int s =0; s < resAllRowListTemp.size(); s++) {
					resAllRowList.add(resAllRowListTemp.get(s));
				}
				if(l == arr.length - 1) {
					breakFlag = true;
				}
				resAllRowListTemp.clear();
			}

			if(resAllRowList != null && resAllRowList.size() > 0) {
				for(int n =0;n < resAllRowList.size(); n++) {
					arr = resAllRowList.get(n).clone();

					colhs0 = new HashSet<Integer>();
					colhs1 = new HashSet<Integer>();
					colhs2 = new HashSet<Integer>();
					colhs3 = new HashSet<Integer>();
					colhs4 = new HashSet<Integer>();
					colhs5 = new HashSet<Integer>();
					colhs6 = new HashSet<Integer>();
					colhs7 = new HashSet<Integer>();
					colhs8 = new HashSet<Integer>();
					colhsList = new ArrayList<>();
					colhsList.add(colhs0);
					colhsList.add(colhs1);
					colhsList.add(colhs2);
					colhsList.add(colhs3);
					colhsList.add(colhs4);
					colhsList.add(colhs5);
					colhsList.add(colhs6);
					colhsList.add(colhs7);
					colhsList.add(colhs8);
					for(int i = 0;i < arr.length;i++) {
						int col = arr[i].length;
						for(int j = 0;j < col;j++) {
							for(int k = 0;k < col;k++) {
								if(arr[k][j] != 0) {
									colhsList.get(j).add(arr[k][j]);
								}
							}
						}
					}

					tempListList = new ArrayList<List<Integer>>();
					for(int i = 0;i < arr.length;i++) {
						int col = arr[i].length;
						// 设置每行临时数组
						List<Integer> tempList = new ArrayList<Integer>();
						for(int k = 1;k < col + 1;k++) {
							boolean flag = false;
							for(int j = 0;j < col;j++) {
								// 设置行
								if(k == arr[i][j]) {
									flag = true;
								}

							}
							if(!flag) {
								tempList.add(k);
							}
						}
						tempListList.add(tempList);

						// 打印每行临时数组
						//System.out.println(tempList.toString());
						Set<Integer> hs = new HashSet<Integer>();
						for(int j = 0;j < col;j++) {
							if(arr[i][j] != 0) {
								hs.add(arr[i][j]);
							}
						}

						//System.out.println(ConvertString(arr[i]));

					}

					List<int[]> resRowList = new ArrayList<>();
					resRowList = setSingleRow(tempListList.get(l),arr[l],resRowList,colhsList);
					//System.out.println("第" + l + "行," + "第" + n + "次循环" + resRowList.size() + "种结果");
					if(resRowList != null && resRowList.size() > 0) {
						for(int m = 0;m < resRowList.size(); m++) {
							arr[l] = resRowList.get(m);
							int[][] arrTemp = arr.clone();
							resAllRowListTemp.add(arrTemp);
						}
					}
				}
			}else {
				List<int[]> resRowList = new ArrayList<>();
				resRowList = setSingleRow(tempListList.get(l),arr[l],resRowList,colhsList);
				if(resRowList != null && resRowList.size() > 0) {
					for(int m = 0;m < resRowList.size(); m++) {
						arr[l] = resRowList.get(m);
						int[][] arrTemp = arr.clone();
						resAllRowList.add(arrTemp);
					}

				}
			}

		}

		if(resAllRowListTemp != null && resAllRowListTemp.size() > 0) {
			resAllRowList.clear();
			for(int s =0; s < resAllRowListTemp.size(); s++) {
				resAllRowList.add(resAllRowListTemp.get(s));
			}
			resAllRowListTemp.clear();
		}

		for(int k = 0; k < resAllRowList.size();k++) {
			System.out.println("-----第" + (k + 1) + "种情况-----rn");
			System.out.println(ConvertString(resAllRowList.get(k)));
		}

		System.out.println("-----------计算完成------------");
		long endTime = System.currentTimeMillis();    //获取结束时间
		System.out.println("程序运行时间:" + (endTime - startTime) + "ms");    //输出程序运行时间
	}

	private static String ConvertString(int[][] list)
	{
		StringBuilder sb = new StringBuilder();
		for (int i = 0; i < list.length; i++)
		{
			for (int j = 0; j < list[i].length; j++)
			{
				sb.append(list[i][j]);
			}
			sb.append("rn");
		}
		 return sb.toString();
	}

	private static List<int[]> setSingleRow(List<Integer> list,int[] arr,List<int[]> res,List<Set<Integer>> colhsList){
		for(int i = 0; i < list.size();i++) {
			int[] arrtemp = new int[arr.length];
			for(int k = 0; k < arr.length; k++) {
				arrtemp[k] = arr[k];
			}
			for(int j = 0;j < arr.length;j++) {
				if(arr[j] == 0) {
					Set<Integer> colhs = colhsList.get(j);
					boolean flag = true;
					for(Integer val : colhs) {
						if(val == list.get(i)) {
							flag = false;
						}
					}
					if(flag) {
						arrtemp[j] = list.get(i);
						List<Integer> listtemp = new ArrayList<Integer>();
						for(int y = 0; y< list.size();y++) {
							listtemp.add(list.get(y));
						}
						listtemp.remove(i);
						if(listtemp != null && listtemp.size() > 0) {
							setSingleRow(listtemp,arrtemp,res,colhsList);
						}else {
							res.add(arrtemp);
							//System.out.println(ConvertString(arrtemp));
						}
					}

					break;
				}
			}
		}

		return res;
	}

}
(2)手动上传第三方构件
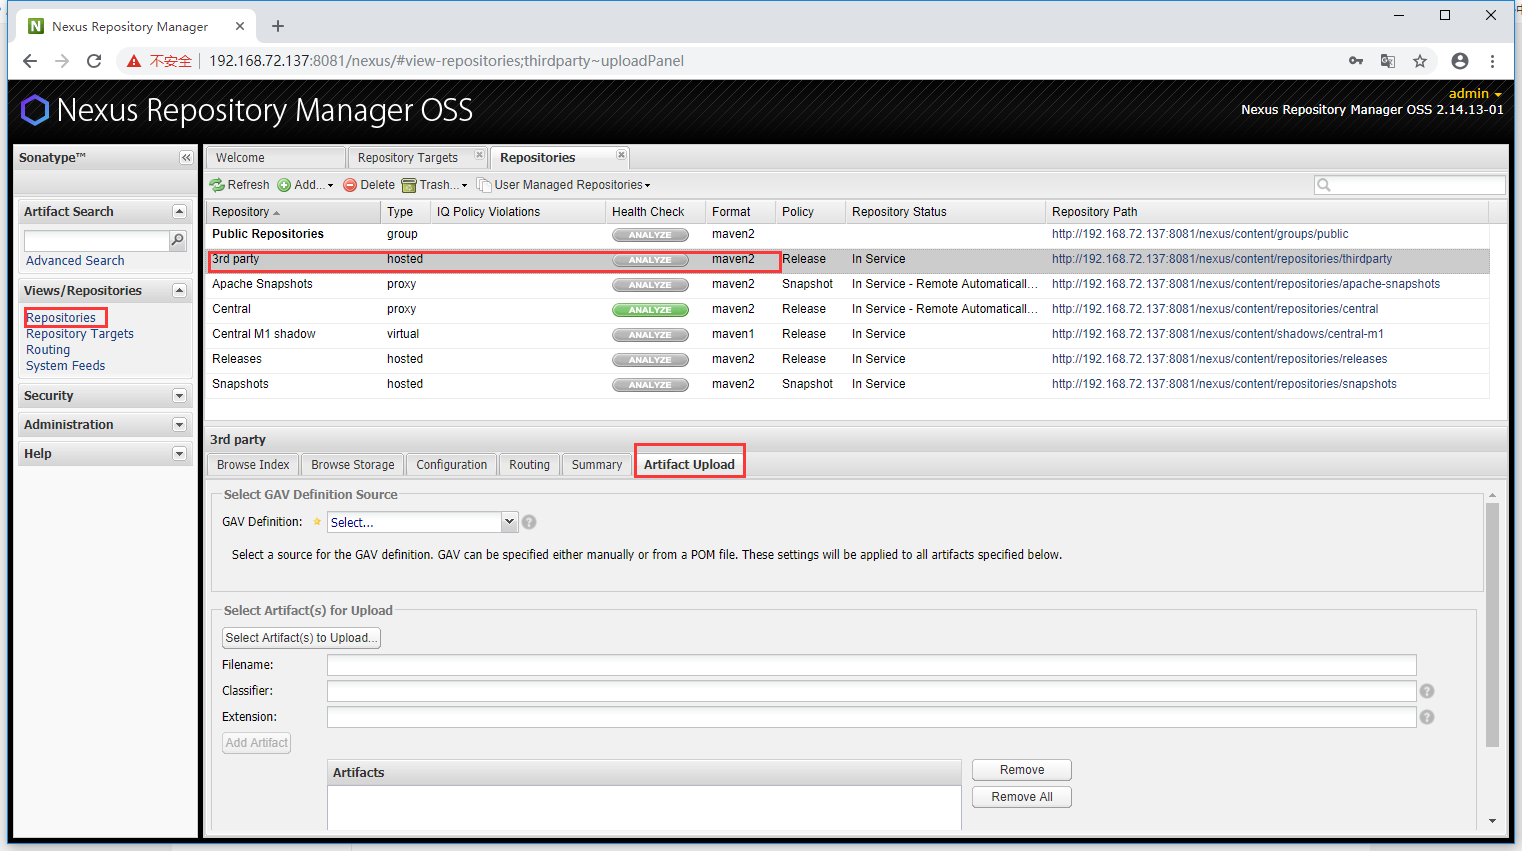
--》点击Repositories--》点击3rd party--》点击Aritfact Upload
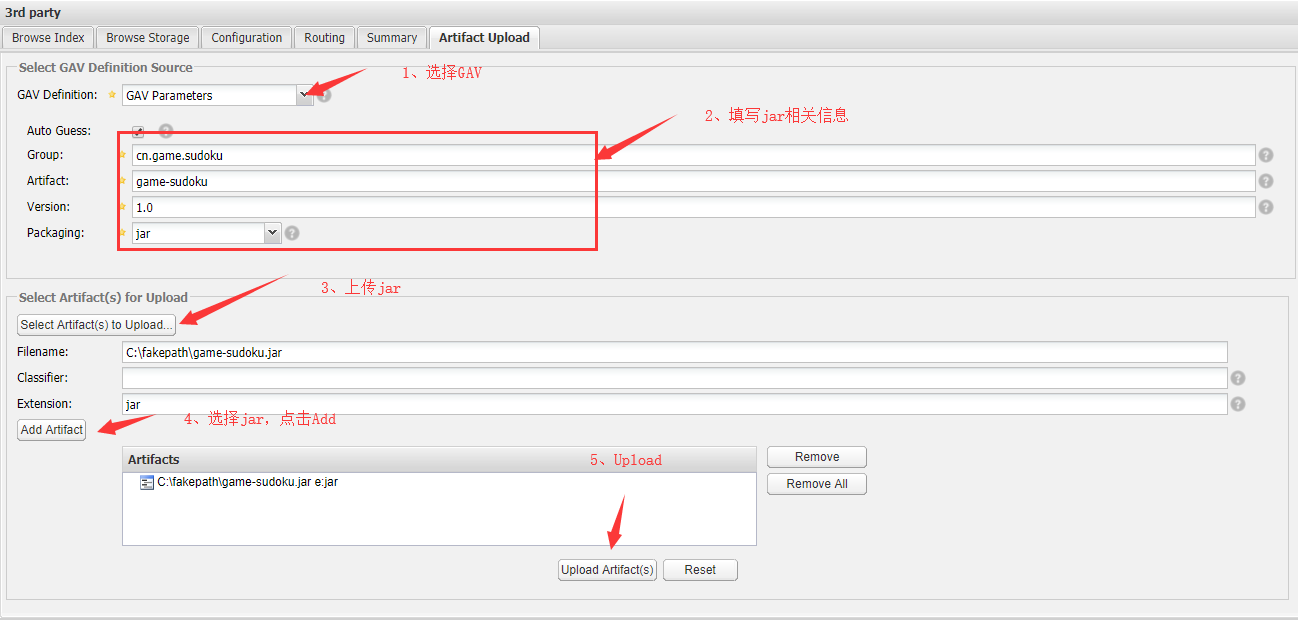
--》添加jar信息
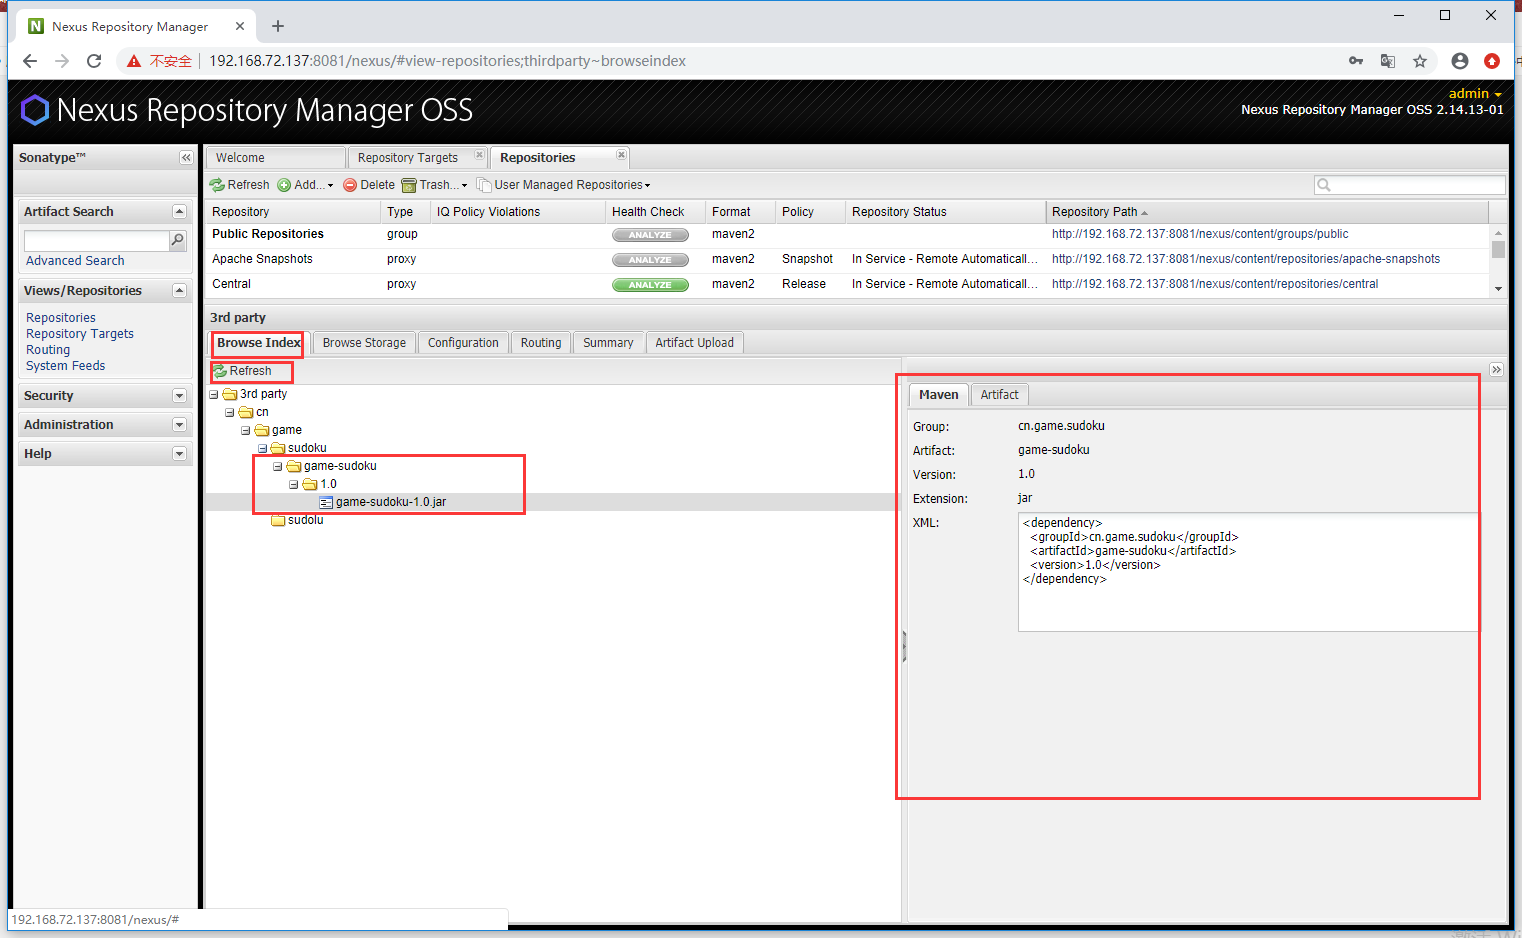
--》查看是否上传成功
--》在项目中下载第三方构件(下面内容详细讲解)--》完成
自动发布构件到远程仓库
(1)创建一个简单的Maven项目
--》使用idea创建一个Maven项目
(2)修改为项目的pom文件,添加发布仓库
--》pom.xml文件中添加发布仓库:<distributionManagement>…</distributionManagement>
<?xml version="1.0" encoding="UTF-8"?>
<project xmlns="http://maven.apache.org/POM/4.0.0"
         xmlns:xsi="http://www.w3.org/2001/XMLSchema-instance"
         xsi:schemaLocation="http://maven.apache.org/POM/4.0.0 http://maven.apache.org/xsd/maven-4.0.0.xsd">
    <modelVersion>4.0.0</modelVersion>

    <groupId>cn.game.demo</groupId>
    <artifactId>demo</artifactId>
    <version>1.0-SNAPSHOT</version><!-- SNAPSHOT定义上传的本版本为快照版且SNAPSHOT必须大写-->
    <packaging>jar</packaging>

    <distributionManagement>
        <repository>
            <id>releases</id> <!-- Releases仓库的Repository ID-->
            <url>http://192.168.72.137:8081/nexus/content/repositories/releases/</url><!-- Releases仓库的Repository Path-->
        </repository>
        <snapshotRepository>
            <id>Snapshots</id><!-- Snapshots仓库的Repository ID-->
            <url>http://192.168.72.137:8081/nexus/content/repositories/snapshots/</url><!-- Snapshots仓库的Repository Path-->
        </snapshotRepository>
    </distributionManagement>

</project>
(3)修改Maven仓库的setting.xml文件,添加<servers><servers/>
--》修改Maven仓库的setting.xml文件,添加<servers><servers/>,用于设置发布项目时验证用户
<servers>
	<server>
      <id>releases</id><!-- Releases仓库的Repository ID-->
      <username>admin</username><!-- 登录用户-->
      <password>admin123</password><!-- 登录密码-->
    </server>
	<server>
      <id>snapshots</id><!-- Snapshots仓库的Repository ID-->
      <username>admin</username><!-- 登录用户-->
      <password>admin123</password><!-- 登录密码-->
    </server>
	<server>
      <id>thirdparty</id><!-- 3rd party仓库的Repository ID-->
      <username>admin</username><!-- 登录用户-->
      <password>admin123</password><!-- 登录密码-->
    </server>
  </servers>
(4)部署发布项目
1、 使用Maven工具发布
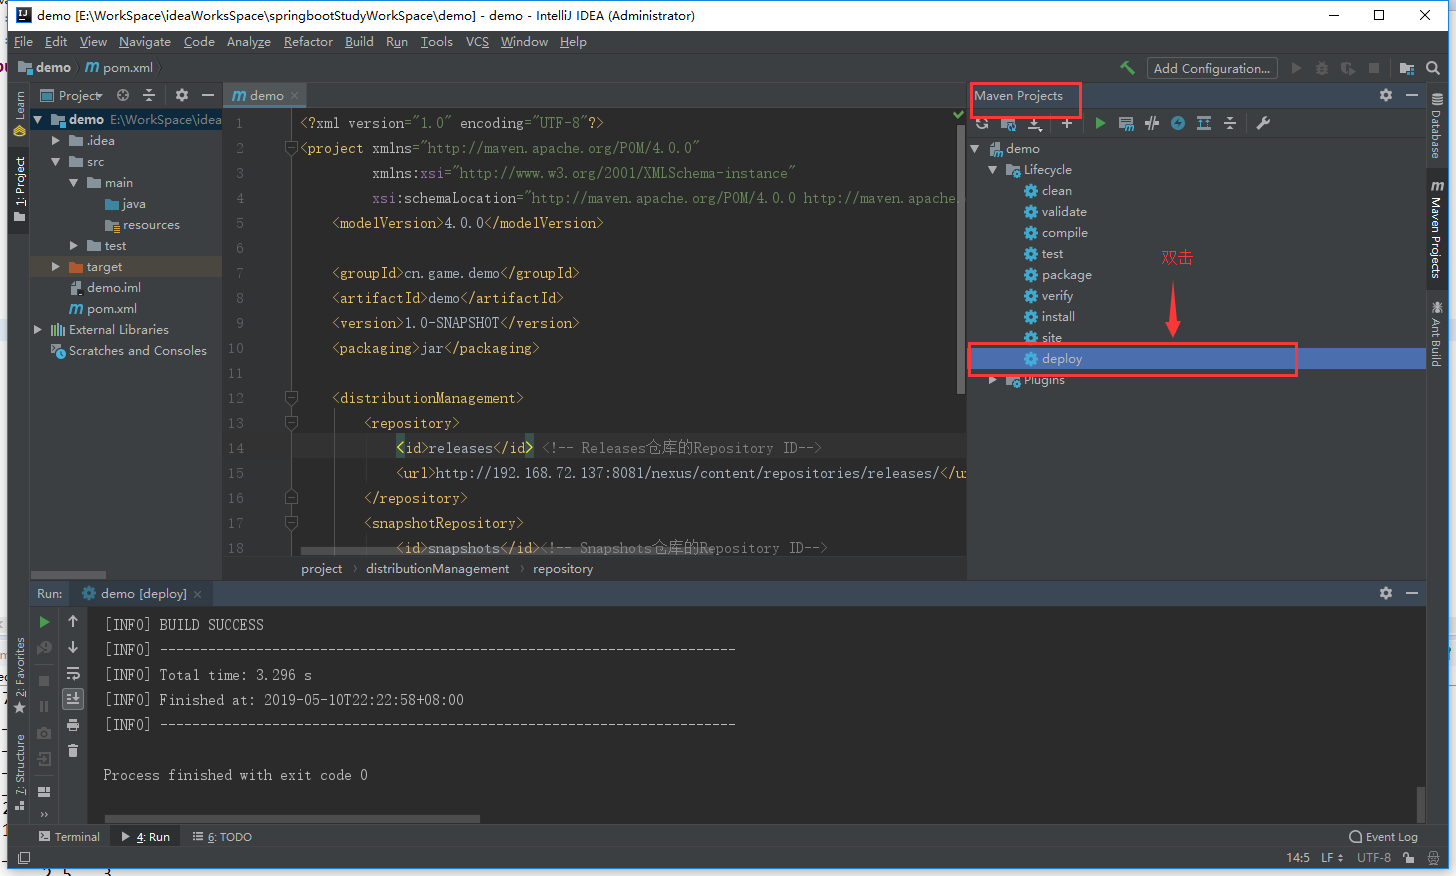
--》查看是否发布
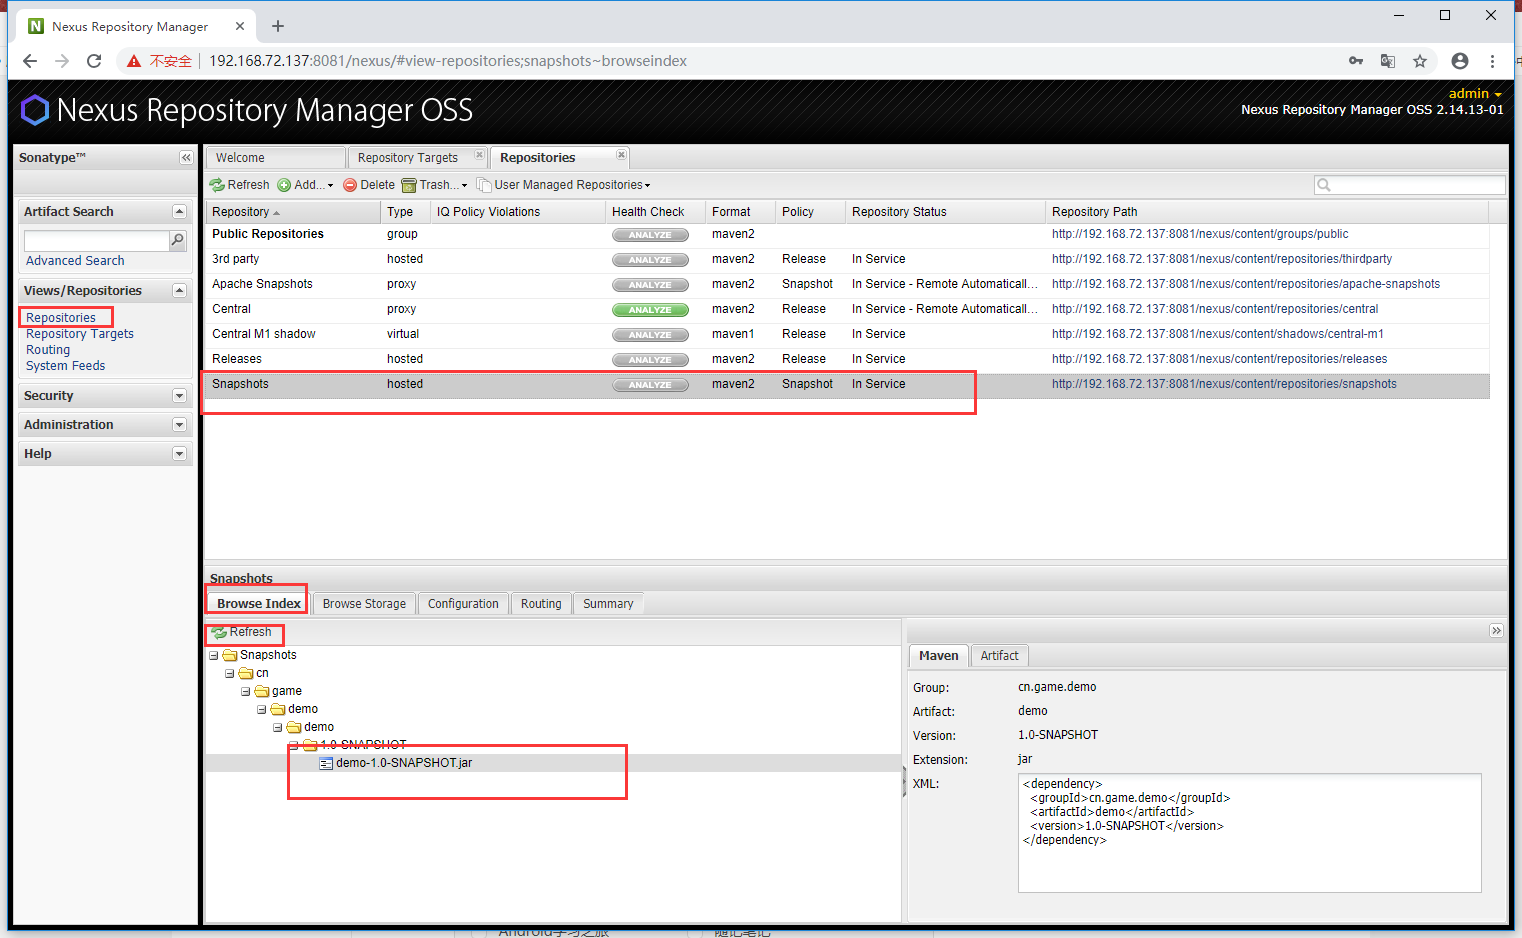
--》完成
2、使用命令mvn:deploy
mvn deploy:deploy-file -DgroupId=cn.game.demo -DartifactId=game-demo -Dversion=1.0-SNAPSHOT -Dpackaging=jar -Dfile=E:WorkSpaceideaWorksSpacespringbootStudyWorkSpacedemotargetdemo-1.0-SNAPSHOT.jar -Durl=http://192.168.72.137:8081/nexus/content/repositories/snapshots/ -DrepositoryId=snapshots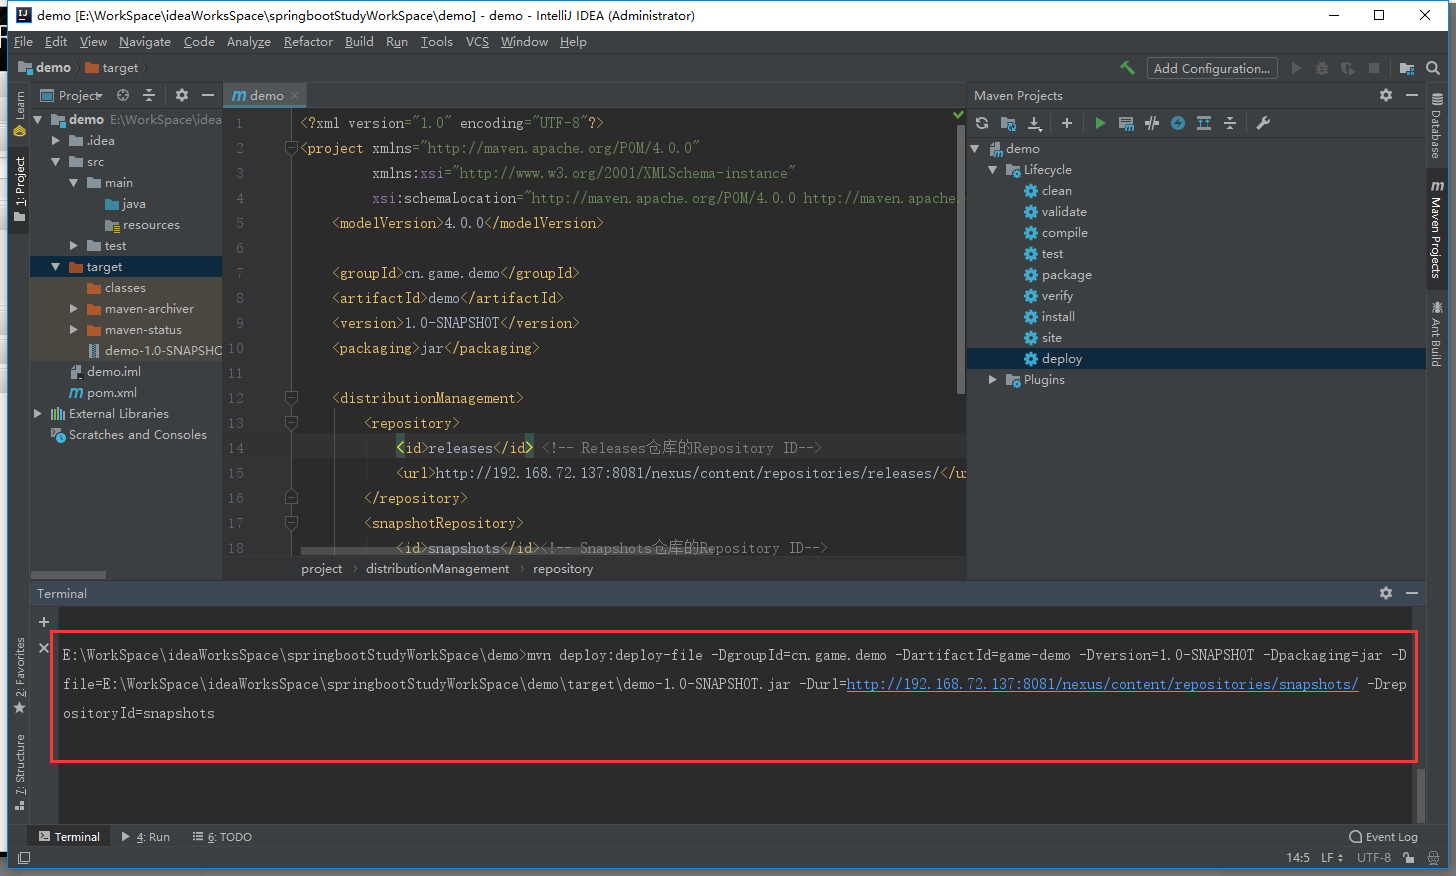
如果报错如下:

请添加Maven的环境变量(这里不做介绍)
--》查看是否发布
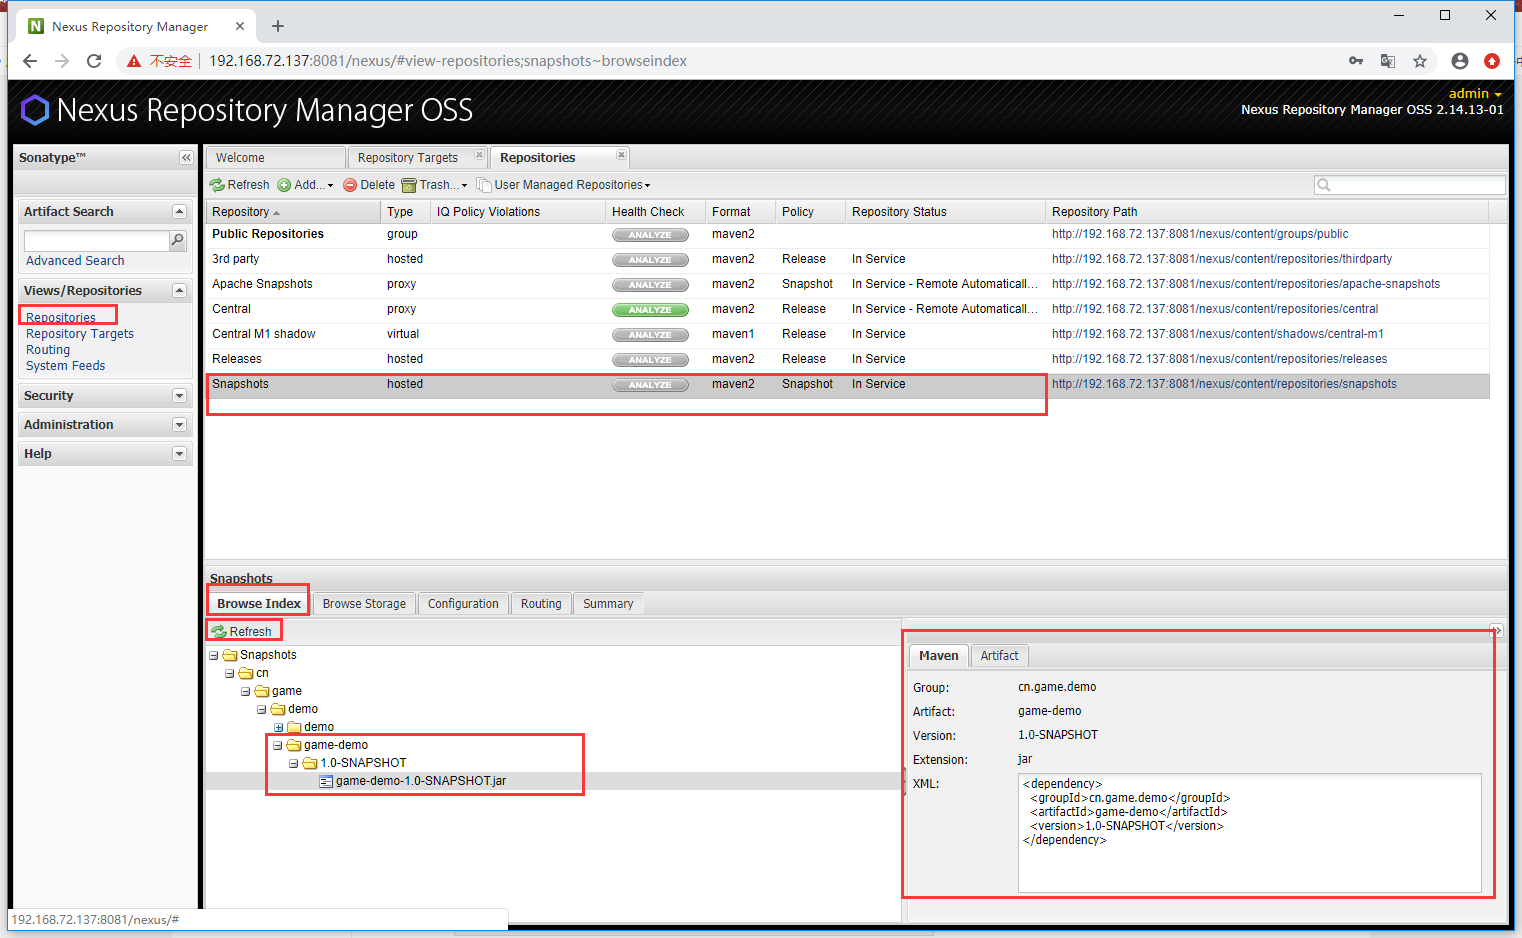
--》完成
本地项目引用私服
从Nexus下载构件
(1)配置Maven镜像(修改setting.xml文件),用于替代maven使用默认central,去Maven中央仓库下载构件
  <mirrors>
	 <mirror>
      <id>public</id><!-- 镜像的ID-->
      <mirrorOf>*</mirrorOf><!-- 可以填写具体的Repository Id,填写*表示所有的仓库都需要通过maven镜像去下载-->
      <name>Human Readable Name for this Mirror.</name><!-- 镜像的名称-->
      <url>http://192.168.72.137:8081/nexus/content/groups/public/</url><!-- 镜像的Reposiroty Path,这里配置的*则使用的是仓库组-->
    </mirror>
  </mirrors>
(2)配置项目pom.xml文件,添加<repositories> ... </repositories>(注:只对当前的Maven项目有效)
<?xml version="1.0" encoding="UTF-8"?>
<project xmlns="http://maven.apache.org/POM/4.0.0"
         xmlns:xsi="http://www.w3.org/2001/XMLSchema-instance"
         xsi:schemaLocation="http://maven.apache.org/POM/4.0.0 http://maven.apache.org/xsd/maven-4.0.0.xsd">
    <modelVersion>4.0.0</modelVersion>

    <groupId>cn.game.demo</groupId>
    <artifactId>demo</artifactId>
    <version>1.0-SNAPSHOT</version>
    <packaging>jar</packaging>

    <distributionManagement>
        <repository>
            <id>releases</id> <!-- Releases仓库的Repository ID-->
            <url>http://192.168.72.137:8081/nexus/content/repositories/releases/</url><!-- Releases仓库的Repository Path-->
        </repository>
        <snapshotRepository>
            <id>snapshots</id><!-- Snapshots仓库的Repository ID-->
            <url>http://192.168.72.137:8081/nexus/content/repositories/snapshots/</url><!-- Snapshots仓库的Repository Path-->
        </snapshotRepository>
    </distributionManagement>

    <repositories>
        <repository>
            <id>public</id><!-- Public Repository仓库组的ID-->
            <name>Maven Repository</name><!-- 仓库名称-->
            <url>http://192.168.72.137:8081/nexus/content/groups/public/</url><!-- Public Repository仓库组的Repository Path -->
            <releases>
                <enabled>true</enabled><!-- 发布版本是否支持更新-->
            </releases>
            <snapshots>
                <enabled>true</enabled><!-- 快照版本是否支持更新-->
            </snapshots>
        </repository>

    </repositories>

</project>
--》测试,使用之前上传的第三方jar,game-sudoku.jar
<dependency>
  <groupId>cn.game.sudoku</groupId>
  <artifactId>game-sudoku</artifactId>
  <version>1.0</version>
</dependency>
--》新建Test类测试
import cn.game.sudoku.Sudoku;

/**
 * Created by Anna. on 2019/5/10 0010.
 */
public class Test {
    public static void main(String[] args) {
        int[][] arr={
                {0,0,5,0,0,6},
                {0,0,0,0,2,0},
                {4,1,6,0,0,0},
                {0,2,0,0,1,0},
                {0,3,0,0,0,0},
                {0,0,0,0,0,1},
        };
        Sudoku sudoku = new Sudoku();
        sudoku.setArr(arr);
        sudoku.computeSudokuSolution();
    }
}
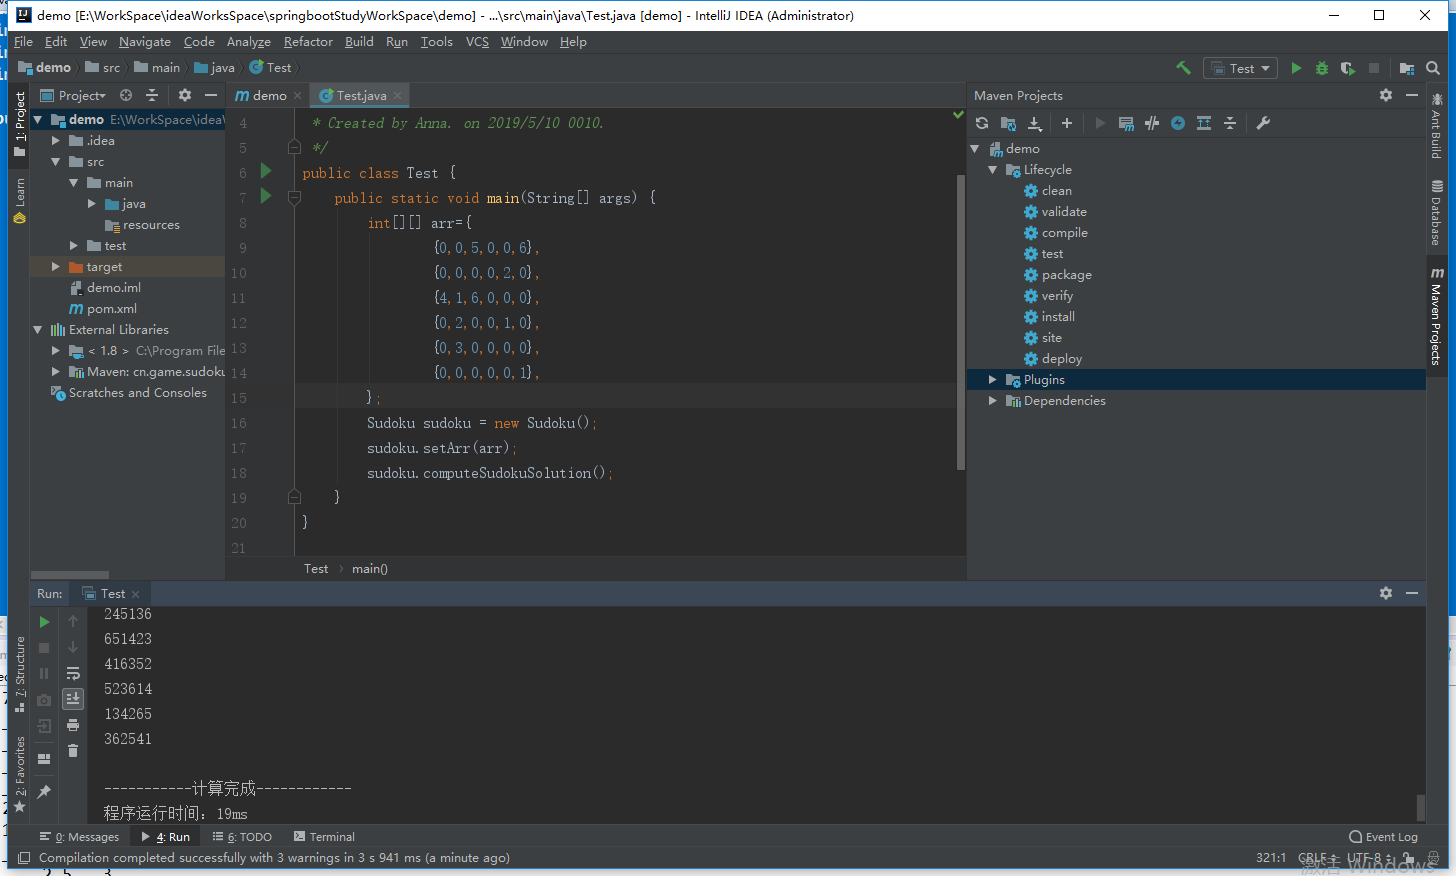
--》完成
(3)配置Maven的配置文件settings.xml ,添加profile元素(注:对本机所有Maven项目有效)
<profiles>
	<profile>
      <id>public</id><!-- profile的ID-->

       <repositories>
        <repository>
            <id>public</id><!-- Public Repository仓库组的ID-->
            <name>Maven Repository</name><!-- 仓库名称-->
            <url>http://192.168.72.137:8081/nexus/content/groups/public/</url><!-- Public Repository仓库组的Repository Path -->
            <releases>
                <enabled>true</enabled><!-- 发布版本是否支持更新-->
            </releases>
            <snapshots>
                <enabled>true</enabled><!-- 快照版本是否支持更新-->
            </snapshots>
        </repository>

      </repositories>
    </profile>

  </profiles>
    <!-- 激活的profile,如果这里不配置,那么配置的profile将无效-->
	<activeProfiles>
		<activeProfile>public</activeProfile><!-- 与需要激活的profile的ID一致-->
	</activeProfiles>
--》测试同上--》完成(注:配置了全局的repositories,那么项目中就不在需要配置repositories了)
附件:
使用Nexus搭建Maven私服(三).zip
链接:https://pan.baidu.com/s/1CU-WPZtYa8dSZMNyIhXBzg
提取码:288s
最后
以上就是坦率画笔最近收集整理的关于使用Nexus搭建Maven私服(三)-基本属性介绍及本地项目配置上传引用私服使用Nexus搭建Maven私服(三)-基本属性介绍及本地项目配置上传引用私服的全部内容,更多相关使用Nexus搭建Maven私服(三)-基本属性介绍及本地项目配置上传引用私服使用Nexus搭建Maven私服(三)-基本属性介绍及本地项目配置上传引用私服内容请搜索靠谱客的其他文章。


发表评论 取消回复