三.:Git 命令操作(10~29)
1:本地库操作:
1)本地库初始化:(创建 .git 文件)
2)设置签名:(2种)(二者必须有一个)
-1:注意:(【系统级别 / 项目级别】,至少有一个)
1:作用:区分不同开发人员身份。
2:辨析:这里设置的签名,和登录远程库的账号、密码,没有任何关系。
4:有效范围:(就近生效)项目级别优于系统用户级别。
-2:(项目级别 / 仓库级别):(仅在当前本地库范围内有效)(保存在当前项目配置文件)
【 git config user.name zhangsan 】
【 git config user.email 498798398@qq.com 】
【 cat .git/config 】

[user]
	name = zhangsan
	email = 498798398@qq.com
-3:(系统用户界别)(登录当前操作系统的,用户范围)
【 git config --global user.name GlobalName 】
【 git config --global user.email GlobalEmail 】
(保存在 git 总配置文件)(/Users/zhangsan/.config)
【 cat /Users/zhangsan/.gitconfig 】

[user]
	name = GlobalName
	email = GlobalEmail
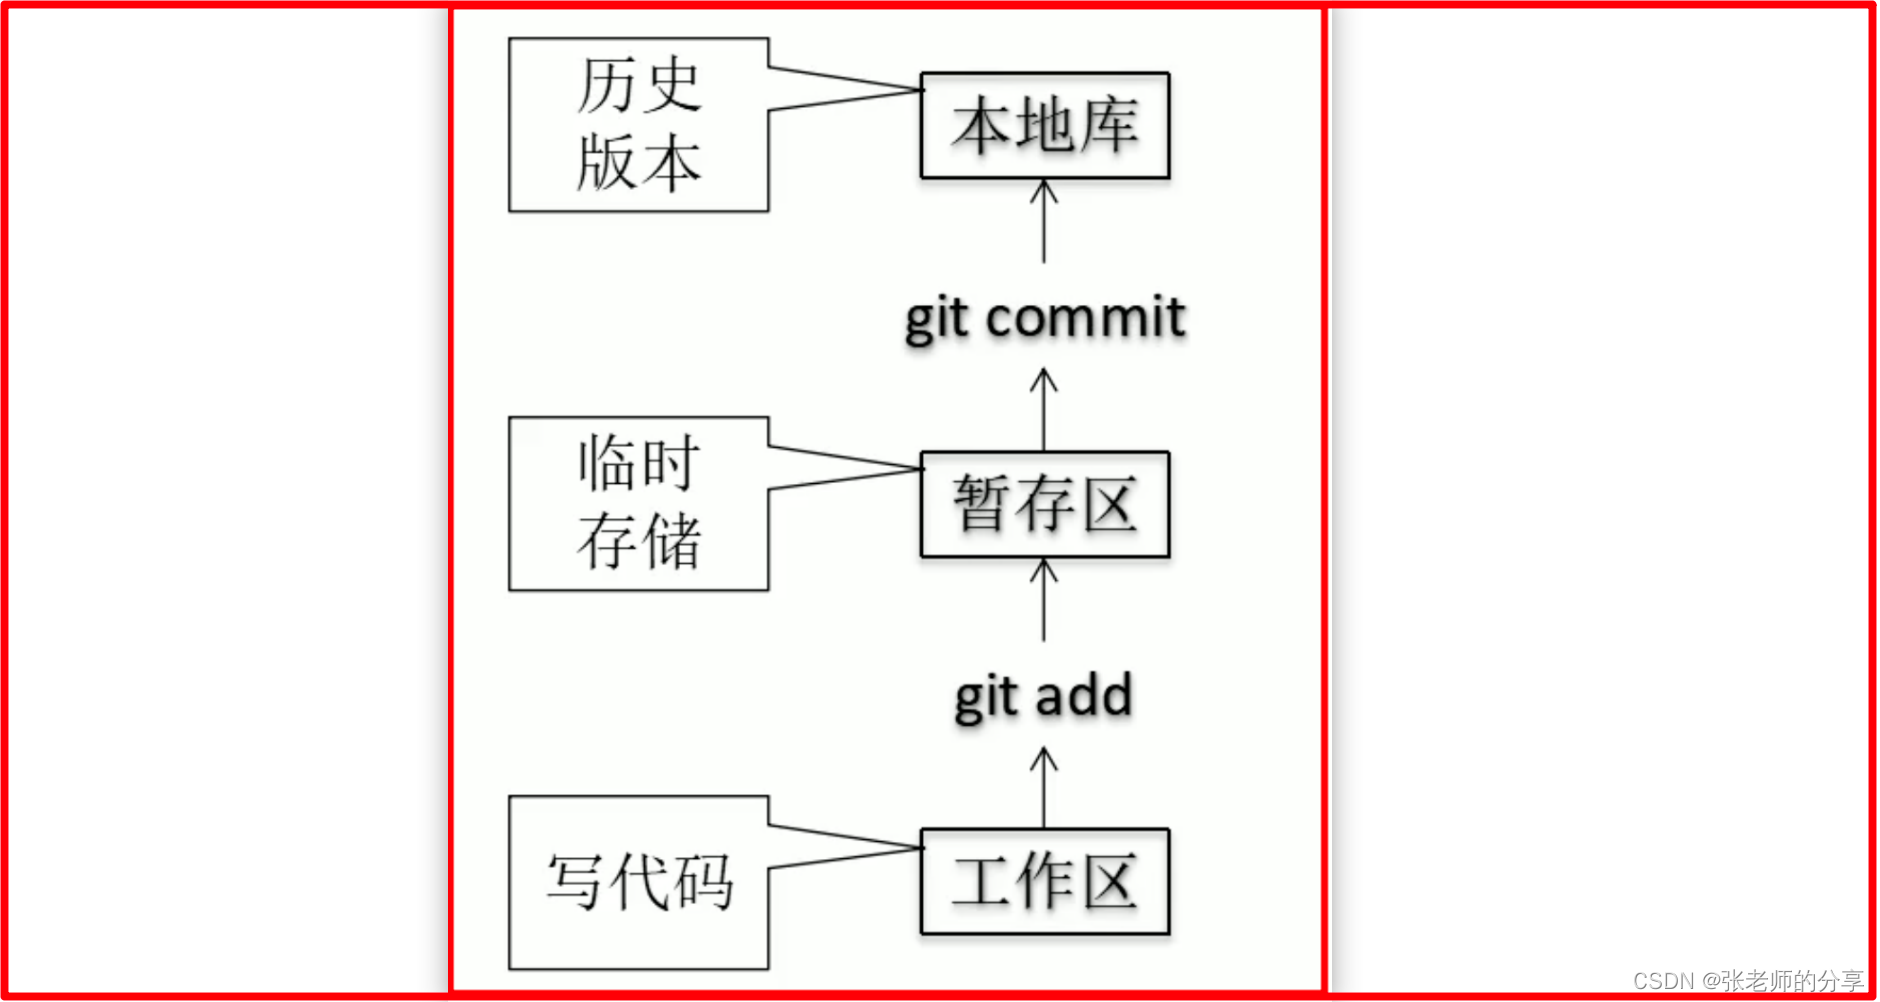
-4:查看状态、提交操作:
1:查看(工作区 / 暂存区)状态:
【 git status 】
2:工作区 --> 暂存区:
【 git add aaa.txt 】
3:从暂存区移除文件:
-- 可使用下面的:【 git restore --staged 】
【 git rm --cached aaa.txt 】
4: 暂存区 --> 本地库:
(修改提交不带文件名称)
-- 第一次提交
【 git commit aaa.txt 】
【 git commit -m "commit message" aaa.txt 】

-- 修改后提交
【 git add aaa.txt 】(可省略)
【 git commit -m "修改测试" -a 】(all)
5:恢复:
--(第一次、第二次)(暂存区 --> 工作区)
--(将暂存区的⽂件从暂存区撤出,但不会更改,工作区的⽂件的内容。)
【 git restore --staged bbb.txt 】

-- 第二次提交,(工作区内,恢复文件修改,撤销文件修改)
-- (指令使得在⼯作空间,但是不在暂存区的⽂件撤销更改)(内容恢复到没修改之前的状态)
-- (可用于:提交暂存区后,工作区删除,的文件找回操作)
【 git restore bbb.txt 】
------------------------------------------------------------------------------------
3)版本的(前进 / 后退):
-1:查看历史记录:
1:查看历史记录:(最完整形式)
操作:(【b / 空格】上下翻页)(键盘上下 阅读移动)(q 退出)
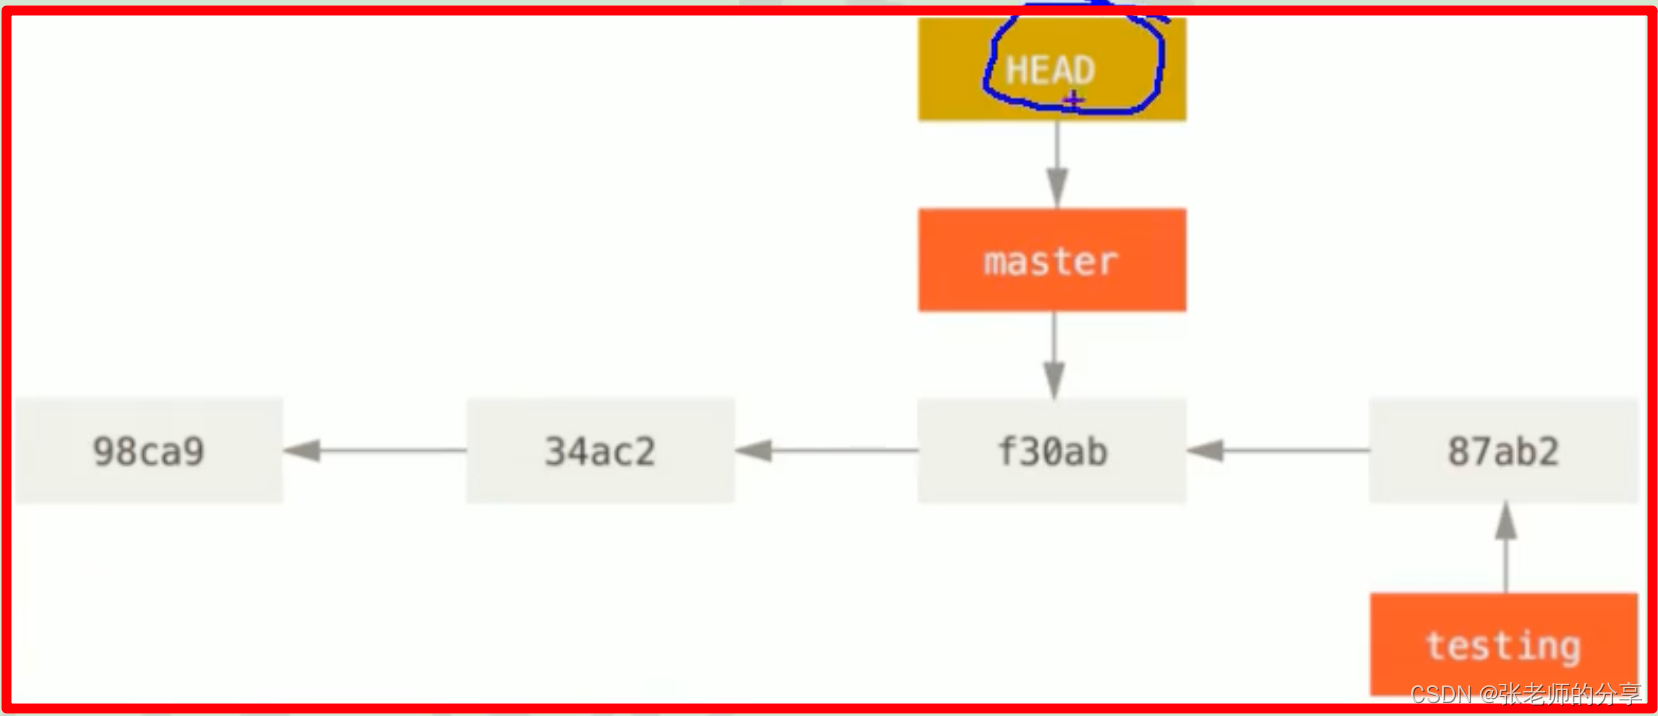
(HEAD :指针)
【 git log 】

commit e2ba1f671f604913e887ecb8d850eb0024c5bddd (HEAD -> master)
Author: zhangxudong <498798398@qq.com>
Date:   Sat Apr 30 15:56:32 2022 +0800

    添加 eee.txt
================================================

commit 99be29830cc572e1fcf3ab25b66f33c663502ed3
Author: zhangxudong <498798398@qq.com>
Date:   Sat Apr 30 15:55:50 2022 +0800

    添加 ddd.txt
2:一行打印:
【 git log --pretty=oneline 】

e2ba1f671f604913e887ecb8d850eb0024c5bddd (HEAD -> master) 添加 eee.txt
99be29830cc572e1fcf3ab25b66f33c663502ed3 添加 ddd.txt
e5cfcccdcba4820fd611d4a707acd42d2650fd9a 提交 ccc.txt
50c7e6500464a5ed86ed25feb0ecc76dd3d38faa 修改回来
e92326bd4d7b5a11a0e168a628f6ddaf4dad8de3 修改 aaa.txt
7d033690cb2665778b3ff7c6b61f9eba4080a3ae 第一次提交
3:可以看到指针移动次数
【 git reflog 】

e2ba1f6 (HEAD -> master) HEAD@{0}: commit: 添加 eee.txt
99be298 HEAD@{1}: commit: 添加 ddd.txt
e5cfccc HEAD@{2}: commit: 提交 ccc.txt
50c7e65 HEAD@{3}: commit: 修改回来
e92326b HEAD@{4}: commit: 修改 aaa.txt
7d03369 HEAD@{5}: commit (initial): 第一次提交
zhangsan@localhost test01 % git reflog --oneline
-2:版本前进、后退 控制:
(版本控制本质: HEAD 指针指向控制,移动指针就可达到版本控制目的。)
1:基于索引值操作:【推荐】
【 git reflog 】
【 git reset --hard 336494e 】
2:使用 ^ 符号:【只能往后退】
【 git reset --hard HEAD^ 】
【 git reset --hard HEAD^^ 】
3:使用 ~ 符号:【只能往后退】
【 git reset --hard HEAD~1 】
【 git reset --hard HEAD~3 】
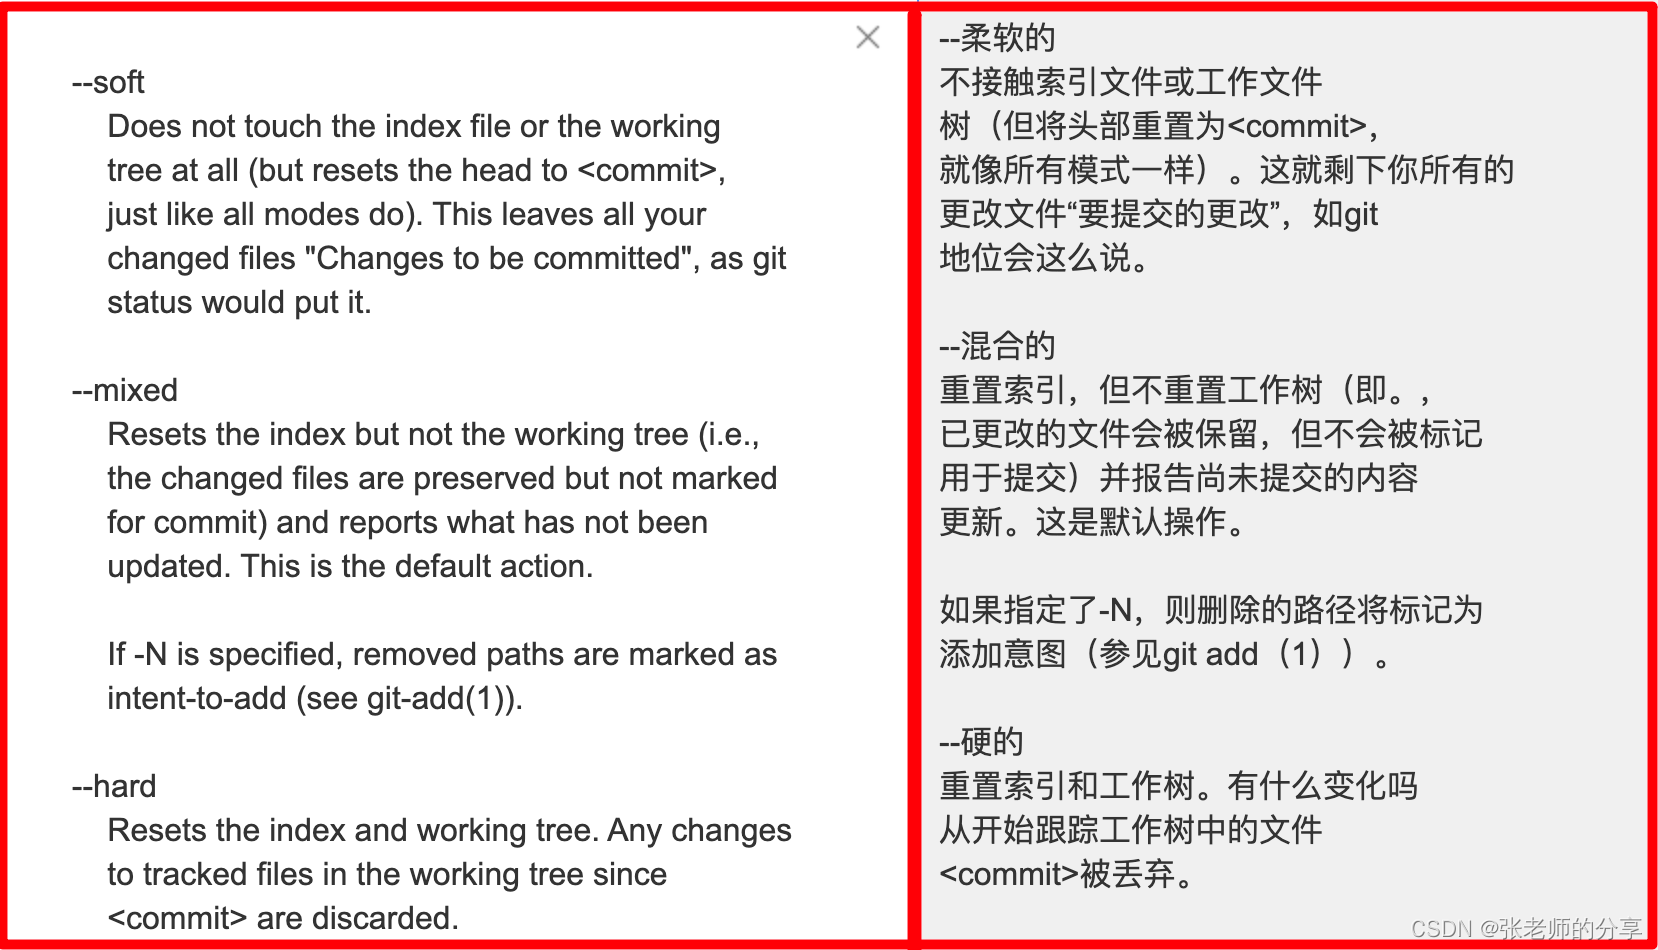
-3:hard、soft、mixed 对比:(文件 commit 到本地库)(hard 用的多)
1:–soft:(1)仅仅在本地库,移动指针。
2:–mixed:(1)在本地库移动指针。(2)重置暂存区。
3:–hard:(1)本地库移动指针。(2)重置暂存区。(3)重置工作区。
4)永久删除,文件找回:
(找回前提:文件提交到 暂存区 / 本地库)
-1:add 添加到 暂存区 文件:
-- 添加文件到暂存区
【 git add ccc.txt 】

-- 删除本地的文件后
【 git status 】
deleted:    ccc.txt

-- 恢复工作区误删除文件(撤销修改)
【 git restore ccc.txt 】
-2:commit 提交 到本地库 文件:(回退版本即可)
【 git reset --hard HEAD 7d03369 】
5)比较稳文件差异:(将工作区文件 与 本地库中文件,进行比较)
-1:修改后和当前版本比较:
【 git diff bbb.txt 】
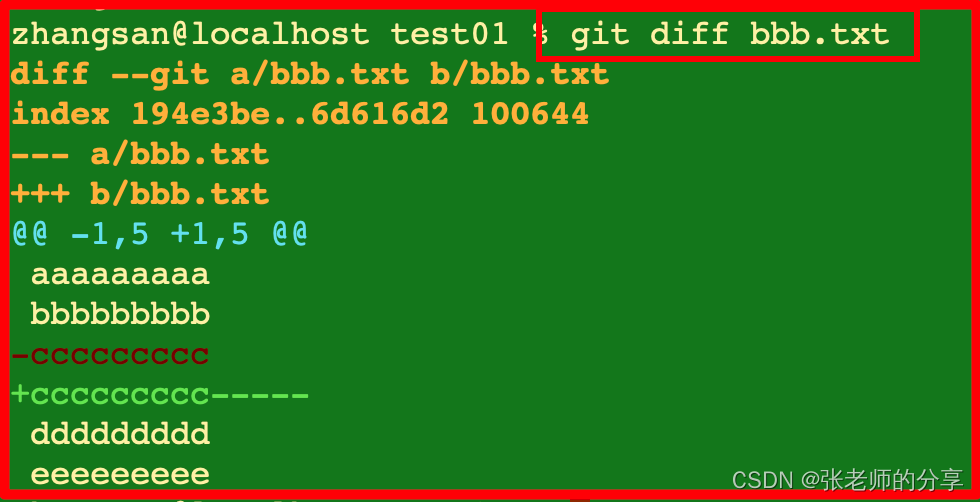
-2:和指定版本比较:
【 git diff e5cfccc bbb.txt 】
-3:比较所有文件:
【 git diff 】
2:分支:
1)什么是分支:在版本控制过程中,使用多条线同时推进多个任务。
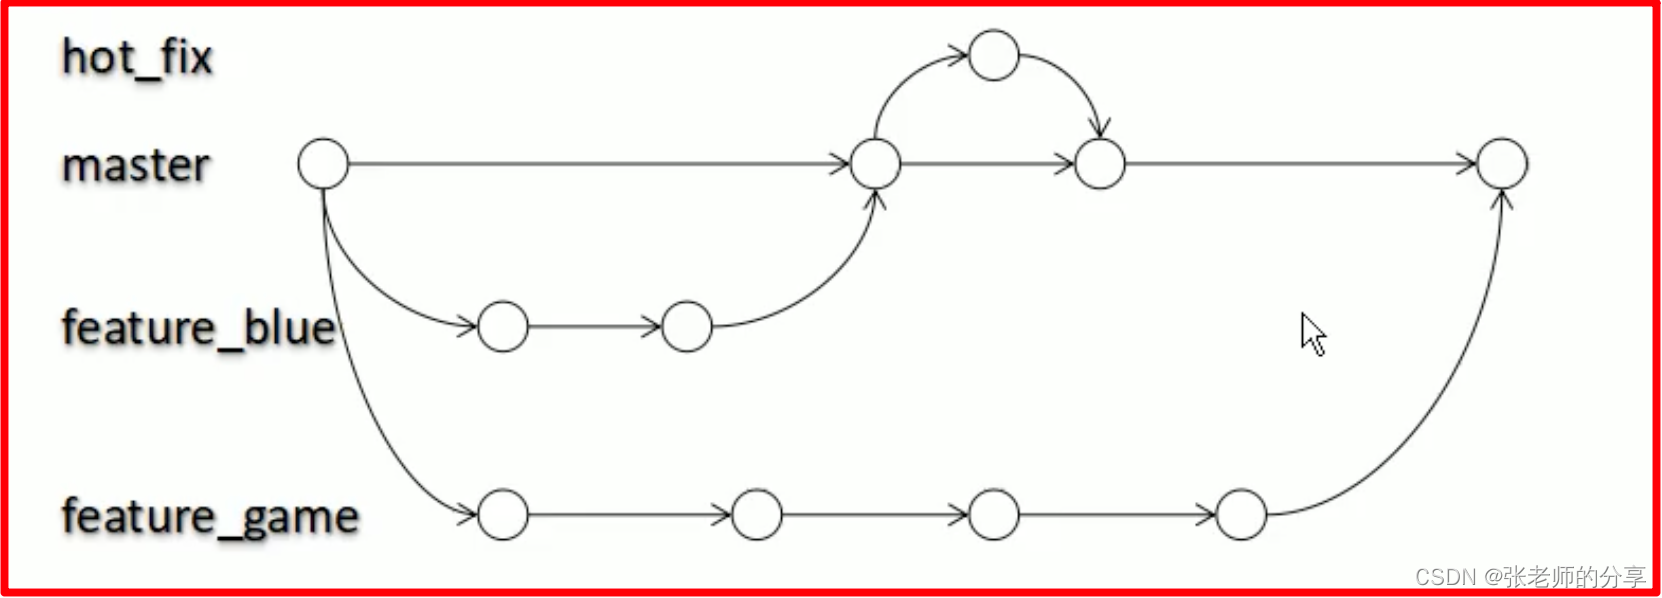
2)分支的好处:
-1:同时并行推进多个功能开发,提高开发效率。
-2:各个分支在开发过程中,如果某一个分支失败,不会对其他分支有任何影响;删除重新开始即可。
3)分支操作:
-1:查看分支:
【 git branch -v 】

  hot_fix 0e45978 修改
* master  0e45978 修改
-2:创建分支:
【 git branch hot_fix 】
-3:切换分支:
【 git checkout hot_fix 】

Switched to branch 'hot_fix'
-4:合并分支:
( hot_fix 合并到 主分支 )
1.切换到 接受修改的分支。(主分支)

2.【 git checkout master 】

3.【 git merge hot_fix 】
4)合并分支时,解决冲突:
-1:冲突展示:
【 git merge hot_fix 】

Auto-merging bbb.txt
CONFLICT (content): Merge conflict in bbb.txt
Automatic merge failed; fix conflicts and then commit the result.
-2:冲突文件内容展示:
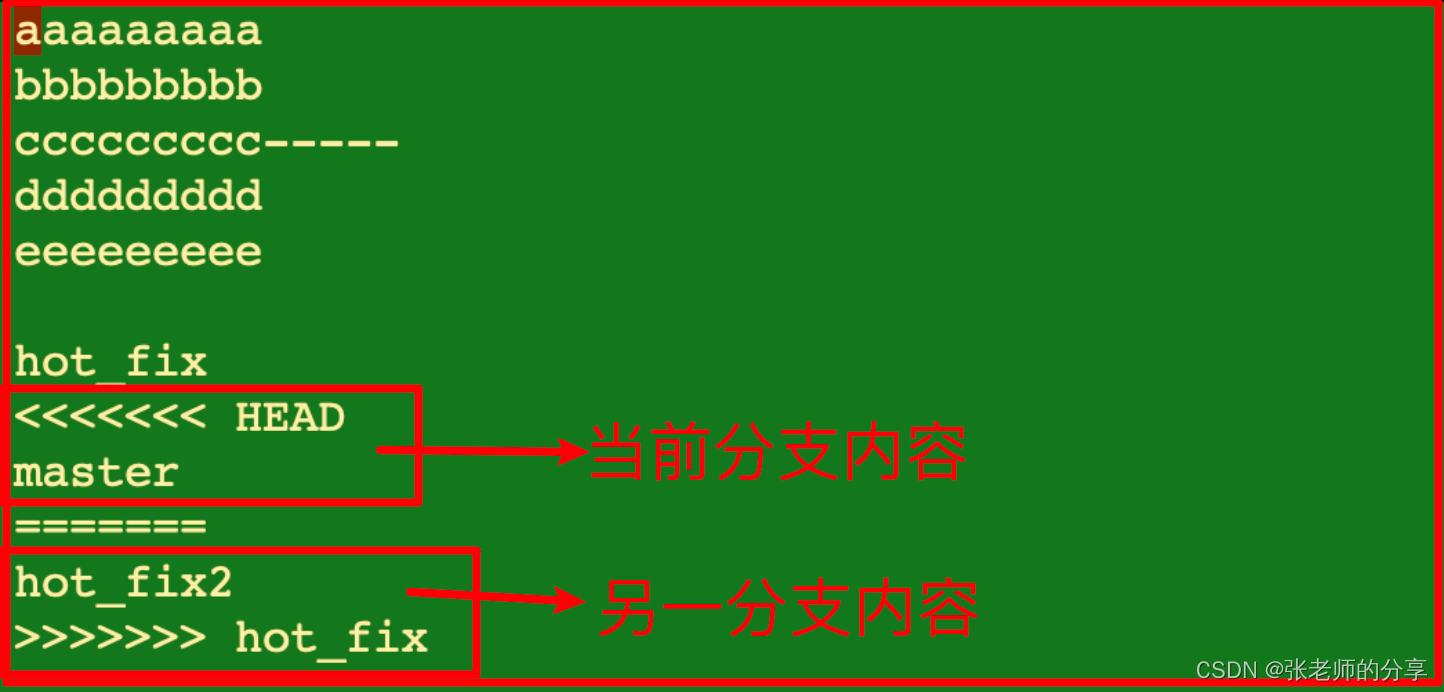
-3:修改冲突文件后:(修改后,add、commit 文件)
1. 自定义编辑文件,殊符号删掉。保存退出。

2. git add

3. git commit -m "message" (-a):(一定不能带文件名称)
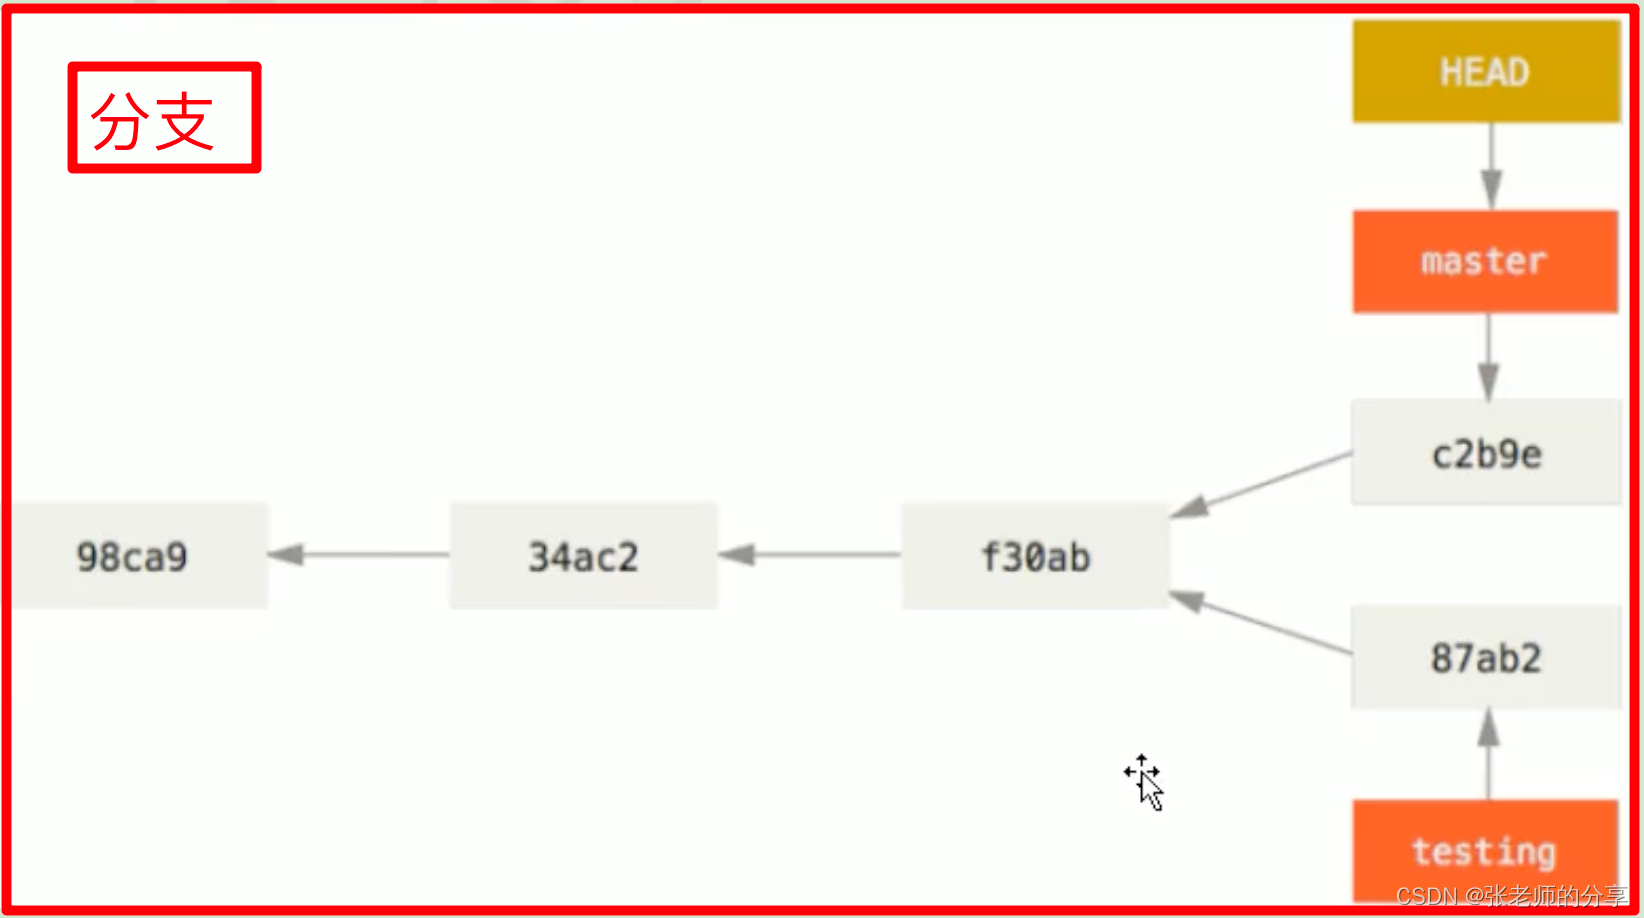
3:Git 基本原理:
1)hash 算法:校验文件。( 明文 --> 算法 --> 密文 )
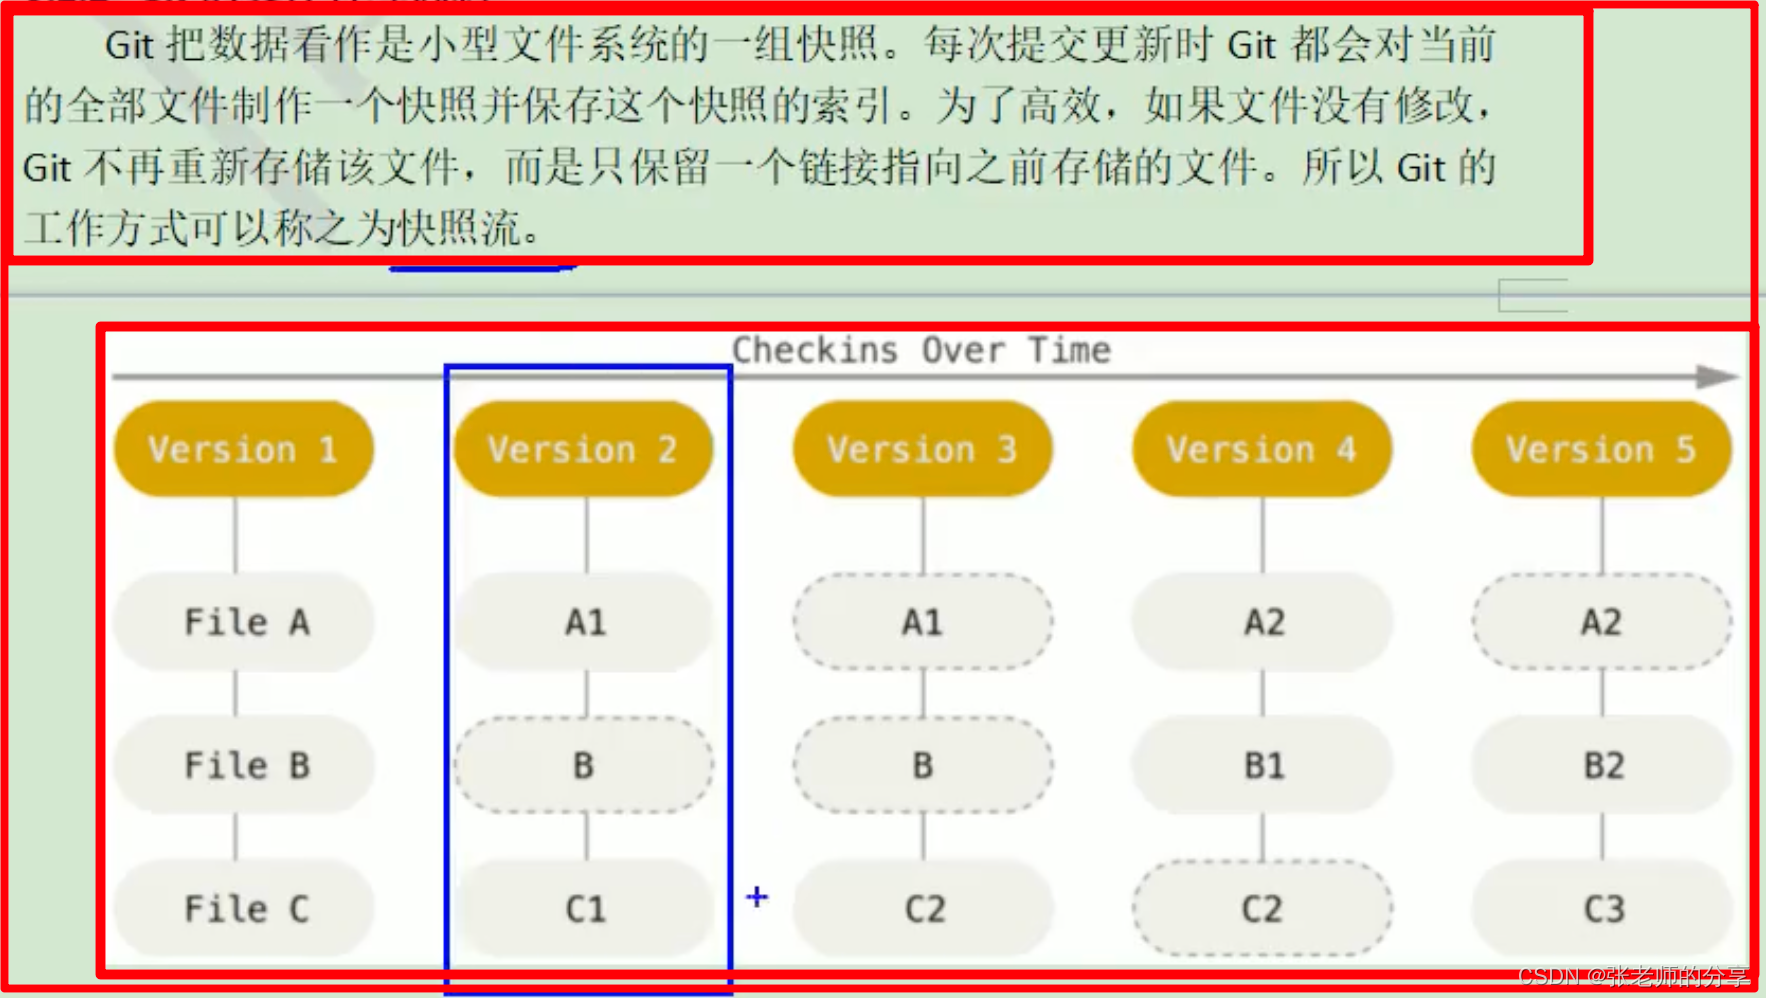
2)保存版本的机制:版本(快照)(Snapshot)。
3)分支管理的本质是:创建 和 移动指针。

4)分支管理机制:
-1:分支的创建:(指针)
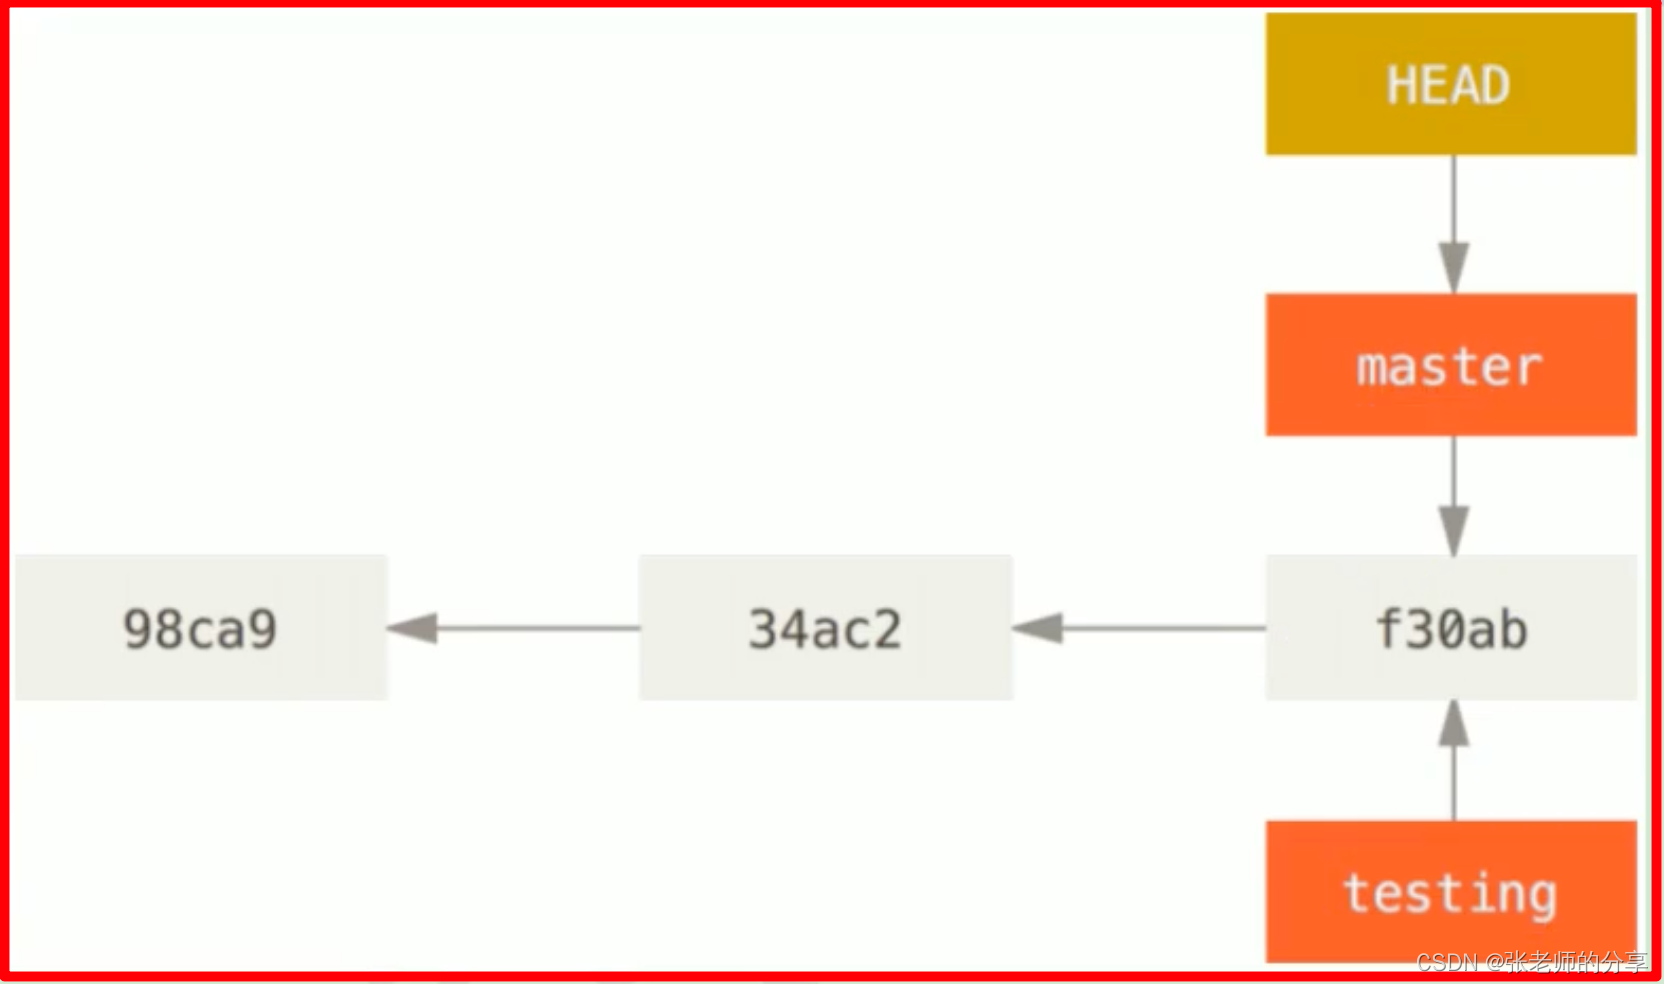
-2:(版本 / 分支)的切换:(HEAD 指针的切换)
四.:远程库操作(30~42)
1:基本操作:
1)注册账号、换头像:
2)创建本地库:(语法:git init、git add、git commit)
3)github 创建 respostory:
-1:添加:
【 git remote add origin https://github.com/Dd498798398/test_git_01.git 】
-2:查看:
【 git remote -v 】

origin	https://github.com/Dd498798398/test_git_01.git (fetch)
origin	https://github.com/Dd498798398/test_git_01.git (push)
-3:移除:
【 git remote remove origin 】
4)本地 推送到 Github:(需要输入账号密码 / 使用 SSH )
【 git push origin master 】

Enumerating objects: 6, done.
Counting objects: 100% (6/6), done.
Delta compression using up to 8 threads
Compressing objects: 100% (2/2), done.
Writing objects: 100% (6/6), 465 bytes | 465.00 KiB/s, done.
Total 6 (delta 0), reused 0 (delta 0), pack-reused 0
remote:
remote: Create a pull request for 'master' on GitHub by visiting:
remote:      https://github.com/Dd498798398/test_git_01/pull/new/master
remote:
To github.com:Dd498798398/test_git_01.git
 * [new branch]      master -> master
5)克隆 到本地库:
-1:语法:
【 git clone https://github.com/Dd498798398/test_git_01.git 】
-2:作用:
1:初始化本地库。
2:完整的把远程库,下载到本地。
3:创建 origin 远程地址别名。
6)pull 拉取:(保持最新状态)
-1:语法:
【 git pull origin master 】
-2:pull 相当于两个操作合并:(分开操作的好处:可以先下载,查看,再合并)
-- 1、拉取、下载
【 git fetch origin main 】

remote: Enumerating objects: 5, done.
remote: Counting objects: 100% (5/5), done.
remote: Compressing objects: 100% (2/2), done.
remote: Total 3 (delta 0), reused 3 (delta 0), pack-reused
Unpacking objects: 100% (3/3), 295 bytes | 98.00 KiB/s, done.
From github.com:Dd498798398/test_git_01
 * branch            main       -> FETCH_HEAD
   1a027d1..61186d4  main       -> origin/main
-- 2、查看
【 git checkout origin/main 】

Note: switching to 'origin/main'.

You are in 'detached HEAD' state. You can look around, make experimental
changes and commit them, and you can discard any commits you make in this
state without impacting any branches by switching back to a branch.

If you want to create a new branch to retain commits you create, you may
do so (now or later) by using -c with the switch command. Example:

  git switch -c <new-branch-name>

Or undo this operation with:

  git switch -

Turn off this advice by setting config variable advice.detachedHead to false

HEAD is now at df0c647 win 第二次修改,添加 eeeee
======================================================

【 git branch -v 】

* (HEAD detached at origin/main) df0c647 win 第二次修改
,添加 eeeee
  main                           61186d4 第四次提交,win 提交 dddddd
-- 3、合并
【 git merge origin/main 】

Updating 1a027d1..61186d4
Fast-forward
 aaa.txt | 1 +
 1 file changed, 1 insertion(+)
7)邀请别人,加入团队,有 push 权限:
-1:没有邀请加入团队,没权限:git push origin master(403)
-2:邀请加入团队:仓库 --> settings --> Manage access --> invite a collaborator -->输入要邀请的人 github 账号。
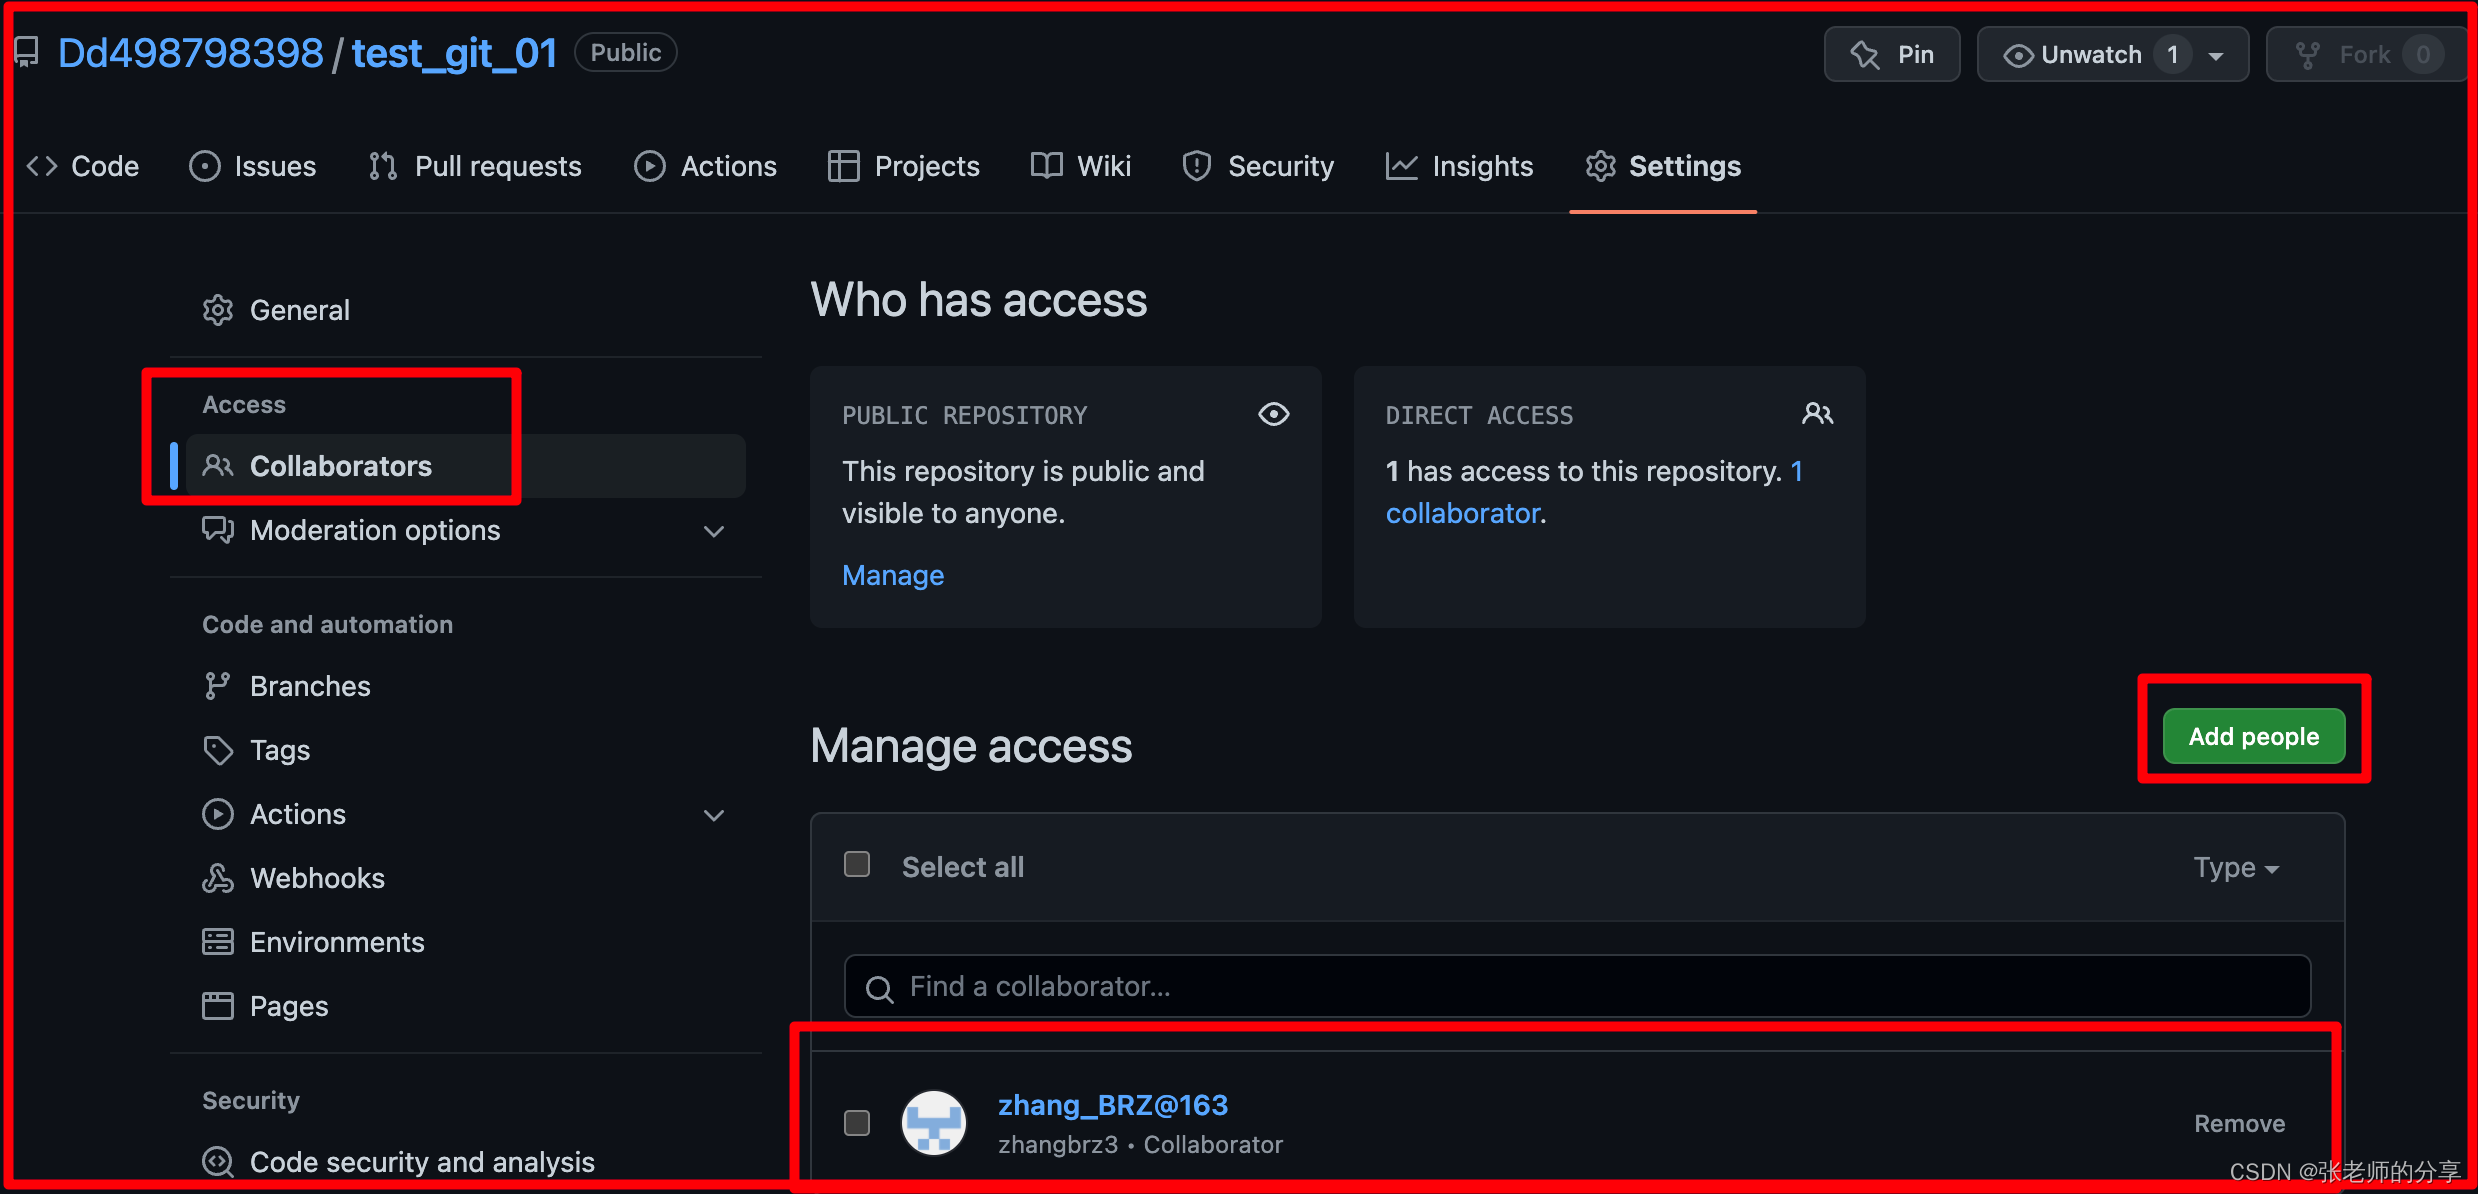
-3:复制邀请链接,发送出去:
-4:自己的 github 登录,复制的访问地址,接受邀请:就变成了团队成员。就有写的(push)权限了。
-5:win 凭据管理器,管理着 github 登陆的密码。
(如果不是基于 github 最新版本,做的修改,不能push)
1、两个人开发同一个位置,先推送到 远程库的可以推送上去,后推送的就推不上去了。
2、他必须先拉取下来,自己决定文件到底怎么修改(解决冲突),修改完再去推送。
8)协同开发时,解决冲突:(一:pull 与本地库冲突)
-1:win push 后,mac pull:(mac 修改 commit 后)
【 git pull origin main 】

error: Pulling is not possible because you have unmerged files.
hint: Fix them up in the work tree, and then use 'git add/rm <file>'
hint: as appropriate to mark resolution and make a commit.
fatal: Exiting because of an unresolved conflict.
-2:修改冲突文件:
【 vim aaa.txt 】

aaaaa
bbbbbb
cccccc
ddddd
eeeee
<<<<<<< HEAD
mac 修改
=======
win 修改
>>>>>>> origin/main
-3:mac 修复冲突文件后 commit;win pull。
9)协同开发时,解决冲突:(二:mac push 时, 与 github 冲突)
-1:win 修改后 commit,push 到 github:
-2:mac 修改后 commit,push 到 github:
【 git push origin main 】

To github.com:Dd498798398/test_git_01.git
 ! [rejected]        main -> main (fetch first)
error: failed to push some refs to 'github.com:Dd498798398/test_git_01.git'
hint: Updates were rejected because the remote contains work that you do
hint: not have locally. This is usually caused by another repository pushing
hint: to the same ref. You may want to first integrate the remote changes
hint: (e.g., 'git pull ...') before pushing again.
hint: See the 'Note about fast-forwards' in 'git push --help' for details.
-3:解决方案:pull github 到本地,解决冲突,再 push。
10)git强制覆盖本地命令(单条执行):
git fetch origin master
git reset --hard origin/master
git pull
2:跨团队协作:
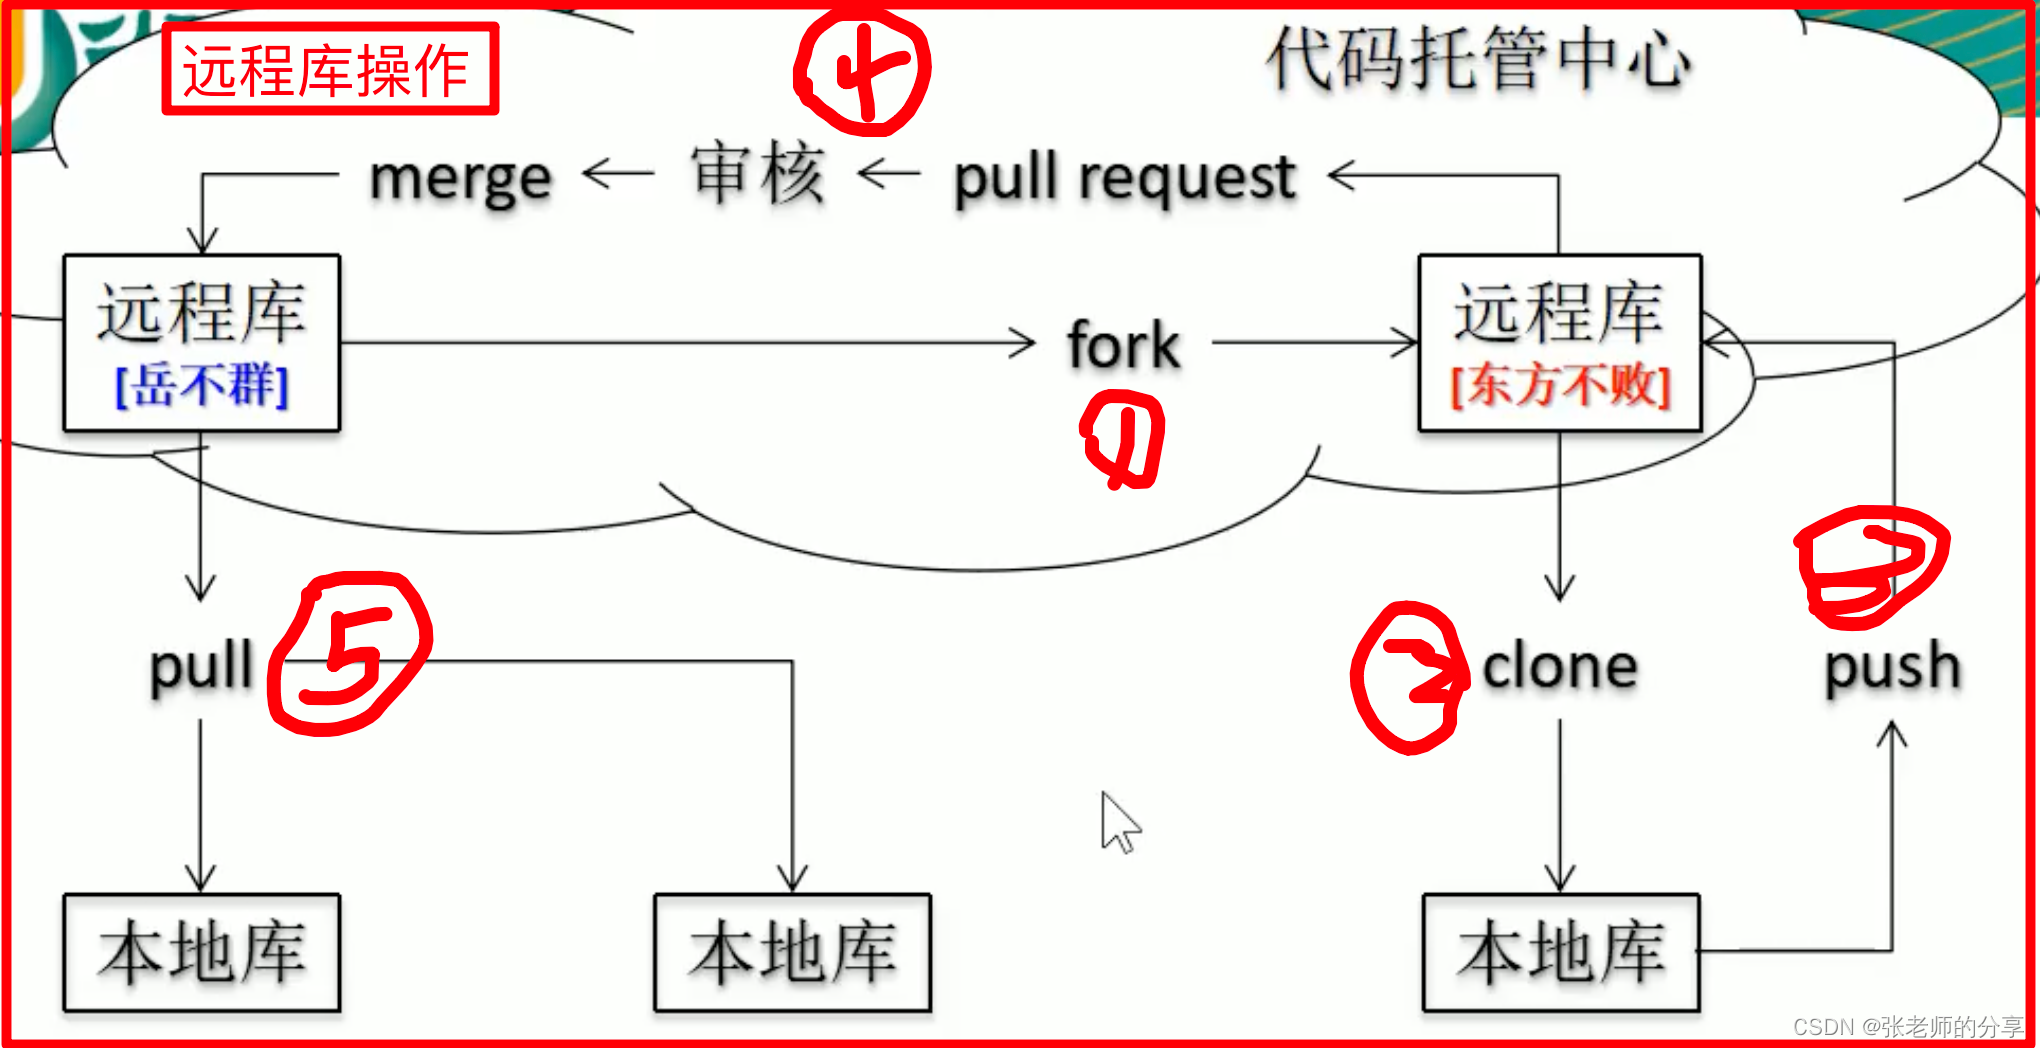
1)本地库 C 拿到项目地址:在自己的 github 中打开,点击fork,把项目复制到C的github中
2)把 github fork 之后的项目:clone 到自己的本地。修改完之后,push 推送到自己的远程库。
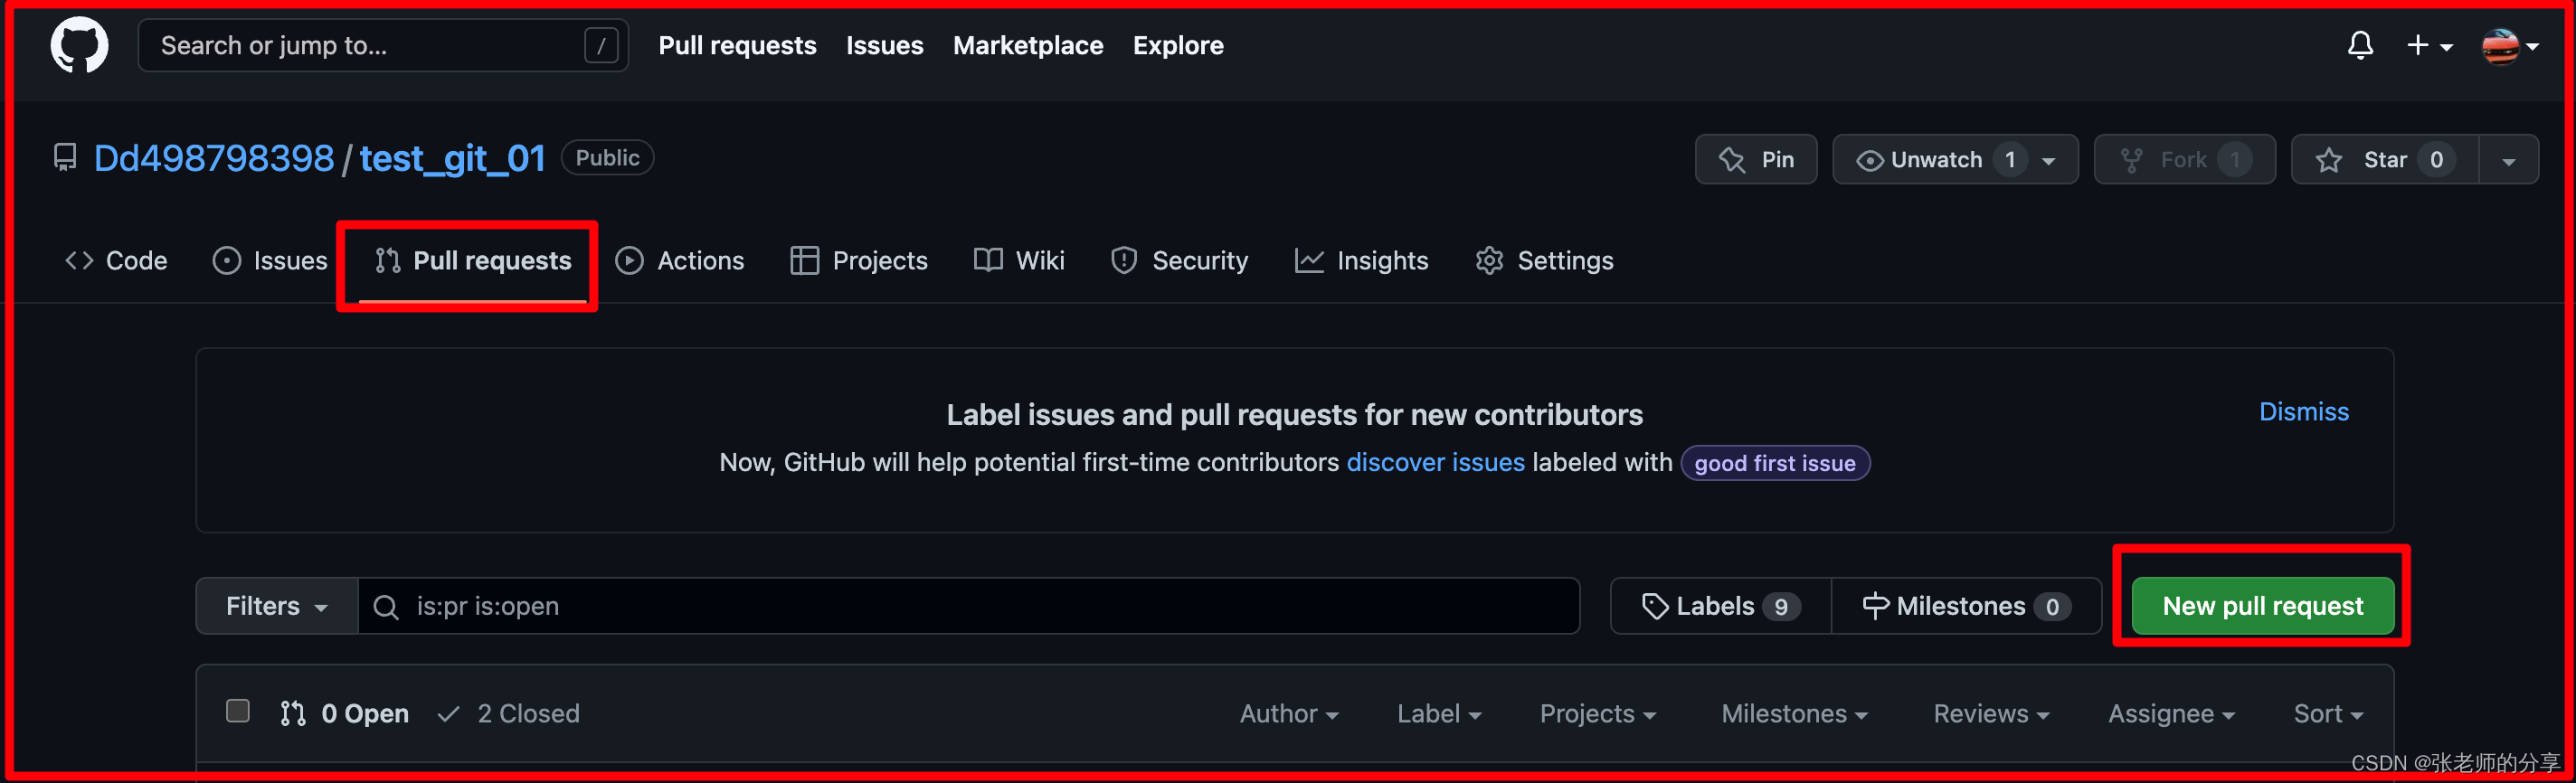
3)pull request:点击摁钮 --> new pull reqeust --> Create pull request --> 填写信息,就提交了申请。
4)用户A 登录 github: --> pull request --> Marge pull request(合并)
3:SSH 免密登陆:

五.:Git 图形化界面操作(43~56)
(视频链接:https://www.bilibili.com/video/BV1Te411W7N6?p=29&spm_id_from=pageDriver)
1:idea 使用 git:
1)在 idea setting 中配置:
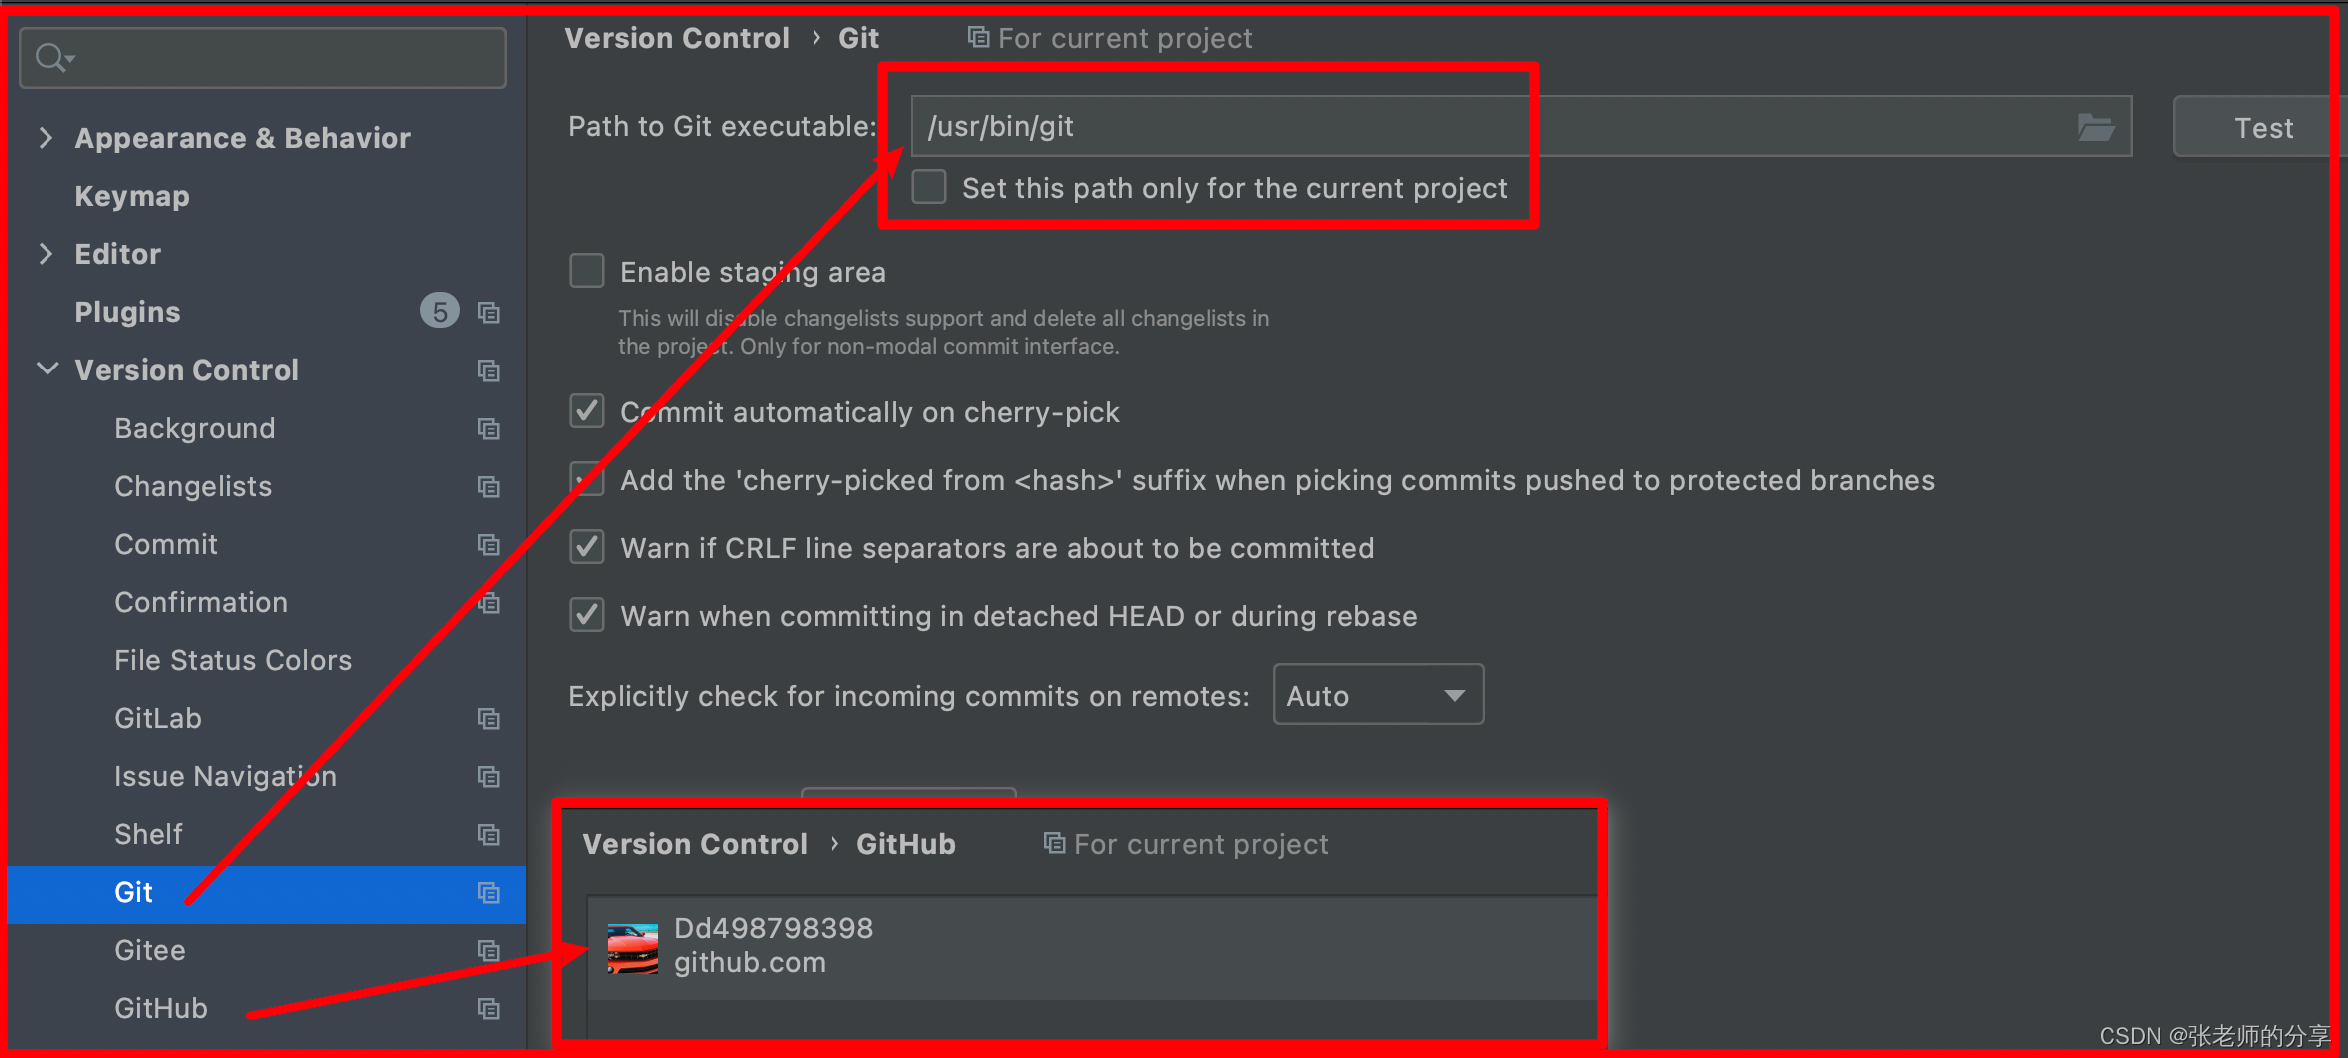
-1:git 安装目录:( which git )–>( /usr/bin/git )
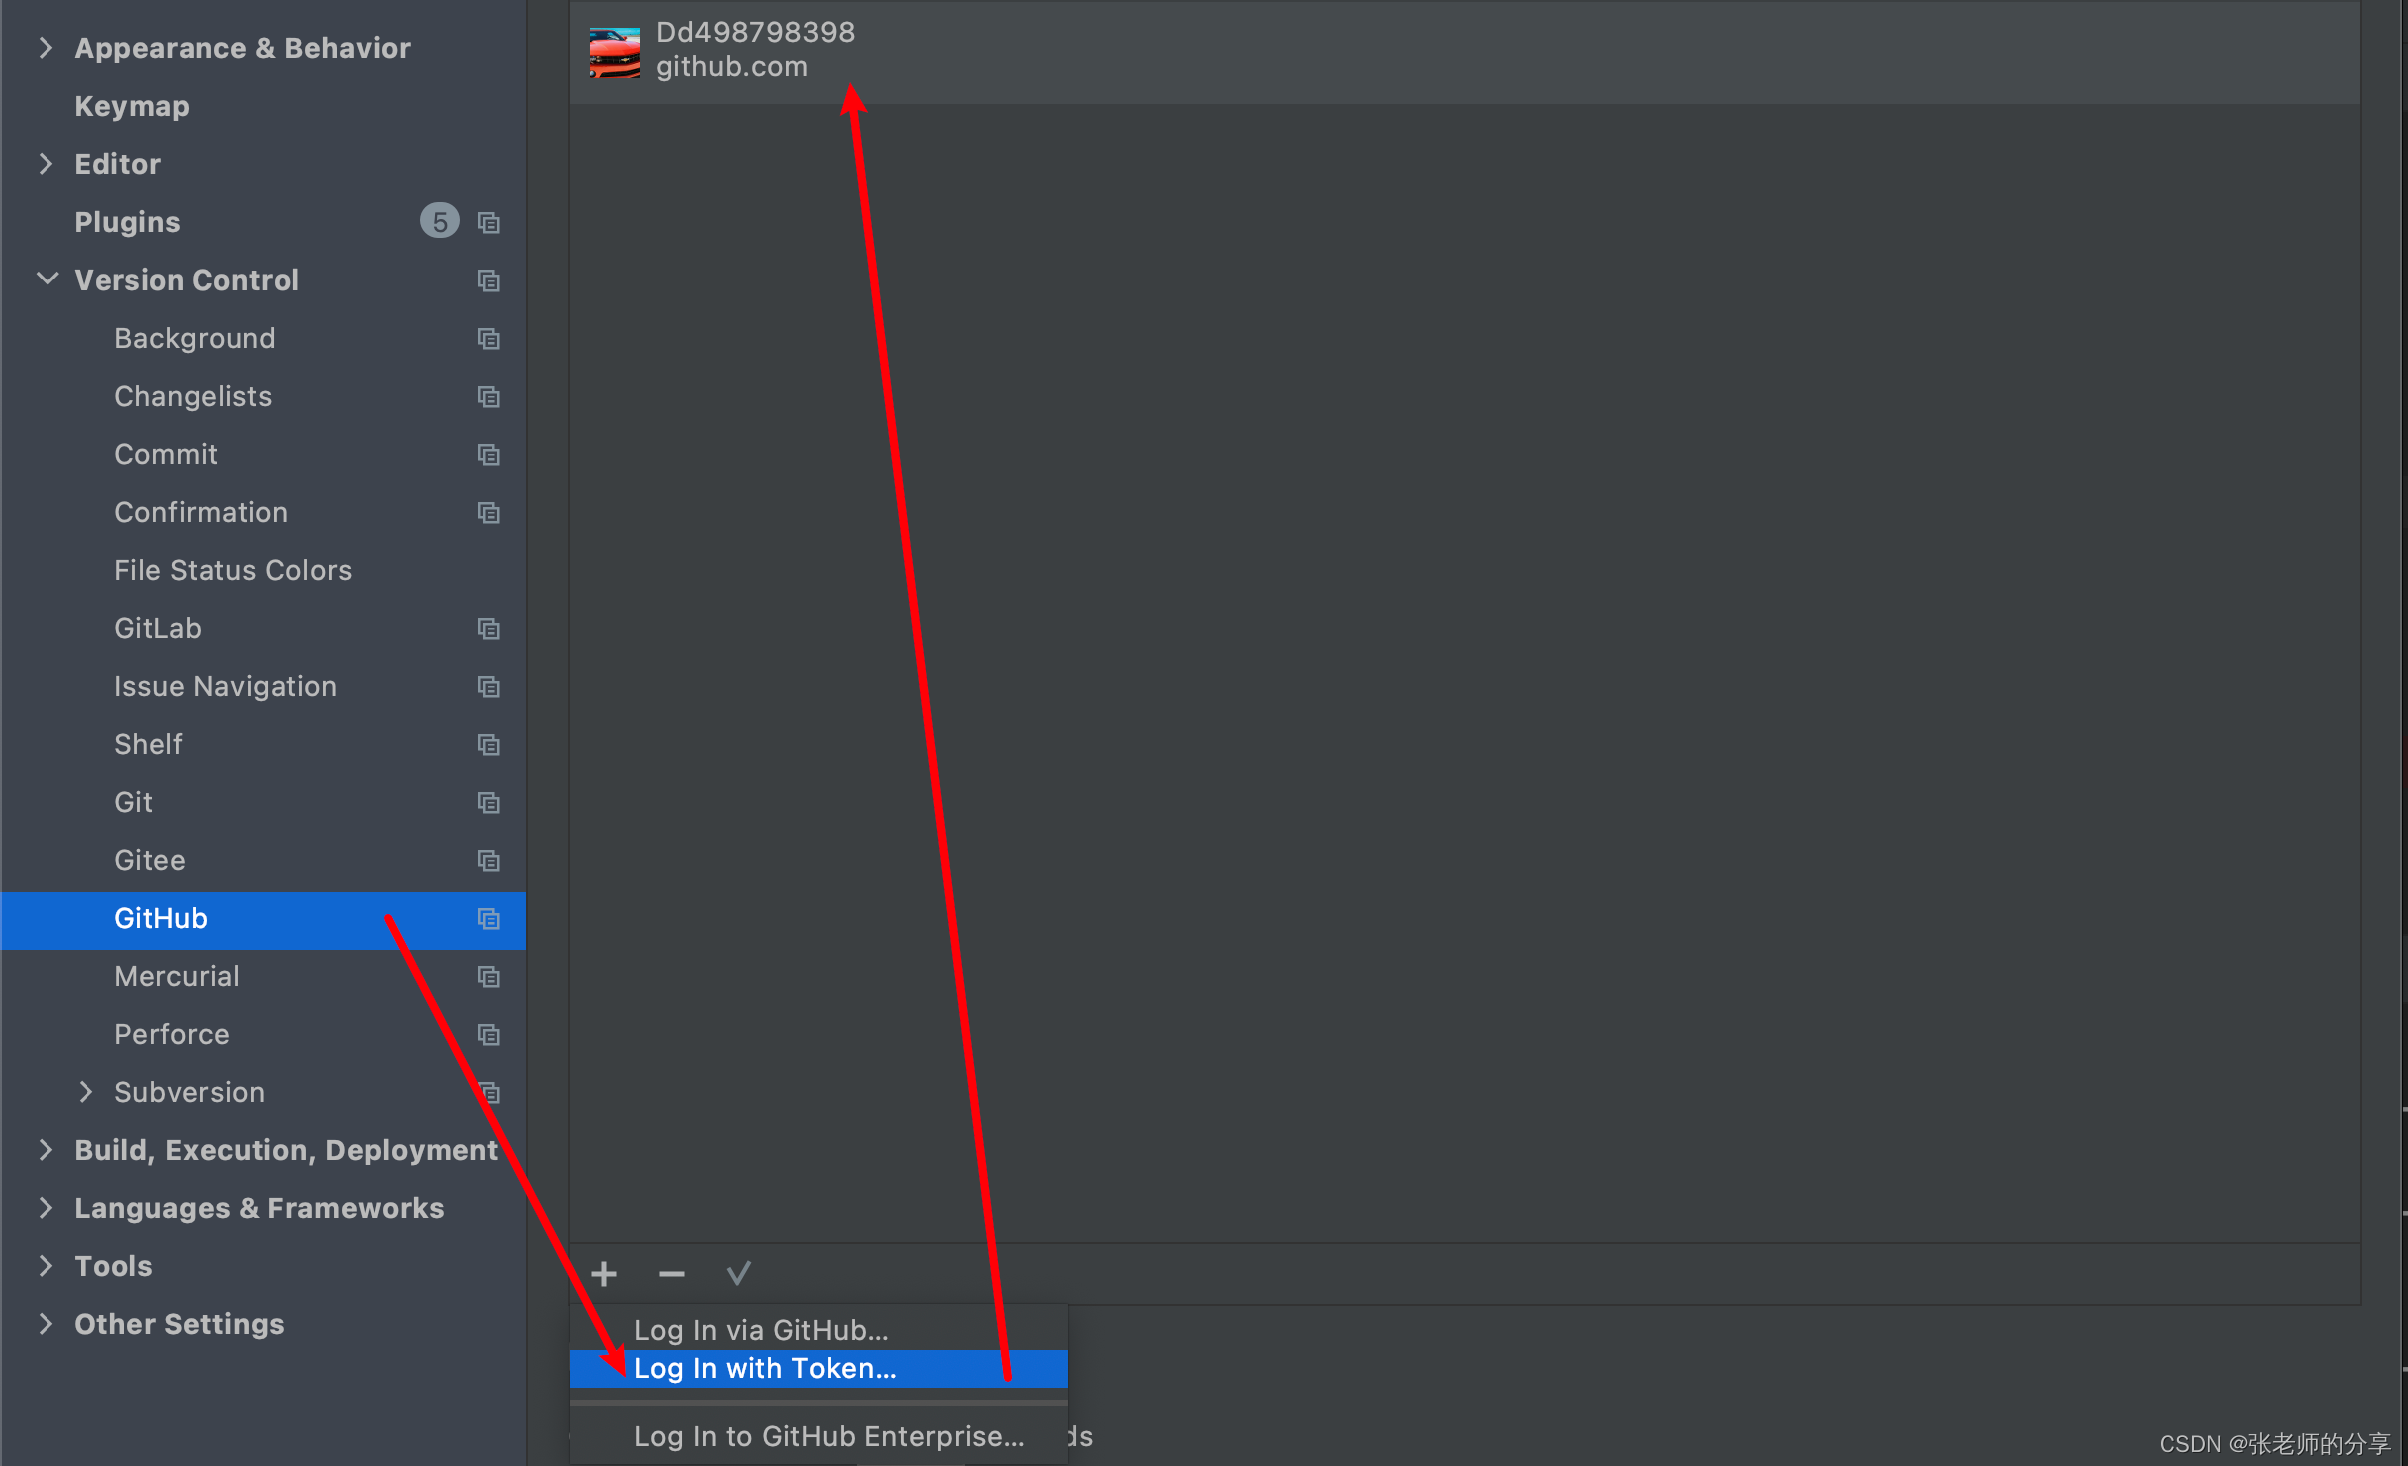
-2:github 用户:(使用 github 生产 token 登陆)
2)管理项目:
-1:idea 新建项目
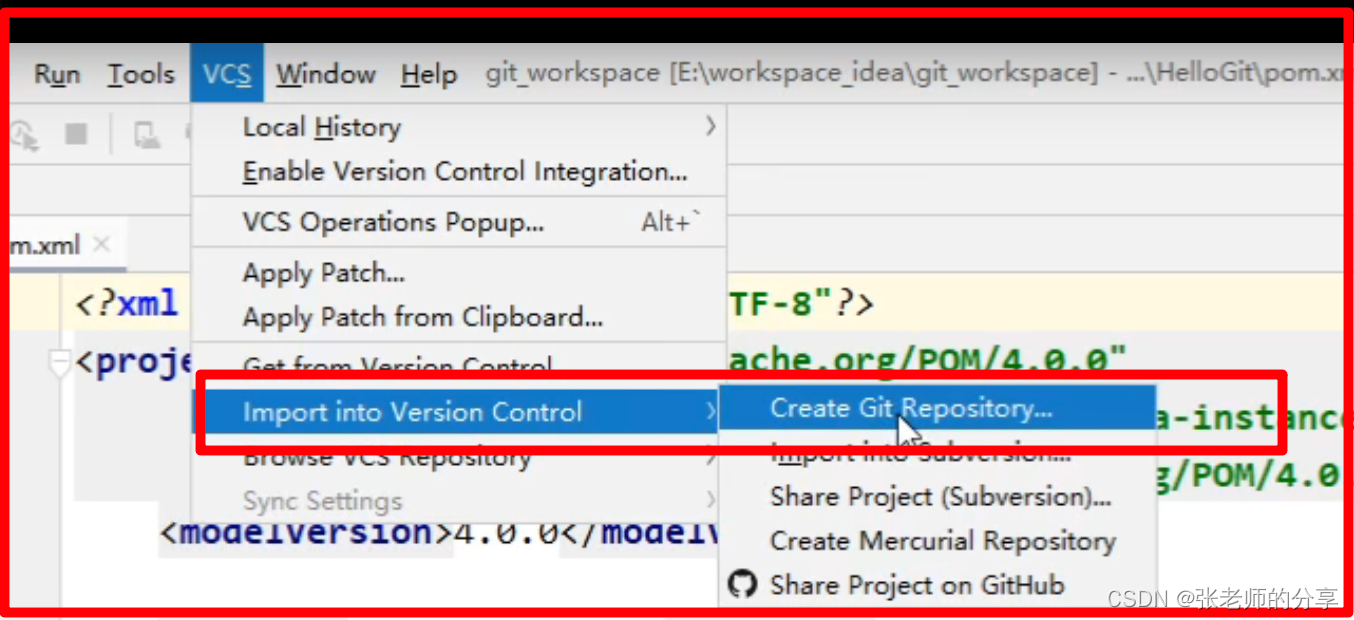
-2:把项目交给 git 管理:(创建 .git 文件)–>( vcs --> Create Git Repository )
-3:多了一个 .git 目录。
3)设置git忽略文件:
-1:文件根目录添加 .gitignore 文件:
-2:.gitignore 文件模版:(被忽略的文件就是 浅黄色)(来自 cloud_hospital)
target/
!.mvn/wrapper/maven-wrapper.jar

### STS ###
.apt_generated
.classpath
.factorypath
.project
.settings
.springBeans

### IntelliJ IDEA ###
.idea
*.iws
*.iml
*.ipr

### NetBeans ###
nbproject/private/
build/
nbbuild/
dist/
nbdist/
.nb-gradle/

### Other ###
logs
*/.settings
*/.classpath
*/.project
*/*.iml
*/*.ipr
*/*.iws
*/build
.DS_Store
*/logs
*.log
*/*.pyc
src/main/webapp/WEB-INF/classes
src/main/webapp/META-INF
*rebel*
hospital-common/src/test/java
hospital-jianguan/src/test/java/local
*/src/test/generated
local
log
4)项目提交:
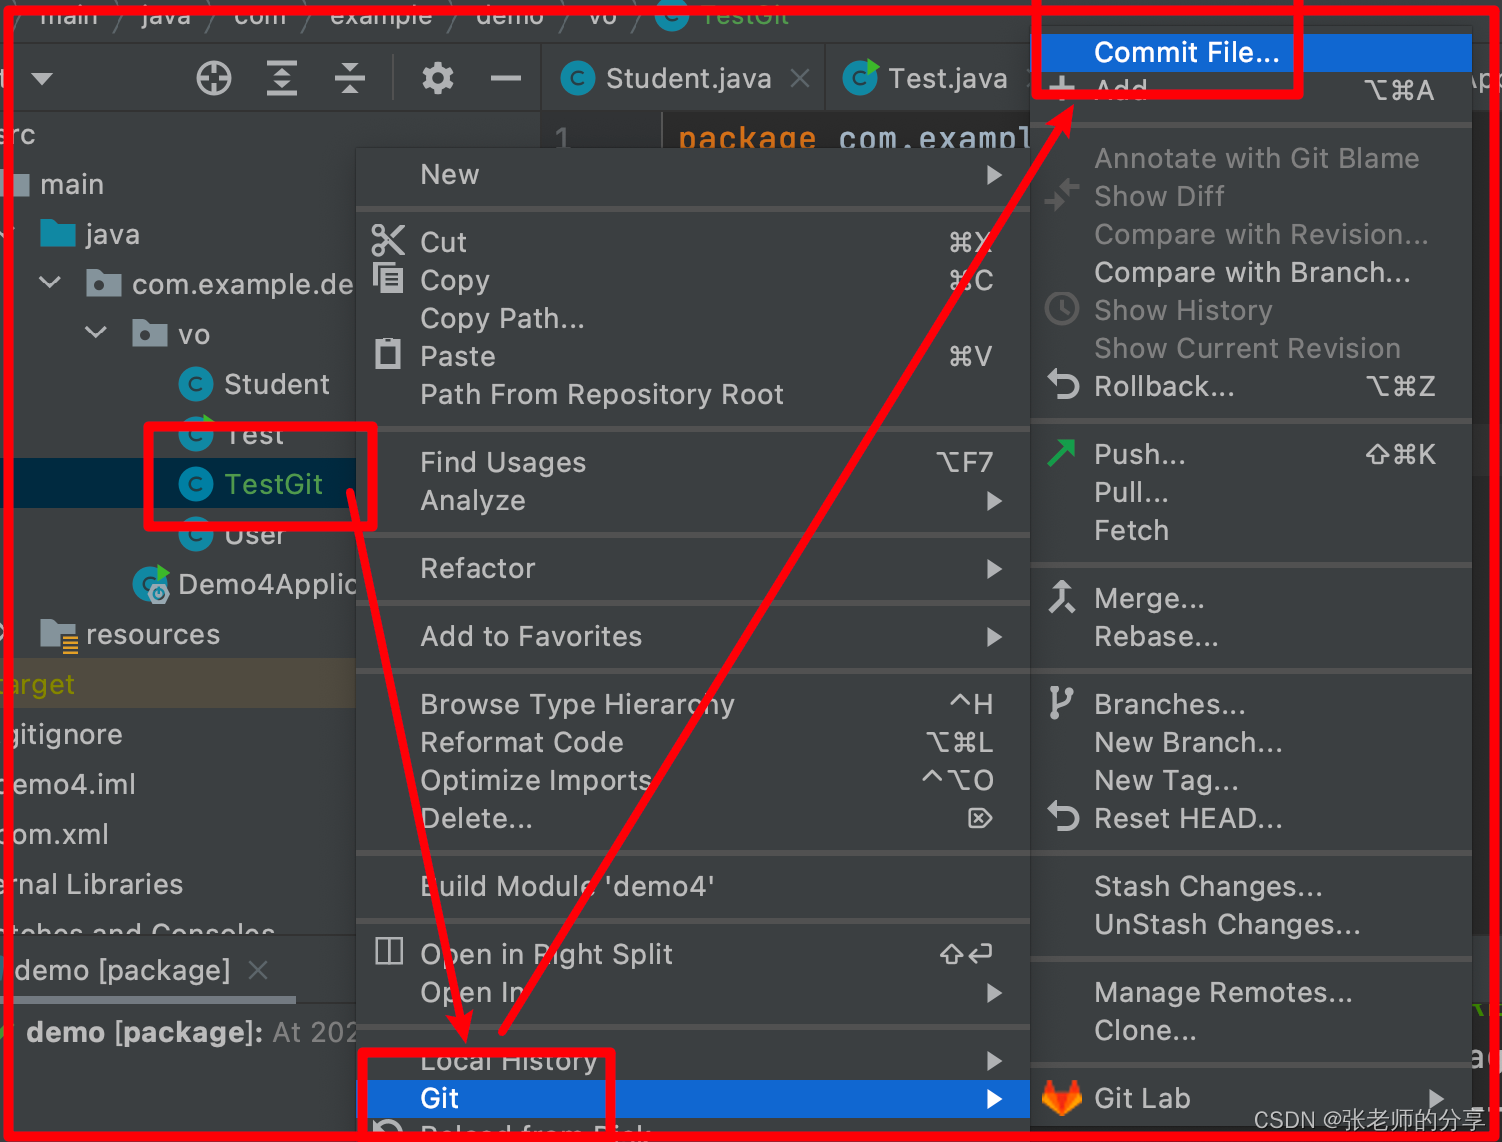
-1:add 添加到暂存区:( 红色 --> git.add --> 绿色 )
-2:add 后,可以回滚:( git --> rollback )(界面上也有 按钮)
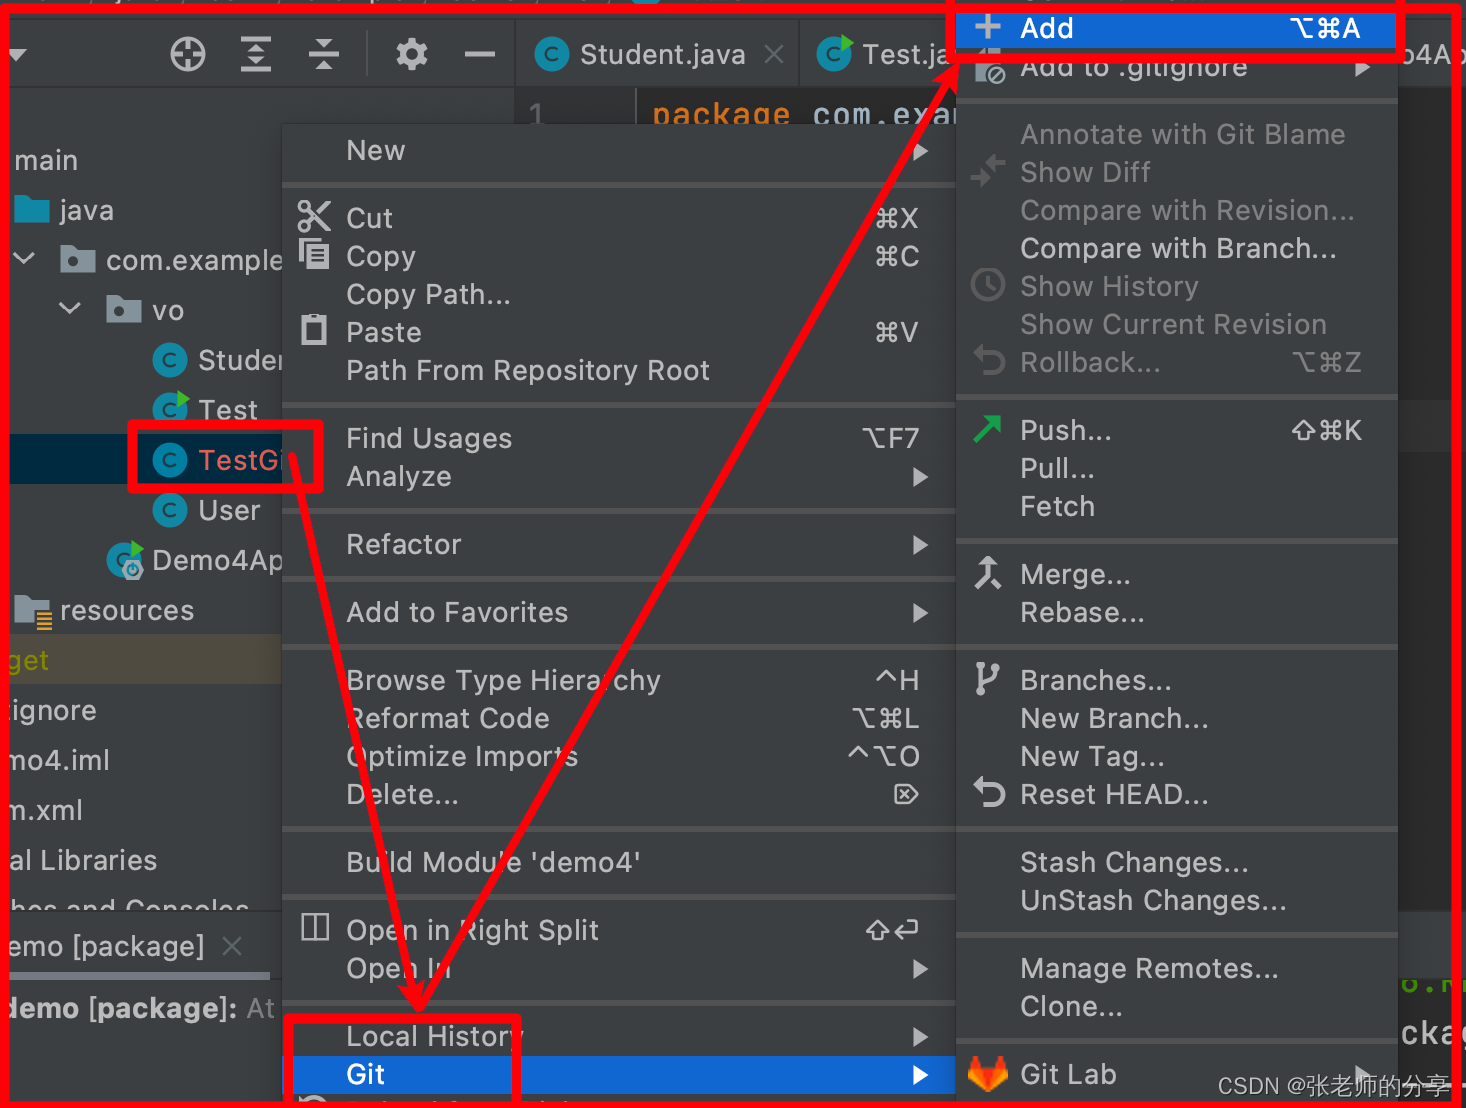
-3:添加到 本地库:( 绿色 --> git.commit --> 黑色 )
2:版本切换:
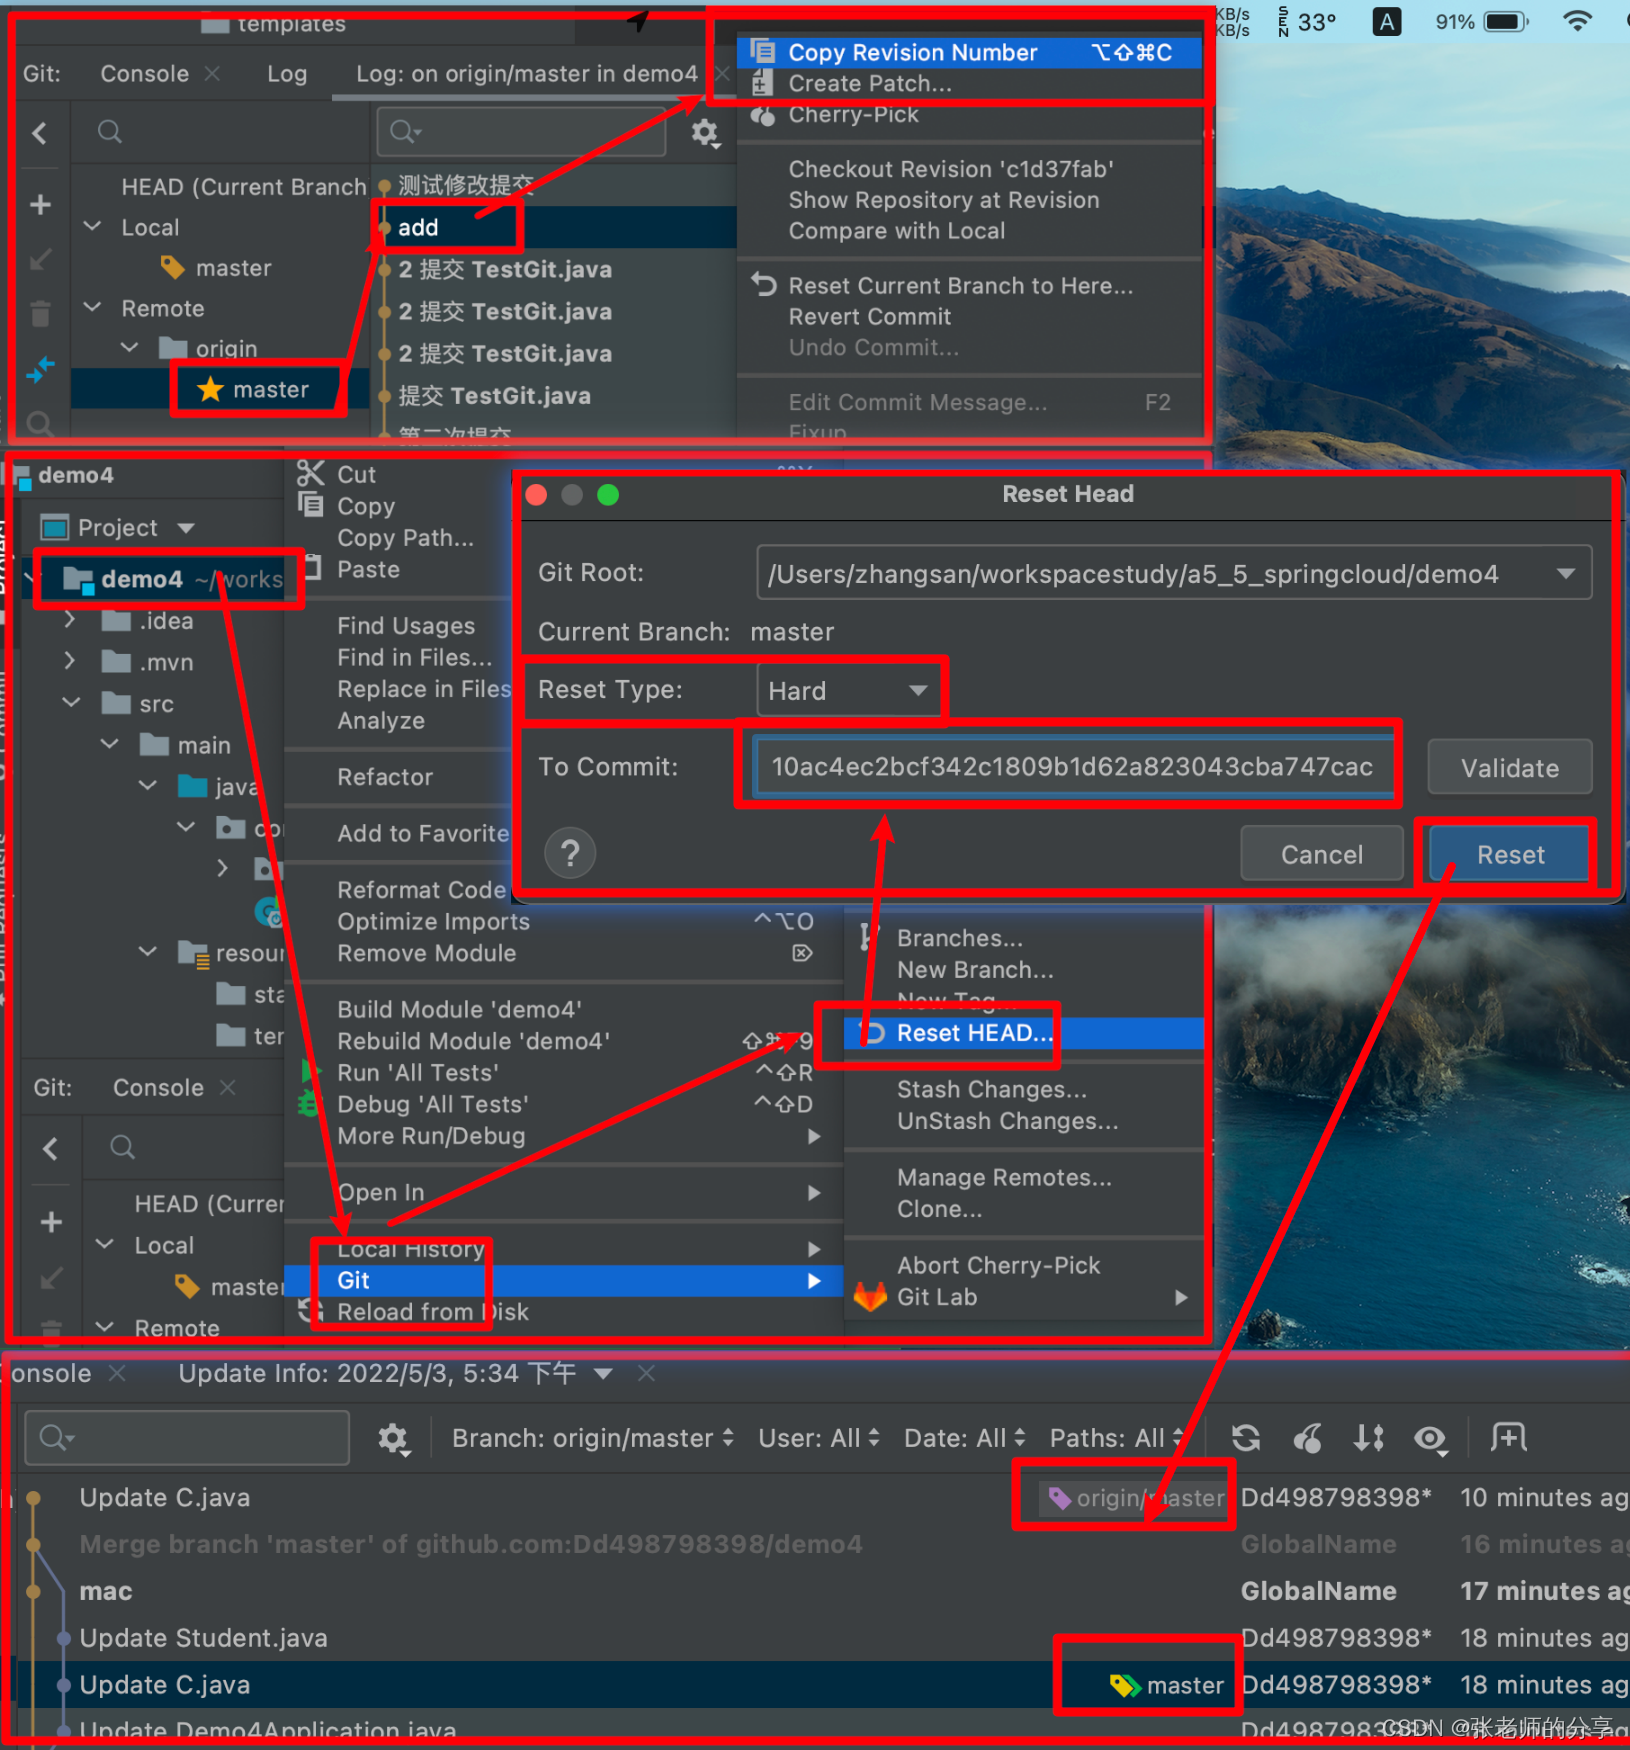
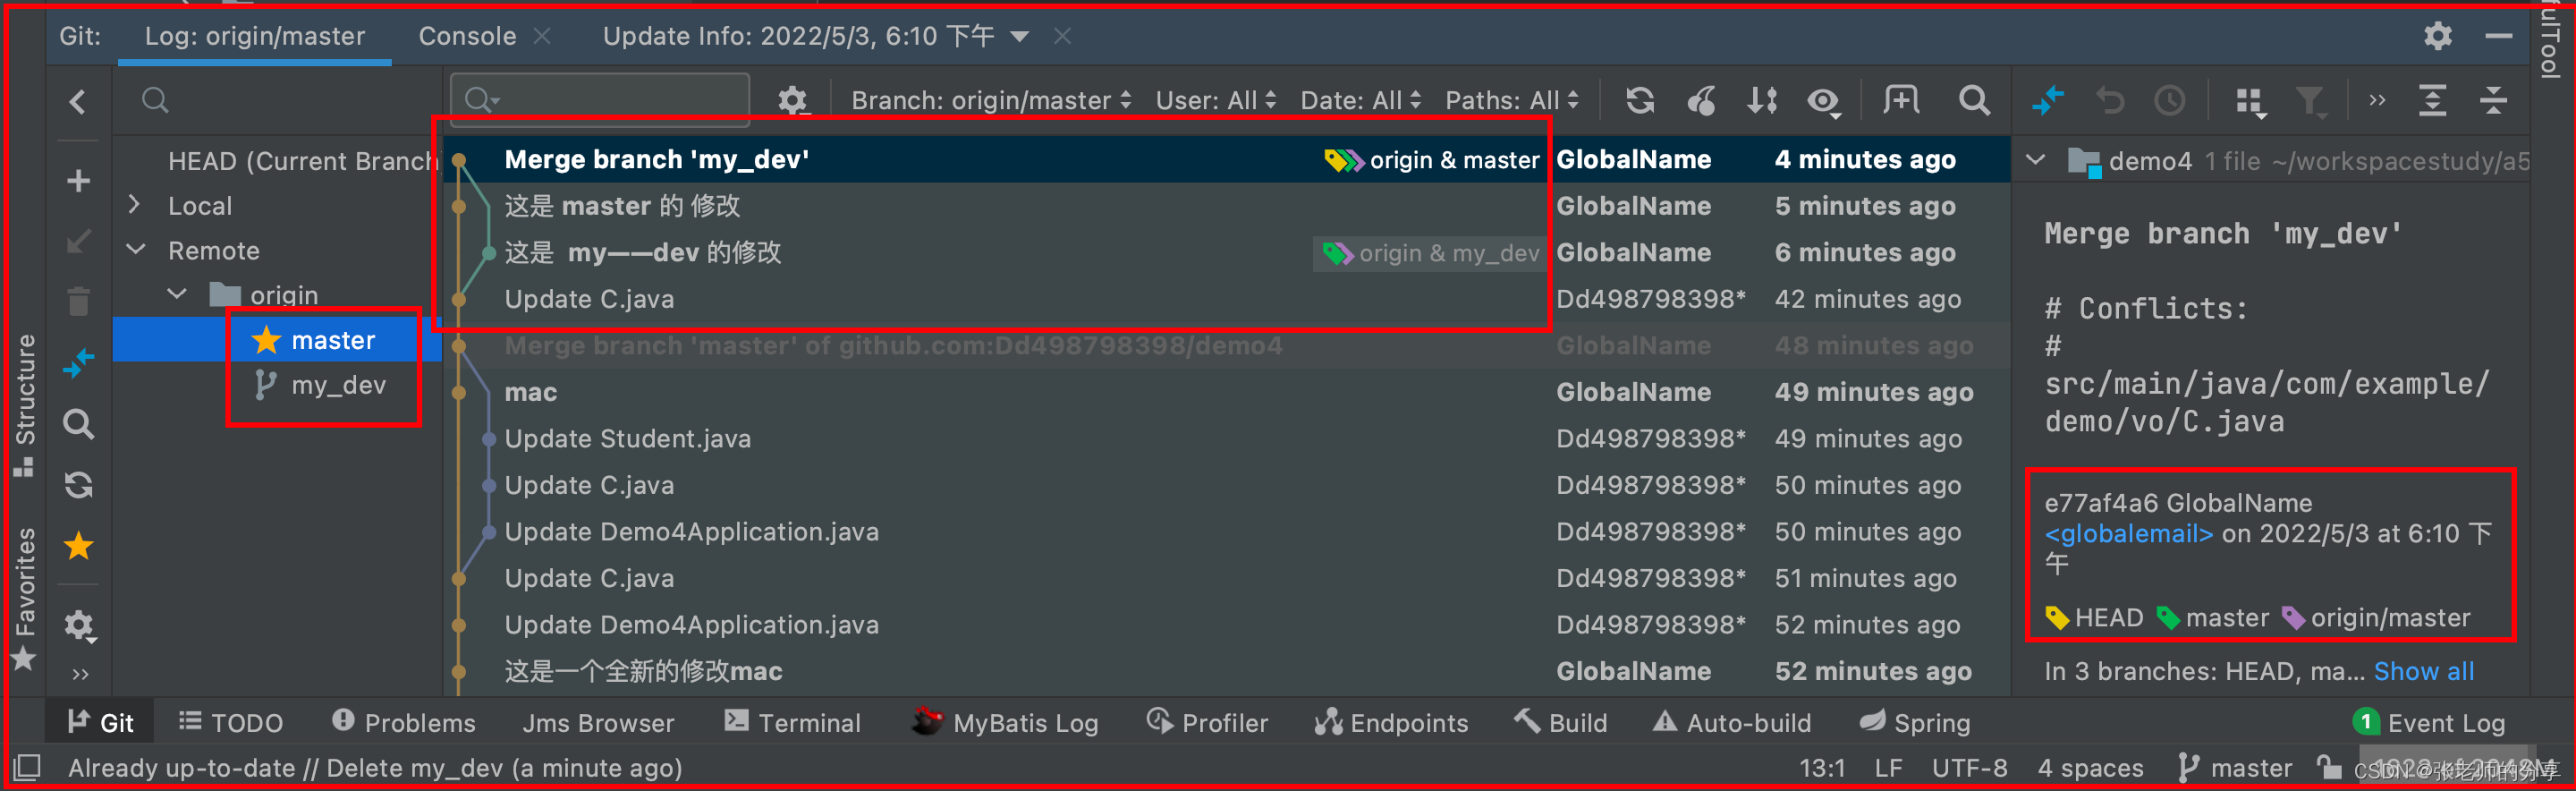
1)找到 history:
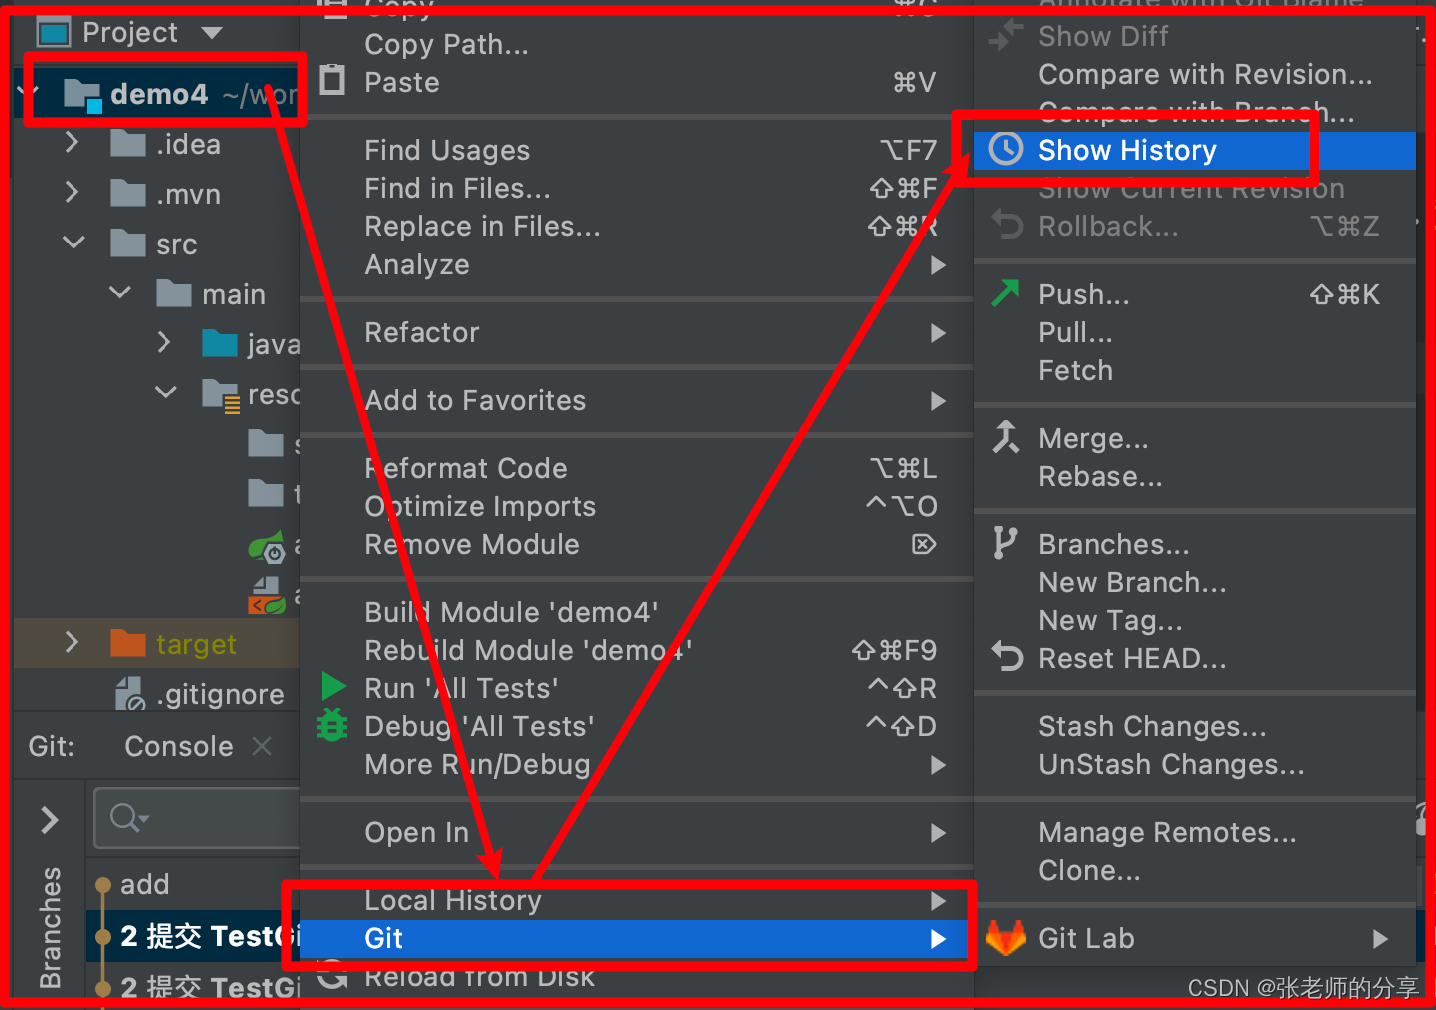
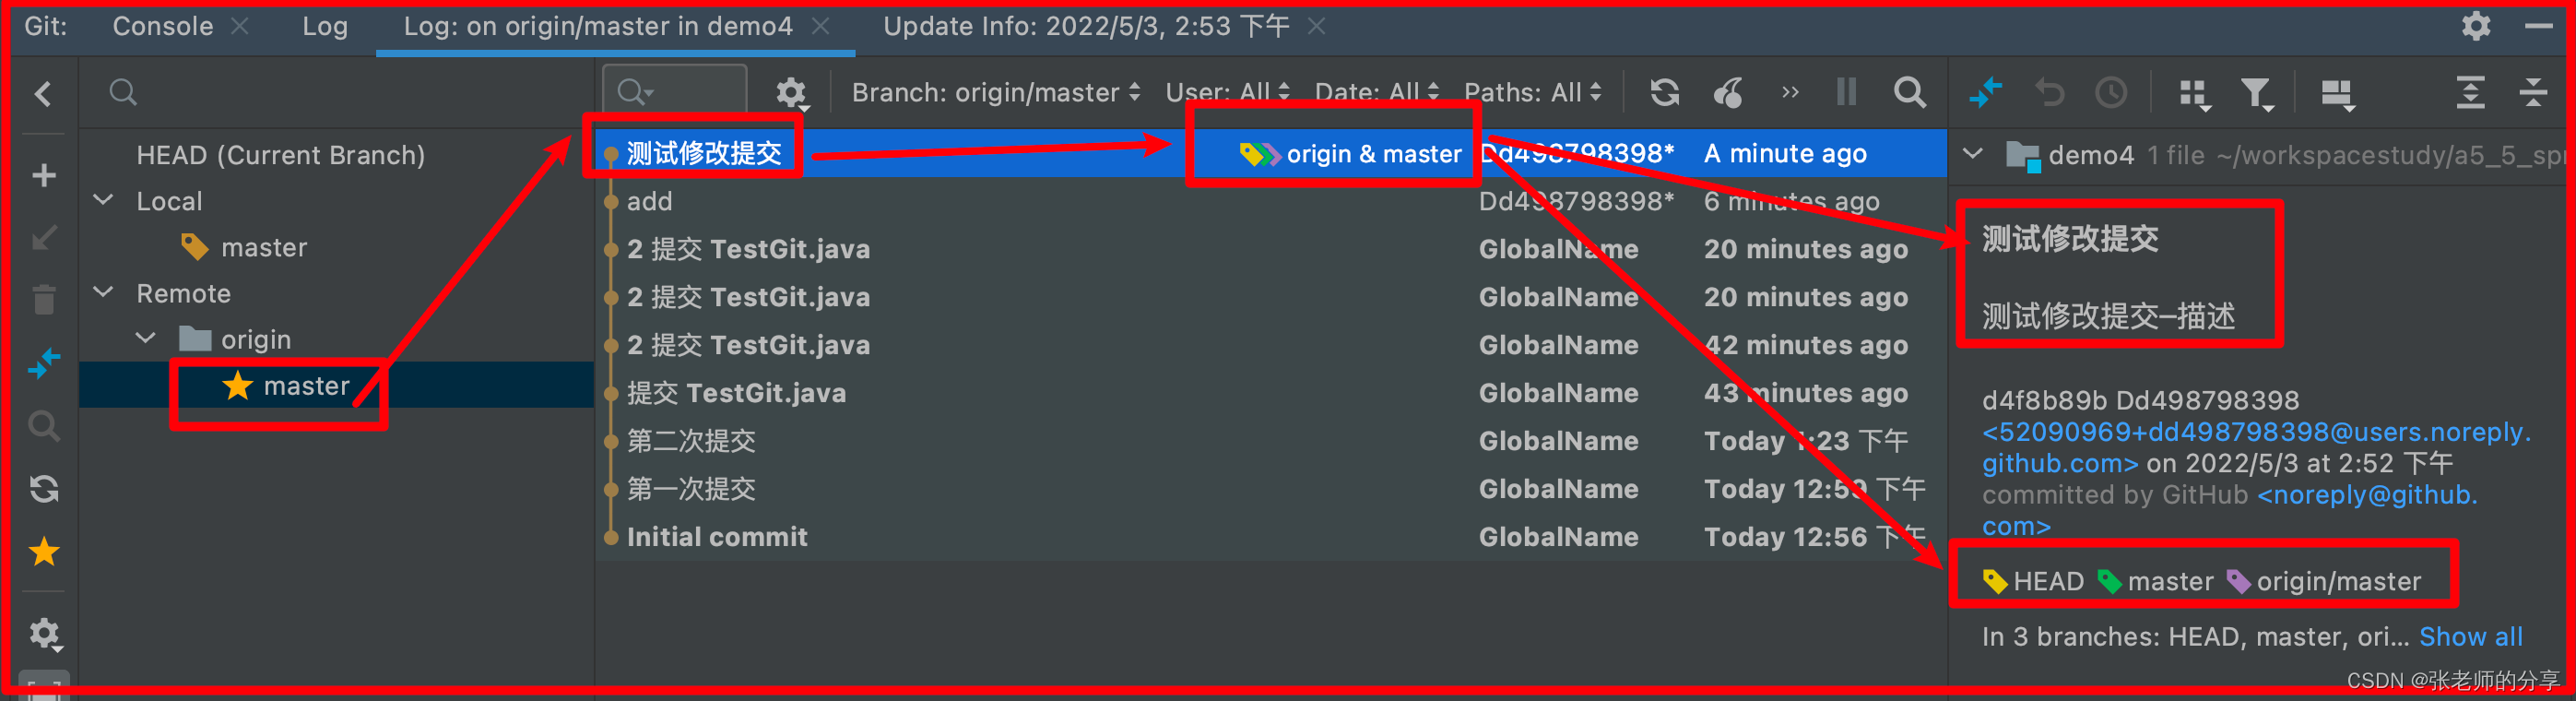
-1:绿的 master 标签代表:当前master 分支的指针。
-2:黄色 HEAD 标签代表:当前界面看到的,头指针所在位置。
2)切换版本:
3:分支:
1)创建分支:
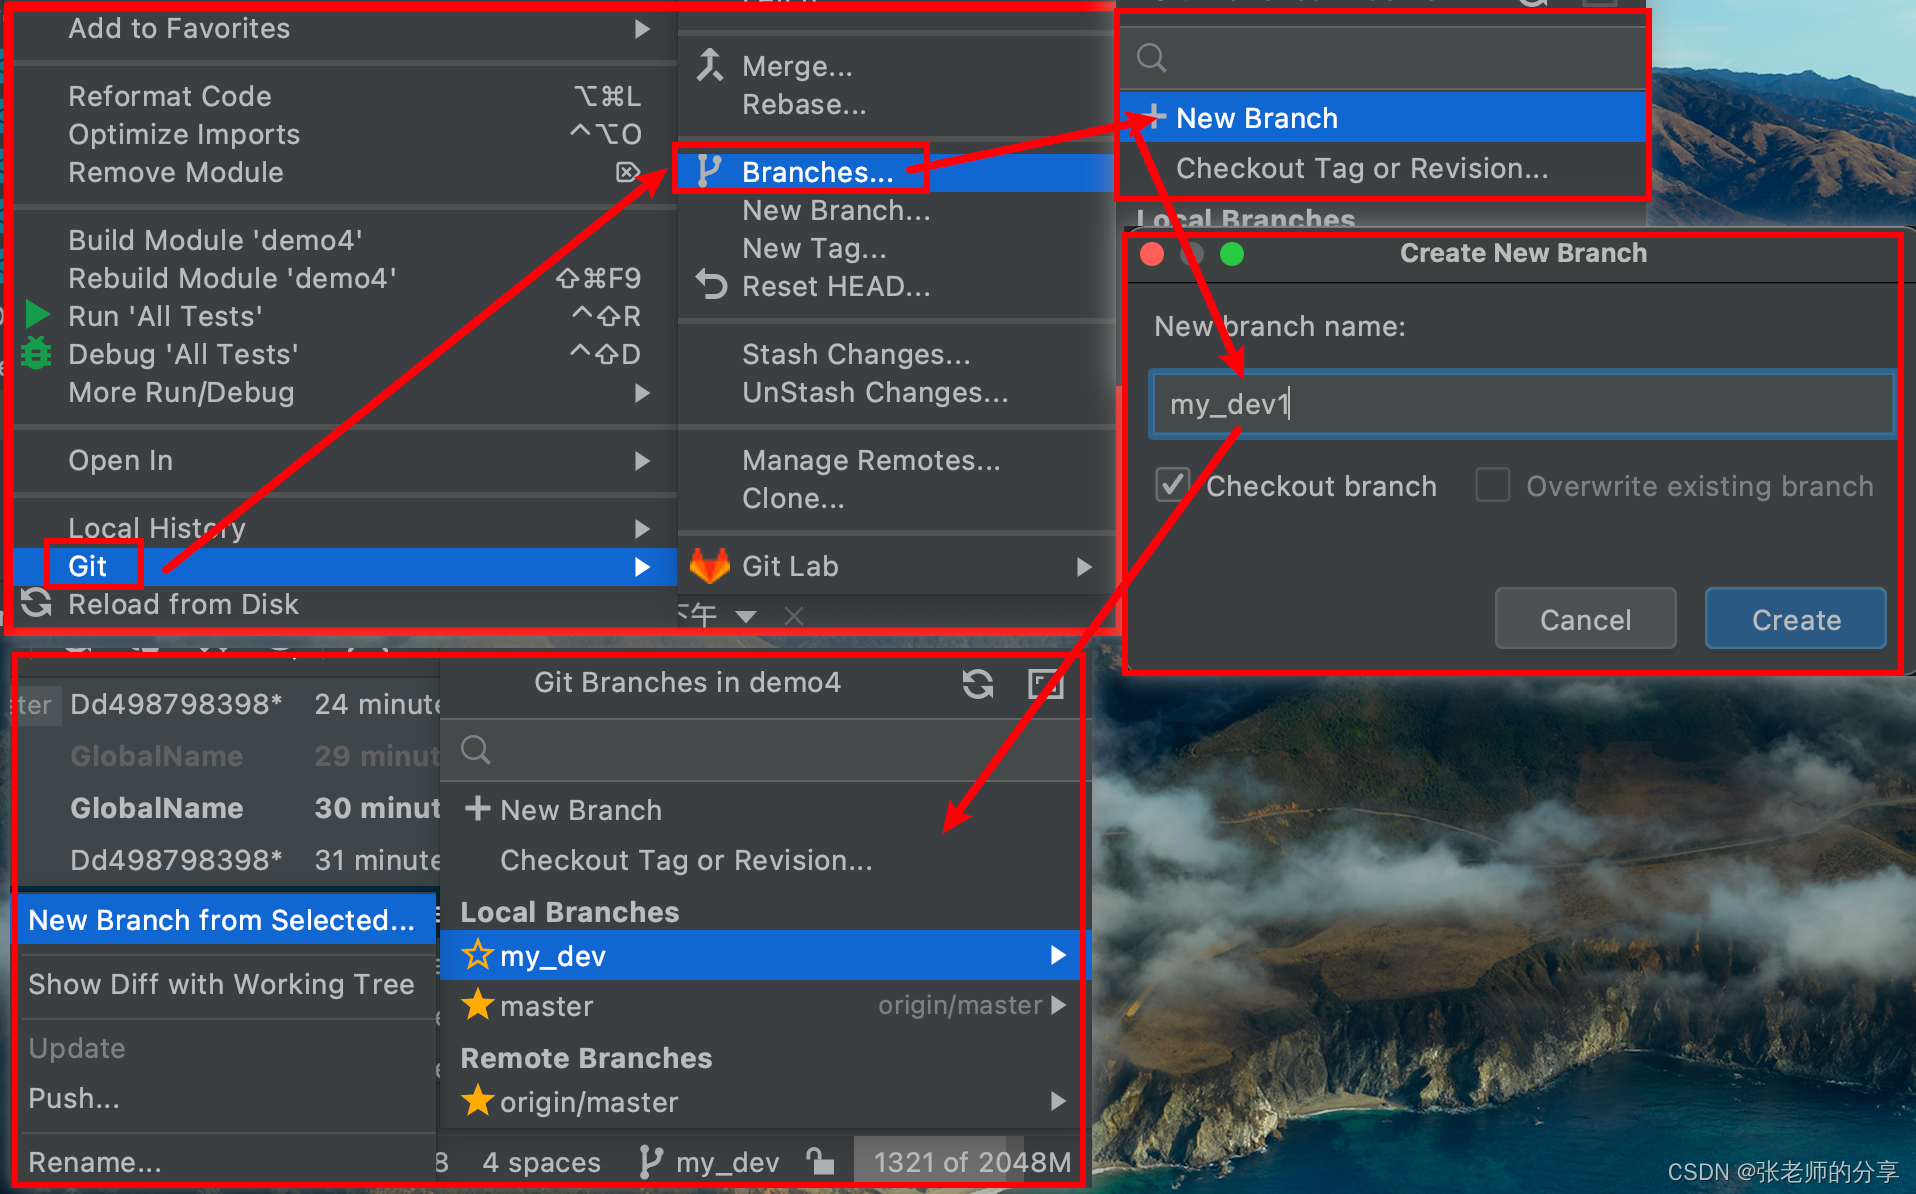
2)切换分支:idea 右下角切换
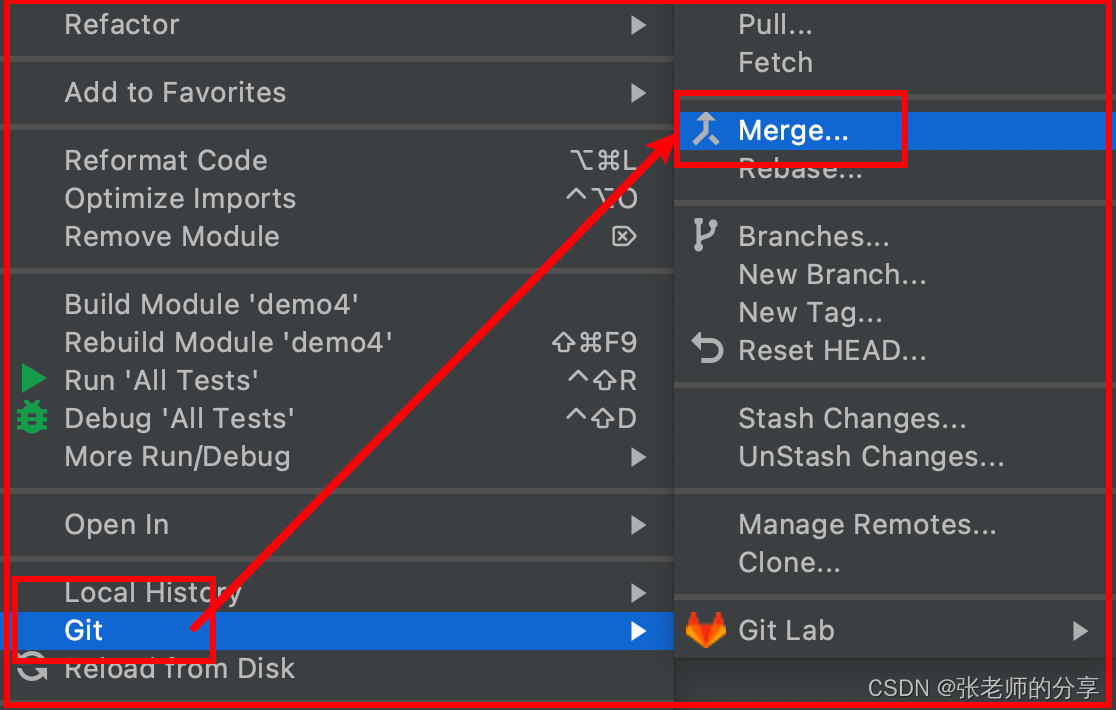
3)合并分支:(当前在 master 上,合并 hot_fix 分支 )
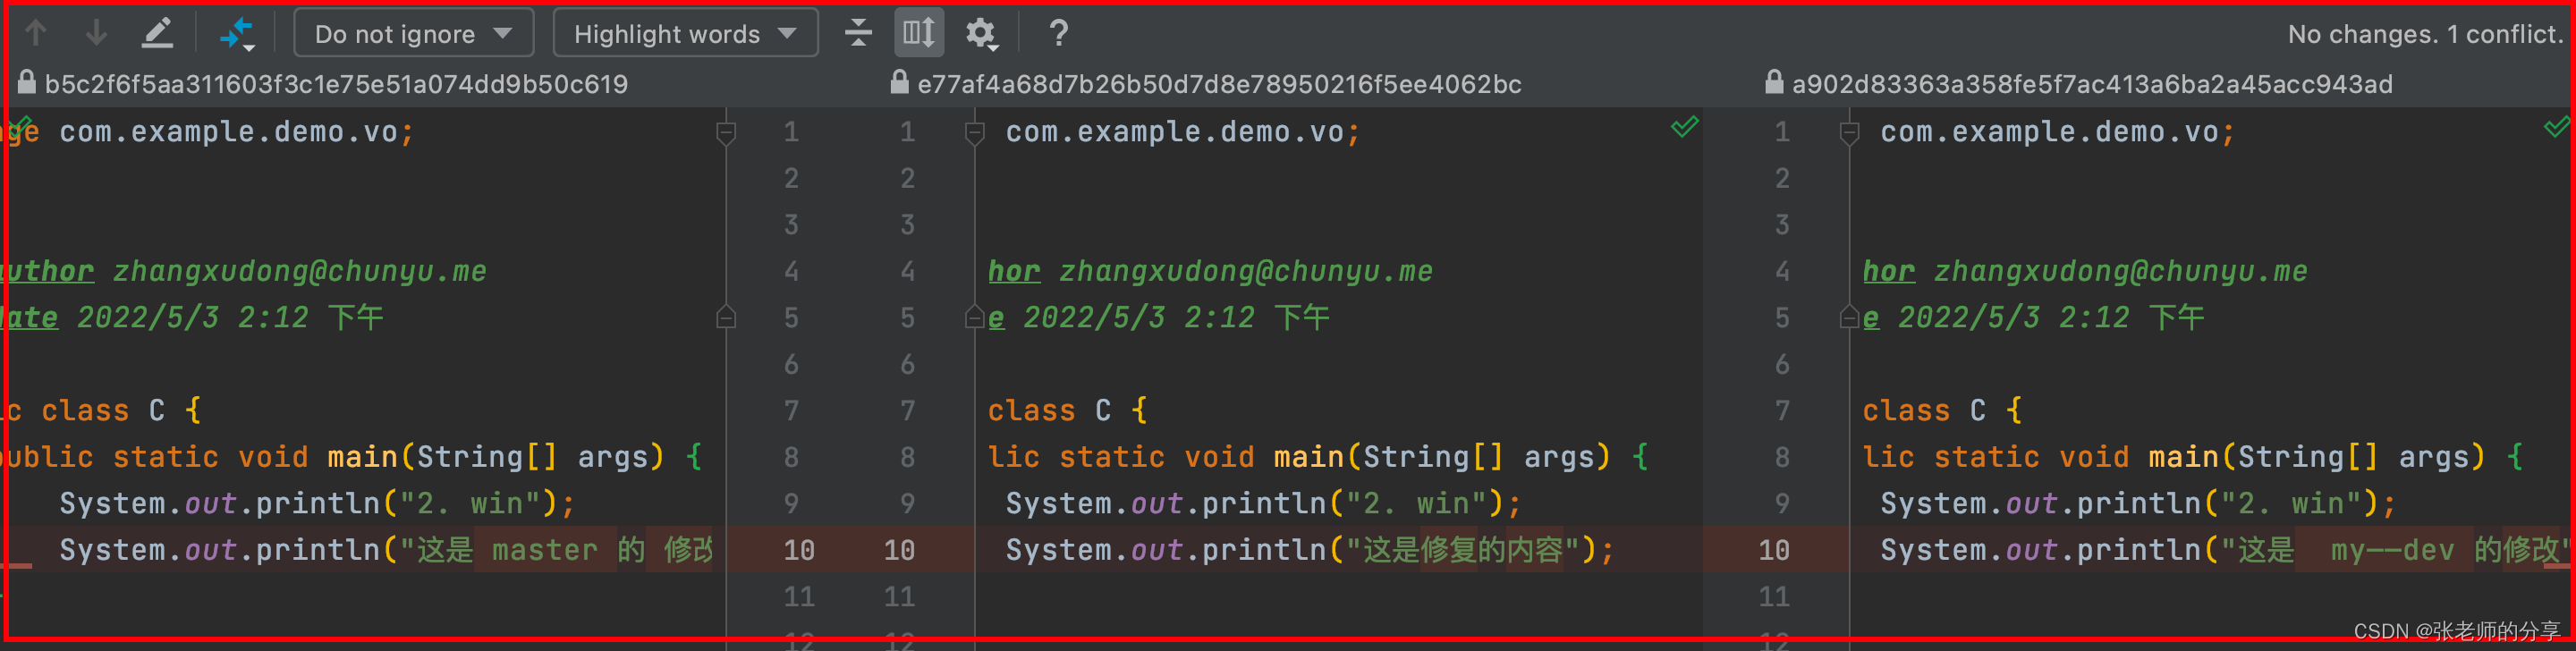
4)冲突合并:(手动选择: 左自己修改 <–> 中间正常无冲突 <–> 右面hot_fix 分支)
4:idea 推送远程库:
1)冲突:(push 时候,远程库已经被修改,push 失败)
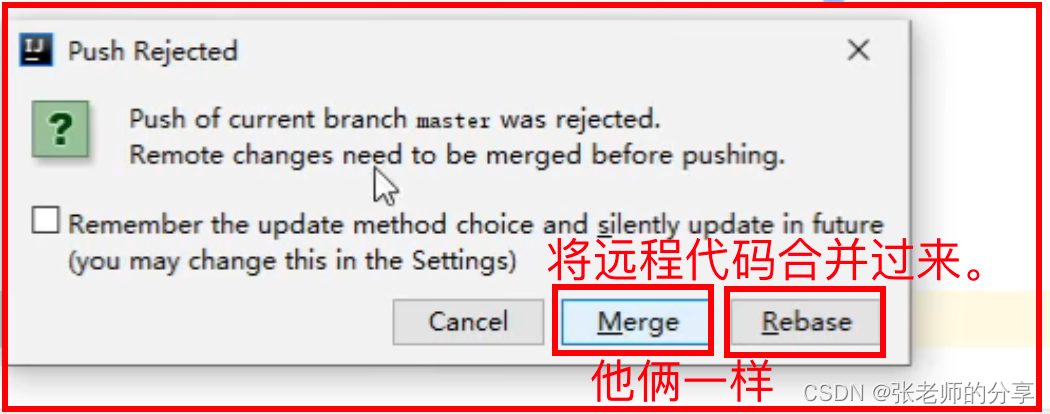
2)github 上,push request,可以在线解决冲突:
4:idea 集成(Github|Gitee|Gitlab):
1)集成 Github:
-1:idea --> settings --> token 登陆
-2:方法一:在 github 建立 repository --> git push (push remote)
-3:方法二:share,自动创建远程库:
-4:本地库推送到远程库、拉取远程库到本地、克隆项目。
2)集成 Gitee:
3)集成 Gitlab:
六.:Gitlib 服务器搭建(57~)
最后
以上就是眯眯眼豆芽最近收集整理的关于git、idea整合—尚硅谷—2018-06-06的全部内容,更多相关git、idea整合—尚硅谷—2018-06-06内容请搜索靠谱客的其他文章。


发表评论 取消回复