前言
上一篇博客中针对一对一映射做了一个简单的总结,但是针对嵌套查询中的fetchType属性却没有做过多的阐述,一对多模式其实和一对一模式大同小异,只是使用的标签不同,同时也会涉及到fetchType的使用,这篇博客中会统一进行总结。
collection标签
和association标签类似,总体来说collection标签的使用分为两种方式。
一种是嵌套的结果查询——一次SQL查询将所有的结果查询出来,然后通过配置的结果映射,将数据映射到不同的对象中。
第二种是集合的嵌套查询——并不是一次SQL查询出所有结果,根据上一次查询的结果,作为参数传递给下一层的SQL,通过多次查询完成结果(可能有点晕,后面看实例)。
具体的实例还是会用老生常谈的RBAC权限模型:一个用户拥有多个角色,一个角色拥有多个权限。
在实例开始之前,需要构建相关属性维持一对多的关系。
SysUser中增加List<SysRole> roleList属性。
    private List<SysRole> roleList;

    public List<SysRole> getRoleList() {
        return roleList;
    }

    public void setRoleList(List<SysRole> roleList) {
        this.roleList = roleList;
    }
SysRole中增加List<SysPrivilege> privilegeList属性
    private List<SysPrivilege> privilegeList;

    public List<SysPrivilege> getPrivilegeList() {
        return privilegeList;
    }

    public void setPrivilegeList(List<SysPrivilege> privilegeList) {
        this.privilegeList = privilegeList;
    }
嵌套结果映射
在相关实体类中完成了属性的配置,我们需要做的就是将结果映射到这些属性上。这个时候collection标签的作用就开始了
1、初步版本,所有的属性映射都在一起
    <resultMap id="userRoleListMap" type="com.learn.chapter06one2many.domain.SysUser">

        <id property="id" column="id"></id>
        <result property="userPassword" column="user_password"></id>
        <result property="userName" column="user_name"></result>
        <result property="userEmail" column="user_email"></result>
        <result property="userInfo" column="user_info"></result>
        <result property="headImg" column="head_img" jdbcType="BLOB"></result>
        <result property="createTime" column="create_time" jdbcType="TIMESTAMP"></result>

        <collection property="roleList" columnPrefix="role_" ofType="com.learn.chapter06one2many.domain.SysRole">
            <id property="id" column="id"></id>
            <result property="roleName" column="role_name"></result>
            <result property="enabled" column="enabled"></result>
            <result property="createBy" column="create_by"></result>
            <result property="createTime" column="create_time" jdbcType="TIMESTAMP"></result>
        </collection>
    </resultMap>
可以看到collection其实和association差不多,collection支持的属性作用和association完全相同
2、直接应用RoleMapper中的映射
将上述简单版本中的collection修改如下即可
<collection property="roleList" columnPrefix="role_" resultMap="com.learn.chapter06one2many.dao.RoleMapper.roleMap"></collection>上述执行的查询情况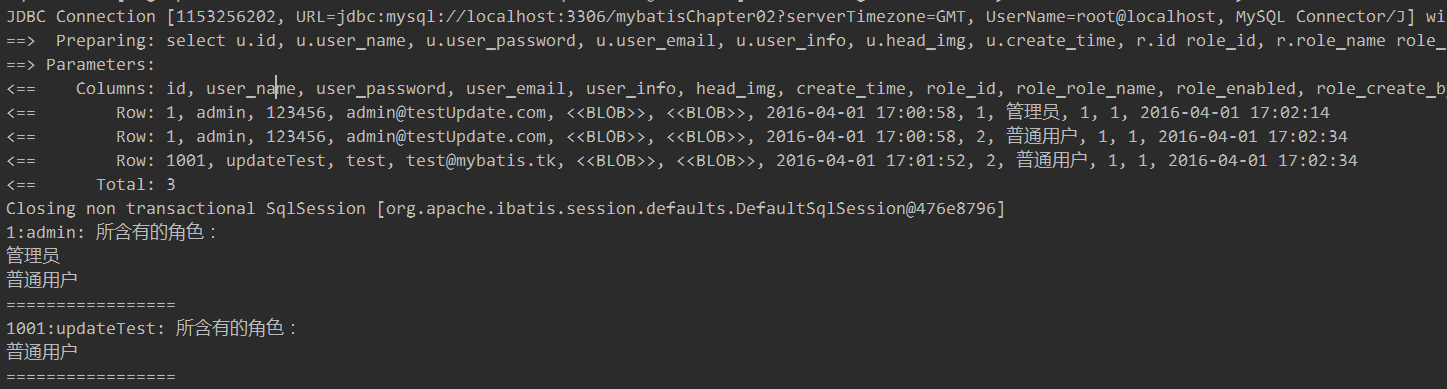
可以看到一次执行的查询查找出三个结果,但是针对MyBatis将其中的两条查询结果融入到了第一条,这个就和MyBatis处理的规则有关系了。
3、将权限表也进行关联
    <resultMap id="privilegeMap" type="com.learn.chapter06one2many.domain.SysPrivilege">
        <id property="id" column="id"></id>
        <result column="privilege_name" property="privilegeName"></result>
        <result column="privilege_url" property="privilegeUrl"></result>
    </resultMap>
RoleMapper中增加相关映射
    <resultMap id="rolePrivilegeListMap" extends="roleMap" type="com.learn.chapter06one2many.domain.SysRole">
        <collection property="privilegeList" columnPrefix="privilege_" resultMap="com.learn.chapter06one2many.dao.PrivilegeMapper.privilegeMap"></collection>
    </resultMap>
userMapper增加相关映射
    <!--加入了Privilege-->
    <resultMap id="userRoleListMapPrivilege" type="com.learn.chapter06one2many.domain.SysUser">

        <id property="id" column="id"></id>
        <result property="userPassword" column="user_password"></result>
        <result property="userName" column="user_name"></result>
        <result property="userEmail" column="user_email"></result>
        <result property="userInfo" column="user_info"></result>
        <result property="headImg" column="head_img" jdbcType="BLOB"></result>
        <result property="createTime" column="create_time" jdbcType="TIMESTAMP"></result>

        <!--使用RoleMapper本身的映射-->
        <collection property="roleList" columnPrefix="role_" resultMap="com.learn.chapter06one2many.dao.RoleMapper.rolePrivilegeListMap"></collection>
    </resultMap>
增加相关SQL
    <select id="selectAllUserAndRolesAndPrivileges" resultMap="userRoleListMapPrivilege">
        select
          u.id,
          u.user_name,
          u.user_password,
          u.user_email,
          u.user_info,
          u.head_img,
          u.create_time,
          r.id role_id,
          r.role_name role_role_name,
          r.enabled role_enabled,
          r.create_by role_create_by,
          r.create_time role_create_time,
          p.id role_privilege_id,
          p.privilege_name role_privilege_privilege_name,
          p.privilege_url role_privilege_privilege_url
        from sys_user u
        inner join sys_user_role ur on u.id = ur.user_id
        inner join sys_role r on ur.role_id = r.id
        inner join sys_role_privilege rp on rp.role_id = r.id
        inner join sys_privilege p on p.id = rp.privilege_id;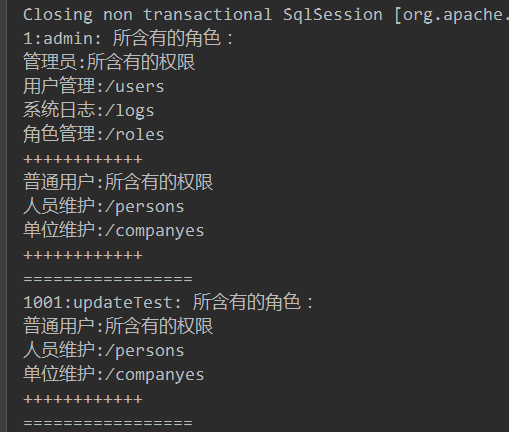
</select>需要注意的是sys_privilege表中列的列名,都变成了role_privilege_,在嵌套中前缀属性的配置也要一层层加上,这个需要注意
最终执行结果:
嵌套结果映射的结果处理规则
MyBatis在处理结果的时候,会判断结果是否相同,如果是相同的就只会保留一个结果,映射结果的处理,核心就是MyBatis如何判断结果是相同的。这个时候<id>标签的作用就显现出来了。
<id property="id" column="id"/>
id除了标记主键之外,如果配置了这个id属性,MyBatis只需要逐条比较所有数据中id标签配置的字段值是否相同即可。如果两条数据的id部分相同,就会标记属于同一个用户,并会将这个数据合并到同一个用户中。
简单修改:
    <resultMap id="userRoleListMap" type="com.learn.chapter06one2many.domain.SysUser">

        <!--<id property="id" column="id"></id>-->
        <id property="userPassword" column="user_password"></id>
        <result column="id" property="id"></result>
        <result property="userName" column="user_name"></result>
        <result property="userEmail" column="user_email"></result>
        <result property="userInfo" column="user_info"></result>
        <result property="headImg" column="head_img" jdbcType="BLOB"></result>
        <result property="createTime" column="create_time" jdbcType="TIMESTAMP"></result>

        <!--使用RoleMapper本身的映射-->
        <collection property="roleList" columnPrefix="role_" resultMap="com.learn.chapter06one2many.dao.RoleMapper.roleMap"></collection>
    </resultMap>
将id对应的属性改成了userPassword,之后在数据库中将所有的password数据修改成123456,执行查询会发现如下结果:
MyBatis只会判断password字段,如果相同就会被判断成同一条数据,数据库中password字段都是一致的,所以最后的结果也就只有一条。
如果没有配置id属性MyBatis会逐条属性判断,如果有一个属性值不同,则会判断为不同,当字段数为M,查询结果有N条时,就需要进行M*N次比较,相比配置了id属性,只需要比较N次,效率会大打折扣。因此要尽量配置id标签。
嵌套查询
其实通俗点将,嵌套查询就是利用简单的SQL查询,通过多次查询转换为我们需要的结果。
1、PrivilegeMapper中配置简单映射
    <select id="selectPrivilegeByRoleId" resultMap="privilegeMap">
        select p.*
        from sys_privilege p
        inner join sys_role_privilege rp on rp.privilege_id = p.id
        where role_id = #{roleId}
    </select>
2、RoleMapper中配置映射和对应的查询方法
    <resultMap id="rolePrivilegeListMapSelect" extends="roleMap" type="com.learn.chapter06one2many.domain.SysRole">
        <collection property="privilegeList" fetchType="lazy" column="{roleId=id}" select="com.learn.chapter06one2many.dao.PrivilegeMapper.selectPrivilegeByRoleId"></collection>
    </resultMap>
<select id="selectRoleByUserId" resultMap="rolePrivilegeListMapSelect">
select
r.id,
r.role_name,
r.enabled,
r.create_by,
r.create_time
from sys_role r
inner join sys_user_role ur on ur.role_id = r.id
where ur.user_id = #{userId}
</select>3、UserMapper中配置映射和查询
    <resultMap id="usereRoleListMapSelect" extends="BaseResultMap" type="com.learn.chapter06one2many.domain.SysUser">
        <collection property="roleList" fetchType="lazy" select="com.learn.chapter06one2many.dao.RoleMapper.selectRoleByUserId" column="{userId=id}"></collection>
    </resultMap>
    <select id="selectAllUserAndRolesSelect" resultMap = "usereRoleListMapSelect">

        select
          u.id,
          u.user_name,
          u.user_password,
          u.user_email,
          u.user_info,
          u.head_img,
          u.create_time
        from sys_user u
        where u.id = #{id}

    </select>
这里相关属性fetchType的配置,后期再详细加入,除此之外还有aggressLazyLoading属性,以及与配置加载方法相关的LazyLoadTiggerMethods属性,这些后期会做一个博客单独整理。
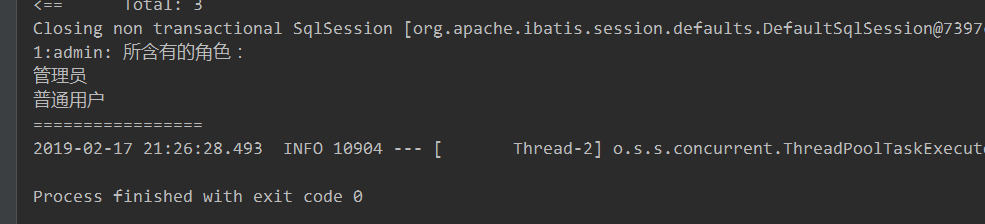
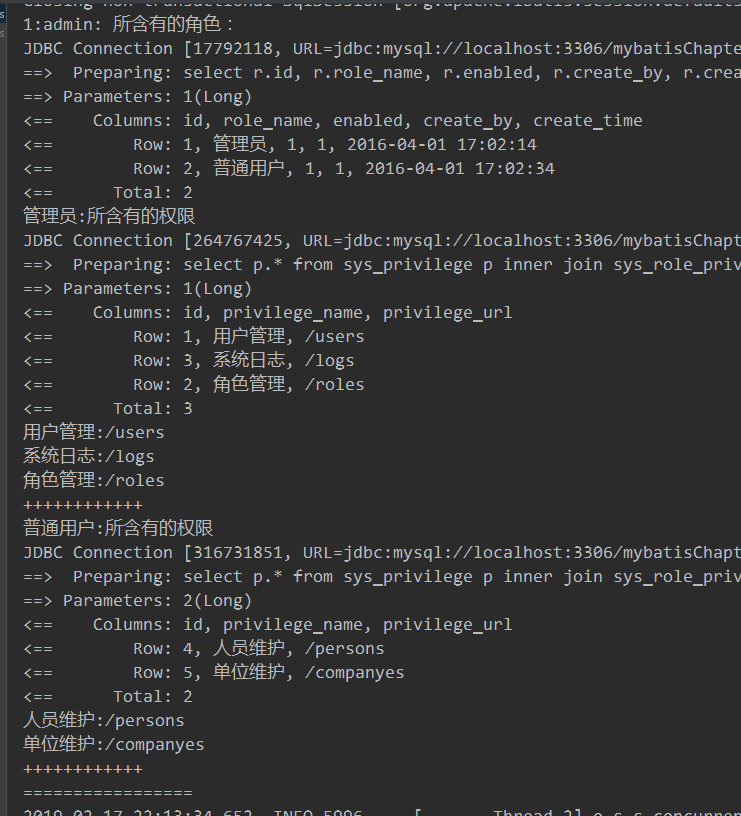
最终执行结果:
总结
梳理了一对多的相关使用方式,但是针对fetchType等相关简单查询的语句,这里依旧没有进一步总结,后续针对这一类属性单独梳理。
最后
以上就是开朗香菇最近收集整理的关于MyBatis学习笔记(六)——高级查询之一对多映射前言collection标签总结的全部内容,更多相关MyBatis学习笔记(六)——高级查询之一对多映射前言collection标签总结内容请搜索靠谱客的其他文章。


发表评论 取消回复