
目录
一、新建项目(记得改编码集UTF-8)
1.file->new->Dynamic Web Project
如果没有在other里找
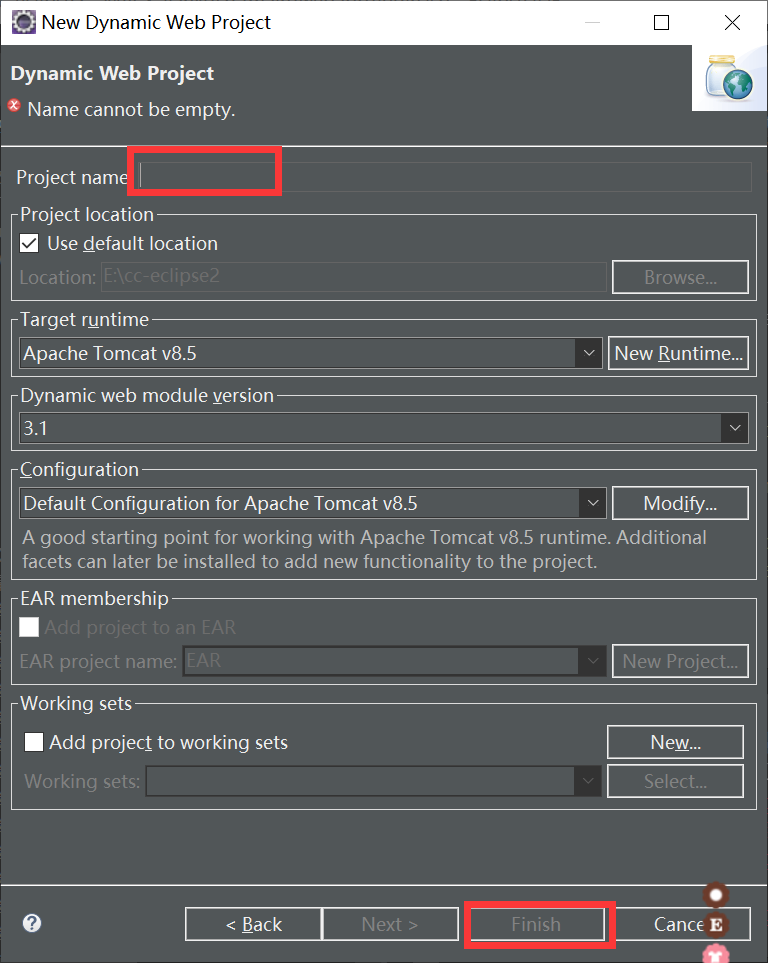
2.写项目名字以后直接finish
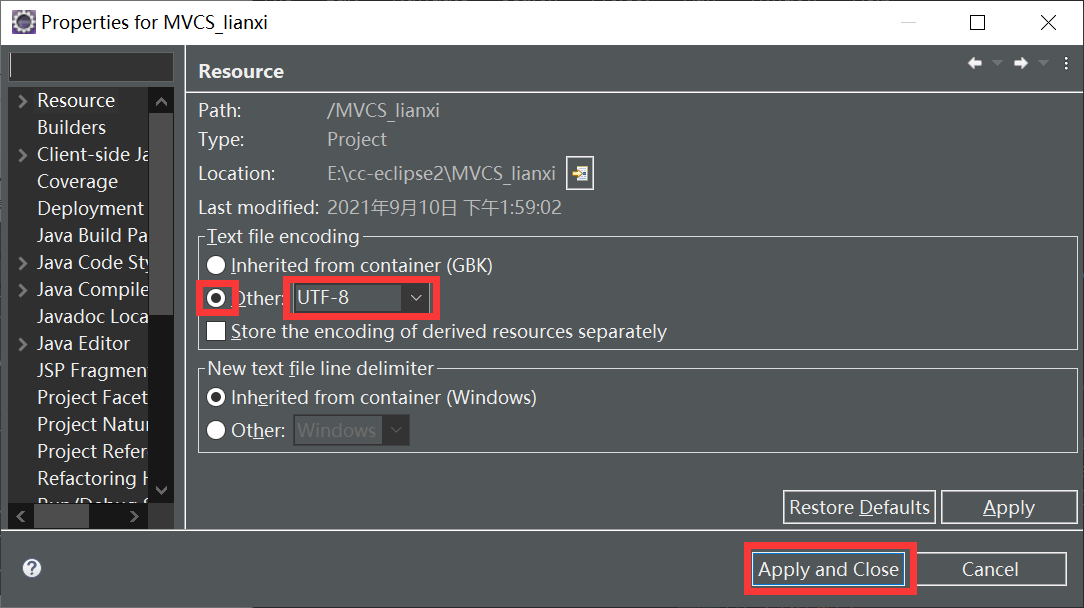
3.更改项目编码集为UTF-8
4.项目目录结构
需要改一下目录布局
4.jar包
直接粘贴到:
5.添加数据库工具类(写好的直接复制过来)
二、前端页面
位置:
类型:jsp
右键文件夹新建-》new-》jsp file
改名字
把编码集改成UTF-8
最后开始写页面
三、浏览器打开
1.首先下载apache-tomcat-8.5.46
2.eclipse里配置apache-tomcat-8.5.46
(1)找到serves
(2) 双击蓝色字
完成如图:
(3)右键-》 Add and Remove
完成如图:
错误解决:
然后如图即可运行
出现的一切都点同意
出现如图,运行成功
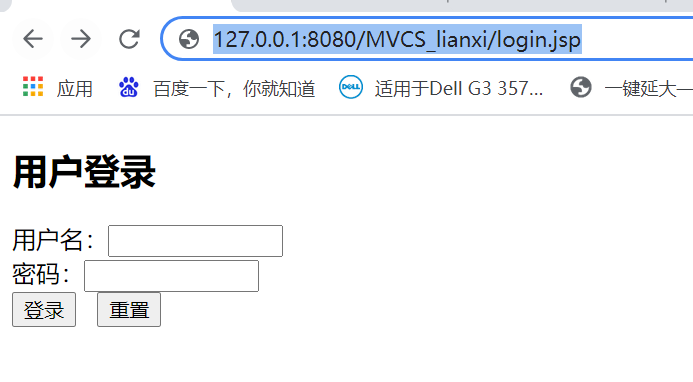
最后在浏览器中输入网址:
四、 后端
从里往外写
1.先写eneity
2.写DAO
3.写servlet
4.建一个controller的servlet
一、新建项目(记得改编码集UTF-8)
1.file->new->Dynamic Web Project
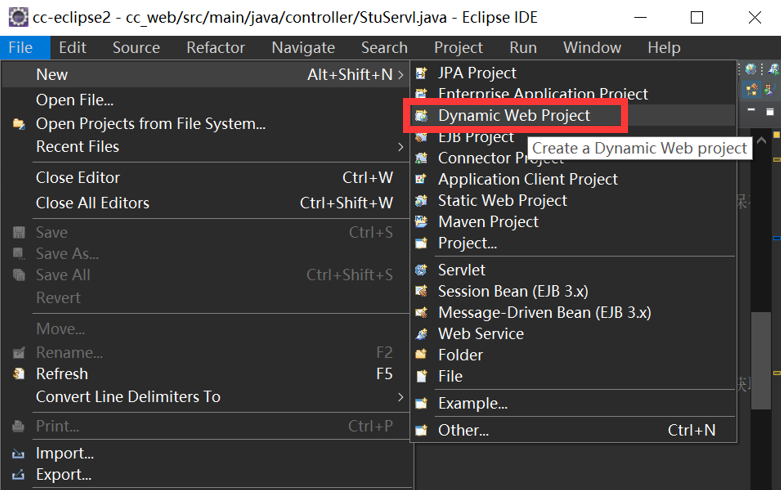
如果没有在other里找
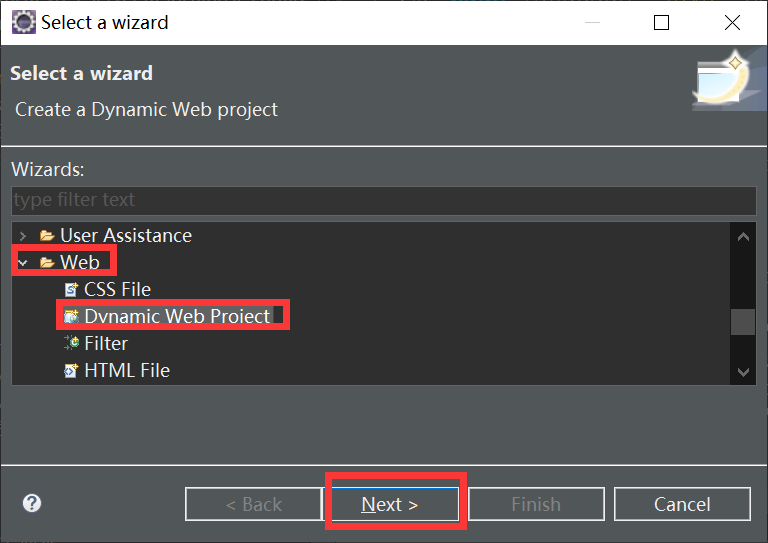
2.写项目名字以后直接finish
3.更改项目编码集为UTF-8
右键项目-》properties
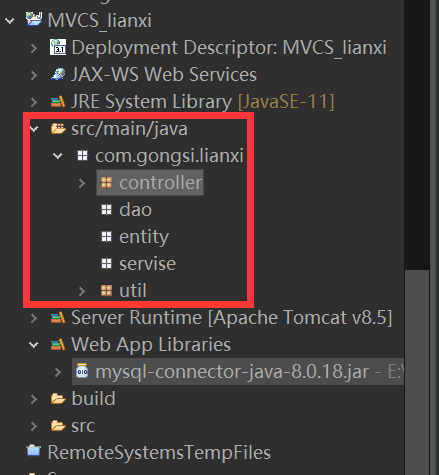
4.项目目录结构
src/main/java
com.gongsi(公司名).lianxi(项目名).controller
com.gongsi(公司名).lianxi(项目名).dao
com.gongsi(公司名).lianxi(项目名).entity
com.gongsi(公司名).lianxi(项目名).servise
com.gongsi(公司名).lianxi(项目名).util
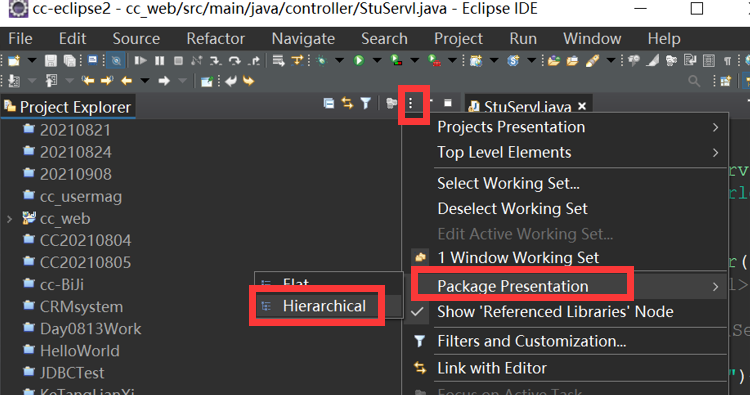
需要改一下目录布局
4.jar包
直接粘贴到:
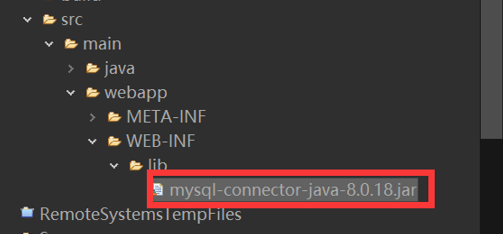
自动到这里就是 导入成功

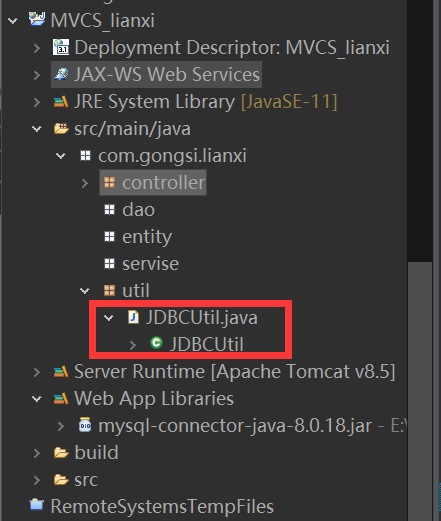
5.添加数据库工具类(写好的直接复制过来)
二、前端页面
位置:
放在src->main->webapp->WEB-INF下
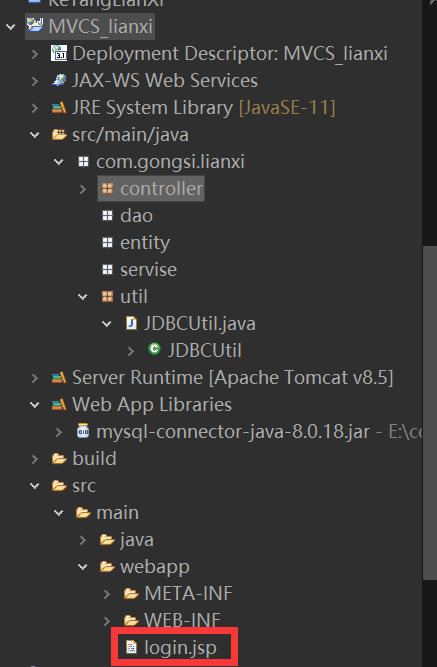
类型:jsp
右键文件夹新建-》new-》jsp file
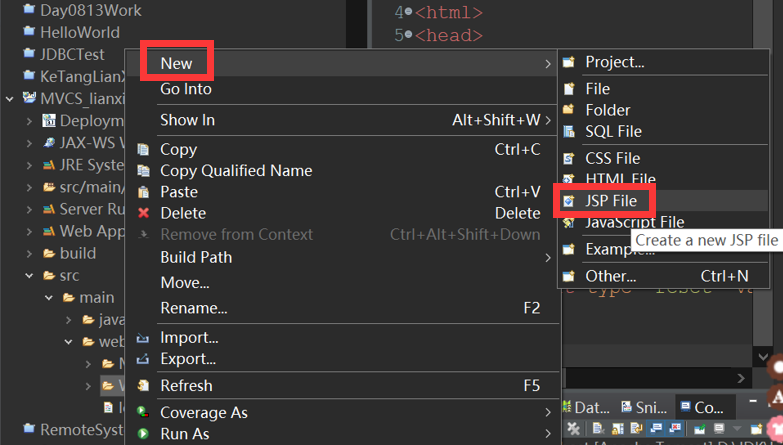
改名字
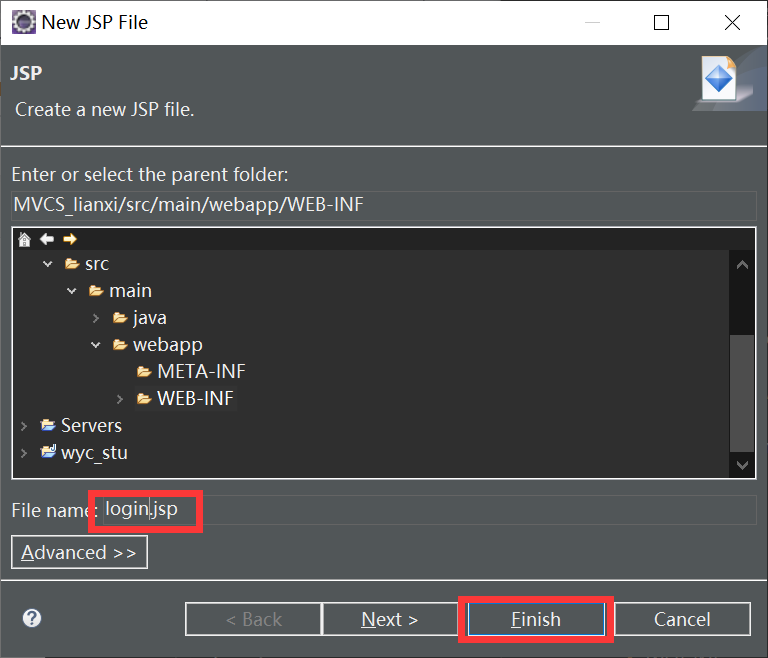
把编码集改成UTF-8
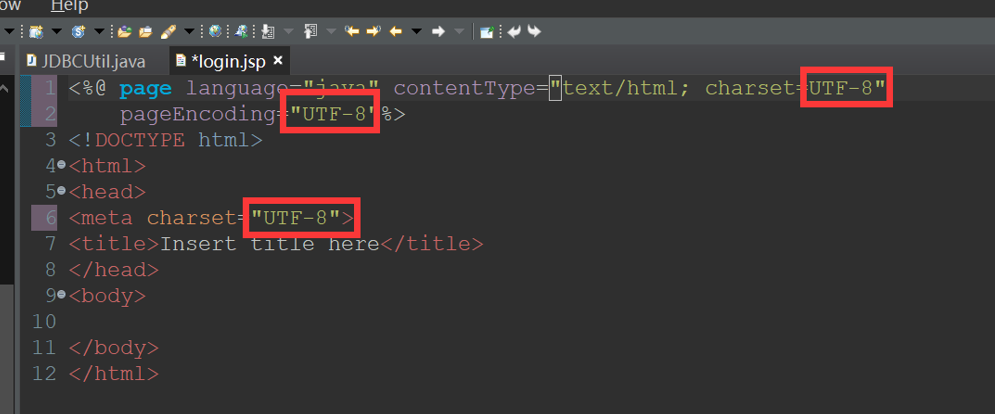
最后开始写页面
<%@ page language="java" contentType="text/html; charset=UTF-8"
pageEncoding="UTF-8"%>
<!DOCTYPE html>
<html>
<head>
<meta charset="UTF-8">
<title>Insert title here</title>
</head>
<body>
<!-- action=提交位置 -->
<form action="UserController" method="get">
<h2>用户登录</h2>
用户名:<input name="username" type="text" size="12"/><br/>
密码:<input name="userpwd" type="password" size="12"/><br/>
<input type="submit" value="登录" />
<input type="reset" value="重置" />
</form>
</body>
</html>三、浏览器打开
1.首先下载apache-tomcat-8.5.46
官网可下载:Apache Tomcat® - Welcome!
自己对照jdk版本,jdk1.7的下7,jdk1.8及以上的下8
2.eclipse里配置apache-tomcat-8.5.46
(1)找到serves

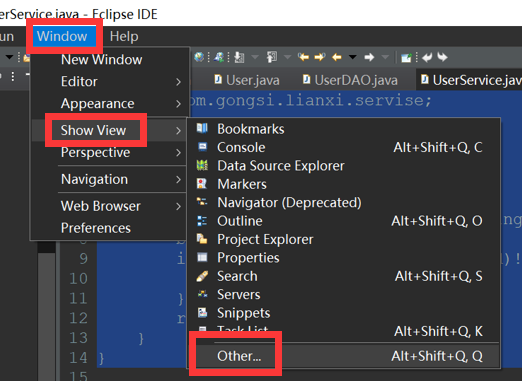
软件下方有个serves,如果没有,在右上角如图点击

如果还没有在window->show view other
(2) 双击蓝色字

出现如图,往下拖可以调大小
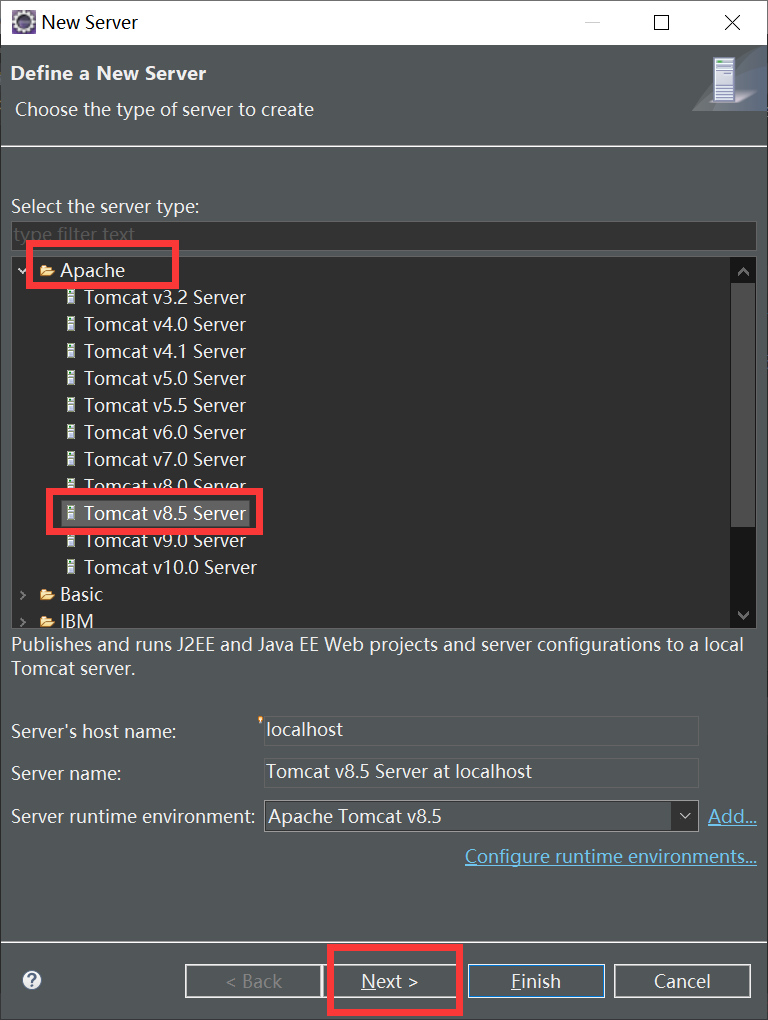
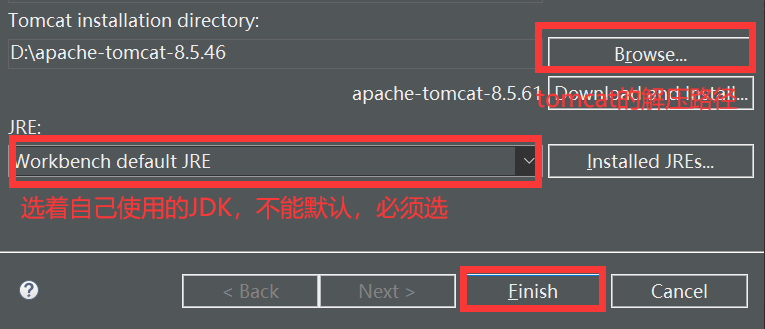
完成如图:
 (3)右键-》 Add and Remove
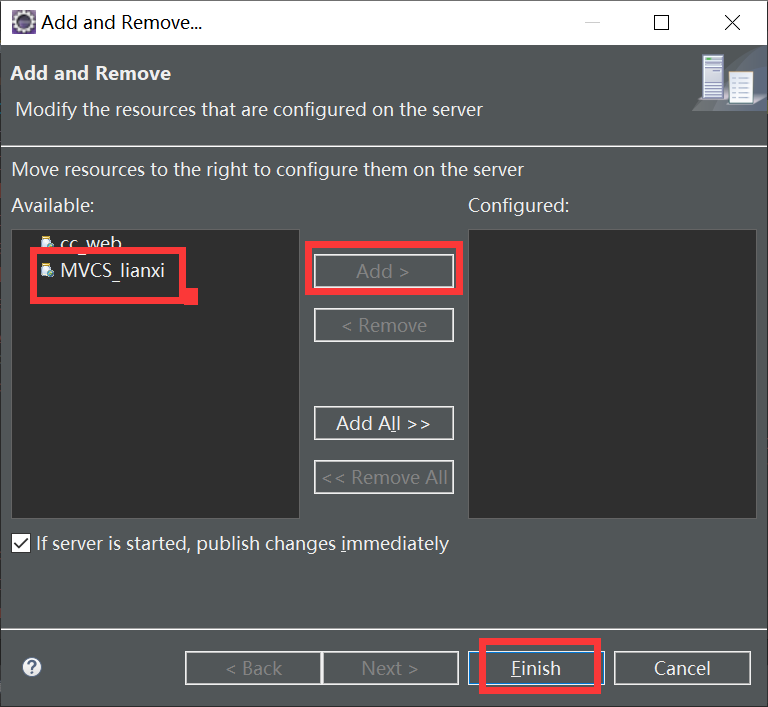
完成如图:

错误解决:
错误: 找不到或无法加载主类 org.apache.catalina.startup.Bootstrap
原因: java.lang.ClassNotFoundException: org.apache.catalina.startup.Bootstrap
如图所示的错误,重启一下eclipse即可!

然后如图即可运行

出现的一切都点同意
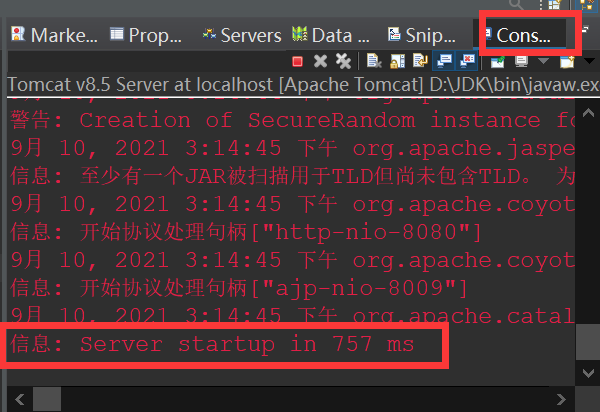
出现如图,运行成功
最后在浏览器中输入网址:
http://127.0.0.1:8080/MVCS_lianxi/login.jsp
http://127.0.0.1:8080/是固定的本地地址
MVCS_lianxi是项目名
/login.jsp是打开的网页
四、 后端
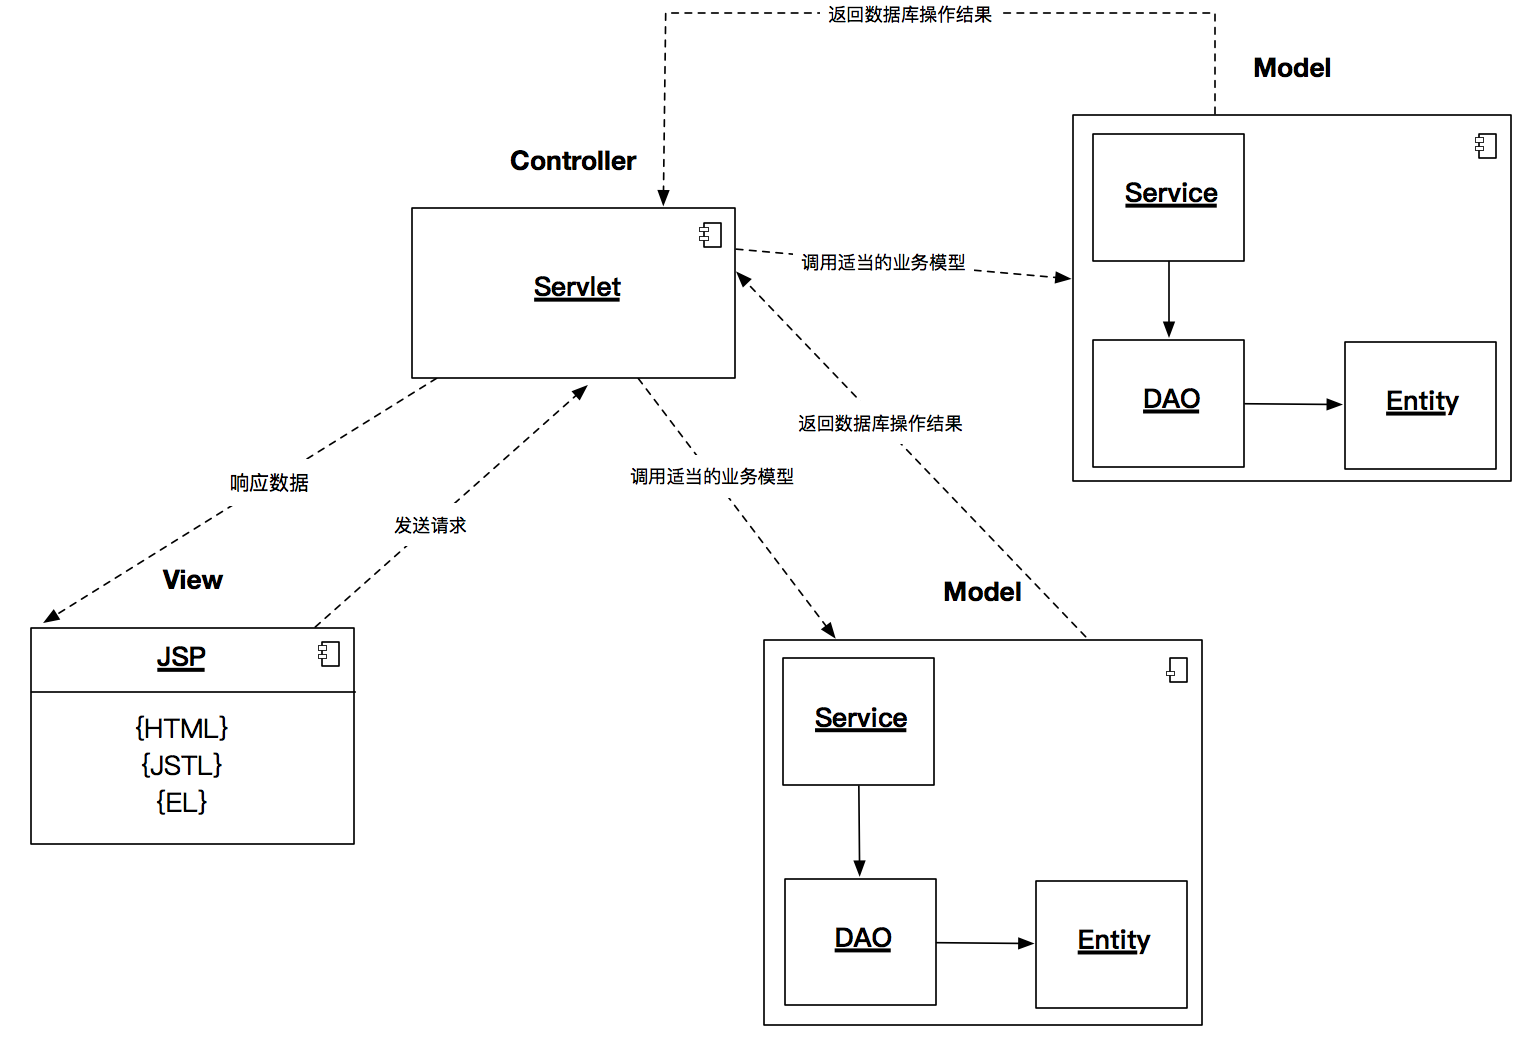
从里往外写
 1.先写eneity
package com.gongsi.lianxi.entity;

public class User {
	 private String id;
	 private String username;
	 private String pwd;
	 private String sex;
	 private int age;
	 private String phone;
	 private String email;
	 private String idcard;
	 private String addr;
	public String getId() {
		return id;
	}
	public void setId(String id) {
		this.id = id;
	}
	public String getUsername() {
		return username;
	}
	public void setUsername(String username) {
		this.username = username;
	}
	public String getPwd() {
		return pwd;
	}
	public void setPwd(String pwd) {
		this.pwd = pwd;
	}
	public String getSex() {
		return sex;
	}
	public void setSex(String sex) {
		this.sex = sex;
	}
	public int getAge() {
		return age;
	}
	public void setAge(int age) {
		this.age = age;
	}
	public String getPhone() {
		return phone;
	}
	public void setPhone(String phone) {
		this.phone = phone;
	}
	public String getEmail() {
		return email;
	}
	public void setEmail(String email) {
		this.email = email;
	}
	public String getIdcard() {
		return idcard;
	}
	public void setIdcard(String idcard) {
		this.idcard = idcard;
	}
	public String getAddr() {
		return addr;
	}
	public void setAddr(String addr) {
		this.addr = addr;
	}
	public User() {
		super();
		// TODO Auto-generated constructor stub
	}
	public User(String id, String username, String pwd, String sex, int age, String phone, String email, String idcard,
			String addr) {
		super();
		this.id = id;
		this.username = username;
		this.pwd = pwd;
		this.sex = sex;
		this.age = age;
		this.phone = phone;
		this.email = email;
		this.idcard = idcard;
		this.addr = addr;
	}
	@Override
	public String toString() {
		return "User [id=" + id + ", username=" + username + ", pwd=" + pwd + ", sex=" + sex + ", age=" + age
				+ ", phone=" + phone + ", email=" + email + ", idcard=" + idcard + ", addr=" + addr + "]";
	}
}
2.写DAO
package com.gongsi.lianxi.dao;

import java.sql.ResultSet;

import com.gongsi.lianxi.entity.User;
import com.gongsi.lianxi.util.JDBCUtil;

/**
 * 通过用户名和密码查询用户
 * @author 淳淳
 *
 */
public class UserDAO {
	public User selectUserByAuth(String name,String pwd) {
		User u=null;

		String sql ="select * from t_user where username='"+name+"' and pwd='"+pwd+"'";
		ResultSet rs =JDBCUtil.search(sql);
		try {
			while(rs.next()) {
				String id = rs.getString("id");
			    String username = rs.getString("username");
			    String pass = rs.getString("pwd");
			    String sex = rs.getString("sex");
			    int age = rs.getInt("age");
			    String phone = rs.getString("phone");
			    String email = rs.getString("email");
			    String idcard = rs.getString("idcard");
			    String addr = rs.getString("addr");
			    u=new User(id,username,pass,sex,age,phone,email,idcard,addr);
			}
		} catch (Exception e) {
			e.printStackTrace();
		}
		return u;
	}
}
3.写servlet
package com.gongsi.lianxi.servise;

import com.gongsi.lianxi.dao.UserDAO;

public class UserService {
	private UserDAO dao = new UserDAO();
	public boolean login(String name,String pwd) {
		boolean isRun=false;
		if(dao.selectUserByAuth(name, pwd)!=null) {
			isRun=true;
		}
		return isRun;
	}
}
4.建一个controller的servlet
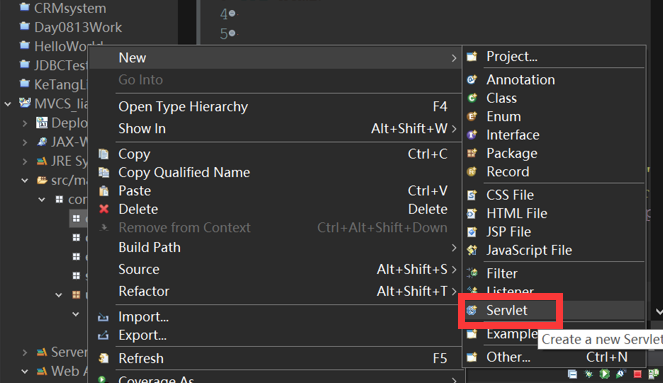
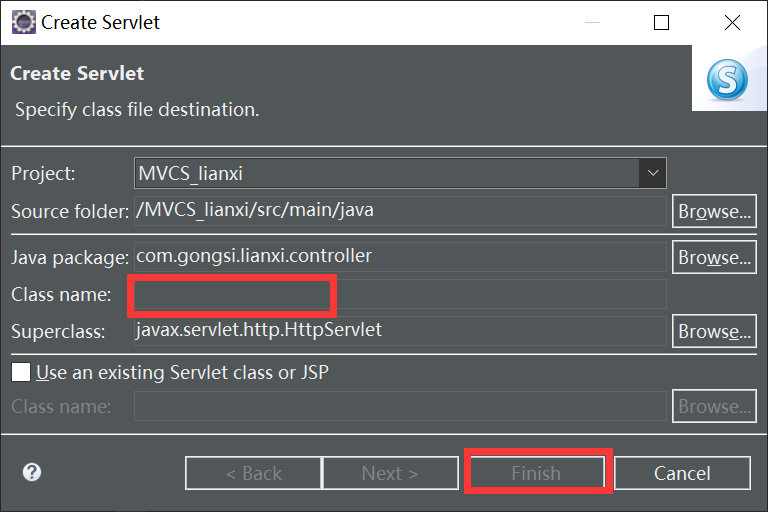
接下来这个servlet只修改doGet里的内容即可
/**
	 * @see HttpServlet#doGet(HttpServletRequest request, HttpServletResponse response)
	 */
	protected void doGet(HttpServletRequest request, HttpServletResponse response) throws ServletException, IOException {
		//设置字符编码
		request.setCharacterEncoding( "utf-8");
		response.setCharacterEncoding("utf-8");
		//设置生成的属性
		response.setContentType("text/html");

		//动态生成html代码
		PrintWriter pw=response.getWriter();

		//System.out.println("成功进入到了后台");
		String name=request.getParameter("username");
		String pwd=request.getParameter("userpwd");
		//System.out.println(name);
		//System.out.println(pwd);
		UserService service=new UserService();
		if(service.login(name, pwd)) {
			pw.print("<h1 style='color:green;'>登陆成功!</h1>");//从HttpServletRequest对象中获取数据
		}else{
			pw.print("<h1 style='color:red;'>登陆失败!</h1>");
		}
		pw.flush();//刷新缓冲区
		pw.close();
	}
最后
以上就是疯狂音响最近收集整理的关于MVCS开发模式练习、包含eclipse里配置apache-tomcat-8.5.46一、新建项目(记得改编码集UTF-8)二、前端页面 三、浏览器打开四、 后端的全部内容,更多相关MVCS开发模式练习、包含eclipse里配置apache-tomcat-8.5.46一、新建项目(记得改编码集UTF-8)二、前端页面 三、浏览器打开四、内容请搜索靠谱客的其他文章。


发表评论 取消回复