在Android中缓存策略有着广泛的应用场景,尤其是在图片加载从应用场景下,基本上都要用到缓存。因为图片加载需要消耗很大量的流量,在移动应用开发中不能过多的消耗用户的流量,一是因为流量是收费的,第二是过大的请求量会造成图片加载很慢用户体验不好。因此在图片加载过成功就要使用到缓存。
图片缓存就是当程序第一次从网络加载图片之后,将图片缓存到移动设备上,下一使用这张图片的时候直接从存储中读取,就不用再从网络加载该图片,这样既可以节省流量,又可以很快的加载出图片,提升用户体验。在很多图片加载框架中,不仅仅是将图片存储到设备上,很多时候为了更好的提高加载效率,经常还会把图片在内存中缓存一份,这样下次再次使用此图片的时候,就可以从内存中直接读取,因为内存中直接加载图片比读取存储中的还要快。其实这种方式也适用于其他的文件类型。
那么什么是缓存策略呢?缓存策略主要包含缓存的添加,读取和删除这三个操作。添加和读取没有什么好说的,缓存策略主要是删除这块,因为移动设备存储空间以及内存都是有限的,因此在使用缓存的时候要指定最大的缓存空间,当分配的缓存空间占用完之后如果还要缓存新的东西就要删除一些就的缓存,怎么样去定义缓存新旧这就是一种策略,不同的策略就要用到不同的缓存算法。
目前常用的一种缓存算法是Least Recently Used,简称:LRU,LRU是近期最少使用算法,它的核心机制是当缓存控件满时,会优先淘汰那些近期最少使用的缓存对象。采用LRU算法的缓存有:LruCache以及DiskLruCache,LruCache用于实现内存缓存,DiskLruCache用于实现存储设备缓存,因此通过这二者的结合使用,就可以很方便地实现一个高效的ImageLoader。
LRU实现原理图:

1. LruCache
LruCache是Android3.1所提供的一个缓存类,通过support-v4可以兼容到早期的Android版本,但是目前基本上都是Android4+了吧,那些还在兼容Android4以下同学你们辛苦了。
LruCache是一个泛型类,LruCache是线程安全的。线程安全就是说多线程访问同一代码,不会产生不确定的结果。编写线程安全的代码是低依靠线程同步。内部用一个LinkedHashMap以强引用的方式存储外界的缓存对象,提供了get和set对象来完成缓存的获取和添加操作,当缓存满时,会移除较早使用的缓存对象,然后再添加新的缓存对象。下面说明下强引用、弱引用、软引用的区别;

下面是LruCache的源码:
package android.util;

import java.util.LinkedHashMap;
import java.util.Map;
public class LruCache<K, V> {
    private final LinkedHashMap<K, V> map;
    private int size;
    private int maxSize;
    private int putCount;
    private int createCount;
    private int evictionCount;
    private int hitCount;
    private int missCount;
    public LruCache(int maxSize) {
        if (maxSize <= 0) {
            throw new IllegalArgumentException("maxSize <= 0");
        }
        this.maxSize = maxSize;
        this.map = new LinkedHashMap<K, V>(0, 0.75f, true);
    }
    public void resize(int maxSize) {
        if (maxSize <= 0) {
            throw new IllegalArgumentException("maxSize <= 0");
        }
        synchronized (this) {
            this.maxSize = maxSize;
        }
        trimToSize(maxSize);
    }
    public final V get(K key) {
        if (key == null) {
            throw new NullPointerException("key == null");
        }
        V mapValue;
        synchronized (this) {
            mapValue = map.get(key);
            if (mapValue != null) {
                hitCount++;
                return mapValue;
            }
            missCount++;
        }
        V createdValue = create(key);
        if (createdValue == null) {
            return null;
        }
        synchronized (this) {
            createCount++;
            mapValue = map.put(key, createdValue);
            if (mapValue != null) {
                // There was a conflict so undo that last put
                map.put(key, mapValue);
            } else {
                size += safeSizeOf(key, createdValue);
            }
        }
        if (mapValue != null) {
            entryRemoved(false, key, createdValue, mapValue);
            return mapValue;
        } else {
            trimToSize(maxSize);
            return createdValue;
        }
    }
    public final V put(K key, V value) {
        if (key == null || value == null) {
            throw new NullPointerException("key == null || value == null");
        }
        V previous;
        synchronized (this) {
            putCount++;
            size += safeSizeOf(key, value);
            previous = map.put(key, value);
            if (previous != null) {
                size -= safeSizeOf(key, previous);
            }
        }
        if (previous != null) {
            entryRemoved(false, key, previous, value);
        }
        trimToSize(maxSize);
        return previous;
    }
    public void trimToSize(int maxSize) {
        while (true) {
            K key;
            V value;
            synchronized (this) {
                if (size < 0 || (map.isEmpty() && size != 0)) {
                    throw new IllegalStateException(getClass().getName()
                            + ".sizeOf() is reporting inconsistent results!");
                }
                if (size <= maxSize) {
                    break;
                }
                Map.Entry<K, V> toEvict = map.eldest();
                if (toEvict == null) {
                    break;
                }
                key = toEvict.getKey();
                value = toEvict.getValue();
                map.remove(key);
                size -= safeSizeOf(key, value);
                evictionCount++;
            }

            entryRemoved(true, key, value, null);
        }
    }
    public final V remove(K key) {
        if (key == null) {
            throw new NullPointerException("key == null");
        }

        V previous;
        synchronized (this) {
            previous = map.remove(key);
            if (previous != null) {
                size -= safeSizeOf(key, previous);
            }
        }

        if (previous != null) {
            entryRemoved(false, key, previous, null);
        }

        return previous;
    }
    protected void entryRemoved(boolean evicted, K key, V oldValue, V newValue) {}
    protected V create(K key) {
        return null;
    }
    private int safeSizeOf(K key, V value) {
        int result = sizeOf(key, value);
        if (result < 0) {
            throw new IllegalStateException("Negative size: " + key + "=" + value);
        }
        return result;
    }
    protected int sizeOf(K key, V value) {
        return 1;
    }

    public final void evictAll() {
        trimToSize(-1); // -1 will evict 0-sized elements
    }
    public synchronized final int size() {
        return size;
    }

    public synchronized final int maxSize() {
        return maxSize;
    }
    public synchronized final int hitCount() {
        return hitCount;
    }
    public synchronized final int missCount() {
        return missCount;
    }
    public synchronized final int createCount() {
        return createCount;
    }
    public synchronized final int putCount() {
        return putCount;
    }
    public synchronized final int evictionCount() {
        return evictionCount;
    }
    public synchronized final Map<K, V> snapshot() {
        return new LinkedHashMap<K, V>(map);
    }

    @Override public synchronized final String toString() {
        int accesses = hitCount + missCount;
        int hitPercent = accesses != 0 ? (100 * hitCount / accesses) : 0;
        return String.format("LruCache[maxSize=%d,hits=%d,misses=%d,hitRate=%d%%]",
                maxSize, hitCount, missCount, hitPercent);
    }
}
LruCache代码实现其实很简单,全部代码猜不到400行,这还是包含了注释的。
LruCache使用很简单,以图片缓存为例介绍基本使用方法,代码如下:
    int maxMemory = (int) (Runtime.getRuntime().totalMemory()/1024);
        int cacheSize = maxMemory/8;

        LruCache<String,Bitmap> bitmapLruCache=new LruCache<String,Bitmap>(cacheSize){
            @Override
            protected int sizeOf(String key, Bitmap value) {
                return value.getRowBytes()*value.getHeight()/1024;

            }
        };
上述代码中我们只需要提供缓存的总容量大小并重写sizeOf方法就可以,sizeOf方法是用来计算缓存对象的大小,这里的大小单位需要和总量单位一致。在一些特殊情况下还需要重写entryRemoved方法,LruCache移除旧缓存时回调用entryRemoved方法,因此可以在entryRemoved中做一些资源回收工作。
2. DiskLruCache
DiskLruCache主要用来实现存储设备缓存,就是缓存到移动设备存储空间上。它通过将缓存对象写入文件系统来实现缓存效果。DiskLruCache不是AndroidSDK的一部分,但是得到了Android官方的推荐。
DiskLruCache地址:
https://android.googlesource.com/platform/libcore/+/android-4.1.1_r1/luni/src/main/java/libcore/io/DiskLruCache.java
其他地址:
https://github.com/JakeWharton/DiskLruCache
第二个可以做直接打开,第一个需要科学上网……
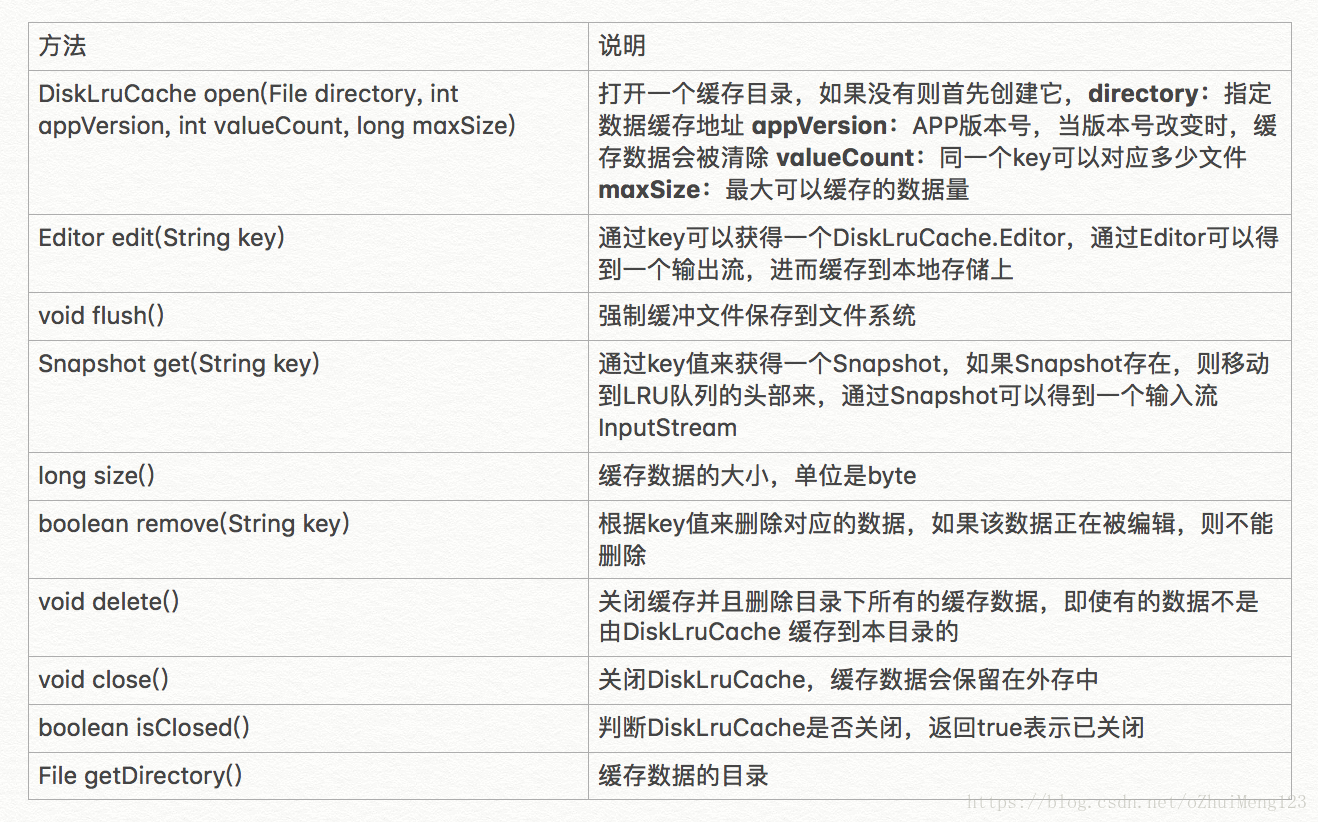
DiskLruCache的常用方法:

DiskLruCache的创建
DiskLruCache不能通过构造方法创建,需要用它提供的open方法来创建自身,代码如下:
    public static DiskLruCache open(File directory, int appVersion, int valueCount, long maxSize)
            throws IOException {
       ……
    }
open有四个入参,具体说明如下:
directory表示磁盘缓存在文件系统中的存储路径,如果应用卸载希望删除缓存文件,就可以设置在SD卡上的缓存目录,具体是/sdcard/Android/data/package_name/cache,其中package_name是应用包名,如果希望卸载后保留,就选择SD卡上面的其他路径。
appVersion表示当前应用的版本号,一般设置为1。
valueCount表示单个节点所对应的数据的个数,一般设置为1。
maxSize表示缓存的总大小,当缓存超出这个设定值后,DiskLruCache会清除之前的缓存数据。
DiskLruCache缓存的添加
DiskLruCache的缓存添加操作是通多Editor来完成的,这里还是用图片来说明,首先需要获取图片的url所对应的key,然后根据key通过edit()来获取Editor对象,代码如下:
    private String hashKeyFromUrl(String url){
        String cacheKey="";
        try{
            final MessageDigest mDigest=MessageDigest.getInstance("MD5");
            mDigest.update(url.getBytes());
        }catch (Exception e){
            cacheKey=String.valueOf(url.hashCode());

        }
        return cacheKey;
    }
    private String byteToHexString(byte[] bytes){
        StringBuilder sb=new StringBuilder();
        for (int i=0;i<bytes.length;i++){
            String hex=Integer.toHexString(0xFF&bytes[i]);
            if (hex.length()==1){
                sb.append('0');
            }
            sb.append(hex);
        }
        return sb.toString();
    }
通过将图片的url转成key之后就可以获取到Editor对象,通过这个Editor对象就可以得到一个文件输出流,如下所示:
DiskLruCache.Editor editor=diskLruCache.edit(key);
        if (editor!=null){
            OutputStream outputStream=editor.newOutputStream(0);

        }
接着我们就可以通过这个文件输出流将文件写入到文件系统上,代码如下:
    public boolean dowloadUrlToStream(String urlString, OutputStream outputStream){
        HttpURLConnection urlConnection=null;
        BufferedOutputStream out=null;
        BufferedInputStream in=null;
        try{
            final URL url=new URL(urlString);
            urlConnection=(HttpURLConnection) url.openConnection();
            in=new BufferedInputStream(urlConnection.getInputStream(),IO_BUFFER_SIZE);
            out=new BufferedOutputStream(outputStream,IO_BUFFER_SIZE);
            int b;
            while ((b=in.read())!=-1){
                out.write(b);
            }
            return true;
        }catch (Exception e){

        }finally {
            if (urlConnection!=null){
                urlConnection.disconnect();
            }
            try {
                out.close();
                in.close();
            }catch (Exception e){

            }

        }
        return false;
    }
通过上述代码,此时图片还还没有真正的写入文件系统,还需要通过Editor的commit()方法来提交写入操作,如果下载图片过程出现异常还可以通过Editor的abort()来回退整个操作,代码如下:
 if (dowloadUrlToStream(url,outputStream)){
                editor.commit();
            }else {
                editor.abort();
            }
            diskLruCache.flush();
DiskLruCache缓存的查找
缓存查找跟缓存添加过程传阿布多,同样需要将文件的url转换为key,然后通过DiskLruCache的get方法获取到一个Snapshot对象,然后通过Snapshot对象就可以得到文件的输出流,再将输出流转换为Bitmap对象,代码如下:
   String key=hashKeyFromUrl(url);
        Bitmap bitmap=null;
        DiskLruCache.Snapshot snapshot=diskLruCache.get(key);
        if (snapshot!=null){
            FileInputStream fileInputStream=(FileInputStream)snapshot.getInputStream(0);
            FileDescriptor fileDescriptor=fileInputStream.getFD();
            bitmap=decodeSampledBitmapFromFileDescriptor(fileDescriptor,100,100);

        }
    public Bitmap decodeSampledBitmapFromFileDescriptor(FileDescriptor fd, int reqWidth, int reqHeight) {
        // First decode with inJustDecodeBounds=true to check dimensions
        final BitmapFactory.Options options = new BitmapFactory.Options();
        options.inJustDecodeBounds = true;
        BitmapFactory.decodeFileDescriptor(fd, null, options);

        // Calculate inSampleSize
        options.inSampleSize = calculateInSampleSize(options, reqWidth,
                reqHeight);

        // Decode bitmap with inSampleSize set
        options.inJustDecodeBounds = false;
        return BitmapFactory.decodeFileDescriptor(fd, null, options);
    }
    public int calculateInSampleSize(BitmapFactory.Options options,
                                     int reqWidth, int reqHeight) {
        if (reqWidth == 0 || reqHeight == 0) {
            return 1;
        }

        // Raw height and width of image
        final int height = options.outHeight;
        final int width = options.outWidth;
//        Log.d(TAG, "origin, w= " + width + " h=" + height);
        int inSampleSize = 1;

        if (height > reqHeight || width > reqWidth) {
            final int halfHeight = height / 2;
            final int halfWidth = width / 2;

            // Calculate the largest inSampleSize value that is a power of 2 and
            // keeps both
            // height and width larger than the requested height and width.
            while ((halfHeight / inSampleSize) >= reqHeight
                    && (halfWidth / inSampleSize) >= reqWidth) {
                inSampleSize *= 2;
            }
        }

//        Log.d(TAG, "sampleSize:" + inSampleSize);
        return inSampleSize;
    }
缓存策略就介绍到这里,感兴趣的童鞋可以自己试着写一个ImageLoader。
最后
以上就是调皮铅笔最近收集整理的关于Android缓存策略的全部内容,更多相关Android缓存策略内容请搜索靠谱客的其他文章。


发表评论 取消回复