依赖注入概述
为什么会有依赖注入?
典型的企业应用程序不包含单个对象(这里就是指Spring中的 bean)。即使是最简单的应用程序,也有一些对象可以协同工作(属性依赖的形式),以呈现最终用户视为一体的应用程序。在Spring中所有对象的控制权利我们都交由IoC容器了,所以这里我们无法手动为这些对象再进行操作,那么就需要IoC容器来帮助我们完成这一操作。而Spring容器为这些bean添加依赖的方式就是依赖注入,下面我们就来学习Spring容器是如何进行依赖注入的,以此将多个独立定义的 Bean实现对象协作继而完全实现目标的应用程序。
依赖注入(DI)是一个过程,通过该过程,对象只能通过构造函数的参数,工厂方法的参数或在创建对象实例后在**对象实例上设置的属性(setter)**来定义其依赖关系(即与它们一起工作的其他对象)。容器在bean对象创建时,将依赖注入到bean对象中(bean的属性上)。从根本上讲,此过程是通过使用类的直接构造或服务定位器模式来自己控制其依赖关系的实例化。从根本上反转了bean本身控制实例化或依赖的位置(因此称为 Control Inversion),这一点举例说明如下:
控制反转
试想一下,java中new一个实例,首先需要import 类的路径 比如import java.lang.String,然后使用它的构造器。也就是控制或定位类的实例靠类的路径或者构造器的方法签名。IOC中,每个容器都有自己的名字name,通过这个name反找出类的全路径,或者实例。这个过程是相反的。这里我认为不是程序员与容器的控制对象权利的反转,而是bean实例依赖赋值时的反转,但都体现了反转一词,仅代表个人理解。
依赖注入的过程:
首先容器(IOC container)是spring 最基础的单元。IOC也就是DI依赖注入,在创建一个bean时,这个bean往往会有很多依赖。spring的解决办法是,将这个bean的这些依赖实例化,然后被这个bean所依赖。想象一个类实例化时需要很多依赖的类实例,但是往往又不能每个类实例都创建一次。但如果将每个类都实例化,被依赖的类只需要保留一个对依赖类实例的引用,主类实例化时容器将其依赖的类实例注入进去也就完成了这个主类bean的实例化,这个实例化的类也是一个bean,可以被其他类所依赖。
使用 DI 原理,代码更简洁,当为对象提供依赖项时,去耦会更有效。该对象不需要查找其依赖项,也不知道依赖项的位置或类。这样我们的类就变得更易于测试,尤其是当依赖项依赖于接口或抽象 Base Class 时,我们只需要给它们的属性表明它们所依赖的类或者直接使用注解@Autowired(它会自动根据类名去容器中找)。
DI的实现
DI 有两种主要形式来实现:基于构造函数的依赖注入和基于 Setter 的依赖注入。
基于构造函数的依赖关系注入
基于构造函数的 DI 是通过容器调用具有多个参数(每个参数代表一个依赖)的构造函数来完成的。调用带有特定参数的static工厂方法来构造 Bean 几乎是等效的。以下示例显示了只能通过构造函数注入进行依赖注入的类:
public class SimpleMovieLister {
    // the SimpleMovieLister has a dependency on a MovieFinder
    private MovieFinder movieFinder;

    // a constructor so that the Spring container can inject a MovieFinder
    public SimpleMovieLister(MovieFinder movieFinder) {
        this.movieFinder = movieFinder;
    }
}
构造函数参数解析
构造函数参数的解析匹配通过参数的类型进行。如果 Bean 定义的构造函数参数中不存在潜在的歧义,则在实例化 Bean 时,在 Bean 定义中构造函数参数的引用就是提供给适当的构造函数的参数引用 。考虑以下类别:
package x.y;

public class ThingOne {

    public ThingOne(ThingTwo thingTwo, ThingThree thingThree) {
        // ...
    }
}
假设ThingTwo和ThingThree类没有通过继承关联(即不是同一个类别下),则不存在潜在的歧义(因为Java支持多态)。因此以下配置可以正常工作,并且无需在<constructor-arg/>元素中显式指定构造函数参数索引或类型。
<beans>
    <bean id="thingOne" class="x.y.ThingOne">
        <constructor-arg ref="thingTwo"/>
        <constructor-arg ref="thingThree"/>
    </bean>

    <bean id="thingTwo" class="x.y.ThingTwo"/>

    <bean id="thingThree" class="x.y.ThingThree"/>
</beans>
构造函数参数类型匹配
当引用另一个 bean 时,类型是Spring已知的(所以不需要标清其具体依赖于哪个bean)且可以发生匹配时,比如当使用简单类型(例如<value>true</value>)时,我们可以使用如下示例:
package examples;

public class ExampleBean {

    // Number of years to calculate the Ultimate Answer
    private int years;

    // The Answer to Life, the Universe, and Everything
    private String ultimateAnswer;

    public ExampleBean(int years, String ultimateAnswer) {
        this.years = years;
        this.ultimateAnswer = ultimateAnswer;
    }
}
如果使用type属性显式指定了构造函数参数的类型,则容器可以使用简单类型的类型匹配。如下例所示:
<bean id="exampleBean" class="examples.ExampleBean">
    <constructor-arg type="int" value="7500000"/>
    <constructor-arg type="java.lang.String" value="42"/>
</bean>
构造函数参数索引
您可以使用index属性来显式指定构造函数参数的索引,如以下示例所示:
<bean id="exampleBean" class="examples.ExampleBean">
    <constructor-arg index="0" value="7500000"/>
    <constructor-arg index="1" value="42"/>
</bean>
指定索引可以解决一些歧义,比如构造函数具有两个相同类型的参数时。注意这里参数索引从 0 开始。
构造函数参数名称
另外还可以使用构造函数的参数名来消除歧义,如以下示例所示:
<bean id="exampleBean" class="examples.ExampleBean">
    <constructor-arg name="years" value="7500000"/>
    <constructor-arg name="ultimateAnswer" value="42"/>
</bean>
要使用该功能,必须在启用调试标志的情况下编译代码,以便 Spring 可以从构造函数中查找参数名称。如果不能使用 debug 标志编译代码,则可以使用@ConstructorProperties这个JDK注解显式命名构造函数参数。然后该示例类必须如下所示:
public class ExampleBean {

    // Fields omitted

    @ConstructorProperties({"years", "ultimateAnswer"})
    public ExampleBean(int years, String ultimateAnswer) {
        this.years = years;
        this.ultimateAnswer = ultimateAnswer;
    }
}
基于 Setter 的依赖项注入
基于设置器的 DI 是通过在调用无参数构造函数或无参数static工厂方法以实例化 bean 之后,在bean 上调用 setter 方法来完成的。
下面的示例显示只能通过使用纯 setter 注入来依赖注入的类。
public class SimpleMovieLister {

    // the SimpleMovieLister has a dependency on the MovieFinder
    private MovieFinder movieFinder;

    // a setter method so that the Spring container can inject a MovieFinder
    public void setMovieFinder(MovieFinder movieFinder) {
        this.movieFinder = movieFinder;
    }
    // business logic that actually uses the injected MovieFinder is omitted...
}
ApplicationContext支持其管理的 bean 基于构造函数和基于 setter 的 DI。在已经通过构造函数方法注入了某些依赖之后,它还支持基于 setter 的 DI。但目前我们开发也很少基于xml了,更多的是基于注解了,比如@Component,@Controller,@Bean,@Configuration,让容器去处理这些注解标注的类并在容器内部实例化,进而加载整个 Spring IoC 容器实例。
由于可以混合使用基于构造函数的 DI 和基于 setter 的 DI,因此将构造函数用于强制性依赖注入并将 setter 方法或配置方法用于可选的依赖注入是一个很好的经验法则。请注意,在 setter 方法上使用@Required注解可用于使属性成为必需的依赖项。
通常提倡构造函数注入,因为它可以将应用程序组件实现为不可变对象(即一旦实例化就不允许再修改这个bean了),并确保所需的依赖不是null。此外,这样可以保证构造函数注入的bean组件始终是完全初始化的状态返回到 Client 端(调用)代码。
Setter 注入主要应用于可以在类中分配合理的可选默认值属性比如null。否则,就必须在代码使用依赖的任何地方执行非空检查。 setter 注入的一个好处是,setter 方法使该类的对象在以后可以重新配置或重新注入。
依赖关系解决流程
容器创建bean并对其属性依赖注入的解析过程如下:
ApplicationContext用所有 bean 的配置元数据创建和初始化。可以通过 XML,Java 代码或注解来指定配置元数据。- 对于每个 bean,其依赖都以属性,构造函数参数或静态工厂方法的参数的形式表示。在实际创建 Bean 时,会将这些依赖提供给 Bean。
- 对于容器创建的bean的每个属性值或构造函数参数值都是一个明确的值(对于基本类型),或者是对容器中另一个 bean 的引用(引用类型)。
- 每个属性值或构造函数参数值都将从其指定的格式转换为该属性或构造函数参数的实际类型。默认情况下,Spring 可以将以字符串格式提供的值转换为所有内置类型,例如
int,long,String,boolean等等。
在创建容器时,Spring 容器会验证每个 bean 的配置。但在实际创建 Bean 之前,不会设置 Bean 属性本身(即预先实例化)。创建容器时,将创建具有单例作用域并设置为预先实例化(默认)的 Bean。范围在Bean Scopes中定义。否则仅在请求时才创建 Bean。因为创建和分配 bean 的依赖关系及其依赖关系的依赖关系时,创建 bean 可能会导致创建一个 bean 图(一个bean的属性引用另一个bean…)。这时如果创建bean和分配bean依赖就可能导致在第一次创建bean时出现循环依赖问题(当然Spring实现中是不会存在这种情况的)。
循环依赖
如果主要使用构造函数注入,则可能会创建无法解决的循环依赖方案。
例如:A 类通过构造函数注入需要 B 类的实例,而 B 类通过构造函数注入需要 A 类的实例。如果为将类 A 和 B 相互注入而配置了 bean,则 Spring IoC 容器会在运行时检测到此循环引用,并抛出BeanCurrentlyInCreationException。
一种可能的解决方案是编辑某些类的源代码,这些类的源代码由程序员而不是构造函数来配置。或者避免构造函数注入,而仅使用 setter 注入。换句话说,尽管不建议这样做,但是可以使用 setter 注入配置循环依赖关系。
与典型情况(没有循环依赖)不同,bean A 和 bean B 之间的循环依赖关系迫使其中一个 bean 在完全初始化之前被注入另一个 bean(经典的“鸡和鸡蛋”场景)。
Spring容器会在加载时检测配置问题,例如对不存在的 Bean 的引用和循环依赖项。
在实际创建 Bean 时,Spring尽可能晚地解决bean的属性依赖关系。这样做的好处是如果创建该对象或其依赖之一时出现问题会在Spring容器加载完成之前就报异常,而不是等到我们真正用到他们的时候才会出异常。这也是为什么默认情况下ApplicationContext实现会实例化单例 bean,并且在实际需要它们之前,要花一些前期时间和内存来创建它们,主要就是因为它可以保证我们在创建ApplicationContext时就发现配置问题,而不是稍后。但我们可以覆盖此默认行为,以使单例 bean 延迟初始化,而不是预先实例化。
如果不存在循环依赖关系,则在将一个或多个协作 Bean 注入从属 Bean 时,每个协作 Bean 都将被完全配置,然后再注入到从属 Bean 中。这意味着,如果 bean A 依赖于 bean B,则 Spring IoC 容器会在对 bean A 调用 setter 方法之前完全配置即实例化beanB。换句话说,实例化bean(如果它不是预先实例化的单例) ),设置其依赖,并调用相关的生命周期方法(例如配置的 init 方法或InitializingBean 回调方法)。关于循环依赖更多细节,会专门用一篇文章来介绍。
总而言之,之所以每个bean在真正实例化之前会先预先实例化一下就是为了解决循环依赖问题的。
依赖注入的示例
基于XML进行DI
基于setter方法的DI
以下示例将基于 XML 的配置元数据用于演示基于 setter(property属性) 的 DI。 Spring XML 配置文件的一小部分指定了一些 bean 定义,如下所示:
<bean id="exampleBean" class="examples.ExampleBean">
    <!-- setter injection using the nested ref element -->
    <property name="beanOne">
        <ref bean="anotherExampleBean"/>
    </property>

    <!-- setter injection using the neater ref attribute -->
    <property name="beanTwo" ref="yetAnotherBean"/>
    <property name="integerProperty" value="1"/>
</bean>

<bean id="anotherExampleBean" class="examples.AnotherBean"/>
<bean id="yetAnotherBean" class="examples.YetAnotherBean"/>
以下示例显示了相应的ExampleBean类:
public class ExampleBean {

    private AnotherBean beanOne;

    private YetAnotherBean beanTwo;

    private int i;

    public void setBeanOne(AnotherBean beanOne) {
        this.beanOne = beanOne;
    }

    public void setBeanTwo(YetAnotherBean beanTwo) {
        this.beanTwo = beanTwo;
    }

    public void setIntegerProperty(int i) {
        this.i = i;
    }
}
基于构造函数的DI
在前面的示例中,声明了 setter 与 XML 文件中指定的属性匹配。以下示例使用基于构造函数(constructor-arg属性)的 DI:
<bean id="exampleBean" class="examples.ExampleBean">
    <!-- constructor injection using the nested ref element -->
    <constructor-arg>
        <ref bean="anotherExampleBean"/>
    </constructor-arg>

    <!-- constructor injection using the neater ref attribute -->
    <constructor-arg ref="yetAnotherBean"/>

    <constructor-arg type="int" value="1"/>
</bean>

<bean id="anotherExampleBean" class="examples.AnotherBean"/>
<bean id="yetAnotherBean" class="examples.YetAnotherBean"/>
以下示例显示了相应的ExampleBean类:
public class ExampleBean {

    private AnotherBean beanOne;

    private YetAnotherBean beanTwo;

    private int i;

    public ExampleBean(
        AnotherBean anotherBean, YetAnotherBean yetAnotherBean, int i) {
        this.beanOne = anotherBean;
        this.beanTwo = yetAnotherBean;
        this.i = i;
    }
}
xml文件中的bean定义中指定的构造函数参数用作ExampleBean这个类的构造函数的参数。
使用工厂方法DI
现在考虑这个示例的一个变体,在该变体中,不是使用构造函数,而是告诉 Spring 调用static工厂方法以返回对象的实例:
<bean id="exampleBean" class="examples.ExampleBean" factory-method="createInstance">
    <constructor-arg ref="anotherExampleBean"/>
    <constructor-arg ref="yetAnotherBean"/>
    <constructor-arg value="1"/>
</bean>

<bean id="anotherExampleBean" class="examples.AnotherBean"/>
<bean id="yetAnotherBean" class="examples.YetAnotherBean"/>
以下示例显示了相应的ExampleBean类:
public class ExampleBean {

    // a private constructor
    private ExampleBean(...) {
        ...
    }

    // a static factory method; the arguments to this method can be
    // considered the dependencies of the bean that is returned,
    // regardless of how those arguments are actually used.
    public static ExampleBean createInstance (
        AnotherBean anotherBean, YetAnotherBean yetAnotherBean, int i) {

        ExampleBean eb = new ExampleBean (...);
        // some other operations...
        return eb;
    }
}
static工厂方法的参数由<constructor-arg/>元素提供,与实际使用构造函数的情况完全相同。 工厂方法返回的类的类型不必与包含static 工厂方法的类的类型相同(此示例中是相同的)。实例(非静态)工厂方法可以基本类比相同的方式进行使用(除了使用factory-bean属性而不是class属性之外,因为静态方法需要一个类,实例方法需要一个对象,这个对象在Spring中就是一个bean)
基于Java注解进行DI
测试代码如下,我们通过在Service中注入LuBanService这个过程来演示基于注解进行DI
public class Main02 {
	public static void main(String[] args) {
        // config类主要完成对类的扫描
		AnnotationConfigApplicationContext ac = new AnnotationConfigApplicationContext(Config.class);
		Service service = (Service) ac.getBean("service");
		service.test();
	}
}

@Component
class LuBanService {
	LuBanService(){
		System.out.println("luBan create ");
	}
}
测试setter方法注入
@Component
public class Service {

	private LuBanService luBanService;

	public Service() {
		System.out.println("service create");
	}

	public void test(){
		System.out.println(luBanService);
	}
	// 通过autowired指定使用set方法完成注入
	@Autowired
	public void setLuBanService(LuBanService luBanService) {
		System.out.println("注入luBanService by setter");
		this.luBanService = luBanService;
	}
}
输出如下:
luBan create
service create
注入luBanService by setter  // 验证了确实是通过setter注入的
com.dmz.official.service.LuBanService@5a01ccaa
测试构造函数注入
@Component
public class Service {

	private LuBanService luBanService;

    public Service() {
		System.out.println("service create by no args constructor");
	}

    // 通过Autowired指定使用这个构造函数,否则默认会使用无参
	@Autowired
	public Service(LuBanService luBanService) {
		System.out.println("注入luBanService by constructor with arg");
		this.luBanService = luBanService;
		System.out.println("service create by constructor with arg");
	}

	public void test(){
		System.out.println(luBanService);
	}
}
输出如下:
luBan create
注入luBanService by constructor // 验证了确实是通过有参构造器注入的
service create by constructor
com.dmz.official.service.LuBanService@1b40d5f0
疑问:
在上面的验证中,大家可能会有以下几个疑问:
@Autowired直接加到字段上跟加到set方法上有什么区别?为什么我们验证的时候需要将其添加到setter方法上?- 首先我们明确一点,直接添加
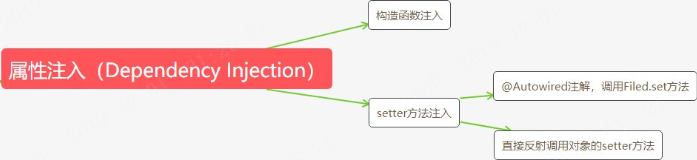
@Autowired注解到字段上,不需要提供setter方法也能完成注入。以上面的例子来说,Spring会通过反射获取到Service中luBanService这个字段,然后通过反射包的方法,Filed.set(Service,luBanService)这种方式来完成注入 - 我们将
@Autowired添加到setter方法时,我们可以通过断点看一下方法的调用栈,如下:
- 首先我们明确一点,直接添加
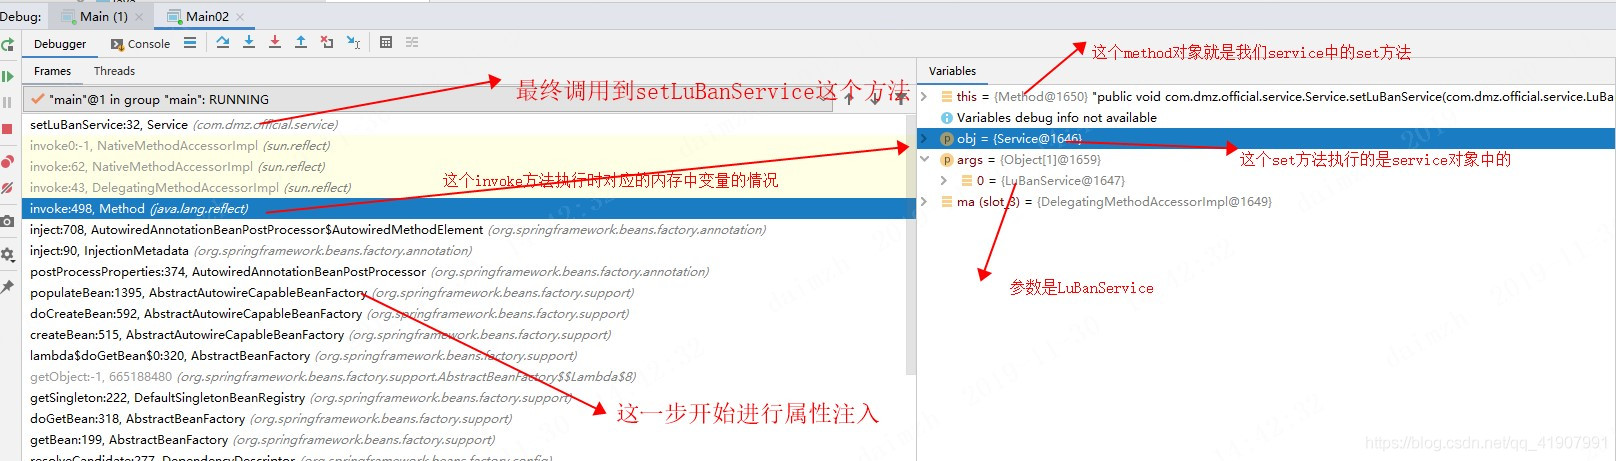
对于这种方式来说,最终是通过Method.invoke(object,args)的方式来完成注入的,这里的method对象就是我们的setter方法
@Autowired为什么加到构造函数上可以指定使用这个构造函数?- 我们先可以测试下,如果我们不加这个注解会怎么样呢?我把前文中的
@Autowired注解注释,然后运行发现
- 我们先可以测试下,如果我们不加这个注解会怎么样呢?我把前文中的
luBan create
service create by no args constructor  // 可以看到执行的是空参构造
null
先不急得出结论,我们再进行一次测试,就是两个函数上都添加@Autowired注解呢?
Exception in thread "main" org.springframework.beans.factory.BeanCreationException: Error creating bean with name 'service': Invalid autowire-marked constructor: public com.dmz.official.service.Service(com.dmz.official.service.LuBanService). Found constructor with 'required' Autowired annotation already: public com.dmz.official.service.Service()
1
发现直接报错了,报错的大概意思是已经找到了一个被@Autowired注解标记的构造函数,同时这个注解中的required属性为true。后来我测试了将其中一个注解中的required属性改为false,发现还是报同样的错,最终将两个注解中的属性都改为false测试才通过,并且测试结果跟上面的一样,都是执行的无参构造。
要说清楚这一点,涉及到两个知识
- Spring中的注入模型。
- Spring对构造函数的推断。
在默认的注入模型下,Spring如果同时找到了两个符合要求的构造函数,那么Spring会采用默认的无参构造进行实例化,如果这个时候没有无参构造,那么此时会报错
java.lang.NoSuchMethodException。什么叫符合要求的构造函数呢?就是构造函数中的参数Spring能找到,参数被Spring所管理。这里需要着重记得:一,默认注入模型;二,符合要求的构造函数,不了解的话先跳过
-
如果我们同时采用构造注入加属性注入会怎么样呢?
在没有进行测试前,我们可以大胆猜测下,Spring虽然能在构造函数里完成属性注入,但是这属于实例化对象阶段做的事情,那么在后面真正进行属性注入的时候,肯定会将其覆盖掉。现在我们来验证我们的结论
@Component
public class Service {
	private LuBanService luBanService;
	public Service(LuBanService luBanService) {
		System.out.println("注入luBanService by constructor with arg");
		this.luBanService = luBanService;
		System.out.println("service create by constructor with arg");
	}
	public void test(){
		System.out.println(luBanService);
	}
	@Autowired
	public void setLuBanService(LuBanService luBanService) {
		System.out.println("注入luBanService by setter");
		this.luBanService = null;
	}
}
运行结果:
注入luBanService by constructor with arg  // 实例化时进行了一次注入
service create by constructor with arg   // 完成了实例化
注入luBanService by setter    // 属性注入时将实例化时注入的属性进行了覆盖
null
由此我们验证了我们从文档中得到的两个结论
-
构造函数注入跟setter方法注入可以混用
- 对于一些强制的依赖,我们最好使用构造函数注入,对于一些可选依赖我们可以采用setter方法注入
-
Spring团队推荐使用构造函数的方式完成注入。但是对于一些参数过长的构造函数,Spring是不推荐的
DI总结
一个对象的依赖就是它自身的属性,Spring中的依赖注入就是属性注入。
- 我们知道一个对象由两部分组成:属性+行为(方法),这里我们目前只学会了Spring可以通过属性注入管理bean的属性,其实Spring还有方法注入来管理bean的方法,进而掌控整个bean。
- 属性注入跟方法注入都是Spring提供给我们用来处理Bean之间协作关系的手段
- 属性注入有两种方式:构造函数,Setter方法。
感谢耐心看到这里的同学,觉得文章对您有帮助的话希望同学们不要吝啬您手中的赞,动动您智慧的小手,您的认可就是我创作的动力!
之后还会勤更自己的学习笔记,感兴趣的朋友点点关注哦。
最后
以上就是冷傲中心最近收集整理的关于Spring官方文档解读(二)之DI依赖注入详解,通俗易懂,小白也可轻松get的全部内容,更多相关Spring官方文档解读(二)之DI依赖注入详解内容请搜索靠谱客的其他文章。


发表评论 取消回复