最近因为公司准备搭建自己的openAPI生态系统,所以致力与研究怎么保证对外接口的安全性问题,大家应该普遍知道一种比较经典的安全加密方式,就是非对称加密生成公钥和私钥之后再生成sign值再来进行服务端进行校验,其实这种加密方式已经非常适用了,如果是只是给外部服务端暴露接口的话,个人觉得这种已经足够了。
但是因为最近springOAuth2比较流行,而且OAuth2的协议也涵盖了大部分对外服务的安全保障,所以专门致力专研了一下springOAuth2,写的不好请各位大佬多提建议,也希望可以帮助到大家快速学习(文末附github地址)。
废话了这么多言,首先简单说下OAuth2,OAuth2只是一个授权标准,它可以使第三方应用程序或客户端获得对HTTP服务上(例如 Google,GitHub )用户帐户信息的有限访问权限。OAuth 2 通过将用户身份验证委派给托管用户帐户的服务以及授权客户端访问用户帐户进行工作。
下面直接开始教程。
关于springOAuth2主要分两个服务,一个是授权服务,负责获取内部服务授权给予的token,一个是资源服务,主要负责输出鉴权后请求的数据。
先来看一下项目的架构:
在这里插入代码片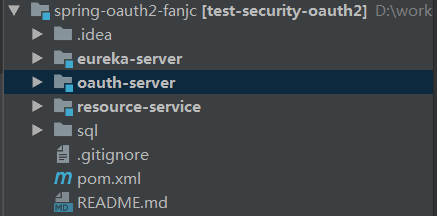
注册中心就不多讲,先主要讲auth服务:
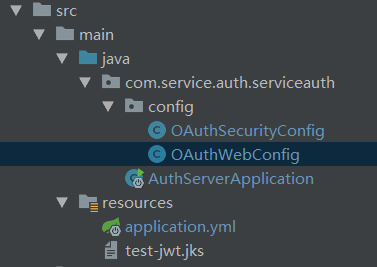
1.先导入maven的依赖文件
<?xml version="1.0" encoding="UTF-8"?>
<project xmlns="http://maven.apache.org/POM/4.0.0" xmlns:xsi="http://www.w3.org/2001/XMLSchema-instance"
         xsi:schemaLocation="http://maven.apache.org/POM/4.0.0 http://maven.apache.org/xsd/maven-4.0.0.xsd">
    <modelVersion>4.0.0</modelVersion>

    <groupId>com.service.auth</groupId>
    <artifactId>oauth-server</artifactId>
    <version>0.0.1-SNAPSHOT</version>
    <packaging>jar</packaging>

    <name>oauth-server</name>
    <description>project for Spring OAuth2</description>

    <parent>
        <groupId>org.springframework.boot</groupId>
        <artifactId>spring-boot-starter-parent</artifactId>
        <version>1.5.3.RELEASE</version>
        <relativePath/> <!-- lookup parent from repository   -->
    </parent>

    <properties>
        <project.build.sourceEncoding>UTF-8</project.build.sourceEncoding>
        <project.reporting.outputEncoding>UTF-8</project.reporting.outputEncoding>
        <java.version>1.8</java.version>
        <spring-cloud.version>Dalston.RELEASE</spring-cloud.version>
    </properties>

    <dependencies>
        <dependency>
            <groupId>org.springframework.cloud</groupId>
            <artifactId>spring-cloud-starter-eureka</artifactId>
        </dependency>
        <dependency>
            <groupId>org.springframework.cloud</groupId>
            <artifactId>spring-cloud-starter-eureka-server</artifactId>
        </dependency>

        <dependency>
            <groupId>org.springframework.boot</groupId>
            <artifactId>spring-boot-starter-actuator</artifactId>
        </dependency>
        <dependency>
            <groupId>org.springframework.cloud</groupId>
            <artifactId>spring-cloud-starter-oauth2</artifactId>
        </dependency>
        <dependency>
            <groupId>org.springframework.boot</groupId>
            <artifactId>spring-boot-starter-data-jpa</artifactId>
        </dependency>
        <dependency>
            <groupId>org.springframework.boot</groupId>
            <artifactId>spring-boot-starter-web</artifactId>
        </dependency>
        <dependency>
            <groupId>org.springframework.boot</groupId>
            <artifactId>spring-boot-starter-test</artifactId>
            <scope>test</scope>
        </dependency>
        <dependency>
            <groupId>org.projectlombok</groupId>
            <artifactId>lombok</artifactId>
            <version>1.16.10</version>
        </dependency>
    </dependencies>

    <dependencyManagement>
        <dependencies>
            <dependency>
                <groupId>org.springframework.cloud</groupId>
                <artifactId>spring-cloud-dependencies</artifactId>
                <version>${spring-cloud.version}</version>
                <type>pom</type>
                <scope>import</scope>
            </dependency>
        </dependencies>
    </dependencyManagement>

    <build>
        <plugins>
            <plugin>
                <groupId>org.springframework.boot</groupId>
                <artifactId>spring-boot-maven-plugin</artifactId>
            </plugin>
            <plugin>
                <groupId>org.apache.maven.plugins</groupId>
                <artifactId>maven-resources-plugin</artifactId>
                <configuration>
                    <nonFilteredFileExtensions>
                        <nonFilteredFileExtension>cert</nonFilteredFileExtension>
                        <nonFilteredFileExtension>jks</nonFilteredFileExtension>
                    </nonFilteredFileExtensions>
                </configuration>
            </plugin>
        </plugins>
    </build>


</project>
2.OAuthSecurityConfig
@Configuration
@EnableAuthorizationServer
public class OAuthSecurityConfig extends AuthorizationServerConfigurerAdapter {
    @Autowired
    private AuthenticationManager authenticationManager;

    @Autowired
    private TokenStore tokenStore;

    @Override
    public void configure(ClientDetailsServiceConfigurer clients) throws Exception {
        clients
                .inMemory()
                .withClient("client_4")
                .secret("123456")
                .scopes("read").autoApprove(true)
                .authorities("WRIGTH_READ")
                .authorizedGrantTypes("refresh_token","authorization_code","password","client_credentials");
    }

    @Override
    public void configure(AuthorizationServerEndpointsConfigurer endpoints) throws Exception {
        endpoints
                .tokenStore(tokenStore)
                .tokenEnhancer(jwtAccessTokenConverter())
                .authenticationManager(authenticationManager)
                .allowedTokenEndpointRequestMethods(HttpMethod.POST,HttpMethod.GET);
    }

    /**
     允许表单验证,浏览器直接发送post请求即可获取tocken
     */
    @Override
    public void configure(AuthorizationServerSecurityConfigurer oauthServer) throws Exception {
        oauthServer.tokenKeyAccess("permitAll()").checkTokenAccess(
                "isAuthenticated()");
        oauthServer.allowFormAuthenticationForClients();
    }

    @Bean
    public TokenStore jwtTokenStore() {
        return new JwtTokenStore(jwtAccessTokenConverter());
    }

    @Bean
    public JwtAccessTokenConverter jwtAccessTokenConverter() {
        KeyStoreKeyFactory keyStoreKeyFactory = new KeyStoreKeyFactory(new ClassPathResource("test-jwt.jks"), "test123".toCharArray());
        JwtAccessTokenConverter converter = new JwtAccessTokenConverter();
        converter.setKeyPair(keyStoreKeyFactory.getKeyPair("test-jwt"));
        return converter;
    }
}

注解开启校验服务器
2.1OAuthSecurityConfig继承AuthorizationServerConfigurerAdapter
AuthorizationServerConfigurerAdapter内主要有三个方法
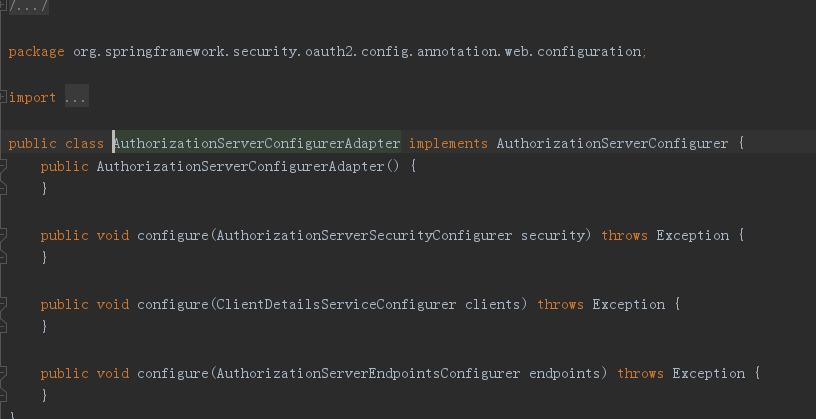
2.1.1
ClientDetailsServiceConfigurer(客户端信息设置)
.inMemory():用内存方式保存client信息;
.withClient():规定client名称;
.secret():规定client的secret;
.scopes():规定客户端的作用域;
.autoApprove(true):授权码模式下是否需要跳转到验证页面去授权;
.authorities():客户端拥有的权限;
.authorizedGrantTypes:指定客户端支持的grant_type,可选值包括 authorization_code,password,refresh_token,implicit,client_credentials, 若支持多个grant_type用逗号(,)分隔,如: “authorization_code,password”. 在实际应用中,当注册时,该字段是一般由服务器端指定的,而不是由申请者去选择的,最常用的grant_type组合有: “authorization_code,refresh_token”(针对通过浏览器访问的客户端); “password,refresh_token”(针对移动设备的客户端)
2.1.2
AuthorizationServerEndpointsConfigurer
用来配置授权(authorization)以及令牌(token)的访问端点和令牌服务(token services),还有token的存储方式(tokenStore)。
.tokenStore(tokenStore):token的存储方式;
.tokenEnhancer:生成自定义令牌;
.authenticationManager:认证管理器;
allowedTokenEndpointRequestMethods(HttpMethod.POST,HttpMethod.GET):支持post和get方式来访问/oauth/token来获取token,oauth2里面默认只能使用post方式来获取token;
2.1.3
AuthorizationServerSecurityConfigurer
用来配置令牌端点(Token Endpoint)的安全约束。
oauthServer.allowFormAuthenticationForClients():允许表单提交;
2.1.4
jwtAccessTokenConverter()
自定义JWT的token
关于什么是jwttoken的传送门在这里
https://www.cnblogs.com/yan7/p/7857833.html
用keytool的方法生成jwt证书文件test-jwt,放在项目的根目录下面,另外生成公钥public.cert存放在资源服务器根目录下,根据JwtAccessTokenConverter里面的setKeyPair里面的RSA非对称加密来进行证书的校验。
3.OAuthWebConfig
@Configuration
@EnableWebSecurity
public class OAuthWebConfig extends WebSecurityConfigurerAdapter {


    @Bean
    @Override
    protected UserDetailsService userDetailsService() {
        InMemoryUserDetailsManager manager = new InMemoryUserDetailsManager();
        manager.createUser(User.withUsername("user_1").password("123456").authorities("USER").build());

        return manager;
    }

    @Override
    @Bean
    public AuthenticationManager authenticationManagerBean() throws Exception {

        return super.authenticationManagerBean();
    }

    @Override
    protected void configure(HttpSecurity http) throws Exception {
        http.csrf().disable();
        http.requestMatchers().anyRequest()
                .and()
                .authorizeRequests()
                .antMatchers("/oauth/**").permitAll();
        //支持表单登录
        http.formLogin();
    }


}
@EnableWebSecurity
注解开启web的安全验证
3.1
InMemoryUserDetailsManager:将用户的信息储存在内存中;
3.2
protected void configure(HttpSecurity http) throws Exception:关于http的安全校验
3.2.1
.antMatchers("/oauth/**").permitAll():/oauth/开头的请求路径不用通过鉴权;
http.formLogin():支持表单登录;
4.启用类
@SpringBootApplication
@EnableResourceServer
@EnableEurekaClient
public class AuthServerApplication {

    public static void main(String[] args) {
        SpringApplication.run(AuthServerApplication.class, args);
    }


}
5.application.yml
spring:
  application:
    name: oauth-server-dev
server:
  port: 8882
eureka:
  client:
    service-url:
      defaultZone: http://localhost:8881/eureka/
security:
  oauth2:
    resource:
      id: oauth-server-dev
鉴权服务到此就简单的搭建完成了,我们来简单测试一下。
依次启动eureka-server,oauth-server;
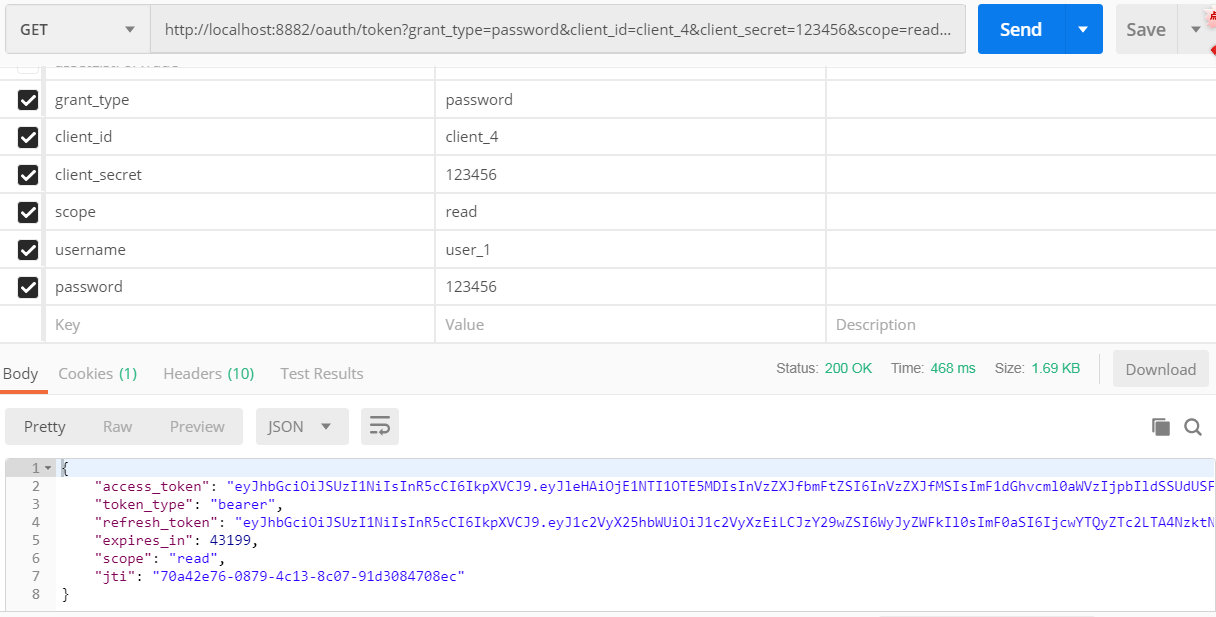
可以看到我们成功获得了token。
下面进行资源服务器的搭建
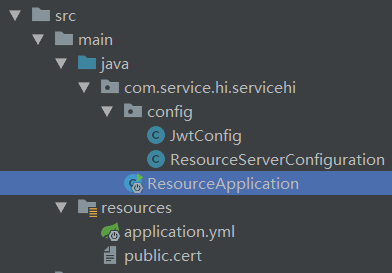
1.ResourceServerConfiguration
@EnableResourceServer
public class ResourceServerConfiguration extends ResourceServerConfigurerAdapter {


    @Override
    public void configure(HttpSecurity http) throws Exception {

        http.authorizeRequests()
                .antMatchers("/**").authenticated();
    }

    @Override
    public void configure(ResourceServerSecurityConfigurer resources) throws Exception {
    }
}
ResourceServerConfiguration继承了ResourceServerConfigurerAdapter
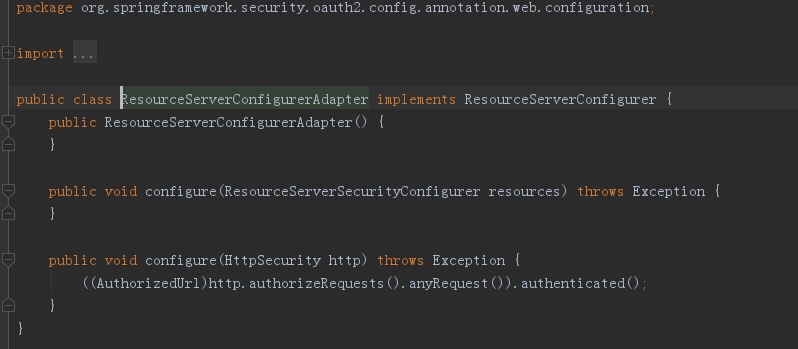
这里也有对应的两个个方法可以重写
1.1
configure(ResourceServerSecurityConfigurer resources):用来自己装配关于资源的拓展信息(如:resourceId等);
1.2
configure(HttpSecurity http):关请求的拓展装配;
.antMatchers("/**").authenticated():设置需鉴权的路径;
2.JWTtoken解析类
@Configuration
public class JwtConfig {

    public static final String public_cert = "public.cert";

    @Autowired
    private JwtAccessTokenConverter jwtAccessTokenConverter;

    @Bean
    @Qualifier("tokenStore")
    public TokenStore tokenStore() {
        return new JwtTokenStore(jwtAccessTokenConverter);
    }

    @Bean
    protected JwtAccessTokenConverter jwtAccessTokenConverter() {
        JwtAccessTokenConverter converter = new JwtAccessTokenConverter();
        Resource resource =  new ClassPathResource(public_cert);

        String publicKey;
        try {
            publicKey = new String(FileCopyUtils.copyToByteArray(resource.getInputStream()));
        }catch (IOException e) {
            throw new RuntimeException(e);
        }

        converter.setVerifierKey(publicKey);
        return converter;
    }
}
这里按照上面提过的,用服务端生成的证书所生成的公钥来进行验证。
3.application.yml
eureka:
  client:
    service-url:
      defaultZone: http://localhost:8881/eureka/
server:
  port: 8883

security:
  oauth2:
    resource:
      jwt:
        key-uri: http://localhost:8882/oauth/token_key
    client:
      client-id: client_4
      client-secret: 123456
      access-token-uri: http://localhost:8882/oauth/token
      grant-type: password
      scope: read
      user-authorization-uri: http://localhost:8882/oauth/authorize
3.1
security.oauth2.resource.jwt.key:向鉴权服务去验证jwttoken有效性的地址;
security.oauth2.client:配置我们刚才在内存里面储存的客户端信息;
security.oauth2.client.access-token-uri:获取token的路径;
security.oauth2. user-authorization-uri:获得授权路径;
4.然后写一个测试类输出数据
@RestController
@RequestMapping(value="/resource/")
public class TestController{


    @ResponseBody
    @RequestMapping(value = "/test", method = RequestMethod.GET, produces = "application/json;charset=UTF-8")
    public String getTest(){
        return  "11111111";
    }

}
然后我们依次启动eureka-server,oauth-server,resource-server来测试一下。
首先还是通过上面讲过的方式来获取token,
然后我们先用没有携带token的请求来请求资源服务试试看
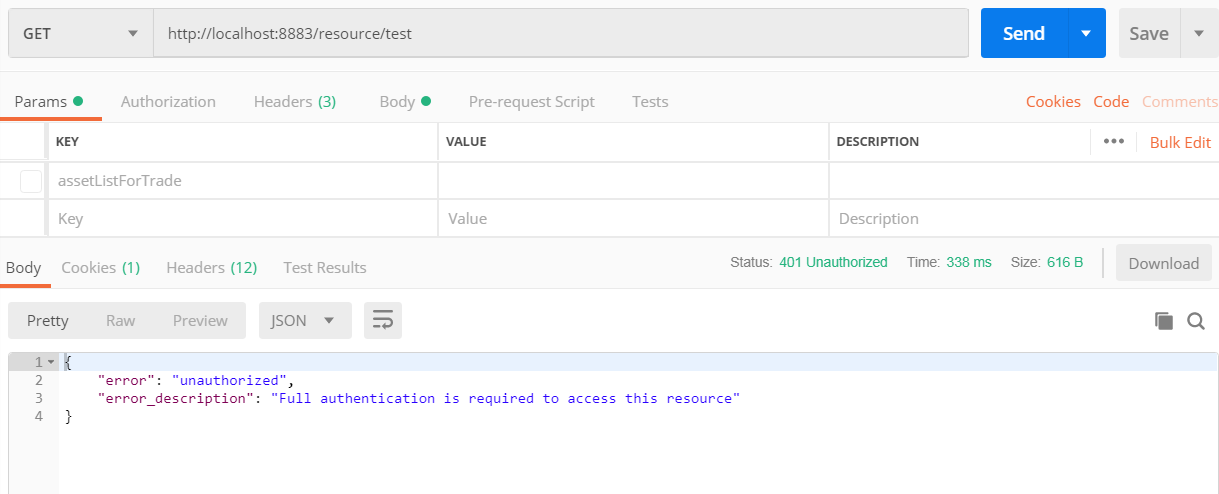
我们可以看到访问被拒绝了。
下面我们再用携带了token的请求来请求试试看
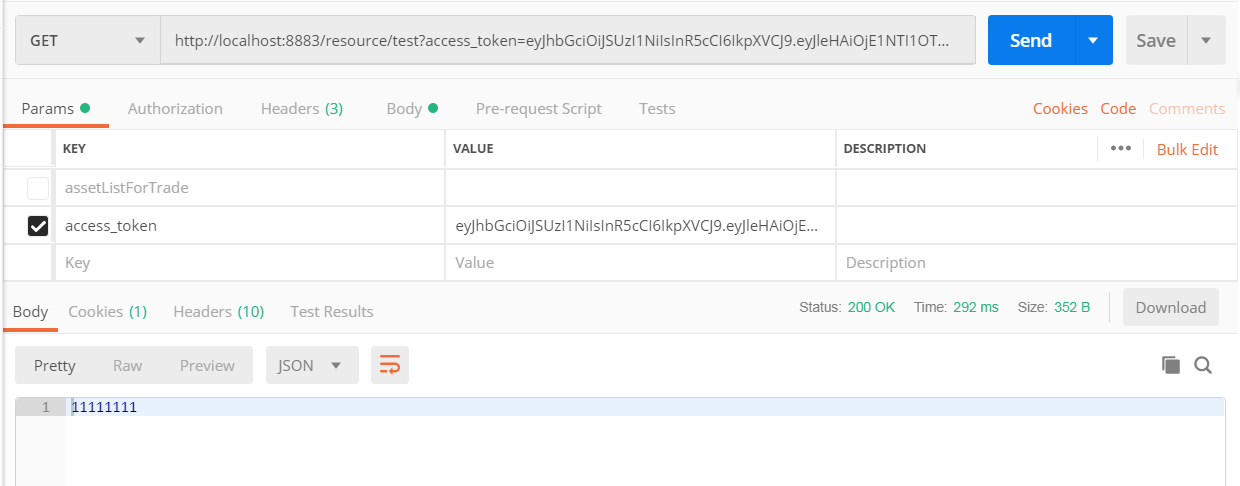
OK,完美成功。到此springOAuth2的简单验证流程就算是成功了,后面的文章会讲到怎么将token存储在redis和关系型数据库里面,还有将会OAuth2的三种模式的实践(简化模式太过于简单就不讲了)。
附上源码地址
https://github.com/fjc440/spring-oauth2-demo
(feature_memory分支)。
最后非常感谢简书用户
感谢大佬写的demo(https://www.jianshu.com/p/3427549a148a)学习良多。
如果有大佬们有好的建议可以随时留言
最后
以上就是耍酷花瓣最近收集整理的关于springOAuth2的教程与内部分析(内存储存篇)的全部内容,更多相关springOAuth2内容请搜索靠谱客的其他文章。


发表评论 取消回复