文章目录
- 1. 搭建资源服务器
- 1. 密码加密配置类 PasswordEncodeConfig
- 2. Token存储配置类 TokenStoreAutoConfiguration
- 3. 资源服务器配置类 ResourceServerAutoConfiguration
- 4. META-INF/spring.factories 文件中添加自动配置类
- 2. 搭建认证服务器
- 1. 安全配置类 WebSecurityConfig
- 2. 授权服务器配置类 AuthorizationServerConfiguration
- 3. Rest调用配置类 RestTemplateConfig
- 4. 认证登录并获取access_token
- 5. 启动项目测试
1. 搭建资源服务器
搭建资源服务器和授权服务器我前面文章已经讲过,资源服务器是一个starter,这里就不重复了。
1. 密码加密配置类 PasswordEncodeConfig
@Configuration
public class PasswordEncodeConfig {
    @Bean
    public PasswordEncoder passwordEncoder() {
        return new BCryptPasswordEncoder();
    }
}
2. Token存储配置类 TokenStoreAutoConfiguration
@Configuration
public class TokenStoreAutoConfiguration {

    @Autowired
    private RedisConnectionFactory connectionFactory;

    /**
     * 初始化 RedisTokenStore 用于将 token 存储至 Redis
     */
    @Bean
    public RedisTokenStore redisTokenStore() {
        RedisTokenStore redisTokenStore = new RedisTokenStore(connectionFactory);
        // 设置key的层级前缀,方便查询
        redisTokenStore.setPrefix("TOKEN:");
        return redisTokenStore;
    }
}
3. 资源服务器配置类 ResourceServerAutoConfiguration
@Slf4j
@Configuration
@EnableResourceServer
@EnableGlobalMethodSecurity(prePostEnabled = true)
public class ResourceServerAutoConfiguration extends ResourceServerConfigurerAdapter {

    @Autowired
    private TokenStore tokenStore;

    @Value("${spring.application.name}")
    private String appName;

    @Override
    public void configure(ResourceServerSecurityConfigurer resources) {
        resources.resourceId(appName);
        resources.tokenStore(tokenStore);
    }
}
4. META-INF/spring.factories 文件中添加自动配置类
# Auto Configure
org.springframework.boot.autoconfigure.EnableAutoConfiguration=
com.hh.config.ResourceServerAutoConfiguration,
com.hh.config.TokenStoreAutoConfiguration
2. 搭建认证服务器
1. 安全配置类 WebSecurityConfig
这里数据源是存储在内存中的,所以通过里配置的用户名和密码来获取token:
/**
 * - @EnableGlobalMethodSecurity:该注解是用来开启权限注解
 * - prePostEnabled = true:开启Spring Security提供的四个权限注解,@PostAuthorize、@PostFilter、@PreAuthorize 以及@PreFilter
 */
@Configuration
@EnableGlobalMethodSecurity(prePostEnabled = true)
@EnableWebSecurity
public class WebSecurityConfig extends WebSecurityConfigurerAdapter {

    @Autowired
    private PasswordEncoder passwordEncoder;

    @Override
    @Bean
    public UserDetailsService userDetailsService() {
        // 内存数据库:用户名root,密码123
        InMemoryUserDetailsManager inMemoryUserDetailsManager = new InMemoryUserDetailsManager();
        inMemoryUserDetailsManager.createUser(User
                .withUsername("root")
                .password(passwordEncoder.encode("123"))
                .roles("ADMIN").build());
        return inMemoryUserDetailsManager;
    }

    //去除security的ROLE_前缀限制
    @Bean
    public RoleVoter roleVoter(){
        RoleVoter roleVoter = new RoleVoter();
        roleVoter.setRolePrefix("");
        return roleVoter;
    }

    /**
     * 放行和认证规则
     */
    @Override
    protected void configure(HttpSecurity http) throws Exception {
        super.configure(http);
    }

    // 自定义AuthenticationManager:并没有在工厂中暴露出来
    // 使用AuthenticationManagerBuilder来自定义AuthenticationManager,覆盖默认的AuthenticationManager
    @Override
    protected void configure(AuthenticationManagerBuilder auth) throws Exception {
        auth.userDetailsService(userDetailsService());
    }

    // 开发者如需使用AuthenticationManager,
    // 则可以通过覆盖此方法,将configure(AuthenticationManagerBuilder)方法构造的AuthenticationManager暴露为Bean。
    @Bean
    @Override
    public AuthenticationManager authenticationManagerBean() throws Exception {
        return super.authenticationManagerBean();
    }
}
2. 授权服务器配置类 AuthorizationServerConfiguration
/**
 * 配置授权服务器
 */
@Configuration
@EnableAuthorizationServer
public class AuthorizationServerConfiguration extends AuthorizationServerConfigurerAdapter {

    @Autowired
    private UserDetailsService userDetailsService;

    @Autowired
    private AuthenticationManager authenticationManager;

    @Autowired
    private PasswordEncoder passwordEncoder;

    @Autowired
    private TokenStore tokenStore;

    /**
     * 用来配置授权服务器可以为哪些客户端授权,使用哪种授权模式
     *
     * 密码模式:在密码模式中,用户向客户端提供用户名和密码,客户端通过用户名和密码到认证服务器获取令牌
     * (A)用户访问客户端,提供URI连接包含用户名和密码信息给授权服务器
     * (B)授权服务器对客户端进行身份验证
     * (C)授权通过,返回access_token给客户端
     */
    @Override
    public void configure(ClientDetailsServiceConfigurer clients) throws Exception {
        clients.inMemory()
                // 客户端id
                .withClient("client_id")
                // 客户端秘钥
                .secret(passwordEncoder.encode("client_secret"))
                // 授权模式
                .authorizedGrantTypes("password", "refresh_token", "client_credentials")
                // access_token的过期时长
                .accessTokenValiditySeconds(43200)
                // refresh_token的过期时长
                .refreshTokenValiditySeconds(86400)
                // 允许授权的范围
                .scopes("all");
    }

    /**
     * 刷新令牌必须配置userDetailsService,用来刷新令牌时的认证
     */
    @Override
    public void configure(AuthorizationServerEndpointsConfigurer endpoints) {
        // 配置token的存储方式
        endpoints.tokenStore(tokenStore);
        // 配置认证管理器
        endpoints.authenticationManager(authenticationManager);
        // 配置认证数据源,刷新令牌时的认证
        endpoints.userDetailsService(userDetailsService);
    }

    /**
     * 开启token检查接口
     */
    @Override
    public void configure(AuthorizationServerSecurityConfigurer security){
        security.allowFormAuthenticationForClients().checkTokenAccess("permitAll()");
    }
}
3. Rest调用配置类 RestTemplateConfig
@Configuration
public class RestTemplateConfig {
    @Bean
    public RestTemplate restTemplate() {
        return new RestTemplate();
    }
}
4. 认证登录并获取access_token
@Slf4j
@RestController
@RequestMapping("/api/v1")
public class OAuthController {

    @Autowired
    private LoginService loginService;

    @PostMapping("/token")
    public ApiResponse<AuthToken> oauth(@RequestBody @Valid LoginQo loginQo) {
        AuthToken authToken = loginService.getAccessToken(loginQo);
        return new ApiResponse<>(0,"success",authToken);
    }
}
@Service
@Slf4j
public class LoginServiceImpl implements LoginService {

    @Autowired
    private RestTemplate restTemplate;

   /**
     * 通过登录信息获取令牌
     * @param loginQo 登录信息
     * @return 令牌
     */
    @Override
    public AuthToken getAccessToken(LoginQo loginQo) {
        MultiValueMap<String, String> map = new LinkedMultiValueMap<>();
        map.add("username", loginQo.getName());
        map.add("password", loginQo.getPassword());
        map.add("client_id", "client_id");
        map.add("client_secret","client_secret");
        map.add("grant_type", "password");
        map.add("scope", "all");
        // 这里会进行 Oauth2.0 的请求:http://127.0.0.1:8081/oauth/token
        Map response = restTemplate.postForObject("http://127.0.0.1:8081/oauth/token", map, Map.class);
        if (MapUtil.isEmpty(response)) {
            return null;
        }
        // 封装返回
        AuthToken authToken = new AuthToken();
        authToken.setAccessToken((String) response.get("access_token"));
        authToken.setExpiresIn((Integer) response.get("expires_in"));
        authToken.setRefreshToken((String) response.get("refresh_token"));
        authToken.setTokenType((String) response.get("token_type"));
        authToken.setScope((String) response.get("scope"));
        return authToken;
    }
}
需要在资源服务器配置类中放行获取token的请求:
@Slf4j
@Configuration
@EnableResourceServer
@EnableGlobalMethodSecurity(prePostEnabled = true)
public class ResourceServerAutoConfiguration extends ResourceServerConfigurerAdapter {

    @Autowired
    private TokenStore tokenStore;

    @Value("${spring.application.name}")
    private String appName;

    @Override
    public void configure(ResourceServerSecurityConfigurer resources) {
        resources.resourceId(appName);
        resources.tokenStore(tokenStore);
    }

    @Override
    public void configure(HttpSecurity http) throws Exception {
        http.authorizeRequests()
            // 放行获取token的请求
            .antMatchers("/api/v1/token").permitAll()
            // 其他请求必须认证才能访问
            .anyRequest().authenticated()
            .and()
            .csrf().disable();
    }
}
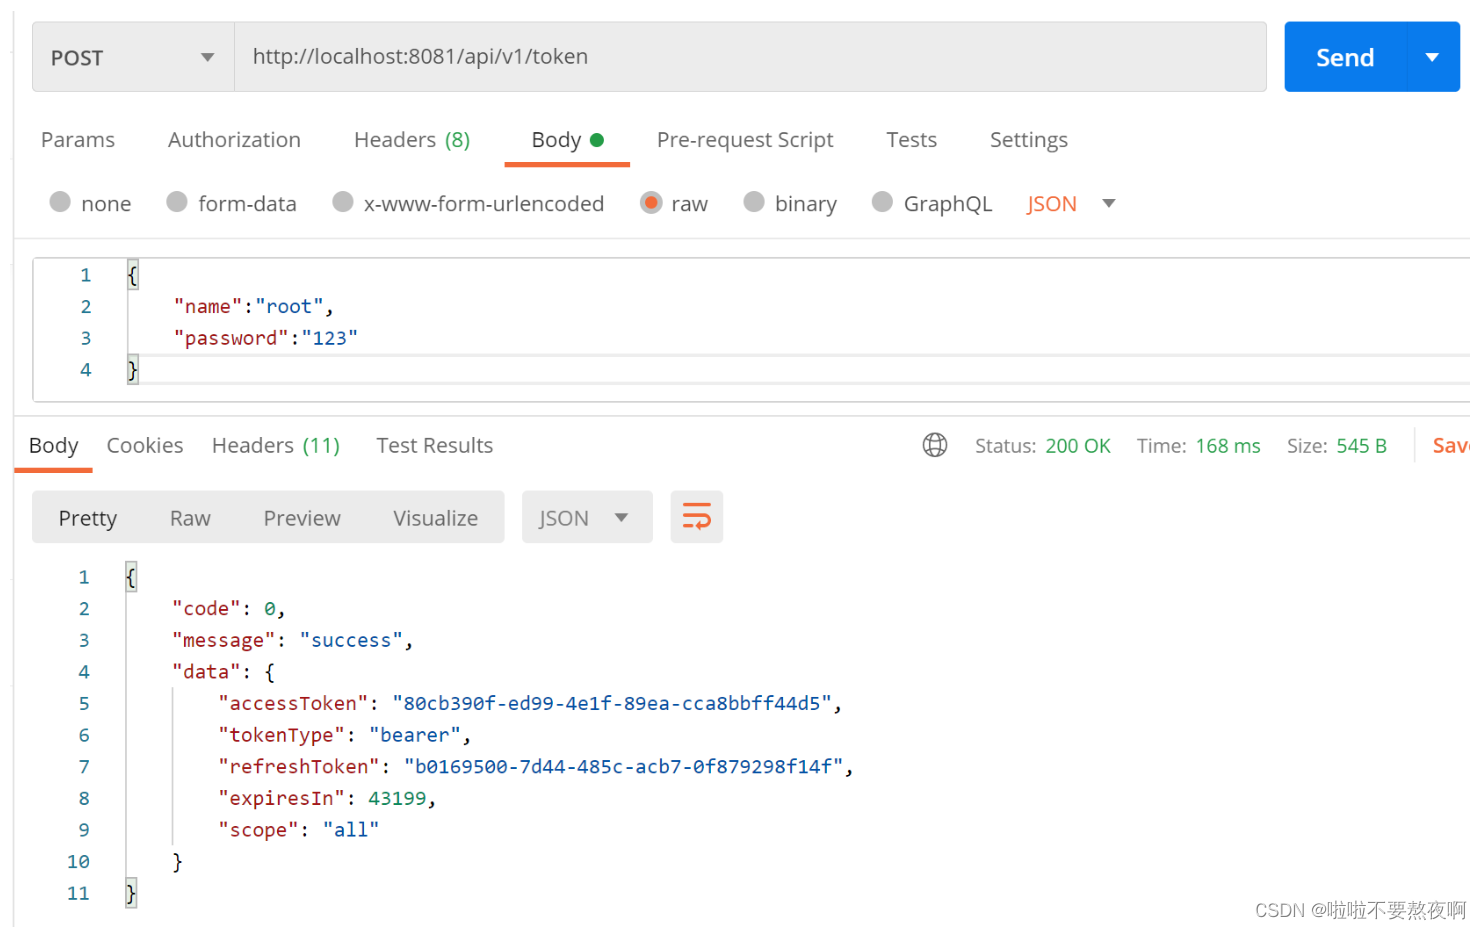
5. 启动项目测试

最后
以上就是大力世界最近收集整理的关于SpringSecurity Oauth2 - 03 内存数据源完成认证登录的全部内容,更多相关SpringSecurity内容请搜索靠谱客的其他文章。
本图文内容来源于网友提供,作为学习参考使用,或来自网络收集整理,版权属于原作者所有。


发表评论 取消回复