1.环境准备
1)代码准备
笔者目前是基于Sentinel-release-1.7的源码进行测试的,在原sentinel-demo-cluster的基础上,适配笔者本地的环境进行修改的。源码地址如下:https://github.com/alibaba/Sentinel/tree/release-1.7
2)Nacos环境准备
由于Sentinel集群测试是基于Nacos配置中心的,所以需要在本地启动一个Nacos服务,这里就不再赘述Nacos的搭建。可参考:GitHub - alibaba/nacos: an easy-to-use dynamic service discovery, configuration and service management platform for building cloud native applications.
3)Sentinel控制台准备
由于我们需要Sentinel控制台去观察我们的集群流控信息,所以需要提前把这个控制台准备好。
这个启动方式官网有介绍,笔者不再赘述
2.基础概念
* token server:集群流控服务端,用来处理token client的请求,根据集群规则来判断是否允许通过
* token client:集群流控客户端,向token server发送请求,询问是否允许该请求通过,token server返回client结果,决定是否限流
* 集群模式支持的规则:限流、热点
* 规则阈值计算方式:
集群总体模式(限定集群内某资源的所有qps不超过此阈值);
单机均摊模式(配置的阈值为单机能够承受的限额,集群总阈值=单机阈值*机器数量)
* token server部署方式
独立部署(单独启动一个token server服务来处理client的请求)
嵌入模式(将token server与应用一起部署)
3.client-server交互原理及必备项
原理:类似于单机限流,单机限流统计的qps在每个实例中单独统计,集群限流是有一个专门的实例(token server)来进行qps统计。其他实例(token client)在处理真正的业务之前会先向token server发送一个请求,如果server返回一个token,则说明集群qps未达到阈值,则可以继续处理业务,否则抛错。
token server配置项:
* namespace(为token server的一个抽象概念,代表一个应用/服务,我们可以主动指定namespace,不指定的话就是${project.name})
* ServerTransportConfig(指定了server服务的port和idleSeconds)
* FlowRule/ParamFlowRule(集群限流规则或参数限流规则)
* 表明当前服务为token server(通过ClusterStateManager.registerProperty()方法来确认)
token client配置项:
* ClusterClientAssignConfig配置(指定token server的host和port)
* ClusterClientConfig配置(指定requestTimeout时间)
* 加载client降级处理FlowRule(在连接token server失败时降级方案,使用本地FlowRule方案)
* 表明当前服务为token client
4.Nacos准备
为何要准备这个?笔者打算使用Nacos当做配置中心,然后上述所有需要的配置项都在Nacos直接加载即可,下面展示下需要提前在Nacos做的配置项:
1)先根据项目名clusterDemo来创建命名服务,如下即可

2)在命名空间clusterDemo的配置列表中添加配置
* 集群FlowRule规则 DataId:clusterDemo-flow-rules,配置内容如下:
[
    {
        "resource" : "cluster-resource",
        "grade" : 1,
        "count" : 10,
        "clusterMode" :  true,
        "clusterConfig" : {
            "flowId" : 111,
            "thresholdType" : 1,
            "fallbackToLocalWhenFail" : true
        }
    }
]
* ClusterClientConfig配置 DataId:clusterDemo-cluster-client-config,内容如下:
{"requestTimeout":3000}* 用于指定server和client的host:port信息 DataId:clusterDemo-cluster-map(后续会在代码中解析这个json,获获取server和port,并确认当前应用身份[client/server]),内容如下:
[{
	"clientSet": ["169.254.207.96@8729", "169.254.207.96@8727"],// client的集合
	"ip": "169.254.207.96",// server ip
	"machineId": "169.254.207.96@8720",// server ip:port
	"port": 7717// server所在服务的启动port
}]
结果如下:

5.嵌入式集群模式
1)主代码
根据原来的DemoClusterInitFunc.java 创建的,代码如下
package com.alibaba.csp.sentinel.demo.cluster.init;

import com.alibaba.csp.sentinel.cluster.ClusterStateManager;
import com.alibaba.csp.sentinel.cluster.client.config.ClusterClientAssignConfig;
import com.alibaba.csp.sentinel.cluster.client.config.ClusterClientConfig;
import com.alibaba.csp.sentinel.cluster.client.config.ClusterClientConfigManager;
import com.alibaba.csp.sentinel.cluster.flow.rule.ClusterFlowRuleManager;
import com.alibaba.csp.sentinel.cluster.flow.rule.ClusterParamFlowRuleManager;
import com.alibaba.csp.sentinel.cluster.server.config.ClusterServerConfigManager;
import com.alibaba.csp.sentinel.cluster.server.config.ServerTransportConfig;
import com.alibaba.csp.sentinel.datasource.ReadableDataSource;
import com.alibaba.csp.sentinel.datasource.nacos.NacosDataSource;
import com.alibaba.csp.sentinel.demo.cluster.DemoConstants;
import com.alibaba.csp.sentinel.demo.cluster.entity.ClusterGroupEntity;
import com.alibaba.csp.sentinel.init.InitFunc;
import com.alibaba.csp.sentinel.slots.block.flow.FlowRule;
import com.alibaba.csp.sentinel.slots.block.flow.FlowRuleManager;
import com.alibaba.csp.sentinel.slots.block.flow.param.ParamFlowRule;
import com.alibaba.csp.sentinel.slots.block.flow.param.ParamFlowRuleManager;
import com.alibaba.csp.sentinel.transport.config.TransportConfig;
import com.alibaba.csp.sentinel.util.AppNameUtil;
import com.alibaba.csp.sentinel.util.HostNameUtil;
import com.alibaba.fastjson.JSON;
import com.alibaba.fastjson.TypeReference;
import com.alibaba.nacos.api.PropertyKeyConst;

import java.util.List;
import java.util.Objects;
import java.util.Optional;
import java.util.Properties;

/**
 * 简单版本
 * @author Eric Zhao
 */
public class DemoClusterInitFuncSimple implements InitFunc {

    private static final String APP_NAME = AppNameUtil.getAppName();

    private final String remoteAddress = "localhost";
    // 这里需要注意的是,我们使用Nacos指定namespace后,这里获取的实际不是namespace的名称clusterDemo,
    // 而是其对应的一串ID,大家可以从各自的Nacos上找到
    private final String nacosNamespace = "11f4068f-d5e7-4c97-af73-b9b1b037f5bd";// clusterDemo
    private final String groupId = "DEFAULT_GROUP";
    private Properties properties = new Properties();

    private final String flowDataId = APP_NAME + DemoConstants.FLOW_POSTFIX;
    private final String paramDataId = APP_NAME + DemoConstants.PARAM_FLOW_POSTFIX;
    private final String configDataId = APP_NAME + "-cluster-client-config";
    private final String clusterMapDataId = APP_NAME + DemoConstants.CLUSTER_MAP_POSTFIX;

    @Override
    public void init() throws Exception {
        // 使用namespace的方式加载Nacos配置
        properties.put(PropertyKeyConst.SERVER_ADDR, remoteAddress);
        properties.put(PropertyKeyConst.NAMESPACE, nacosNamespace);


        // client:加载FlowRule(降级规则)
        initDynamicRuleProperty();

        // client:加载ClusterClientConfig(requestTimeout)
        initClientConfigProperty();
        // client:加载ClusterClientAssignConfig(serverHost、serverPort)
        initClientServerAssignProperty();

        // server:加载集群规则,namespace下对应的FlowRule
        registerClusterRuleSupplier();
        // server:从assignMap中获取ServerTransportConfig(port、idleSeconds)
        initServerTransportConfigProperty();

        // 根据我们的clusterDemo-cluster-map配置,设置当前应用状态(CLIENT/SERVER/NOT_STARTED)
        initStateProperty();
    }

    // 这个最简单,本地加载降级规则,没啥好说的
    private void initDynamicRuleProperty() {
        ReadableDataSource<String, List<FlowRule>> ruleSource = new NacosDataSource<>(properties, groupId,
            flowDataId, source -> JSON.parseObject(source, new TypeReference<List<FlowRule>>() {}));
        FlowRuleManager.register2Property(ruleSource.getProperty());
    }

    // client端加载requestTimeout配置
    private void initClientConfigProperty() {
        ReadableDataSource<String, ClusterClientConfig> clientConfigDs = new NacosDataSource<>(properties, groupId,
            configDataId, source -> JSON.parseObject(source, new TypeReference<ClusterClientConfig>() {}));
        ClusterClientConfigManager.registerClientConfigProperty(clientConfigDs.getProperty());
    }

    // server端加载port
    private void initServerTransportConfigProperty() {
        ReadableDataSource<String, ServerTransportConfig> serverTransportDs = new NacosDataSource<>(properties, groupId,
            clusterMapDataId, source -> {
            List<ClusterGroupEntity> groupList = JSON.parseObject(source, new TypeReference<List<ClusterGroupEntity>>() {});
            return Optional.ofNullable(groupList)
                // 主要在这里,通过clusterDemo-cluster-map配置的值中的machineID来比对当前应用IP:port是否符合,符合则代表是server端
                // 获取配置中的port值
                .flatMap(this::extractServerTransportConfig)
                .orElse(null);
        });
        ClusterServerConfigManager.registerServerTransportProperty(serverTransportDs.getProperty());
    }

    // 这个是最关键的,根据namespace来动态从Nacos中获取FlowRule
    // namespace可以主动加载,通过代码ClusterServerConfigManager.loadServerNamespaceSet(Collections.singleton(APP_NAME));
    // 也可以不写,在启动项中添加project.name=xxx,则namespace默认取该配置项值
    private void registerClusterRuleSupplier() {
        // Register cluster flow rule property supplier which creates data source by namespace.
        // Flow rule dataId format: ${namespace}-flow-rules
        ClusterFlowRuleManager.setPropertySupplier(namespace -> {
            ReadableDataSource<String, List<FlowRule>> ds = new NacosDataSource<>(properties, groupId,
                namespace + DemoConstants.FLOW_POSTFIX, source -> JSON.parseObject(source, new TypeReference<List<FlowRule>>() {}));
            return ds.getProperty();
        });
    }

    // 这里主要是通过map配置项中的clientSet,比对当前应用的ip:port来确认当前是否client端,如果是,则设置serverIp:serverPort为配置中的ip:port
    private void initClientServerAssignProperty() {
        // Cluster map format:
        // [{"clientSet":["169.254.207.96@8729","169.254.207.96@8727"],"ip":"169.254.207.96","machineId":"169.254.207.96@8720","port":7717}]
        // machineId: <ip@commandPort>, commandPort for port exposed to Sentinel dashboard (transport module)
        ReadableDataSource<String, ClusterClientAssignConfig> clientAssignDs = new NacosDataSource<>(properties, groupId,
            clusterMapDataId, source -> {
            List<ClusterGroupEntity> groupList = JSON.parseObject(source, new TypeReference<List<ClusterGroupEntity>>() {});
            return Optional.ofNullable(groupList)
                // 主要在这里
                .flatMap(this::extractClientAssignment)
                .orElse(null);
        });
        ClusterClientConfigManager.registerServerAssignProperty(clientAssignDs.getProperty());
    }

    // 这里同样很关键,通过map配置中提前设定好的clientSet,machineID来确定当前应用是server还是client
    private void initStateProperty() {
        // Cluster map format:
        // [{"clientSet":["169.254.207.96@8729","169.254.207.96@8727"],"ip":"169.254.207.96","machineId":"169.254.207.96@8720","port":7717}]
        // machineId: <ip@commandPort>, commandPort for port exposed to Sentinel dashboard (transport module)
        ReadableDataSource<String, Integer> clusterModeDs = new NacosDataSource<>(properties, groupId,
            clusterMapDataId, source -> {
            List<ClusterGroupEntity> groupList = JSON.parseObject(source, new TypeReference<List<ClusterGroupEntity>>() {});
            return Optional.ofNullable(groupList)
                // 主要在这里
                .map(this::extractMode)
                .orElse(ClusterStateManager.CLUSTER_NOT_STARTED);
        });
        ClusterStateManager.registerProperty(clusterModeDs.getProperty());
    }

    private int extractMode(List<ClusterGroupEntity> groupList) {
        // If any server group machineId matches current, then it's token server.
        if (groupList.stream().anyMatch(this::machineEqual)) {
            return ClusterStateManager.CLUSTER_SERVER;
        }
        // If current machine belongs to any of the token server group, then it's token client.
        // Otherwise it's unassigned, should be set to NOT_STARTED.
        boolean canBeClient = groupList.stream()
            .flatMap(e -> e.getClientSet().stream())
            .filter(Objects::nonNull)
            .anyMatch(e -> e.equals(getCurrentMachineId()));
        return canBeClient ? ClusterStateManager.CLUSTER_CLIENT : ClusterStateManager.CLUSTER_NOT_STARTED;
    }

    private Optional<ServerTransportConfig> extractServerTransportConfig(List<ClusterGroupEntity> groupList) {
        return groupList.stream()
            .filter(this::machineEqual)
            .findAny()
            .map(e -> new ServerTransportConfig().setPort(e.getPort()).setIdleSeconds(600));
    }

    private Optional<ClusterClientAssignConfig> extractClientAssignment(List<ClusterGroupEntity> groupList) {
        if (groupList.stream().anyMatch(this::machineEqual)) {
            return Optional.empty();
        }
        // Build client assign config from the client set of target server group.
        for (ClusterGroupEntity group : groupList) {
            if (group.getClientSet().contains(getCurrentMachineId())) {
                String ip = group.getIp();
                Integer port = group.getPort();
                return Optional.of(new ClusterClientAssignConfig(ip, port));
            }
        }
        return Optional.empty();
    }

    private boolean machineEqual(/*@Valid*/ ClusterGroupEntity group) {
        return getCurrentMachineId().equals(group.getMachineId());
    }

    private String getCurrentMachineId() {
        // Note: this may not work well for container-based env.
//        return HostNameUtil.getIp() + SEPARATOR + TransportConfig.getRuntimePort();

        return HostNameUtil.getIp() + SEPARATOR + TransportConfig.getPort();
    }

    private static final String SEPARATOR = "@";
}
2)启动应用配置
上述主代码写完之后,适用于集群中的所有应用。接下来我们要去在应用启动之前加载这个主类。
通过在ClusterDemoApplication.main()方法中加载这个类,代码如下(当然也可以配置在文件中,通过SPI的方式加载):
@SpringBootApplication
public class ClusterDemoApplication {

    public static void main(String[] args) {
        try {
            // 这里我们要主动加载DemoClusterInitFuncSimple.init()方法
            // 也可以通过SPI的方式加载
            new DemoClusterInitFuncSimple().init();
        } catch (Exception e) {
            e.printStackTrace();
        }
        SpringApplication.run(ClusterDemoApplication.class, args);
    }
}
* 下面就是启动server,照常启动SpringBoot项目的方式(也就是执行ClusterDemoApplication.main()方法)即可,启动配置为
-Dserver.port=7718 // 应用服务器启动端口
-Dproject.name=clusterDemo // 应用名称(也对应着我们在Nacos中配置的namespace)
-Dcsp.sentinel.dashboard.server=localhost:8080 // 指定Sentinel控制台的地址(本地启动)
-Dcsp.sentinel.api.port=8720 // 本地启动 HTTP API Server 的端口号
-Dcsp.sentinel.log.use.pid=true // 日志文件名中是否加入进程号,用于单机部署多个应用的情况
这里需要注意的是:
我们的project.name一定要与Nacos中配置的namespace一致,否则会拉取不到配置信息
csp.sentinel.api.port配置的8720端口需要与clusterDemo-cluster-map配置中machineID中的port保持一致,否则无法判断当前为server端;
* 启动client1,启动配置为
-Dserver.port=7719 // 应用服务器端口,其他与server基本类似
-Dproject.name=clusterDemo
-Dcsp.sentinel.dashboard.server=localhost:8080
-Dcsp.sentinel.api.port=8729 // 与上述的注意事项一致,这里的port需要与map配置中的clientSet中的当前ip对应的port保持一致,否则无法判断当前为client
-Dcsp.sentinel.log.use.pid=true
* 启动client2,启动配置为
-Dserver.port=7720 // 应用服务器端口,其他与server基本类似
-Dproject.name=clusterDemo // 三个项目的project.name要保持一致
-Dcsp.sentinel.dashboard.server=localhost:8080
-Dcsp.sentinel.api.port=8727 // 与上述的注意事项一致,这里的port需要与map配置中的clientSet中的当前ip对应的port保持一致,否则无法判断当前为client
-Dcsp.sentinel.log.use.pid=true
在这里,把我们的Nacos中clusterDemo-cluster-map的配置项再回顾一下
[{
	"clientSet": ["169.254.207.96@8729", "169.254.207.96@8727"],// 这里的ip:port与我们client1IP:csp.sentinel.api.port是保持一致的
	"ip": "169.254.207.96",// server ip
	"machineId": "169.254.207.96@8720",// serverIp:csp.sentinel.api.port
	"port": 7717 //server应用服务器port
}]
3)Sentinel控制台验证
在启动上面三个应用后,我们可以在Sentinel控制台看到以下展示
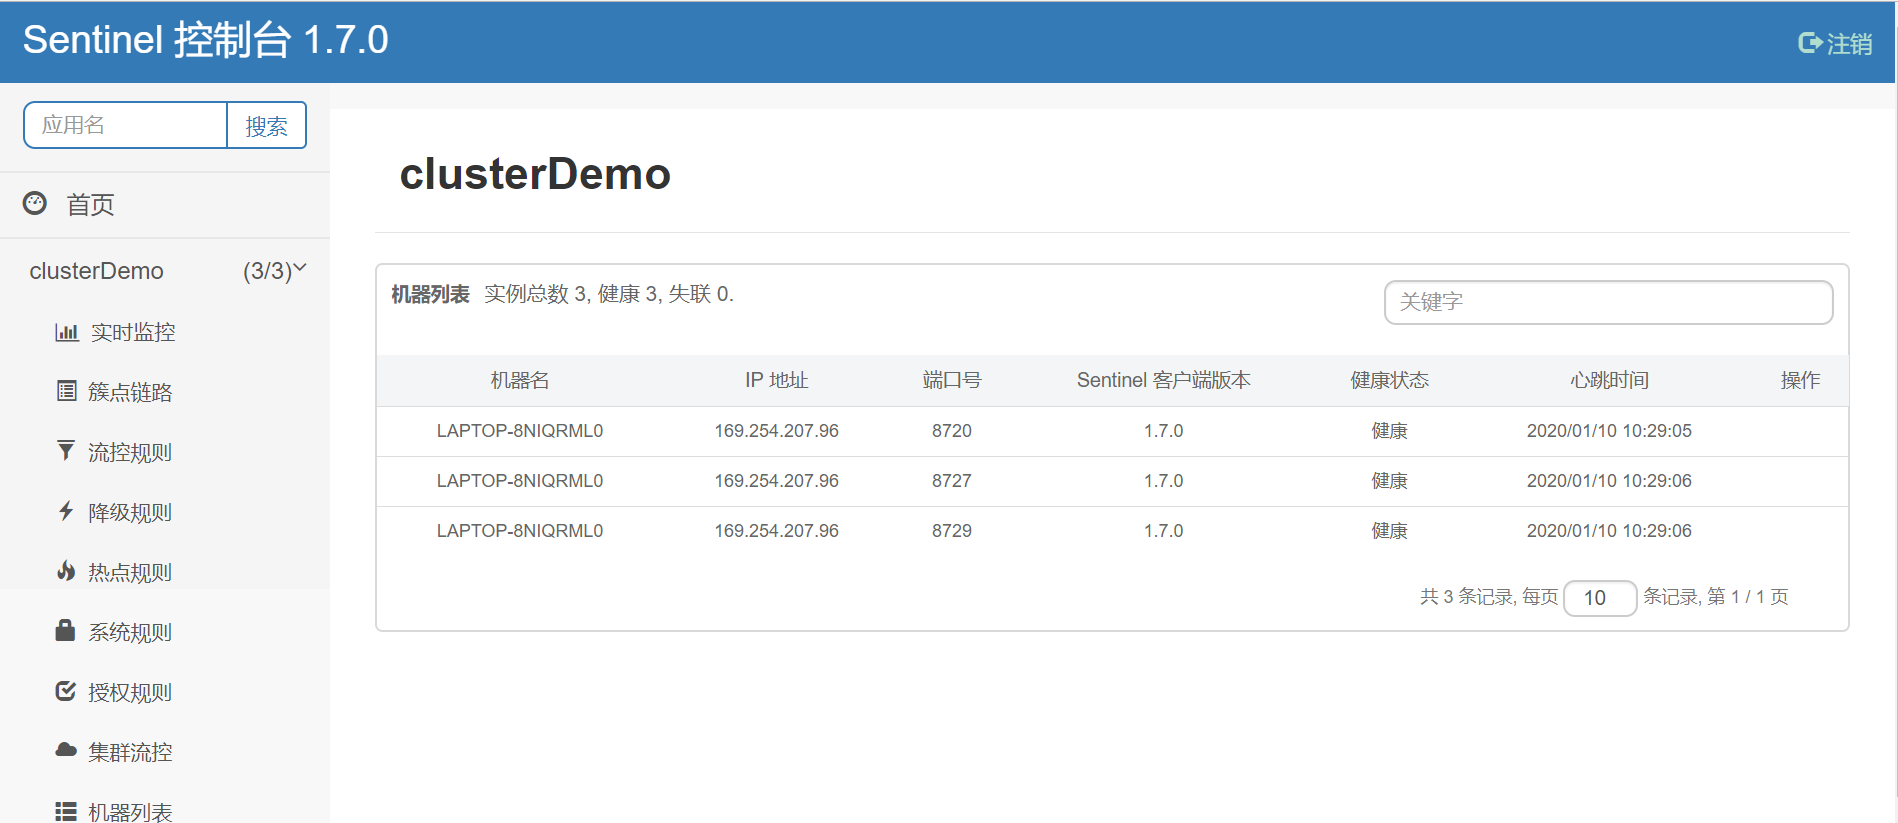
可以看到项目名为clusterDemo的机器列表中有我们启动的三个应用ip和port,需要注意的是这里的port是我们在应用启动参数中指定的csp.sentinel.api.port。
在集群流控页面中可以看到以下页面: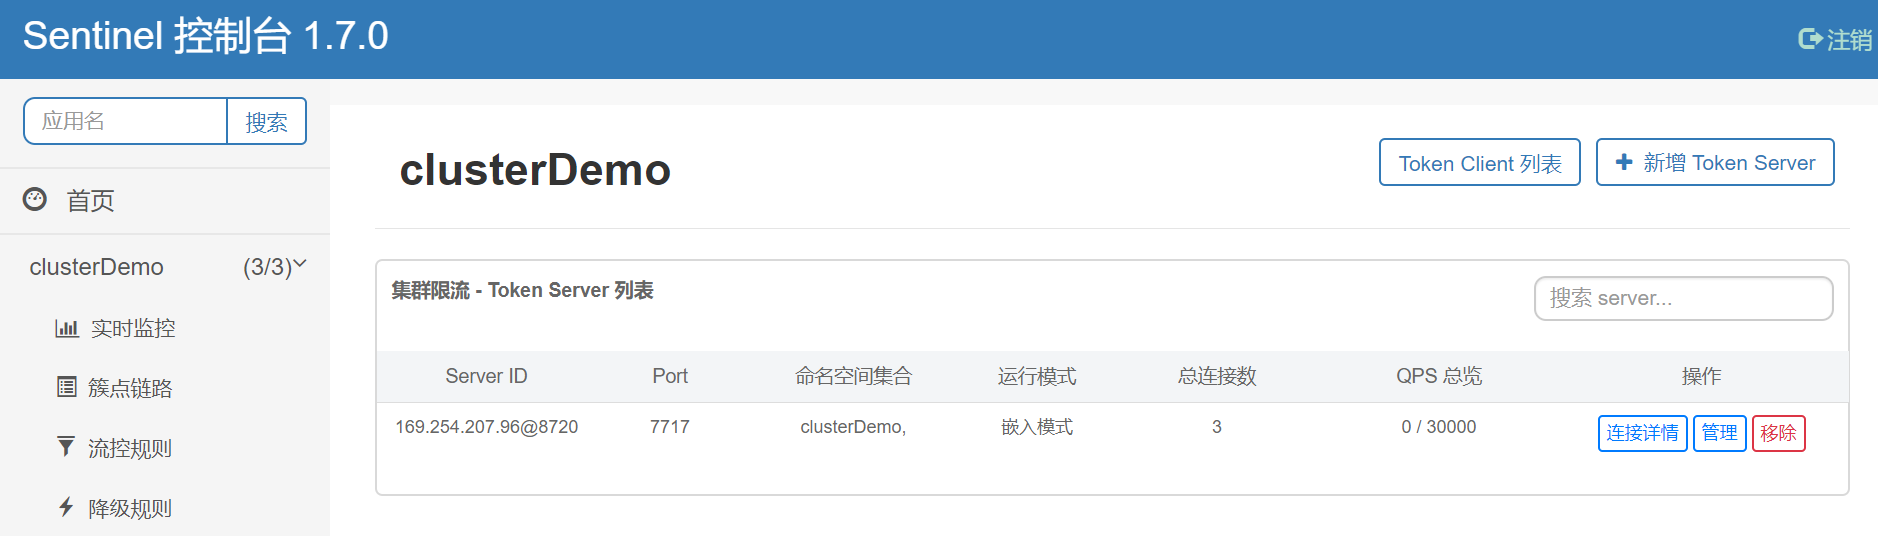
在管理信息中如下所示:可以看到token server和token client与我们在之前map配置中指定的是一致的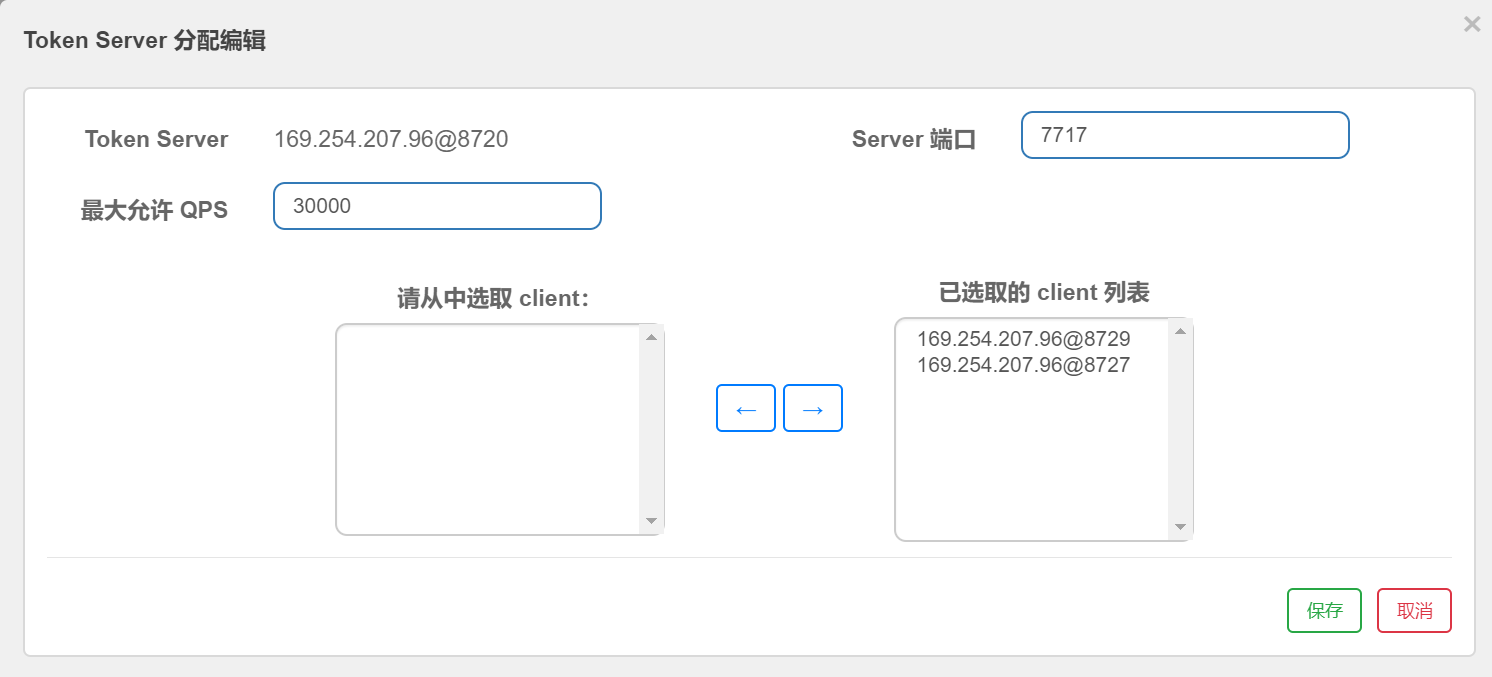
6.测试验证
下面我们通过请求server和client的接口来验证下集群限流是否生效
1)测试代码
// 新建类,用于测试
public class HttpRequestDemo {

    // 注意这里的port为我们应用服务器的启动port,对应应用启动参server.port
    public static final String requestPath = "http://localhost:7720/hello/jack";
    public static final String requestPath2 = "http://localhost:7719/hello/jack";
    public static final String requestPath3 = "http://localhost:7718/hello/jack";

    private static RestTemplate restTemplate = new RestTemplate();
    private static RestTemplate restTemplate2 = new RestTemplate();
    private static RestTemplate restTemplate3 = new RestTemplate();

    public static void main(String[] args) {

        int i = 0;
        while (true) {
            executeGet();
            i++;
            if (i % 10 == 0) {
                try {
                    Thread.sleep(200);
                } catch (InterruptedException e) {
                    e.printStackTrace();
                }
            }

            if (i == 2000) {
                break;
            }
        }
    }

    // 连续执行get请求
    private static void executeGet() {
        restTemplate.getForEntity(requestPath, String.class);
        restTemplate2.getForEntity(requestPath2, String.class);
        restTemplate3.getForEntity(requestPath3, String.class);
    }
}

// com.alibaba.csp.sentinel.demo.cluster.app.service.DemoService
@Service
public class DemoService {

    // 特别注意下,这里的value值要修改为我们定义的resource,也就是我们在Nacos clusterDemo-flow-rules配置项对应的resource
    @SentinelResource(value = "cluster-resource", blockHandler = "sayHelloBlockHandler")
    public String sayHello(String name) {
        return "Hello, " + name;
    }

    public String sayHelloBlockHandler(String name, BlockException ex) {
        // This is the block handler.
        ex.printStackTrace();
        return String.format("Oops, <%s> blocked by Sentinel", name);
    }
}
2)Sentinel控制台查看限流结果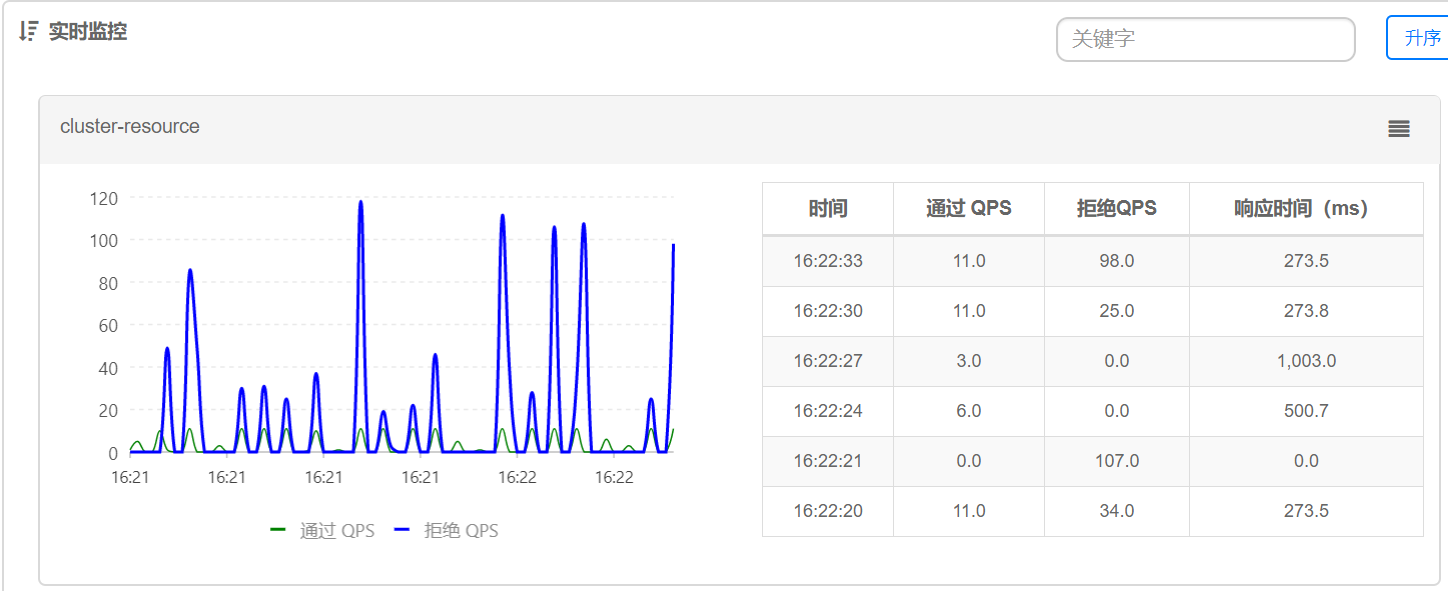
可以看到通过的QPS基本维持在10左右。
总结:
笔者在参考Sentinel wiki进行集群限流验证的时候还是很痛苦的,因为wiki中给的比较简略,再看代码,代码后来可以慢慢看懂,但是在真正运行的时候却总是失败。终于在弄明白了代码的含义尤其是如何确定应用是token server还是token client的时候才明白,这个demo缺少了运行时的参数指定,所以总也失败。
还有就是通过页面去访问的话,无法体现出集群限流的功能,所以笔者补了一个用于连续发送请求的demo。用于验证限流功能。
参考:
https://github.com/alibaba/Sentinel/wiki/%E9%9B%86%E7%BE%A4%E6%B5%81%E6%8E%A7
https://www.jianshu.com/p/bb198c08b418
最后
以上就是要减肥身影最近收集整理的关于Sentinel嵌入式集群模式搭建(Nacos)的全部内容,更多相关Sentinel嵌入式集群模式搭建(Nacos)内容请搜索靠谱客的其他文章。


![Spring Cloud Alibaba之服务容错组件 - Sentinel [规则持久化篇]](https://www.shuijiaxian.com/files_image/reation/bcimg22.png)
![Spring Cloud Alibaba之服务容错组件 - Sentinel [代码篇]](https://www.shuijiaxian.com/files_image/reation/bcimg23.png)
发表评论 取消回复