前言:
本部分主要参考此博客:
https://www.w3cschool.cn/shellbook/uglqdozt.html
数值运算:
进制转换:
其他进制转换为10进制, 可以使用Shell内置的进制转换
如将8进制的11转换为10进制:
echo "8to10 $[8#11]"
直接使用bc计算器, 能直接指定源&目标进制, 方便转换
由于bc是交互式的计算器, 所以这里没法直接使用参数的形式进行, 而是采用echo一个用分号分割的多条语句组成的字符串给bc, 其将自动打印结果
echo "obase=16;ibase=10;1024*1024" | bc

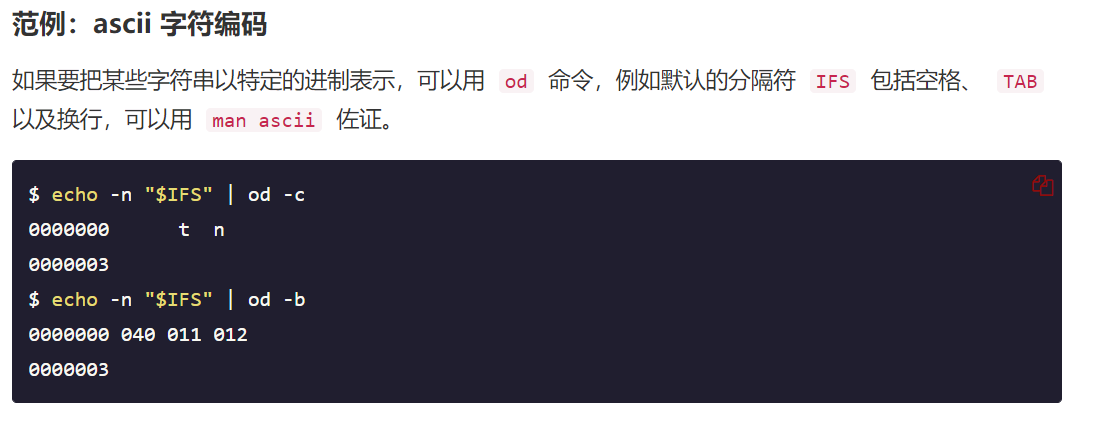
ascii字符编码:
使用od命令, 可以实现将某些字符串以特定的进制表示
这个暂时不知道啥用, 先放着
浮点计算:
快速入门篇介绍了常规的整数计算, 但是无论是内置方法, 还是let, expr, 都无法执行浮点运算
这里需要借助bc 或 awk 实现
和上头的进制转换相同, 也是使用echo将多语句传给交互式的bc
echo "1.1+2.2" | bc
echo "1.1-2.2" | bc
echo "1.1*2.2" | bc
echo "scale=3;7/2.2" | bc

这里用到了指定精度用的scale
bc中还有其他几个内置变量, 计算时经常用到
| 变量名 | 作 用 |
|---|---|
| scale | 指定精度,也即小数点后的位数;默认为 0,也即不使用小数部分。 |
| ibase | 指定输入的数字的进制,默认为十进制。 |
| obase | 指定输出的数字的进制,默认为十进制。 |
| last 或者 . | 表示最近打印的数字 |
注意:obase 要尽量放在 ibase 前面,因为 ibase 设置后,后面的数字都是以 ibase 的进制来换算的
高级浮点计算:
使用到bc的几个内置函数
使用这些函数需要加-l参数
| 函数名 | 作用 |
|---|---|
| s(x) | 计算 x 的正弦值,x 是弧度值。 |
| c(x) | 计算 x 的余弦值,x 是弧度值。 |
| a(x) | 计算 x 的反正切值,返回弧度值。 |
| l(x) | 计算 x 的自然对数。 |
| e(x) | 求 e 的 x 次方。 |
| j(n, x) | 贝塞尔函数,计算从 n 到 x 的阶数。 |
复杂的计算可以使用awk实现
随机数:
这里使用到环境变量RANDOM, 他能产生0<=RANDOM<=32767的随机数
或者使用awk的rand()函数, 其能产生0<=rand()<=1的随机数
echo $RANDOM

随机IP地址:
defaultGatway="192.169.1.1"
# 求IP地址前缀, 用于后头的地址拼接
len=${#defaultGatway}
echo "len=${len}"
i=$[${len}-1]
while [ ${i}>=0 ]
do
    temp=${i}
    substr=${defaultGatway:${i}:1}
    echo "substr=${substr}"
    if [ ${substr}="." ]
    then
        echo "index=${i}"
        netIndex=${defaultGatway:0:${i}}
        break
    fi
    i=$[${i}-1]
done
echo "netIndex=${netIndex}"

rand=$RANDOM
rand=$[rand%256]
echo "rand=${rand}"
echo "rand IP address = ${netIndex}${rand}"
统计字符串中单词出现的次数
这里主要用到了sed
sed -e "s/[^a-zA-Z]/n/g" shellTest2.sh | grep -v "^$" | sort | uniq -c | sort -n -k 1 -r
[hhtxzzj@localhost temp]$  /bin/bash "/home/hhtxzzj/temp/shellTest.sh"
     77 echo
     22 i
     20 var
     20 a
     18 ans
     12 b
     11 then
     11 n
     11 if
     11 fi
      9 else
      8 file
      7 v
      7 rand
      7 done
      7 do
      6 printf
      6 d
      6 bc
      5 while
      5 sh
      5 s
      5 defaultGatway
      4 true
      4 temp
      4 substr
      4 str
      4 shellTest
      4 netIndex
      4 len
      4 int
      4 input
      4 fun
      3 subs
      3 read
      3 name
      3 for
      3 false
      3 cos
      2 sort
      2 sed
      2 scale
      2 ret
      2 r
      2 passwd
      2 msg
      2 list
      2 let
      2 is
      2 IP
      2 Hello
      2 g
      2 function
      2 e
      2 data
      2 D
      2 break
      1 zA
      1 Z
      1 your
      1 x
      1 wget
      1 W
      1 w
      1 usr
      1 uniq
      1 to
      1 THIS
      1 This
      1 this
      1 than
      1 Substring
      1 sqrt
      1 spider
      1 source
      1 rootfs
      1 return
      1 RANDOM
      1 of
      1 od
      1 obase
      1 net
      1 N
      1 mi
      1 match
      1 makeFiles
      1 M
      1 location
      1 l
      1 k
      1 janusvsuperpc
      1 index
      1 in
      1 ibase
      1 home
      1 hhtxzzj
      1 head
      1 grep
      1 funciton
      1 found
      1 f
      1 Enter
      1 efg
      1 dynv
      1 cat
      1 c
      1 bin
      1 bigger
      1 BEGIN
      1 bash
      1 awk
      1 at
      1 address
      1 abc
统计指定单词出现的次数:
# 判定输入参数的个数, 至少应该输入2个参数
if [ $# -lt 1 ]
then
    echo "need at lest 2 args"
    exit -1
fi

# 获取源文件名 & 目标单词数
file=$1
wordsNum=$#-1

# 将全体单词数统计结果暂存
# 这里如果暂存到变量中会导致缺少n
sed -e "s/[^a-zA-Z]/n/g" ${file} | grep -v "^$" | sort | uniq -c | sort -n -k 1 -r > temp.tmp

# 循环grep输出
for((i=0;i<${wordsNum};++i))
do
    shift
    # echo "${1}"
    # echo
    cat temp.tmp | grep "b${1}b"
done
布尔运算
这里主要使用test进行相关测试
test能非常方便的完成一些简单的测试, 所以进行逻辑判定时如果涉及文件等, 首选test
先看下test 的help
test: test [expr]
Evaluate conditional expression.

Exits with a status of 0 (true) or 1 (false) depending on
the evaluation of EXPR.  Expressions may be unary or binary.  Unary
expressions are often used to examine the status of a file.  There
are string operators and numeric comparison operators as well.

The behavior of test depends on the number of arguments.  Read the
bash manual page for the complete specification.

File operators:

-a FILE        True if file exists.
-b FILE        True if file is block special.
-c FILE        True if file is character special.
-d FILE        True if file is a directory.
-e FILE        True if file exists.
-f FILE        True if file exists and is a regular file.
-g FILE        True if file is set-group-id.
-h FILE        True if file is a symbolic link.
-L FILE        True if file is a symbolic link.
-k FILE        True if file has its `sticky' bit set.
-p FILE        True if file is a named pipe.
-r FILE        True if file is readable by you.
-s FILE        True if file exists and is not empty.
-S FILE        True if file is a socket.
-t FD          True if FD is opened on a terminal.
-u FILE        True if the file is set-user-id.
-w FILE        True if the file is writable by you.
-x FILE        True if the file is executable by you.
-O FILE        True if the file is effectively owned by you.
-G FILE        True if the file is effectively owned by your group.
-N FILE        True if the file has been modified since it was last read.

FILE1 -nt FILE2  True if file1 is newer than file2 (according to
modification date).

FILE1 -ot FILE2  True if file1 is older than file2.

FILE1 -ef FILE2  True if file1 is a hard link to file2.

String operators:

-z STRING      True if string is empty.

-n STRING
STRING      True if string is not empty.

STRING1 = STRING2
True if the strings are equal.
STRING1 != STRING2
True if the strings are not equal.
STRING1 < STRING2
True if STRING1 sorts before STRING2 lexicographically.
STRING1 > STRING2
True if STRING1 sorts after STRING2 lexicographically.

Other operators:

-o OPTION      True if the shell option OPTION is enabled.
-v VAR     True if the shell variable VAR is set
! EXPR         True if expr is false.
EXPR1 -a EXPR2 True if both expr1 AND expr2 are true.
EXPR1 -o EXPR2 True if either expr1 OR expr2 is true.

arg1 OP arg2   Arithmetic tests.  OP is one of -eq, -ne,
-lt, -le, -gt, or -ge.

Arithmetic binary operators return true if ARG1 is equal, not-equal,
less-than, less-than-or-equal, greater-than, or greater-than-or-equal
than ARG2.

Exit Status:
Returns success if EXPR evaluates to true; fails if EXPR evaluates to
false or an invalid argument is given.
几个比较常用的点
test内部逻辑运算与Shell内置的逻辑运算符稍有不同:
-
-a(and) 对应 && -
-o(or) 对应 || -
非运算都是
! -
在
Bash里,test命令可以用[] 运算符取代,但是需要注意,[之后与]之前需要加上额外的空格这常用在之前的流程控制语句中, 如if-else
几个简单的栗子:
要求某文件非空且可执行
两种方法
file="shellTest2.sh"
if test -s ${file} && test -x ${file}
then
    echo "${file} yes"
else
    echo "${file} no"
fi

if test -s ${file} -a -x ${file}
then
    echo "${file} yes"
else
    echo "${file} no"
fi

替换为[]版本, 看上去更加简洁
if [ -s ${file} ] && [ -x ${file} ]
then
    echo "${file} yes"
else
    echo "${file} no"
fi

if [ -s ${file} -a -x ${file} ]
then
    echo "${file} yes"
else
    echo "${file} no"
fi
命令列表
命令列表就是使用&& || 构建逻辑判断句, 减少if-else的使用
命令列表仍然遵循逻辑运算的短路法则
- &&连接的命令, 前头的false, 后头不执行, 反之执行
- ||连接的命令, 前头true, 后头不执行, 反之执行
小栗子:
echo $#
echo $1
if [ $# -eq 1 ] && (echo $1 | grep ^[0-9]*$ >/dev/null);then
    echo "YES"
fi
/dev/null为一个黑洞文件, 输出到这个文件中的内容被视为丢弃, 但报告写入成功, 读取这个文件会立刻报告一个EOF
所以以上命令的意思是, 要求输入参数的数量必须为1, 且参数为数字, 否则grep就不会向null文件写入, 也就不会返回true
使用命令列表将if-else简化
echo $#
echo $1
! ([ $# -eq 1 ] && (echo $1 | grep ^[0-9]*$ >/dev/null)) && exit 1

echo "YES"
代码更加美观, 但是设计上逻辑较为复杂
字符串操作:
这里先介绍2个特殊的文件
/dev/null 和 /dev/zero
参考博客:
https://blog.csdn.net/longerzone/article/details/12948925
/dev/null 被称之为空设备, 或黑洞, 是一个特殊的设备文件
写入其中的数据都会丢弃, 但报告写入操作成功, 读取会立刻得到一个EOF
常用于将垃圾数据重定向到黑洞中进行丢弃
/dev/zero 在读取的时候, 能无限制的提供空字符(NULL, ASCII NUL, 0x00)
常用其提供的字符流来覆盖信息, 或是产生一个特定大小的空白文件
字符串查找
字符串这里常用的查找操作是grep, grep+正则能解决绝大多数的字符串查找问题
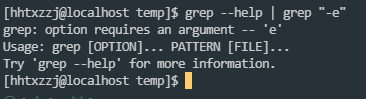
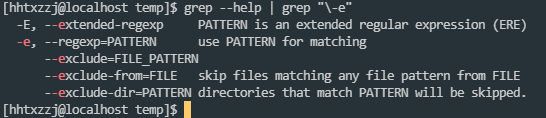
使用要点:
grep支持正则表达式, 但是最好使用的时候都带上-E -e, 否则不支持完整的正则, 或部分正则字符会和grep自身的内置规则冲突, 导致需要使用转移才能正常正则
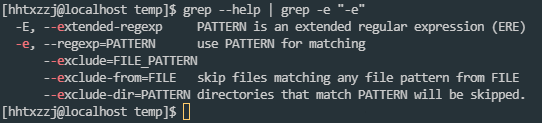
如, 查找-开头的字符串, 没有-e的情况下需要使用转义
判断是否为可打印字符
j="tn"
echo ${j} | grep -E -e "[[:print:]]+"

字符串显示
这里就是实现以下几个功能:
- 显示特定颜色背景的字符串
- 将字符串打印在屏幕的特定位置
用的不多, 有用到在看
参考博客:
https://www.w3cschool.cn/shellbook/6ngszozt.html
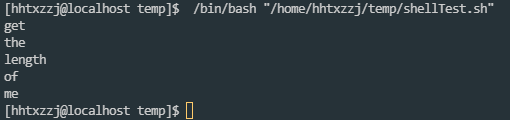
字符串存储:
字符串拆分为数组:
默认情况下, 将以空格为分隔符拆分字符串, 形成由单词组成的数组
str="get the length of me"
var_str=(${str})
for((i=0;i<5;++i))
do
    echo ${var_str[${i}]}
done
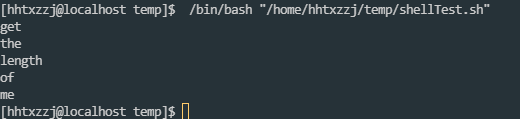
或者可以使用for进行访问, 也能达到同样的效果:
str="get the length of me"
for i in ${str}
do
    echo ${i}
done
还可以使用awk将字符串划分为数组, 但也是以空格划分, 并不能做到像C++一样使用下标访问每一个字符
此外, awk还支持数组下标为字符串, 即实现map映射数组
字符串的常规操作
取子串
下标直接定位
$ var="get the length of me"
$ echo ${var:0:3}
get
$ echo ${var:(-2)}   # 方向相反呢
me

$ echo `expr substr "$var" 5 3` #记得把$var引起来,否则expr会因为空格而解析错误
the

$ echo $var | awk '{printf("%sn", substr($0, 9, 6))}'
length
awk` 把 `$var` 按照空格分开为多个变量,依次为 `$1`,`$2`,`$3`,`$4`,`$5`, 而$0 代表整个字符串
匹配字符求子串
bash内置规则:
$ echo ${var%% *} #从右边开始计算,删除最左边的空格右边的所有字符
get
$ echo ${var% *} #从右边开始计算,删除第一个空格右边的所有字符
get the length of
$ echo ${var##* }  #从左边开始计算,删除最右边的空格左边的所有字符
me
$ echo ${var#* }  #从左边开始计算,删除第一个空格左边的所有字符
the length of me
使用sed更加方便, 功能也更加强大
# 删除所有 空格+字母组合 的字符串:
$ echo $var | sed 's/ [a-z]*//g'
get
$ echo $var | sed 's/[a-z]* //g'
me
tr通常用来替换部分字符, 也能实现子串截取
head & tail 可实现取首尾部分
查询子串
子串查询包括:
- 返回符合某个模式的子串本身
- 返回子串在目标串中的位置
expr index 可以实现返回某个字符或多个字符中第一个字符出现的位置
$ var="get the length of me"
$ expr index "$var" t
3
而awk脚本可以实现更为复杂的功能, 如找出子串, 以及使用match匹配正则表达式
$ echo $var | awk '{printf("%dn", match($0,"the"));}'
5
所以推荐直接使用awk
awk中内置的使用正则表达式的函数:
# 替换正则匹配的第一个串, 返回替换的数量
sub( Ere, Repl, [ In ] )
# Ere 正则
# Repl 替换串
# In 源串

# 替换正则匹配的所有串, 其余与stb() 相同
gsub( Ere, Repl, [ In ] )
# 参数与sub() 相同

# 返回正则匹配的串的起始下标(index从1开始), 如果没找到, 返回0
match( String, Ere )
# String 源串
# Ere 正则

# 将String分割为字符串数组, 存储在a中
split( String, A, [Ere] )
# String 源串
# A 目标字符串数组
# Ere 正则指定的分隔符
其他几个都很好理解, 这里来尝试一下split
str="W123D43N54M654D"
out=`echo ${str} | awk '{split($0, a, "[0-9]+"); print a[1],a[2],a[3],a[4],a[5]}'`
echo ${out}

子串替换
shell仍然内置了子串替换功能, 不过用的不经常
$ var="get the length of me"
$ echo ${var/ /_}        #把第一个空格替换成下划线
get_the length of me
$ echo ${var// /_}       #把所有空格都替换成下划线
get_the_length_of_me
通常直接使用sed 或 awk 进行子串替换
$ echo $var | awk '{sub(" ", "_", $0); printf("%sn", $0);}'
get_the length of me
$ echo $var | awk '{gsub(" ", "_", $0); printf("%sn", $0);}'
get_the_length_of_me
$ echo $var | sed -e 's/ /_/'    #s <= substitude
get_the length of me
$ echo $var | sed -e 's/ /_/g'   #看到没有,简短两个命令就实现了最小匹配和最大匹配g <= global
get_the_length_of_me
插入子串
同样来看一下Shell内置功能
$ var="get the length of me"
$ echo ${var/ /_ }        #在指定字符串之前插入一个字符串
get_ the length of me
$ echo ${var// /_ }
get_ the_ length_ of_ me
$ echo ${var/ / _}        #在指定字符串之后插入一个字符串
get _the length of me
$ echo ${var// / _}
get _the _length _of _me
插入子串主要来看sed
$ echo $var | sed -e 's/( )/_1/'
get_ the length of me
$ echo $var | sed -e 's/( )/_1/g'
get_ the_ length_ of_ me
$ echo $var | sed -e 's/( )/1_/'
get _the length of me
$ echo $var | sed -e 's/( )/1_/g'
get _the _length _of _me
$ echo $var | sed -e 's/([a-z]*) ([a-z]*) /2 1 /g'
the get of length me
这里可以看到sed的一个分组功能
类似于正则的分组, sed使用() 对匹配到的字符进行分组, 并能在后头使用1 , 2 灯光进行调用
这里使用() 需要用转义字符( )
这里插入字符的实现思路主要是, 使用s 替换字符, 首先定位, 在将源内容输入, 并增加插入内容
删除子串:
删除子串就是将目标子串替换为空即可
没啥好说的
子串排序:
这里主要用到sort命令
同样, cut 与 万能的awk 也能做到
$ var="get the length of me"
$ echo $var | tr ' ' 'n' | sort   #正序排
get
length
me
of
the
$ echo $var | tr ' ' 'n' | sort -r #反序排
the
of
me
length
get
可以注意到, sort排序的单位是行
所以对于如下的数值排序, 使用sort的话需要将所有的空格替换为n
1 2 3 4 5 6 7 8 9 10 11 12 13 14 15
41 45 44 44 26 44 42 20 20 38 37 25 45 45 45
16 17 18 19 20 21 22 23 24 25 26 27 28 29 30
44 20 30 39 35 38 38 28 25 30 36 20 24 32 33
31 32 33 34 35 36 37 38 39 40 41 42 43 44 45
41 33 51 39 20 20 44 37 38 39 42 40 37 50 50
46 47 48 49 50 51 52 53 54 55 56
42 43 41 42 45 42 19 39 75 17 17
cat shellTest2.sh | sed -e "s/ /n/g" | sort -k 1 -n

子串进制转换
这个在快速入门篇中讲过, 直接使用bc进行
$ echo "ibase=10;obase=16;10" | bc
A
子串编码转换
这里主要使用iconv 工具进行
iconv命令用于文件编码的转换
如在不同的操作系统中交换文件时, 常常遇到gbk编码与utf8编码, 需要转换可直接利用iconv进行
语法结构:
iconv -f 原编码 -t 新编码 filename -o newfile
常用参数
-f encoding :把字符从encoding编码开始转换。

-t encoding :把字符转换到encoding编码。

-l :列出已知的编码字符集合

-o file :指定输出文件

-c :忽略输出的非法字符

-s :禁止警告信息,但不是错误信息

--verbose :显示进度信息
栗子:
nihao_utf8=$(echo "你好")
nihao_gb2312=$(echo $nihao_utf8 | iconv -f utf8 -t gb2312 --verbose)
echo ${nihao_utf8}
echo ${nihao_gb2312}

正则小栗子:
url="https://www.cnblogs.com/yangyongzhi/archive/2012/11/05/2755421.html"

# 匹配url有效性
echo ${url} | grep -P -e "[a-zA-Z]+://[a-zA-Z0-9.?=@]+"

# 截取服务器类型
echo ${url} | grep -P -oe  "[a-z]+(?=://)"

# 截取域名
echo ${url} | grep -P -oe "(?<=://)[^/]+(?=/)"

# 截取路径
name=`echo ${url} | grep -P -oe "(?<=://)[^/]+(?=/)"`
file=`echo ${url} | grep -P -oe "(?<=/)[^/]+$"`
echo ${url} | grep -P -oe "(?<=//${name}/).+(?=${file})"

# 截取文件名
echo ${url} | grep -P -oe "(?<=/)[^/]+$"

# 截取文件扩展名
echo ${file} | grep -P -oe "(?<=.)[^.]+$"
匹配长字符串:
一般文件都不仅仅只有一行, 这时使用正则就有点无力了
这里使用sed
源文件
Chapter 7 -- Exercises

7.1 please execute the program: mainwithoutreturn, and print the return value
of it with the command "echo $?", and then compare the return of the printf
function, they are the same.

7.2 it will depend on the exection mode, interactive or redirection to a file,
if interactive, the "output" action will accur after the n char with the line
buffer mode, else, it will be really "printed" after all of the strings have
been stayed in the buffer.

7.3 there is no another effective method in most OS. because argc and argv are
not global variables like environ.
cat shellTest2.sh | sed -n 7,9p

处理格式化文本
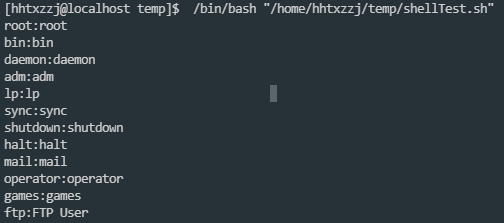
格式化文本主要指类似/etc/passwd, tree 这种具有固定格式的文本
这里主要用到了cut
cut命令用于显示每行从开头算起 num1 到 num2 的文字
能够很方便的指定分隔符对字符串进行分割
cat /etc/passwd | cut -d":" -f1,5
指定分隔符为:, 并显示第一行和第五行
多文件关联操作
其余就是join的使用
有点像数据库的联合查找, 当需要在多个文件间联合查找数据时, 可以使用join
有需要直接来看吧, 现在先放着
文件操作:
了解文件操作首先大致了解一下Linux文件存储的inode
参考博客:
https://blog.csdn.net/xuz0917/article/details/79473562
文件读取以块block为单位, 而inode存储文件的元信息, 其内容有点类似于文件控制块FCB
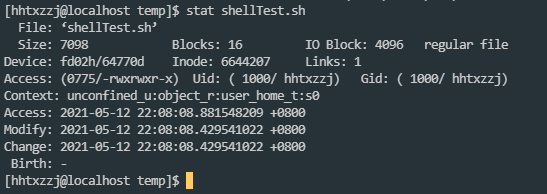
文件属性:
完成文件操作之前, 首先需要了解文件属性
struct stat {
    dev_t st_dev; /* 设备   */
    ino_t st_ino; /* 节点   */
    mode_t st_mode; /* 模式   */
    nlink_t st_nlink; /* 硬连接 */
    uid_t st_uid; /* 用户ID */
    gid_t st_gid; /* 组ID   */
    dev_t st_rdev; /* 设备类型 */
    off_t st_off; /* 文件字节数 */
    unsigned long  st_blksize; /* 块大小 */
    unsigned long st_blocks; /* 块数   */
    time_t st_atime; /* 最后一次访问时间 */
    time_t st_mtime; /* 最后一次修改时间 */
    time_t st_ctime; /* 最后一次改变时间(指属性) */
};
ls -l 也能获取到部分文件信息:
这里以教程为例:
$ ls -l
total 12
drwxr-xr-x 2 root root 4096 2007-12-07 20:08 directory_file
prw-r--r-- 1 root root    0 2007-12-07 20:18 fifo_pipe
brw-r--r-- 1 root root 3, 1 2007-12-07 21:44 hda1_block_dev_file
crw-r--r-- 1 root root 1, 3 2007-12-07 21:43 null_char_dev_file
-rw-r--r-- 2 root root  506 2007-12-07 21:55 regular_file
-rw-r--r-- 2 root root  506 2007-12-07 21:55 regular_file_hard_link
lrwxrwxrwx 1 root root   12 2007-12-07 20:15 regular_file_soft_link -> regular_file
d表示目录-表示普通文件(或者硬链接)l表示符号链接p表示管道文件b表示块设备c表示字符设备s表示socket文件
不同属性的异同
普通文件 & 目录 这里就不进行阐述
-
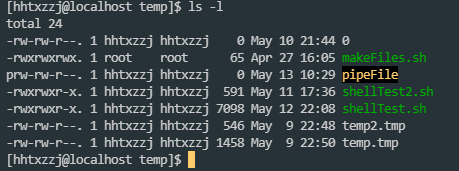
有名管道文件
具有管道的特点: 为空时, 读取阻塞, 没有读取者时, 写入阻塞
主要用于进程通信
测试时可以使用两个terminal进行读写, 当没有echo > pipeFile时, cat pipefile将被阻塞
-
块设备 & 字符文件
字符设备与块设备的区别主要是, 字符设备发送&接收的数据是字符, 而块设备的数据传输是以数据缓冲区发送的, 如硬盘则是块设备, 以数据缓冲区为单位与系统交换信息, 而鼠标键盘这种低速设备则是字符设备, 传输字符数据
-
软链接 & 硬链接
这个在基础入门中有大致了解过
硬链接可以说就是原文件,软链接只是有那么一个
inode,但没有实际的存储空间$ ls regular_file* ls regular_file* -l -rw-r--r-- 2 root root 204800 2007-12-07 22:30 regular_file -rw-r--r-- 2 root root 204800 2007-12-07 22:30 regular_file_hard_link lrwxrwxrwx 1 root root 12 2007-12-07 20:15 regular_file_soft_link -> regular_file $ rm regular_file # 删除原文件 $ cat regular_file_hard_link # 硬链接还在,而且里头的内容还有呢 fefe $ cat regular_file_soft_link cat: regular_file_soft_link: No such file or directory
普通文件再分类:
普通文件在windows系统下, 可通过后缀名进行在分类, 但在Linux系统中, 后缀名仅仅是为用户提供快速识别文件类型的途径, 操作系统是根据文件头识别各类文件的, 这样在解释文件时更不容易出错
使用file命令可以查看各类文件的属性, 通常用于进一步识别普通文件
file不同类型的文件
$ file ./
./: directory
$ file /etc/profile
/etc/profile: ASCII English text
$ file /lib/libc-2.5.so
/lib/libc-2.5.so: ELF 32-bit LSB shared object, Intel 80386, version 1 (SYSV), not stripped
$ file /bin/test
/bin/test: ELF 32-bit LSB executable, Intel 80386, version 1 (SYSV), dynamically linked (uses shared libs), stripped
$ file /dev/hda
/dev/hda: block special (3/0)
$ file /dev/console
/dev/console: character special (5/1)
$ cp /etc/profile .
$ tar zcf profile.tar.gz profile
$ file profile.tar.gz
profile.tar.gz: gzip compressed data, from Unix, last modified: Tue Jan  4 18:53:53 2000
$ mkfifo fifo_test
$ file fifo_test
fifo_test: fifo (named pipe)
文件属主
修改文件从属:
chown 用户名:组名 文件名
查看文件从属:
ls -l
其实现是通过文件结构体的用户&组ID, 查找/etc/passwd & /etc/group 中的用户名&组名来实现的
文件权限:
修改文件权限
入门必备, 这里不再阐述
给文件加锁
这里使用chattr命令
chattr常用与以超越用户权限的方式改变文件属性
语法结构:
chattr [ -RVf ] [ -v version ] [ mode ] files...
常用参数:
-A:即Atime,告诉系统不要修改对这个文件的最后访问时间。

-S:即Sync,一旦应用程序对这个文件执行了写操作,使系统立刻把修改的结果写到磁盘。

-a:即Append Only,系统只允许在这个文件之后追加数据,不允许任何进程覆盖或截断这个文件。如果目录具有这个属性,系统将只允许在这个目录下建立和修改文件,而不允许删除任何文件。

-b:不更新文件或目录的最后存取时间。

-c:将文件或目录压缩后存放。

-d:当dump程序执行时,该文件或目录不会被dump备份。

-D:检查压缩文件中的错误。

-i:即Immutable,系统不允许对这个文件进行任何的修改。如果目录具有这个属性,那么任何的进
程只能修改目录之下的文件,不允许建立和删除文件。

-s:彻底删除文件,不可恢复,因为是从磁盘上删除,然后用0填充文件所在区域。

-u:当一个应用程序请求删除这个文件,系统会保留其数据块以便以后能够恢复删除这个文件,用来防止意外删除文件或目录。

-t:文件系统支持尾部合并(tail-merging)。

-X:可以直接访问压缩文件的内容。
给文件加锁的方式就是打上immutable位, 即系统不允许对此文件进行任何修改
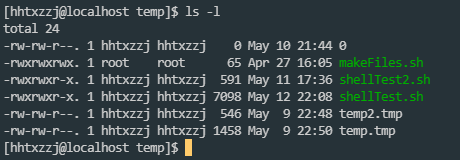
[hhtxzzj@localhost temp]$ sudo chattr +i shellTest2.sh
[sudo] password for hhtxzzj:
[hhtxzzj@localhost temp]$ ls -l
total 24
-rw-rw-r--. 1 hhtxzzj hhtxzzj    0 May 10 21:44 0
-rwxrwxrwx. 1 root    root      65 Apr 27 16:05 makeFiles.sh
prw-rw-r--. 1 hhtxzzj hhtxzzj    0 May 13 10:29 pipeFile
-rwxrwxr-x. 1 hhtxzzj hhtxzzj  591 May 11 17:36 shellTest2.sh
-rwxrwxr-x. 1 hhtxzzj hhtxzzj 7098 May 12 22:08 shellTest.sh
-rw-rw-r--. 1 hhtxzzj hhtxzzj  546 May  9 22:48 temp2.tmp
-rw-rw-r--. 1 hhtxzzj hhtxzzj 1458 May  9 22:50 temp.tmp
使用chattr修改后的文件, 在ls -l中, 权限并没有变换
需要用lsattr 查看chattr修改后的文件属性
[hhtxzzj@localhost temp]$ lsattr shellTest2.sh
----i----------- shellTest2.sh
[hhtxzzj@localhost temp]$
可以看到, 文件当前只读
取消immutable后, lsattr的结果:
[hhtxzzj@localhost temp]$ sudo chattr -i shellTest2.sh
[sudo] password for hhtxzzj:
[hhtxzzj@localhost temp]$ lsattr shellTest2.sh
---------------- shellTest2.sh
[hhtxzzj@localhost temp]$
文件大小:
- 普通文件的大小就是文件内容的大小
- 目录作为一个特殊的文件, 存放的内容是以目录结构体组织的各类文件信息, 所以大小一般是固定的
- 设备文件的大小对应设备的主次设备号
- 有名管道(named pipe) 大小是0
- 硬链接实际上就是文件的拷贝, 大小就是源文件的大小
- 软链接的大小仅仅是一个inode, 所以大小就是源文件名的字节数
目录的结构体如下:
struct dirent {
    long d_ino;
    off_t d_off;
    unsigned short d_reclen;
    char d_name[NAME_MAX+1]; /* 文件名称 */
}
文件基本操作
这里就是一些文件的常用操作, 包括创建, 删除, 赋值, 修改, 编辑,压缩&解压
都是日常常用操作, 很熟悉, 这里直接略过
文件搜索
这里主要使用find进行文件查找
参考博客:
https://blog.csdn.net/lilygg/article/details/84076757
find 目录 参数 参数值
-name 	"name"	查找name文件
-user  	"user"  查找属于某用户的文件
-group  "group"	查找属于某用户组的文件

-maxdepth  1    查看多深的文件,不能超过所限制的目录下的内容
-mindepth  2    查看不小于多深的文件,不低于所限制内容
# 这个要放到参数的最前头

-size  20K   	按文件大小查找20K 的文件
-size  -20K  	查找不大于20K的文件
-size  +20K  	查找大于 20K的文件
# 这种+-在后头的参数中也有用到

-type			查找指定类型的文件
#主要的文件类型:
     f        #file		普通文件
     d        #dir		目录
     b        #block	块设备
     s        #socket	套接字
     c        #char		字符设备
     l        #link		链接
     p        #pipe		管道


-cmin  5  		查看距现在5分钟时修改
-cmin  -5  		查看五分钟内修改的文件
-cmin  +5  		五分钟之前修改的文件

-ctime   5     	五内的时间点修改过的文件
-ctime   +5     五天前修改或的文件
-ctime  -5     	小于五天修改过的文件

-perm     		按权限查找
-perm  555  	查找权限为555的文件
-perm  -444  	查找所有人 所有组 其他人 有读权限的文件
-perm  /444  	查找所有人 或所有组 或其他人 至少有一个有读权限的文件
常用实例:
找到temp目录下7天之内以log结尾的文件, 并删除
find ./temp/ -type f -name "*log" -ctime -5 -print

而删除文件使用的是xargs
xargs用来给命令传递参数, 通常可以用在管道中
xargs详细命令:
https://www.linuxprobe.com/linux-xargs-usage.html
find ./temp/ -type f -name "*log" -ctime -5 -print | xargs -n 1 rm
也可以使用grep配合正则表达式执行
find . -type f | grep ".*log" | xargs rm -r
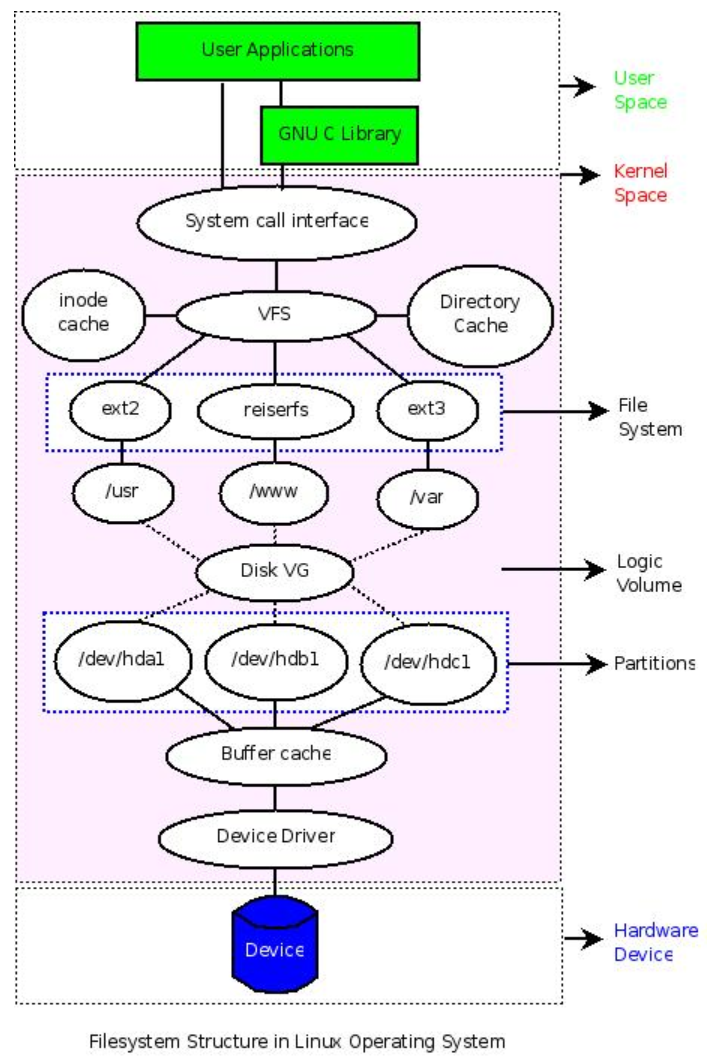
文件系统操作:
文件系统在Linux中的位置:
如图, 可以清楚的看到linux系统层次布局与文件系统所在的位置
由于文件系统无法独立与Linxu与硬件而存在, 所以有必要了解这俩
硬件管理 & 设备驱动
Linux 系统通过设备驱动管理硬件设备
如果添加了新的硬件设备,那么需要编写相应的硬件驱动来管理它。对于一些常见的硬件设备,系统已经自带了相应的驱动,编译内核时,选中它们,然后编译成内核的一部分或者以模块的方式编译。如果以模块的方式编译,那么可以在系统的 /lib/modules/$(uname -r)目录下找到对应的模块文件
常用的设备驱动管理操作:
查找设备所需的驱动文件:
这里主要使用到了locate命令
参考博客:
https://www.runoob.com/linux/linux-comm-locate.html
locate命令用于查找符合条件的文档
他会去保存文档和目录名称的数据库内进行查找, 速度很快, 但是需要更新文件索引数据库:
updatedb
通常只需要locate filename 即可查找到所需文件
其他需求直接去看参考博客
栗子:
locate vmxnet3.ko

以.ko文件结尾的驱动, 在系统安装时, 默认被编译为了模块而并没有添加进内核中, 主要是为了降低内核的大小, 并可根据需要灵活的加载&卸载这些驱动
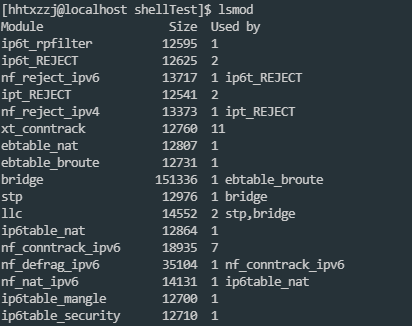
查看各个模块的状态:
文件系统中的/proc/modules文件检查内核中已加载的各个模块的状态
cat /proc/modules

或者可以直接使用lsmod命令进行
lsmod
查看已加载的设备驱动:
[hhtxzzj@localhost ~]$ lsmod | egrep "vm"
kvm_intel             188740  0
kvm                   637289  1 kvm_intel
irqbypass              13503  1 kvm
vmw_balloon            18094  0
vmw_vmci               67168  0
vmwgfx                291993  1
drm_kms_helper        186531  2 vmwgfx,nvidia_drm
ttm                    96673  1 vmwgfx
drm                   456166  5 ttm,drm_kms_helper,vmwgfx,nvidia_drm
vmxnet3                58104  0
vmw_pvscsi             23130  0
卸载 & 挂载设备驱动:
rmmod 完整驱动名
这里的驱动名是lsmod中列出的完整的驱动名
insmod 驱动路径
通常驱动路径使用locate进行定位, 如:
insmod `locate usbhid.ko`
查看设备驱动对应的设备文件:
[hhtxzzj@localhost ~]$ ls -l /dev/sda*
brw-rw----. 1 root disk 8, 0 May 16 11:43 /dev/sda
brw-rw----. 1 root disk 8, 1 May 16 11:43 /dev/sda1
brw-rw----. 1 root disk 8, 2 May 16 11:43 /dev/sda2
brw-rw----. 1 root disk 8, 3 May 16 11:43 /dev/sda3
几个注意点:
-
第一列都是b, 表示这是一个块设备
-
第五列都是8, 是该硬件在内核中的对应设备编号
可以在内核的Documentation/devices.txt 和 /proc/devices 中找到设备的分配情况
-
第六列对应的设备的辅助编号, 用于区分同一设备的不同部分
可以看到, 系统只挂在了一块硬盘,但是设备文件有4个, 所以就需要辅助编号进行进一步的区分
访问设备文件:
根据上头的方法查找到对应的设备文件, 就可以直接访问设备了
这里使用到dd命令
参考博客:
https://www.cnblogs.com/ginvip/p/6370836.html
dd命令用指定大小的块拷贝一个文件,并在拷贝的同时进行指定的转换
if=文件名:输入文件名,缺省为标准输入。即指定源文件。< if=input file >
of=文件名:输出文件名,缺省为标准输出。即指定目的文件。< of=output file >
ibs=bytes:一次读入bytes个字节,即指定一个块大小为bytes个字节。
obs=bytes:一次输出bytes个字节,即指定一个块大小为bytes个字节。
bs=bytes:同时设置读入/输出的块大小为bytes个字节。
cbs=bytes:一次转换bytes个字节,即指定转换缓冲区大小。
skip=blocks:从输入文件开头跳过blocks个块后再开始复制。
seek=blocks:从输出文件开头跳过blocks个块后再开始复制。
注意:通常只用当输出文件是磁盘或磁带时才有效,即备份到磁盘或磁带时才有效。
count=blocks:仅拷贝blocks个块,块大小等于ibs指定的字节数。
conv=conversion:用指定的参数转换文件:
    ascii:转换ebcdic为ascii
    ebcdic:转换ascii为ebcdic
    ibm:转换ascii为alternate ebcdic
    block:把每一行转换为长度为cbs,不足部分用空格填充
    unblock:使每一行的长度都为cbs,不足部分用空格填充
    lcase:把大写字符转换为小写字符
    ucase:把小写字符转换为大写字符
    swab:交换输入的每对字节
    noerror:出错时不停止
    notrunc:不截短输出文件
    sync:将每个输入块填充到ibs个字节,不足部分用空(NUL)字符补齐。
如用 dd 命令复制出硬盘的前 512 个字节
[hhtxzzj@localhost ~]$ sudo dd if=/dev/sda of=/home/hhtxzzj/shellTest/mbr.bin bs=512 count=1
[sudo] password for hhtxzzj:
1+0 records in
1+0 records out
512 bytes (512 B) copied, 0.000149194 s, 3.4 MB/s
查看导出文件的相应信息:
[hhtxzzj@localhost shellTest]$ file mbr.bin
mbr.bin: x86 boot sector; partition 1: ID=0xee, starthead 0, startsector 1, 167772159 sectors, extended partition table (last)�11, code offset 0x0
由于导出文件是二进制文件, 可用od转码之后查看
[hhtxzzj@localhost shellTest]$ od -x mbr.bin
0000000 0000 0000 0000 0000 0000 0000 0000 0000
*
0000700 0002 feee ffff 0001 0000 ffff 09ff 0000
0000720 0000 0000 0000 0000 0000 0000 0000 0000
*
0000760 0000 0000 0000 0000 0000 0000 0000 aa55
0001000
读取鼠标信息:
[hhtxzzj@localhost shellTest]$ ls /dev/input/ -l
total 0
drwxr-xr-x. 2 root root      80 May 16 11:43 by-id
drwxr-xr-x. 2 root root     160 May 16 11:43 by-path
crw-rw----. 1 root input 13, 64 May 16 11:43 event0
crw-rw----. 1 root input 13, 65 May 16 11:43 event1
crw-rw----. 1 root input 13, 66 May 16 11:43 event2
crw-rw----. 1 root input 13, 67 May 16 11:43 event3
crw-rw----. 1 root input 13, 68 May 16 11:43 event4
crw-rw----. 1 root input 13, 69 May 16 11:43 event5
crw-rw-r--. 1 root input 13,  0 May 16 11:43 js0
crw-rw----. 1 root input 13, 63 May 16 11:43 mice
crw-rw----. 1 root input 13, 32 May 16 11:43 mouse0
crw-rw----. 1 root input 13, 33 May 16 11:43 mouse1
crw-rw----. 1 root input 13, 34 May 16 11:43 mouse2
cat /dev/input/mouse1 | od -x
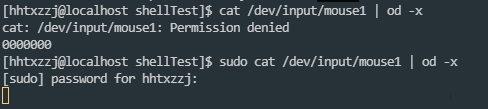
可以看到读取被阻塞, 具体的机制涉及到系统深层知识, 暂时跳过
主要是由于读取的是设备文件, 类似于管道, 设备文件读取时如果为空, 则被阻塞, 鼠标移动时会向设备文件写入信息, 此时就会输出
理解 & 查看磁盘分区:
磁盘分区基本原理:
-
设备管理 & 分区
之前已经了解到了, Linux下每一个存储设备都对应一个系统设备文件
而对于硬盘(IDE, SCSI)设备, 对应与系统
/dev下的hdx & sdx 设备文件, 并对多块硬盘进行a-z的编号, 生成如sda, sdb等设备文件, 再按照设备的不同部分进行数字编号, 最终生成如以下的设备文件:[hhtxzzj@localhost shellTest]$ ls -l /dev/ | grep "sd" brw-rw----. 1 root disk 8, 0 May 16 11:43 sda brw-rw----. 1 root disk 8, 1 May 16 11:43 sda1 brw-rw----. 1 root disk 8, 2 May 16 11:43 sda2 brw-rw----. 1 root disk 8, 3 May 16 11:43 sda3 -
各个分区的作用:
与windows相同, linux系统也分为主分区 & 逻辑分区
主分区的作用是计算机用来启动操作系统的, 所以操作系统的引导程序就放在主分区上
Linux系统规定主分区(或逻辑分区)占用分区号的前四位(1-4), 所以不会看到主分区为sda5之类的
而扩展分区则是为了扩展更多的逻辑分区的,在 Linux 下,逻辑分区占用了hda5-16或者sda5-16等 12 个编号 -
分区类型:
它规定了这个分区上的文件系统的类型。Linux支持诸如msdoc,vfat,ext2,ext3等诸多的文件系统类型,更多信息在下一小节进行进一步的介绍。
通过分析MBR来理解分区基本原理:
之前用dd命令读取了sda的头512字节内容, 此为MBR
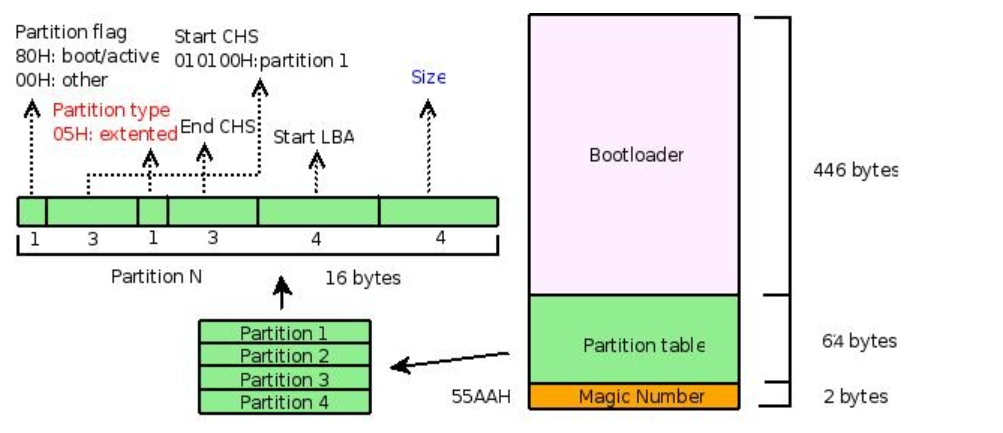
此图描述 MBR 了的结构
MBR包括了引导部分, 分区表, 结束标记(55AAH)
这里重点看分区表
这里是AA55, 也不知道为啥, 可能高低位相反?
中间的*表示重复
[hhtxzzj@localhost shellTest]$ od -x mbr.bin
0000000 0000 0000 0000 0000 0000 0000 0000 0000
*
0000700 0002 feee ffff 0001 0000 ffff 09ff 0000
0000720 0000 0000 0000 0000 0000 0000 0000 0000
*
0000760 0000 0000 0000 0000 0000 0000 0000 aa55
0001000
这里写了个循环吧所有的磁盘设备文件的MBR都读取了:
num=`ls -l /dev/ | grep "sd" | wc -l`

for((i=0;i<${num};++i))
do
    inFile="/dev/sda${i}"
    outFile="mbr.bin${i}"
    if [ ${i} = 0 ]
    then
        dd if=/dev/sda of=${outFile} bs=512 count=1
    else
        dd if=${inFile} of=${outFile} bs=512 count=1
    fi
    echo ""
    echo ${outFile}
    od -x ${outFile}
done

echo "----------------------------------------------------------------"

for((i=0;i<${num};++i))
do
    outFile="mbr.bin${i}"
    echo ""
    echo ${outFile}
    file ${outFile}
done
[hhtxzzj@localhost shellTest]$ sudo ./shellTest.sh
1+0 records in
1+0 records out
512 bytes (512 B) copied, 0.00020594 s, 2.5 MB/s
mbr.bin0
0000000 0000 0000 0000 0000 0000 0000 0000 0000
*
0000700 0002 feee ffff 0001 0000 ffff 09ff 0000
0000720 0000 0000 0000 0000 0000 0000 0000 0000
*
0000760 0000 0000 0000 0000 0000 0000 0000 aa55
0001000
1+0 records in
1+0 records out
512 bytes (512 B) copied, 0.000188815 s, 2.7 MB/s
mbr.bin1
0000000 3ceb 6d90 666b 2e73 6166 0074 0802 0001
0000020 0002 0002 f800 00c8 003f 00ff 0000 0000
0000040 4000 0006 0100 f129 8d63 4e70 204f 414e
0000060 454d 2020 2020 4146 3154 2036 2020 1f0e
0000100 5bbe ac7c c022 0b74 b456 bb0e 0007 10cd
0000120 eb5e 32f0 cde4 cd16 eb19 54fe 6968 2073
0000140 7369 6e20 746f 6120 6220 6f6f 6174 6c62
0000160 2065 6964 6b73 202e 5020 656c 7361 2065
0000200 6e69 6573 7472 6120 6220 6f6f 6174 6c62
0000220 2065 6c66 706f 7970 6120 646e 0a0d 7270
0000240 7365 2073 6e61 2079 656b 2079 6f74 7420
0000260 7972 6120 6167 6e69 2e20 2e2e 0d20 000a
0000300 0000 0000 0000 0000 0000 0000 0000 0000
*
0000760 0000 0000 0000 0000 0000 0000 0000 aa55
0001000
1+0 records in
1+0 records out
512 bytes (512 B) copied, 0.000187458 s, 2.7 MB/s
mbr.bin2
0000000 4658 4253 0000 0010 0000 0000 0400 0000
0000020 0000 0000 0000 0000 0000 0000 0000 0000
0000040 0242 20f9 8881 a74a c9a3 b9d7 169d f6ae
0000060 0000 0000 0200 0400 0000 0000 0000 4000
0000100 0000 0000 0000 4100 0000 0000 0000 4200
0000120 0000 0100 0100 0000 0000 0400 0000 0000
0000140 0000 000a b5b4 0002 0002 0800 0000 0000
0000160 0000 0000 0000 0000 090c 0309 0010 1900
0000200 0000 0000 0000 c000 0000 0000 0000 ad00
0000220 0000 0000 0300 153f 0000 0000 0000 0000
0000240 ffff ffff ffff ffff ffff ffff ffff ffff
0000260 0000 0000 0000 0400 0000 0000 0000 0000
0000300 0000 0000 0000 0100 0000 8a01 0000 8a01
0000320 0000 0000 0000 0000 0000 0100 0000 0000
0000340 7b32 e11f 0000 0000 ffff ffff ffff ffff
0000360 0000 0100 0000 0d02 0000 0000 0000 0000
0000400 0000 0000 0000 0000 0000 0000 0000 0000
*
0001000
1+0 records in
1+0 records out
512 bytes (512 B) copied, 0.000189473 s, 2.7 MB/s
mbr.bin3
0000000 0000 0000 0000 0000 0000 0000 0000 0000
*
0001000
----------------------------------------------------------------
mbr.bin0
mbr.bin0: x86 boot sector; partition 1: ID=0xee, starthead 0, startsector 1, 167772159 sectors, extended partition table (last)�11, code offset 0x0
mbr.bin1
mbr.bin1: x86 boot sector, mkdosfs boot message display, code offset 0x3c, OEM-ID "mkfs.fat", sectors/cluster 8, root entries 512, Media descriptor 0xf8, sectors/FAT 200, heads 255, sectors 409600 (volumes > 32 MB) , reserved 0x1, serial number 0x708d63f1, unlabeled, FAT (16 bit)
mbr.bin2
mbr.bin2: SGI XFS filesystem data (blksz 4096, inosz 512, v2 dirs)
mbr.bin3
mbr.bin3: data
后来才想起来本机系统使用的是GPT引导, 与MBR不同
所以这里直接来看教程中的部分吧:
$ file mbr.bin
mbr.bin: x86 boot sector, LInux i386 boot LOader; 	partition 3: ID=0x82, starthead 254, startsector 19535040, 1959930 sectors; partition 4: ID=0x5, starthead 254, startsector 21494970, 56661255 sectors, code offset 0x48
$ od -x mbr.bin | tail -6   #仅关注中间的64字节,所以截取了结果中后6行
0000660 0000 0000 0000 0000 a666 a666 0000 0180
0000700 0001 fe83 ffff 003f 0000 1481 012a 0000
0000720 0000 0000 0000 0000 0000 0000 0000 fe00
0000740 ffff fe82 ffff 14c0 012a e7fa 001d fe00
0000760 ffff fe05 ffff fcba 0147 9507 0360 aa55
$ sudo -s
$ fdisk -l | grep ^/  #仅分析MBR相关的部分,不分析逻辑分区部分
/dev/sda1   *           1        1216     9767488+  83  Linux
/dev/sda3            1217        1338      979965   82  Linux swap / Solaris
/dev/sda4            1339        4865    28330627+   5  Extended
首先看file显示的结果:
分号隔开了不同的分区信息, 首先是boot loader, 而后是分区3, 分区4
分区3的ID为分区类型标识符, 0x82表示这是一个swap分区, 之后是
- starthead分区起始磁头号
- startsector分区起始扇区号
- 扇区数
计算分区大小:
1959930*512(默认扇区大小)/1024(swap分区默认块大小) = 979965
与fdisk的内容相对应
再来看od的结果:
fe00 ffff fe82 ffff 14c0 012a e7fa 001d
首先是分区标记,00H,从上图中,看出它就不是引导分区(80H 标记的才是引导分区),而分区类型呢?为 82H,和 file 显示结果一致,现在再来关注一下分区大小,即 file 结果中的扇区数。
$ echo "ibase=10;obase=16;1959930" | bc
1DE7FA
刚好对应 e7fa 001d
分区与文件系统的关系:
查看当前内核支持的文件系统
fdisk -l
man fs
cat /proc/filesystem
ext2,ext3,ext4:这三个是 Linux 根文件系统通常采用的类型swap:这个是实现 Linux 虚拟内存时采用的一种文件系统,安装时一般需要建立一个专门的分区,并格式化为swap文件系统(如果想添加更多swap分区,可以参考本节的参考资料,熟悉dd,mkswap,swapon,swapoff等命令的用法)proc:这是一种比较特别的文件系统,作为内核和用户之间的一个接口存在,建立在内存中(可以通过cat命令查看/proc系统下的文件,甚至可以通过修改/proc/sys下的文件实时调整内核配置,前提是需要把proc文件系统挂载上:mount -t proc proc /proc
除了上述文件系统类型外,Linux 支持包括 vfat,iso,xfs,nfs 在内各种常见的文件系统类型,在 Linux 下,可以自由地查看和操作 Windows 等其他操作系统使用的文件系统
格式化的过程就是将文件系统与磁盘建立关联的过程
格式化实际上重新组织了磁盘分区
主要通过mkfs命令实现, 也可以通过fdisk命令实现
- mkfs主要对已有分区进行格式化
- fdisk 则可以完成磁盘的分区与格式化操作
格式化文件系统:
这里使用到mkfs命令
参考博客:
https://www.runoob.com/linux/linux-comm-mkfs.html
语法结构:
mkfs [-V] [-t fstype] [fs-options] filesys [blocks]
参数 :
- device : 预备检查的硬盘分区,例如:/dev/sda1
- -V : 详细显示模式
- -t : 给定档案系统的型式,Linux 的预设值为 ext2
- -c : 在制做档案系统前,检查该partition 是否有坏轨
- -l bad_blocks_file : 将有坏轨的block资料加到 bad_blocks_file 里面
- block : 给定 block 的大小
把 /dev/sda9 分区格式化为 ext3 的文件系统
mkfs -t ext3 /dev/sda9
分区, 逻辑卷 & 文件系统的关系:
这里涉及到LVM原理, 直接参考博客:
https://www.cnblogs.com/moox/p/11163229.html
文件系统的可视化结构
文件系统的可视化结构就是树形结构
可以使用ls, find, tree 呈现
文件系统的挂载:
这里主要用到mount命令
mount命令是经常会使用到的命令,它用于挂载Linux系统外的文件
语法:
mount [-hV]
mount -a [-fFnrsvw] [-t vfstype]
mount [-fnrsvw] [-o options [,...]] device | dir
mount [-fnrsvw] [-t vfstype] [-o options] device dir
参数:
-V:显示程序版本
-h:显示辅助讯息
-v:显示较讯息,通常和 -f 用来除错。
-a:将 /etc/fstab 中定义的所有档案系统挂上。
-F:这个命令通常和 -a 一起使用,它会为每一个 mount 的动作产生一个行程负责执行。在系统需要挂上大量 NFS 档案系统时可以加快挂上的动作。
-f:通常用在除错的用途。它会使 mount 并不执行实际挂上的动作,而是模拟整个挂上的过程。通常会和 -v 一起使用。
-n:一般而言,mount 在挂上后会在 /etc/mtab 中写入一笔资料。但在系统中没有可写入档案系统存在的情况下可以用这个选项取消这个动作。
-s-r:等于 -o ro
-w:等于 -o rw
-L:将含有特定标签的硬盘分割挂上。
-U:将档案分割序号为 的档案系统挂下。-L 和 -U 必须在/proc/partition 这种档案存在时才有意义。
-t:指定档案系统的型态,通常不必指定。mount 会自动选择正确的型态。
-o async:打开非同步模式,所有的档案读写动作都会用非同步模式执行。
-o sync:在同步模式下执行。
-o atime、-o noatime:当 atime 打开时,系统会在每次读取档案时更新档案的『上一次调用时间』。当我们使用 flash 档案系统时可能会选项把这个选项关闭以减少写入的次数。
-o auto、-o noauto:打开/关闭自动挂上模式。
-o defaults:使用预设的选项 rw, suid, dev, exec, auto, nouser, and async.
-o dev、-o nodev-o exec、-o noexec允许执行档被执行。
-o suid、-o nosuid:
允许执行档在 root 权限下执行。
-o user、-o nouser:使用者可以执行 mount/umount 的动作。
-o remount:将一个已经挂下的档案系统重新用不同的方式挂上。例如原先是唯读的系统,现在用可读写的模式重新挂上。
-o ro:用唯读模式挂上。
-o rw:用可读写模式挂上。
-o loop=:使用 loop 模式用来将一个档案当成硬盘分割挂上系统。
根文件系统的挂载:
挂载系统根文件系统 /dev/sda1 到 /mnt
mount -t ext3 /dev/sda1 /mnt/
这里的-t通常不用指定
查看 设备 的挂载情况
$ mount | grep sda1
/dev/sda1 on / type ext3 (rw,errors=remount-ro)
/dev/sda1 on /mnt type ext3 (rw)
可以看到,一个设备可以多次挂载
将一个已经挂载的目录以新的属性重新挂载
mount -n -o remount, rw /
挂载一个新增设备
这里使用到dmesg命令
dmesg命令显示linux内核的环形缓冲区信息,我们可以从中获得诸如系统架构、cpu、挂载的硬件,RAM等多个运行级别的大量的系统信息。当计算机启动时,系统内核(操作系统的核心部分)将会被加载到内存中。在加载的过程中会显示很多的信息,在这些信息中我们可以看到内核检测硬件设备
首先使用dmesg命令查看新加载的设备
通常新加载的设备在dmesg的后部, 直接tail输出后头几行即可:
dmesg | tail -n 10
找到新增设备对应的设备文件, 使用mount 挂载
mount -t vfat /dev/sdN /path/to/mountpoint_directory
挂载iso 或 光盘
iso:
mount -t iso9660 /path/to/isofile /path/to/mountpoint_directory
光盘:
mount -t iso9660 /dev/cdrom /path/to/mountpoint_directory
可以看到, 在Linux中, iso与光盘并没有本质的区别, 只不过指向不同的文件而已
挂载一个远程文件系统:
mount -t nfs remote_ip:/path/to/share_directory /path/to/local_directory
挂载一个proc文件系统:
之前讲到, proc的内容组织在内存中, 但仍可以吧他挂载在某个目录下(通常是/proc)
mount -t proc proc /proc
挂载到/proc之后, 才能方便很多系统管理工具的使用, 如
- top(读取/proc/meminfo & /proc/stat)
- lsmod 读取/proc/modules
- netstat读取/proc/net/dev等
同样, 挂载之后也能动态调整系统配置, 如往 /proc/sys/net/ipv4/ip_forward 文件中写入数字 1 就可以让内核支持数据包转发
挂载一个目录:
mount --bind /path/to/needtomount_directory /path/to/mountpoint_directory
这个有点类似于虚拟目录, 如在ftp中, 无须将文件拷贝到ftp目录下, 只需要挂载一个虚拟目录即可共享文件
卸载文件系统:
这里主要用到umount
参考博客:
https://www.runoob.com/linux/linux-comm-umount.html
语法:
umount [-ahnrvV][-t <文件系统类型>][文件系统]
参数:
-a 卸除/etc/mtab中记录的所有文件系统。
-h 显示帮助。
-n 卸除时不要将信息存入/etc/mtab文件中。
-r 若无法成功卸除,则尝试以只读的方式重新挂入文件系统。
-t<文件系统类型> 仅卸除选项中所指定的文件系统。
-v 执行时显示详细的信息。
-V 显示版本信息。
[文件系统] 除了直接指定文件系统外,也可以用设备名称或挂入点来表示文件系统。
栗子:
umount /path/to/mountpoint_directory
# 或
umount /path/to/mount_source
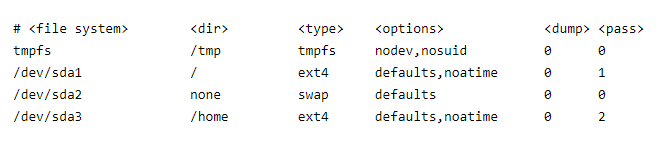
如果经常需要挂载&卸载, 为了避免手动操作, 除了写脚本的方法, 还可以修改fstab文件
参考博客:
https://blog.csdn.net/kepa520/article/details/81315430
当系统启动的时候,系统会自动地从这个文件读取信息,并且会自动将此文件中指定的文件系统挂载到指定的目录
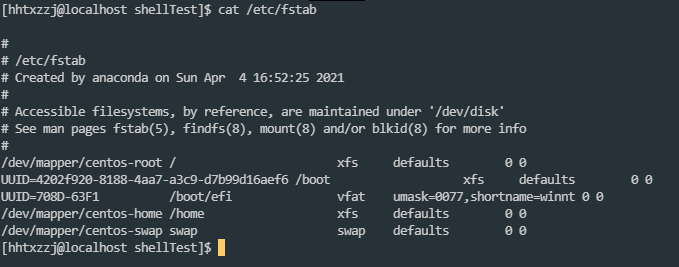
几个列的定义:
-
<file systems>- 要挂载的分区或存储设备. -
<dir>-<file systems>的挂载位置。 -
<type>- 要挂载设备或是分区的文件系统类型,支持许多种不同的文件系统:ext2,ext3,ext4,reiserfs,xfs,jfs,smbfs,iso9660,vfat,ntfs,swap及auto。 设置成auto类型,mount 命令会猜测使用的文件系统类型,对 CDROM 和 DVD 等移动设备是非常有用的。 -
- 挂载时使用的参数,注意有些mount 参数是特定文件系统才有的。一些比较常用的参数有:
auto- 在启动时或键入了mount -a命令时自动挂载。noauto- 只在你的命令下被挂载。exec- 允许执行此分区的二进制文件。noexec- 不允许执行此文件系统上的二进制文件。ro- 以只读模式挂载文件系统。rw- 以读写模式挂载文件系统。user- 允许任意用户挂载此文件系统,若无显示定义,隐含启用noexec,nosuid,nodev参数。users- 允许所有 users 组中的用户挂载文件系统.nouser- 只能被 root 挂载。owner- 允许设备所有者挂载.sync- I/O 同步进行。async- I/O 异步进行。dev- 解析文件系统上的块特殊设备。nodev- 不解析文件系统上的块特殊设备。suid- 允许 suid 操作和设定 sgid 位。这一参数通常用于一些特殊任务,使一般用户运行程序时临时提升权限。nosuid- 禁止 suid 操作和设定 sgid 位。noatime- 不更新文件系统上 inode 访问记录,可以提升性能(参见 atime 参数)。nodiratime- 不更新文件系统上的目录 inode 访问记录,可以提升性能(参见 atime 参数)。relatime- 实时更新 inode access 记录。只有在记录中的访问时间早于当前访问才会被更新。(与 noatime 相似,但不会打断如 mutt 或其它程序探测文件在上次访问后是否被修改的进程。),可以提升性能(参见 atime 参数)。flush-vfat的选项,更频繁的刷新数据,复制对话框或进度条在全部数据都写入后才消失。defaults- 使用文件系统的默认挂载参数,例如ext4的默认参数为:rw,suid,dev,exec,auto,nouser,async.
-
dump 工具通过它决定何时作备份. dump 会检查其内容,并用数字来决定是否对这个文件系统进行备份。 允许的数字是 0 和 1 。0 表示忽略, 1 则进行备份。大部分的用户是没有安装 dump 的 ,对他们而言 应设为 0。
-
fsck 读取 的数值来决定需要检查的文件系统的检查顺序。允许的数字是0, 1, 和2。 根目录应当获得最高的优先权 1, 其它所有需要被检查的设备设置为 2. 0 表示设备不会被 fsck 所检查。
如何制作一个文件系统:
-
用dd创建一个固定大小的文件:
dd if=/dev/zero of=./minifs bs=4096 count=4096这是一个都是0的文件(写0操作, 有点类似于低格), 没有特定的数据结构, 写0之后方便格式化
[hhtxzzj@localhost shellTest]$ file minifs
minifs: data
但需要注意, 有些格式要求格式化的目标满足最小空间, 如ext3需要>=64M
-
用mkfs格式化文件
xfs文件系统最小需要block=4096, blknum=4096, 总共16M的空间
[hhtxzzj@localhost shellTest]$ mkfs -t xfs ./minifs
meta-data=./minifs               isize=512    agcount=1, agsize=4096 blks
         =                       sectsz=512   attr=2, projid32bit=1
         =                       crc=1        finobt=0, sparse=0
data     =                       bsize=4096   blocks=4096, imaxpct=25
         =                       sunit=0      swidth=0 blks
naming   =version 2              bsize=4096   ascii-ci=0 ftype=1
log      =internal log           bsize=4096   blocks=855, version=2
         =                       sectsz=512   sunit=0 blks, lazy-count=1
realtime =none                   extsz=4096   blocks=0, rtextents=0
此时在file文件;
[hhtxzzj@localhost shellTest]$ file minifs minifs: SGI XFS filesystem data (blksz 4096, inosz 512, v2 dirs) -
挂载刚创建的文件系统
这里用到一个特殊的设备 /dev/loop 循环设备, 又称为循环文件接口
与/dev/null /dev/zero 一样, 是一个伪设备, 此设备使得操作系统上的文件能像块设备一样被访问
$ sudo mount minifs /home/hhtxzzj/shellTest/mnt/ -o loop挂载之后, 在此目录下写入的任何东西, 都将写入到所创建的文件系统中
对创建的文件系统进行读写:
创建一个文件:
$ cp minifs minifs.bak
$ cd mnt
$ touch hello
$ cd -
$ cp minifs minifs-touch.bak
$ od -x minifs.bak > orig.od
$ od -x minifs-touch.bak > touch.od
之后, 比较文件系统的异同:
[hhtxzzj@localhost shellTest]$ diff origin.od touch.od
210,212c210,213
< 0054000 edfe beba 0000 0000 0000 0200 0000 0000
< 0054020 0000 0000 0000 0c00 0000 0100 0000 0800
< 0054040 0000 0000 0000 0000 0000 0000 0000 0000
---
> 0054000 edfe beba 0000 0100 0000 0200 0000 0006
> 0054020 0000 0100 0000 0c00 0000 0100 0000 0c00
> 0054040 f3d0 a5df 0000 0a00 0000 0f00 a841 7a1d
> 0054060 0000 0000 0000 0000 0000 0000 0000 0000
216c217,218
< 0054500 0000 0000 0000 0000 0000 0000 0000 0000
---
> 0054500 0000 0080 0000 0000 0000 0000 0000 0000
> 0054520 0000 0000 0000 0000 0000 0000 0000 0000
218,239c220,293
< 0055000 edfe beba 0000 0000 0000 0200 0000 0000
< 0055020 0000 0000 0000 0d00 0000 0100 0000 0800
< 0055040 0000 0000 0000 0000 0000 0000 0000 0000
< *
< 0055440 0000 0000 0000 0000 0000 0000 0000 0100
< 0055460 e8a4 c522 abdb 2042 4a82 f318 f642 75e9
< 0055500 0000 0000 0000 0000 0000 0000 0000 0000
< *
< 0056000 edfe beba 0000 0000 0000 0200 0000 0000
< 0056020 0000 0000 0000 0e00 0000 0100 0000 0800
< 0056040 0000 0000 0000 0000 0000 0000 0000 0000
< *
< 0056440 0000 0000 0000 0000 0000 0000 0000 0100
< 0056460 e8a4 c522 abdb 2042 4a82 f318 f642 75e9
< 0056500 0000 0000 0000 0000 0000 0000 0000 0000
< *
< 0057000 edfe beba 0000 0000 0000 0200 0000 0000
< 0057020 0000 0000 0000 0f00 0000 0100 0000 0800
< 0057040 0000 0000 0000 0000 0000 0000 0000 0000
< *
< 0057440 0000 0000 0000 0000 0000 0000 0000 0100
< 0057460 e8a4 c522 abdb 2042 4a82 f318 f642 75e9
---
> 0055000 0000 0100 0000 0000 0169 0000 a841 7a1d
> 0055020 0000 1000 0069 0000 414e 5452 0028 0000
> 0055040 1d7a 41a8 000c 0000 a841 7a1d 0000 1800
> 0055060 0069 0000 123c 0002 3800 0001 0002 0000
> 0055100 0000 0000 0001 0000 0001 0000 a841 7a1d
> 0055120 0000 8000 0069 0000 4158 4947 0000 0100
> 0055140 0000 0000 0000 0010 0000 4000 0000 0300
> 0055160 0000 0100 0000 3c00 0000 001b ffff ffff
> 0055200 ffff ffff ffff ffff ffff ffff ffff ffff
> *
> 0055320 ffff ffff ffff ffff a841 7a1d 0000 1800
> 0055340 0069 0000 123c 0002 2000 0008 0018 0000
> 0055360 0000 0000 0001 0000 0001 0000 a841 7a1d
> 0055400 0000 8000 0069 0000 4149 3342 0000 0100
> 0055420 ffff ffff ffff ffff 0000 0000 0000 1800
> 0055440 0000 0000 0000 0000 e8a4 c522 abdb 2042
> 0055460 4a82 f318 f642 75e9 0000 0000 981d 4dc1
> 0055500 0000 001b 0000 3c00 ffff ffff ffff f0ff
> 0055520 0000 0000 0000 0000 0000 0000 0000 0000
> *
> 0055600 0000 0000 0000 0000 a841 7a1d 0000 1800
> 0055620 0069 0000 123c 0002 9000 0001 0000 0000
> 0055640 0000 0000 0001 0000 0007 0000 a841 7a1d
> 0055660 0000 8001 0069 0000 4658 4253 0000 0010
> 0055700 0000 0000 0000 0010 0000 0000 0000 0000
> 0055720 0000 0000 0000 0000 e8a4 c522 abdb 2042
> 0055740 4a82 f318 f642 75e9 0000 0000 0000 0400
> 0055760 0000 0000 0000 001b 0000 0000 0000 011b
> 0056000 0000 0100 0000 021b 0000 0100 0000 0010
> 0056020 0000 0100 0000 0000 0000 5703 b5b4 0002
> 0056040 0002 0800 0000 0000 0000 0000 0000 0000
> 0056060 090c 0309 000c 1900 0000 0000 0000 4000
> 0056100 0000 0000 0000 3c00 0000 0000 0000 cc0b
> 0056120 0000 0000 0000 0000 ffff ffff ffff ffff
> 0056140 ffff ffff ffff ffff 0000 0000 0000 0400
> 0056160 0000 0000 0000 0000 0000 0000 0000 0100
> 0056200 0000 8a01 0000 8a01 0000 0000 0000 0000
> 0056220 0000 0100 0000 0000 d296 62fc 0000 0000
> 0056240 ffff ffff ffff ffff 0000 0100 0000 0800
> 0056260 0000 0000 0000 0000 0000 0000 0000 0000
> *
> 0056460 0000 0000 0000 0000 a841 7a1d 0000 3800
> 0056500 0069 0000 123b 0003 0041 0000 0034 0000
> 0056520 0000 0000 1b03 0000 0000 0000 0000 0000
> 0056540 0000 0000 0000 0000 0000 0000 1b00 0000
> 0056560 0000 0000 0020 0000 0600 0000 a841 7a1d
> 0056600 0000 b000 0069 0000 494e 81a4 0203 0000
> 0056620 0000 0000 0000 0000 0001 0000 0000 0000
> 0056640 0000 0000 0000 0000 1593 60a3 8d4e 036d
> 0056660 1593 60a3 8d4e 036d 1593 60a3 8d4e 036d
> 0056700 0000 0000 0000 0000 0000 0000 0000 0000
> 0056720 0000 0000 0000 0000 0000 0123 0000 0000
> 0056740 0000 0000 82bd d139 ffff ffff 0000 0000
> 0056760 0005 0000 0000 0000 0000 0000 0000 0000
> 0057000 0000 0100 0000 0000 0000 0000 0000 0000
> 0057020 0000 0000 0000 0000 1593 60a3 8d4e 036d
> 0057040 1b03 0000 0000 0000 e8a4 c522 abdb 2042
> 0057060 4a82 f318 f642 75e9 a841 7a1d 0000 3400
> 0057100 0069 0000 3300 f701 2507 7304 6c65 6e69
> 0057120 7875 6e75 6f63 666e 6e69 6465 755f 6f3a
> 0057140 6a62 6365 5f74 3a72 6e75 616c 6562 656c
> 0057160 5f64 3a74 3073 0000 a841 7a1d 0000 3800
> 0057200 0069 0000 123b 0003 0003 0000 0000 0014
> 0057220 0000 0000 1b00 0000 0000 0000 0000 0000
> 0057240 0000 0000 0000 0000 0000 0000 1b00 0000
> 0057260 0000 0000 0020 0000 0000 0000 a841 7a1d
> 0057300 0000 b000 0069 0000 494e 41ed 0103 0000
> 0057320 0000 0000 0000 0000 0002 0000 0000 0000
> 0057340 0000 0000 0000 0000 1594 60a3 2313 21a6
> 0057360 1593 60a3 8d4e 036d 1593 60a3 8d4e 036d
> 0057400 0013 0000 0000 0000 0000 0000 0000 0000
> 0057420 0000 0000 0000 0000 0000 0200 0000 0000
> 0057440 0000 0000 0000 0000 ffff ffff 0000 0000
> 0057460 0005 0000 0000 0000 0000 0000 0000 0000
240a295,301
> 0057520 0000 0000 0000 0000 11dd 60a3 0778 2268
> 0057540 1b00 0000 0000 0000 e8a4 c522 abdb 2042
> 0057560 4a82 f318 f642 75e9 a841 7a1d 0000 1400
> 0057600 0069 0000 0001 0000 001b 0005 6860 6c65
> 0057620 6f6c 0001 1b00 0003 a841 7a1d 0000 0000
> 0057640 0269 0000 0000 0000 0000 0000 0000 0000
> 0057660 0000 0000 0000 0000 0000 0000 0000 0000
由于xfs文件系统的结构原因, 可以看到有很大异同
写入文件内容:
$ echo "hello, world" > mnt/hello	# 需要root
$ sync
$ cp minifs minifs-echo.bak
$ od -x minifs-echo.bak > echo.od
这里用到了sync
主要是由于块设备有数据缓冲区的原因, sync保证了缓存中的数据已经写入硬盘
之后比较异同
数据很长……
[hhtxzzj@localhost shellTest]$ diff touch.od echo.od
7c7
< 0000140 0000 5703 a5b4 0002 0002 0800 0000 0000
---
> 0000140 0000 5703 b5b4 0002 0002 0800 0000 0000
9,10c9,10
< 0000200 0000 0000 0000 4000 0000 0000 0000 3d00
< 0000220 0000 0000 0000 9d0c 0000 0000 0000 0000
---
> 0000200 0000 0000 0000 4000 0000 0000 0000 3c00
> 0000220 0000 0000 0000 d10b 0000 0000 0000 0000
15,16c15,16
< 0000340 d296 62fc 0000 0000 ffff ffff ffff ffff
< 0000360 0000 0100 0000 0800 0000 0000 0000 0000
---
> 0000340 f138 b9fd 0000 0000 ffff ffff ffff ffff
> 0000360 0000 0100 0000 1200 0000 0000 0000 0000
22c22
< 0001060 0000 0400 0000 990c 0000 980c 0000 0000
---
> 0001060 0000 0400 0000 980c 0000 980c 0000 0000
26c26
< 0001320 0000 0000 0000 0000 d108 5166 0000 0000
---
> 0001320 0000 0100 0000 1600 b307 dd1a 0000 0000
30c30
< 0002020 0000 4000 0000 0300 0000 0100 0000 3d00
---
> 0002020 0000 4000 0000 0300 0000 0100 0000 3c00
35,36c35,37
< 0002460 4a82 f318 f642 75e9 795e a0d0 0000 0000
< 0002500 0000 0000 0000 0000 0000 0000 0000 0000
---
> 0002460 4a82 f318 f642 75e9 70bb 0ff0 0000 0000
> 0002500 0000 0100 0000 0c00 0000 0000 0000 0000
> 0002520 0000 0000 0000 0000 0000 0000 0000 0000
46,47c47,48
< 0010000 4241 4233 0000 0200 ffff ffff ffff ffff
< 0010020 0000 0000 0000 0800 0000 0000 0000 0000
---
> 0010000 4241 4233 0000 0100 ffff ffff ffff ffff
> 0010020 0000 0000 0000 0800 0000 0100 0000 1600
49c50
< 0010060 0000 0000 733c e901 0000 5f03 0000 0100
---
> 0010060 0000 0000 4b63 7a25 0000 6803 0000 980c
53,54c54,55
< 0020000 4241 4333 0000 0200 ffff ffff ffff ffff
< 0020020 0000 0000 0000 1000 0000 0000 0000 0000
---
> 0020000 4241 4333 0000 0100 ffff ffff ffff ffff
> 0020020 0000 0000 0000 1000 0000 0100 0000 1600
56c57
< 0020060 0000 0000 34d4 1cb4 0000 5f03 0000 0100
---
> 0020060 0000 0000 0c8b 8f90 0000 6803 0000 980c
61c62
< 0030020 0000 0000 0000 1800 0000 0000 0000 0000
---
> 0030020 0000 0000 0000 1800 0000 0100 0000 0c00
63,64c64,65
< 0030060 0000 0000 981d 4dc1 0000 001b 0000 3d00
< 0030100 ffff ffff ffff f8ff 0000 0000 0000 0000
---
> 0030060 0000 0000 dc98 500e 0000 001b 0000 3c00
> 0030100 ffff ffff ffff f0ff 0000 0000 0000 0000
303,305c304,307
< 0060000 edfe beba 0000 0000 0000 0200 0000 0000
< 0060020 0000 0000 0000 1000 0000 0100 0000 0800
< 0060040 0000 0000 0000 0000 0000 0000 0000 0000
---
> 0060000 edfe beba 0000 0100 0000 0200 0000 0002
> 0060020 0000 0100 0000 1000 0000 0100 0000 0c00
> 0060040 dddb 0197 0000 0c00 0000 0500 a011 2c53
> 0060060 0000 0000 0000 0000 0000 0000 0000 0000
309c311,312
< 0060500 0000 0000 0000 0000 0000 0000 0000 0000
---
> 0060500 0000 0080 0000 0000 0000 0000 0000 0000
> 0060520 0000 0000 0000 0000 0000 0000 0000 0000
311,321c314,343
< 0061000 edfe beba 0000 0000 0000 0200 0000 0000
< 0061020 0000 0000 0000 1100 0000 0100 0000 0800
< 0061040 0000 0000 0000 0000 0000 0000 0000 0000
< *
< 0061440 0000 0000 0000 0000 0000 0000 0000 0100
< 0061460 e8a4 c522 abdb 2042 4a82 f318 f642 75e9
< 0061500 0000 0000 0000 0000 0000 0000 0000 0000
< *
< 0062000 edfe beba 0000 0000 0000 0200 0000 0000
< 0062020 0000 0000 0000 1200 0000 0100 0000 0800
< 0062040 0000 0000 0000 0000 0000 0000 0000 0000
---
> 0061000 0000 0100 0000 0000 0169 0000 a011 2c53
> 0061020 0000 1000 0069 0000 414e 5452 0028 0000
> 0061040 532c 11a0 0002 0000 a011 2c53 0000 1800
> 0061060 0069 0000 123c 0002 9000 0001 0000 0000
> 0061100 0000 0000 0001 0000 0007 0000 a011 2c53
> 0061120 0000 8001 0069 0000 4658 4253 0000 0010
> 0061140 0000 0000 0000 0010 0000 0000 0000 0000
> 0061160 0000 0000 0000 0000 e8a4 c522 abdb 2042
> 0061200 4a82 f318 f642 75e9 0000 0000 0000 0400
> 0061220 0000 0000 0000 001b 0000 0000 0000 011b
> 0061240 0000 0000 0000 021b 0000 0100 0000 0010
> 0061260 0000 0100 0000 0000 0000 5703 b5b4 0002
> 0061300 0002 0800 0000 0000 0000 0000 0000 0000
> 0061320 090c 0309 000c 1900 0000 0000 0000 4000
> 0061340 0000 0000 0000 3c00 0000 0000 0000 d10b
> 0061360 0000 0000 0000 0000 ffff ffff ffff ffff
> 0061400 ffff ffff ffff ffff 0000 0000 0000 0400
> 0061420 0000 0000 0000 0000 0000 0000 0000 0100
> 0061440 0000 8a01 0000 8a01 0000 0000 0000 0000
> 0061460 0000 0100 0000 0000 8af1 34c7 0000 0000
> 0061500 ffff ffff ffff ffff 0000 0100 0000 0800
> 0061520 0000 0000 0000 0000 0000 0000 0000 0000
> *
> 0061720 0000 0000 0000 0000 a011 2c53 0000 0000
> 0061740 0269 0000 0000 0000 0000 0000 0000 0000
> 0061760 0000 0000 0000 0000 0000 0000 0000 0000
> 0062000 edfe beba 0000 0100 0000 0200 0000 0002
> 0062020 0000 0100 0000 1200 0000 0100 0000 1000
> 0062040 0401 00b1 0000 1000 0000 0500 f595 ba1f
> 0062060 0000 0000 0000 0000 0000 0000 0000 0000
325c347,348
< 0062500 0000 0000 0000 0000 0000 0000 0000 0000
---
> 0062500 0000 0080 0000 0000 0000 0000 0000 0000
> 0062520 0000 0000 0000 0000 0000 0000 0000 0000
327,337c350,379
< 0063000 edfe beba 0000 0000 0000 0200 0000 0000
< 0063020 0000 0000 0000 1300 0000 0100 0000 0800
< 0063040 0000 0000 0000 0000 0000 0000 0000 0000
< *
< 0063440 0000 0000 0000 0000 0000 0000 0000 0100
< 0063460 e8a4 c522 abdb 2042 4a82 f318 f642 75e9
< 0063500 0000 0000 0000 0000 0000 0000 0000 0000
< *
< 0064000 edfe beba 0000 0000 0000 0200 0000 0000
< 0064020 0000 0000 0000 1400 0000 0100 0000 0800
< 0064040 0000 0000 0000 0000 0000 0000 0000 0000
---
> 0063000 0000 0100 0000 0000 0169 0000 f595 ba1f
> 0063020 0000 1000 0069 0000 414e 5452 0028 0000
> 0063040 1fba 95f5 0002 0000 f595 ba1f 0000 1800
> 0063060 0069 0000 123c 0002 9000 0001 0000 0000
> 0063100 0000 0000 0001 0000 0007 0000 f595 ba1f
> 0063120 0000 8001 0069 0000 4658 4253 0000 0010
> 0063140 0000 0000 0000 0010 0000 0000 0000 0000
> 0063160 0000 0000 0000 0000 e8a4 c522 abdb 2042
> 0063200 4a82 f318 f642 75e9 0000 0000 0000 0400
> 0063220 0000 0000 0000 001b 0000 0000 0000 011b
> 0063240 0000 0000 0000 021b 0000 0100 0000 0010
> 0063260 0000 0100 0000 0000 0000 5703 b5b4 0002
> 0063300 0002 0800 0000 0000 0000 0000 0000 0000
> 0063320 090c 0309 000c 1900 0000 0000 0000 4000
> 0063340 0000 0000 0000 3c00 0000 0000 0000 d10b
> 0063360 0000 0000 0000 0000 ffff ffff ffff ffff
> 0063400 ffff ffff ffff ffff 0000 0000 0000 0400
> 0063420 0000 0000 0000 0000 0000 0000 0000 0100
> 0063440 0000 8a01 0000 8a01 0000 0000 0000 0000
> 0063460 0000 0100 0000 0000 a48b 6627 0000 0000
> 0063500 ffff ffff ffff ffff 0000 0100 0000 0800
> 0063520 0000 0000 0000 0000 0000 0000 0000 0000
> *
> 0063720 0000 0000 0000 0000 f595 ba1f 0000 0000
> 0063740 0269 0000 0000 0000 0000 0000 0000 0000
> 0063760 0000 0000 0000 0000 0000 0000 0000 0000
> 0064000 edfe beba 0000 0100 0000 0200 0000 0002
> 0064020 0000 0100 0000 1400 0000 0100 0000 1200
> 0064040 b7da 92b9 0000 1200 0000 0500 dd14 5b01
> 0064060 0000 0000 0000 0000 0000 0000 0000 0000
341c383,384
< 0064500 0000 0000 0000 0000 0000 0000 0000 0000
---
> 0064500 0000 0080 0000 0000 0000 0000 0000 0000
> 0064520 0000 0000 0000 0000 0000 0000 0000 0000
343,348c386,405
< 0065000 edfe beba 0000 0000 0000 0200 0000 0000
< 0065020 0000 0000 0000 1500 0000 0100 0000 0800
< 0065040 0000 0000 0000 0000 0000 0000 0000 0000
< *
< 0065440 0000 0000 0000 0000 0000 0000 0000 0100
< 0065460 e8a4 c522 abdb 2042 4a82 f318 f642 75e9
---
> 0065000 0000 0100 0000 0000 0169 0000 dd14 5b01
> 0065020 0000 1000 0069 0000 414e 5452 0028 0000
> 0065040 015b 14dd 0002 0000 dd14 5b01 0000 3800
> 0065060 0069 0000 123b 0002 0001 0000 0000 0000
> 0065100 0000 0000 1b03 0000 0000 0000 0000 0000
> 0065120 0000 0000 0000 0000 0000 0000 1b00 0000
> 0065140 0000 0000 0020 0000 0600 0000 dd14 5b01
> 0065160 0000 b000 0069 0000 494e 81a4 0203 0000
> 0065200 0000 0000 0000 0000 0001 0000 0000 0000
> 0065220 0000 0000 0000 0000 1593 60a3 8d4e 036d
> 0065240 1672 60a3 616f 22e1 1672 60a3 616f 22e1
> 0065260 0000 0000 0000 0000 0000 0000 0000 0000
> 0065300 0000 0000 0000 0000 0000 0123 0000 0000
> 0065320 0000 0000 82bd d139 ffff ffff 0000 0000
> 0065340 000a 0000 0000 0000 0000 0000 0000 0000
> 0065360 0000 0000 0000 0000 0000 0000 0000 0000
> 0065400 0000 0000 0000 0000 1593 60a3 8d4e 036d
> 0065420 1b03 0000 0000 0000 e8a4 c522 abdb 2042
> 0065440 4a82 f318 f642 75e9 dd14 5b01 0000 0000
> 0065460 0269 0000 abdb 2042 4a82 f318 f642 75e9
351,353c408,411
< 0066000 edfe beba 0000 0000 0000 0200 0000 0000
< 0066020 0000 0000 0000 1600 0000 0100 0000 0800
< 0066040 0000 0000 0000 0000 0000 0000 0000 0000
---
> 0066000 edfe beba 0000 0100 0000 0200 0000 0004
> 0066020 0000 0100 0000 1600 0000 0100 0000 1400
> 0066040 4dbd 880d 0000 1400 0000 0c00 04ed 62ab
> 0066060 0000 0000 0000 0000 0000 0000 0000 0000
357c415,416
< 0066500 0000 0000 0000 0000 0000 0000 0000 0000
---
> 0066500 0000 0080 0000 0000 0000 0000 0000 0000
> 0066520 0000 0000 0000 0000 0000 0000 0000 0000
359,373c418,471
< 0067000 edfe beba 0000 0000 0000 0200 0000 0000
< 0067020 0000 0000 0000 1700 0000 0100 0000 0800
< 0067040 0000 0000 0000 0000 0000 0000 0000 0000
< *
< 0067440 0000 0000 0000 0000 0000 0000 0000 0100
< 0067460 e8a4 c522 abdb 2042 4a82 f318 f642 75e9
< 0067500 0000 0000 0000 0000 0000 0000 0000 0000
< *
< 0070000 edfe beba 0000 0000 0000 0200 0000 0000
< 0070020 0000 0000 0000 1800 0000 0100 0000 0800
< 0070040 0000 0000 0000 0000 0000 0000 0000 0000
< *
< 0070440 0000 0000 0000 0000 0000 0000 0000 0100
< 0070460 e8a4 c522 abdb 2042 4a82 f318 f642 75e9
< 0070500 0000 0000 0000 0000 0000 0000 0000 0000
---
> 0067000 0000 0100 0000 0000 0169 0000 04ed 62ab
> 0067020 0000 1000 0069 0000 414e 5452 0028 0000
> 0067040 ab62 ed04 0009 0000 04ed 62ab 0000 1800
> 0067060 0069 0000 123c 0002 2800 0001 0001 0000
> 0067100 0000 0000 0001 0000 0001 0000 04ed 62ab
> 0067120 0000 8000 0069 0000 4158 4647 0000 0100
> 0067140 0000 0000 0000 0010 0000 0100 0000 0200
> 0067160 0000 0000 0000 0100 0000 0100 0000 0000
> 0067200 0000 0000 0000 0300 0000 0400 0000 980c
> 0067220 0000 980c 0000 0000 e8a4 c522 abdb 2042
> 0067240 4a82 f318 f642 75e9 0000 0000 0000 0000
> 0067260 0000 0000 0000 0000 0000 0000 0000 0000
> *
> 0067320 0000 0000 0000 0000 04ed 62ab 0000 1800
> 0067340 0069 0000 123c 0002 2000 0008 0010 0000
> 0067360 0000 0000 0001 0000 0001 0000 04ed 62ab
> 0067400 0000 8000 0069 0000 4241 4333 0000 0100
> 0067420 ffff ffff ffff ffff 0000 0000 0000 1000
> 0067440 0000 0000 0000 0000 e8a4 c522 abdb 2042
> 0067460 4a82 f318 f642 75e9 0000 0000 34d4 1cb4
> 0067500 0000 6803 0000 980c 0000 6803 0000 980c
> 0067520 0000 0000 0000 0000 0000 0000 0000 0000
> *
> 0067600 0000 0000 0000 0000 04ed 62ab 0000 1800
> 0067620 0069 0000 123c 0002 2000 0008 0008 0000
> 0067640 0000 0000 0001 0000 0001 0000 04ed 62ab
> 0067660 0000 8000 0069 0000 4241 4233 0000 0100
> 0067700 ffff ffff ffff ffff 0000 0000 0000 0800
> 0067720 0000 0000 0000 0000 e8a4 c522 abdb 2042
> 0067740 4a82 f318 f642 75e9 0000 0000 733c e901
> 0067760 0000 6803 0000 980c 0000 6803 0000 980c
> 0070000 0000 0100 0000 0000 0000 0000 0000 0000
> 0070020 0000 0000 0000 0000 0000 0000 0000 0000
> *
> 0070060 0000 0000 0000 0000 04ed 62ab 0000 3800
> 0070100 0069 0000 123b 0003 0005 0000 0000 0010
> 0070120 0000 0000 1b03 0000 0000 0000 0000 0000
> 0070140 0000 0000 0000 0000 0000 0000 1b00 0000
> 0070160 0000 0000 0020 0000 0600 0000 04ed 62ab
> 0070200 0000 b000 0069 0000 494e 81a4 0203 0000
> 0070220 0000 0000 0000 0000 0001 0000 0000 0000
> 0070240 0000 0000 0000 0000 1593 60a3 8d4e 036d
> 0070260 1672 60a3 616f 22e1 1672 60a3 616f 22e1
> 0070300 000c 0000 0000 0000 0001 0000 0000 0000
> 0070320 0000 0000 0001 0000 0000 0123 0000 0000
> 0070340 0000 0000 82bd d139 ffff ffff 0000 0000
> 0070360 000c 0000 0000 0000 0014 0000 0001 0000
> 0070400 0000 0000 0000 0000 0000 0000 0000 0000
> 0070420 0000 0000 0000 0000 1593 60a3 8d4e 036d
> 0070440 1b03 0000 0000 0000 e8a4 c522 abdb 2042
> 0070460 4a82 f318 f642 75e9 04ed 62ab 0000 1000
> 0070500 0069 0000 0000 0000 0000 0000 0000 0000
> 0070520 e06b 0100 04ed 62ab 0000 0000 0269 0000
> 0070540 0000 0000 0000 0000 0000 0000 0000 0000
33038a33137,33139
> 15370000 6568 6c6c 206f 6f77 6c72 0a64 0000 0000
> 15370020 0000 0000 0000 0000 0000 0000 0000 0000
> *
33041,33042c33142,33143
< 15400040 a360 3814 8820 8257 a360 dd11 6822 7807
< 15400060 a360 dd11 6822 7807 0000 0000 0000 0600
---
> 15400040 a360 9415 a621 1323 a360 9315 6d03 4e8d
> 15400060 a360 9315 6d03 4e8d 0000 0000 0000 1300
33045,33046c33146,33147
< 15400140 ffff ffff 2a18 b3a8 0000 0000 0000 0300
< 15400160 0000 0100 0000 0200 0000 0000 0000 0000
---
> 15400140 ffff ffff 165c 001e 0000 0000 0000 0500
> 15400160 0000 0100 0000 0c00 0000 0000 0000 0000
33050,33051c33151,33153
< 15400260 0000 0000 001b 0000 0000 0000 0000 0000
< 15400300 0000 0000 0000 0000 0000 0000 0000 0000
---
> 15400260 0001 0000 001b 0005 6860 6c65 6f6c 0001
> 15400300 1b00 0003 0000 0000 0000 0000 0000 0000
> 15400320 0000 0000 0000 0000 0000 0000 0000 0000
33079,33085c33181,33190
< 15403000 4e49 0000 0003 0000 0000 0000 0000 0000
< 15403020 0000 0000 0000 0000 0000 0000 0000 0000
< *
< 15403140 ffff ffff 5a98 a60f 0000 0000 0000 0000
< 15403160 0000 0000 0000 0000 0000 0000 0000 0000
< *
< 15403220 0000 0000 0000 0000 0000 0000 0000 031b
---
> 15403000 4e49 a481 0203 0000 0000 0000 0000 0000
> 15403020 0000 0100 0000 0000 0000 0000 0000 0000
> 15403040 a360 9315 6d03 4e8d a360 7216 e122 6f61
> 15403060 a360 7216 e122 6f61 0000 0000 0000 0c00
> 15403100 0000 0000 0000 0100 0000 0000 0000 0100
> 15403120 0000 0123 0000 0000 0000 0000 39d1 bd82
> 15403140 ffff ffff c15b 2019 0000 0000 0000 0c00
> 15403160 0000 0100 0000 1600 0000 0000 0000 0000
> 15403200 0000 0000 0000 0000 0000 0000 0000 0000
> 15403220 a360 9315 6d03 4e8d 0000 0000 0000 031b
33087c33192,33193
< 15403260 0000 0000 0000 0000 0000 0000 0000 0000
---
> 15403260 0000 0000 0000 0000 0000 0000 e06b 0100
> 15403300 0000 0000 0000 0000 0000 0000 0000 0000
33088a33195,33198
> 15403700 0000 0000 0000 0000 3300 f701 2507 7304
> 15403720 6c65 6e69 7875 6e75 6f63 666e 6e69 6465
> 15403740 755f 6f3a 6a62 6365 5f74 3a72 6e75 616c
> 15403760 6562 656c 5f64 3a74 3073 0000 0000 0000
将二进制解释为字符串:
[hhtxzzj@localhost shellTest]$ strings minifs
XFSB
XAGF
XAGI
XAFL
AB3B
cK%z
AB3C
IAB3
NART(
NART(
XFSB
NART(
XFSB
NART(
XAGI
IAB3
XFSB
selinuxunconfined_u:object_r:unlabeled_t:s0
`hello
NART(
XFSB
NART(
XFSB
NART(
NART(
XAGF
AB3C
AB3B
NART(
XFSB
hello world
`hello
selinuxunconfined_u:object_r:unlabeled_t:s0
w|K|
'h38
|x?Q
%~cY
~no0
可以看到hello world已经写入文件
删除hello文件:
$ rm /mnt/hello
$ cp minifs minifs-rm.bak
$ od -x minifs-rm.bak > rm.od
$ diff echo.od rm.od
直接来看字符串:
可以看到hello world还在, 所以文件被删除后, 文件系统中的信息并没有被覆盖, 仍有数据恢复的可能性
hhtxzzj@localhost shellTest]$ strings minifs
XFSB
XAGF
XAGI
u%%q
XAFL
AB3B
AB3C
IAB3
NART(
NART(
XFSB
NART(
XFSB
NART(
XAGI
IAB3
XFSB
selinuxunconfined_u:object_r:unlabeled_t:s0
`hello
NART(
XFSB
NART(
XFSB
NART(
NART(
XAGF
AB3C
AB3B
NART(
XFSB
NART(
XFSB
NART(
XAGF
AB3B
cK%z
AB3C
succ
XAGI
IAB3
hello world
`hello
selinuxunconfined_u:object_r:unlabeled_t:s0
w|K|
'h38
|x?Q
%~cY
~no0
进程操作:
什么是程序, 什么是进程:
这个在操作系统中已经阐释的很清楚了, 这里不在阐述
进程的创建
命令行执行的每一条命令基本都会创建一个进程
让进程在后台执行:
之前用到过, 直接在命令的结尾加个&, 命令就会转移到后台执行
这对于一些耗时较长的命令很有帮助, 可以有效避免terminal等待
sleep 100 &
sleep等待100秒, 如果没有到后台执行时, 就需要在中断等待100s
查看进程ID
这里用到pidof命令
pidof 进程名
[hhtxzzj@localhost shellTest]$ sleep 100 &
[1] 4080
[hhtxzzj@localhost shellTest]$ pidof sleep
4080 4064
[hhtxzzj@localhost shellTest]$ ps -ef | grep "sleep"
hhtxzzj    4064   3688  0 14:36 ?        00:00:00 sleep 180
hhtxzzj    4080   3858  0 14:38 pts/1    00:00:00 sleep 100
hhtxzzj    4083   3858  0 14:38 pts/1    00:00:00 grep --color=auto sleep
[hhtxzzj@localhost shellTest]$
但是这个命令完全可以被更强大的ps命令替代
查看进程的内存映象
程序被执行后,就被加载到内存中,成为了一个进程
下头显示了该进程的内存映像(虚拟内存),包括程序指令、数据,以及一些用于存放程序命令行参数、环境变量的栈空间,用于动态内存申请的堆空间都被分配好
详细部分可以看这个:
https://www.linuxprobe.com/linux-proc-pid.html
[hhtxzzj@localhost shellTest]$ cat /proc/4088/maps
00400000-00406000 r-xp 00000000 fd:00 140641                             /usr/bin/sleep
00606000-00607000 r--p 00006000 fd:00 140641                             /usr/bin/sleep
00607000-00608000 rw-p 00007000 fd:00 140641                             /usr/bin/sleep
0222f000-02250000 rw-p 00000000 00:00 0                                  [heap]
7f4ce96c5000-7f4cefc08000 r--p 00000000 fd:00 100701120                  /usr/lib/locale/locale-archive
7f4cefc08000-7f4cefdcc000 r-xp 00000000 fd:00 33562123                   /usr/lib64/libc-2.17.so
7f4cefdcc000-7f4ceffcb000 ---p 001c4000 fd:00 33562123                   /usr/lib64/libc-2.17.so
7f4ceffcb000-7f4ceffcf000 r--p 001c3000 fd:00 33562123                   /usr/lib64/libc-2.17.so
7f4ceffcf000-7f4ceffd1000 rw-p 001c7000 fd:00 33562123                   /usr/lib64/libc-2.17.so
7f4ceffd1000-7f4ceffd6000 rw-p 00000000 00:00 0
7f4ceffd6000-7f4cefff8000 r-xp 00000000 fd:00 33555088                   /usr/lib64/ld-2.17.so
7f4cf01ea000-7f4cf01ed000 rw-p 00000000 00:00 0
7f4cf01f6000-7f4cf01f7000 rw-p 00000000 00:00 0
7f4cf01f7000-7f4cf01f8000 r--p 00021000 fd:00 33555088                   /usr/lib64/ld-2.17.so
7f4cf01f8000-7f4cf01f9000 rw-p 00022000 fd:00 33555088                   /usr/lib64/ld-2.17.so
7f4cf01f9000-7f4cf01fa000 rw-p 00000000 00:00 0
7fffb453a000-7fffb455b000 rw-p 00000000 00:00 0                          [stack]
7fffb45b3000-7fffb45b5000 r-xp 00000000 00:00 0                          [vdso]
ffffffffff600000-ffffffffff601000 r-xp 00000000 00:00 0                  [vsyscall]
查看进程的属性 & 状态:
这里主要用ps命令
查看系统当前所有进程的属性:
$ ps -ef
查看命令中包含某字符的程序对应的进程
这个用grep也能做到
$ ps -C init
选择某个特定用户启动的进程:
$ ps -U falcon
按照指定格式输出指定内容,下面输出命令名和 cpu 使用率:
$ ps -e -o "%C %c"
打印 cpu 使用率最高的前 4 个程序:
$ ps -e -o "%C %c" | sort -u -k1 -r | head -5
 7.5 firefox-bin
 1.1 Xorg
 0.8 scim-panel-gtk
 0.2 scim-bridge
这个直接通过以下命令也能获取到:
[hhtxzzj@localhost shellTest]$ ps -aux | sort -u -k4 -r | head -n 5
USER        PID %CPU %MEM    VSZ   RSS TTY      STAT START   TIME COMMAND
hhtxzzj    4321  1.7  2.2 1261536 179796 ?      Sl   15:13   0:10 /home/hhtxzzj/.vscode-server/extensions/ms-vscode.cpptools-1.3.1/bin/cpptools
hhtxzzj    3888  0.2  2.2 1261536 178420 ?      Sl   14:12   0:10 /home/hhtxzzj/.vscode-server/extensions/ms-vscode.cpptools-1.3.1/bin/cpptools
hhtxzzj    3842  0.1  1.5 1119632 124680 ?      Sl   14:12   0:04 /home/hhtxzzj/.vscode-server/bin/054a9295330880ed74ceaedda236253b4f39a335/node /home/hhtxzzj/.vscode-server/bin/054a9295330880ed74ceaedda236253b4f39a335/out/bootstrap-fork --type=extensionHost --uriTransformerPath=/home/hhtxzzj/.vscode-server/bin/054a9295330880ed74ceaedda236253b4f39a335/out/vs/server/uriTransformer.js
hhtxzzj    4295  0.5  1.4 1051240 118064 ?      Sl   15:13   0:03 /home/hhtxzzj/.vscode-server/bin/054a9295330880ed74ceaedda236253b4f39a335/node /home/hhtxzzj/.vscode-server/bin/054a9295330880ed74ceaedda236253b4f39a335/out/bootstrap-fork --type=extensionHost --uriTransformerPath=/home/hhtxzzj/.vscode-server/bin/054a9295330880ed74ceaedda236253b4f39a335/out/vs/server/uriTransformer.js
查看进程亲缘关系
[hhtxzzj@localhost shellTest]$ pstree
systemd─┬─NetworkManager─┬─dhclient
        │                └─2*[{NetworkManager}]
        ├─agetty
        ├─auditd───{auditd}
        ├─chronyd
        ├─crond
        ├─dbus-daemon───{dbus-daemon}
        ├─firewalld───{firewalld}
        ├─irqbalance
        ├─lvmetad
        ├─master─┬─pickup
        │        └─qmgr
        ├─polkitd───6*[{polkitd}]
        ├─rsyslogd───2*[{rsyslogd}]
        ├─sh───node─┬─node─┬─bash───pstree
        │           │      └─11*[{node}]
        │           ├─2*[node───10*[{node}]]
        │           ├─2*[node─┬─cpptools───22*[{cpptools}]]
        │           │         ├─node───6*[{node}]]
        │           │         └─15*[{node}]]
        │           └─11*[{node}]
        ├─sshd───sshd───sshd───bash───sleep
        ├─systemd-journal
        ├─systemd-logind
        ├─systemd-udevd
        └─tuned───4*[{tuned}]
用top动态查看进程信息
这个直接去看top的使用
确保同一时间内特定程序只有一个副本在运行
考虑的情况为, 同一个程序, 运行后具有不变的进程名
[hhtxzzj@localhost ~]$ ps -aux | grep "shellTest.sh" | grep -v "grep"
hhtxzzj    2299  0.0  0.0 113288  1192 pts/3    S+   10:27   0:00 /bin/bash /home/hhtxzzj/shellTest/shellTest.sh
写成程序形式:
echo ${1}
count=`ps -aux | grep "${1}" | grep -v "grep" | wc -l`
echo "count=${count}"

if [ count>=1 ]
then
    echo "there are more than 1 prog running......"
else
    echo "can start a new prog...."
fi
调整进程优先级:
这里主要用到nice & renice
参考博客:
https://www.runoob.com/linux/linux-comm-nice.html
https://www.runoob.com/linux/linux-comm-renice.html
语法
nice [-n adjustment] [-adjustment] [--adjustment=adjustment] [--help] [--version] [command [arg...]]
参数说明:
- -n adjustment, -adjustment, --adjustment=adjustment 皆为将该原有优先序的增加 adjustment
- –help 显示求助讯息
- –version 显示版本资讯
语法
renice priority [[-p] pid ...] [[-g] pgrp ...] [[-u] user ...]
参数说明:
- -p pid 重新指定行程的 id 为 pid 的行程的优先序
- -g pgrp 重新指定行程群组(process group)的 id 为 pgrp 的行程 (一个或多个) 的优先序
- -u user 重新指定行程拥有者为 user 的行程的优先序
查看进程优先级:
F S UID         PID   PPID  C PRI  NI ADDR SZ WCHAN  STIME TTY          TIME CMD
4 S root          1      0  0  80   0 - 48493 ep_pol 09:48 ?        00:00:01 /usr/lib/systemd/system
d --switched-root --system --deserialize 22
1 S root          2      0  0  80   0 -     0 kthrea 09:48 ?        00:00:00 [kthreadd]
1 S root          4      2  0  60 -20 -     0 worker 09:48 ?        00:00:00 [kworker/0:0H]
1 S root          6      2  0  80   0 -     0 smpboo 09:48 ?        00:00:00 [ksoftirqd/0]
1 S root          7      2  0 -40   - -     0 smpboo 09:48 ?        00:00:00 [migration/0]
1 S root          8      2  0  80   0 -     0 rcu_gp 09:48 ?        00:00:00 [rcu_bh]
1 S root          9      2  0  80   0 -     0 rcu_gp 09:48 ?        00:00:00 [rcu_sched]
1 S root         10      2  0  60 -20 -     0 rescue 09:48 ?        00:00:00 [lru-add-drain]
5 S root         11      2  0 -40   - -     0 smpboo 09:48 ?        00:00:00 [watchdog/0]
必须加-l才能显示优先级与nice值
- PRI
代表这个进程可被执行的优先级,其值越小越早被执行 - NI
代表这个进程的nice值
调整进程优先级:
[hhtxzzj@localhost shellTest]$ ps -elf | grep "shellTest2.sh"
0 S hhtxzzj    2503   2275  0  80   0 - 28323 do_wai 10:55 pts/3    00:00:00 /bin/bash ./shellTest2.sh
0 S hhtxzzj    2508   2251  0  80   0 - 28205 pipe_w 10:55 pts/0    00:00:00 grep --color=auto shellTest2.sh
当前shellTest2.sh的nice=0
调整到1
[hhtxzzj@localhost shellTest]$ renice 1 -p 2503
2503 (process ID) old priority 0, new priority 1
[hhtxzzj@localhost shellTest]$ ps -elf | grep "shellTest2.sh"
0 S hhtxzzj    2503   2275  0  81   1 - 28323 do_wai 10:55 pts/3    00:00:00 /bin/bash ./shellTest2.sh
0 R hhtxzzj    2516   2251  0  80   0 - 28204 -      10:56 pts/0    00:00:00 grep --color=auto shellTest2.sh
结束进程:
这里主要用到kill命令
kill命令可以发送各种signal给进程, 默认发送9(SIGTERM) , termination终止进程
kill支持以下信号:
[hhtxzzj@localhost shellTest]$ kill -l
 1) SIGHUP       2) SIGINT       3) SIGQUIT      4) SIGILL       5) SIGTRAP
 6) SIGABRT      7) SIGBUS       8) SIGFPE       9) SIGKILL     10) SIGUSR1
11) SIGSEGV     12) SIGUSR2     13) SIGPIPE     14) SIGALRM     15) SIGTERM
16) SIGSTKFLT   17) SIGCHLD     18) SIGCONT     19) SIGSTOP     20) SIGTSTP
21) SIGTTIN     22) SIGTTOU     23) SIGURG      24) SIGXCPU     25) SIGXFSZ
26) SIGVTALRM   27) SIGPROF     28) SIGWINCH    29) SIGIO       30) SIGPWR
31) SIGSYS      34) SIGRTMIN    35) SIGRTMIN+1  36) SIGRTMIN+2  37) SIGRTMIN+3
38) SIGRTMIN+4  39) SIGRTMIN+5  40) SIGRTMIN+6  41) SIGRTMIN+7  42) SIGRTMIN+8
43) SIGRTMIN+9  44) SIGRTMIN+10 45) SIGRTMIN+11 46) SIGRTMIN+12 47) SIGRTMIN+13
48) SIGRTMIN+14 49) SIGRTMIN+15 50) SIGRTMAX-14 51) SIGRTMAX-13 52) SIGRTMAX-12
53) SIGRTMAX-11 54) SIGRTMAX-10 55) SIGRTMAX-9  56) SIGRTMAX-8  57) SIGRTMAX-7
58) SIGRTMAX-6  59) SIGRTMAX-5  60) SIGRTMAX-4  61) SIGRTMAX-3  62) SIGRTMAX-2
63) SIGRTMAX-1  64) SIGRTMAX
各种信号有不同的作用
参考博客:
https://www.cnblogs.com/frisk/p/11602973.html
SIGHUP       1          /* Hangup (POSIX).  */                          终止进程     终端线路挂断
SIGINT       2          /* Interrupt (ANSI).  */                        终止进程     中断进程 Ctrl+C
SIGQUIT      3          /* Quit (POSIX).  */                            建立CORE文件终止进程,并且生成core文件 Ctrl+
SIGILL       4          /* Illegal instruction (ANSI).  */              建立CORE文件,非法指令
SIGTRAP      5          /* Trace trap (POSIX).  */                      建立CORE文件,跟踪自陷
SIGABRT      6          /* Abort (ANSI).  */
SIGIOT       6          /* IOT trap (4.2 BSD).  */                      建立CORE文件,执行I/O自陷
SIGBUS       7          /* BUS error (4.2 BSD).  */                     建立CORE文件,总线错误
SIGFPE       8          /* Floating-point exception (ANSI).  */         建立CORE文件,浮点异常
SIGKILL      9          /* Kill, unblockable (POSIX).  */               终止进程     杀死进程
SIGUSR1      10         /* User-defined signal 1 (POSIX).  */           终止进程     用户定义信号1
SIGSEGV      11         /* Segmentation violation (ANSI).  */           建立CORE文件,段非法错误
SIGUSR2      12         /* User-defined signal 2 (POSIX).  */           终止进程     用户定义信号2
SIGPIPE      13         /* Broken pipe (POSIX).  */                     终止进程     向一个没有读进程的管道写数据
SIGALARM     14         /* Alarm clock (POSIX).  */                     终止进程     计时器到时
SIGTERM      15         /* Termination (ANSI).  */                      终止进程     软件终止信号
SIGSTKFLT    16         /* Stack fault.  */
SIGCLD       SIGCHLD    /* Same as SIGCHLD (System V).  */
SIGCHLD      17         /* Child status has changed (POSIX).  */        忽略信号     当子进程停止或退出时通知父进程
SIGCONT      18         /* Continue (POSIX).  */                        忽略信号     继续执行一个停止的进程
SIGSTOP      19         /* Stop, unblockable (POSIX).  */               停止进程     非终端来的停止信号
SIGTSTP      20         /* Keyboard stop (POSIX).  */                   停止进程     终端来的停止信号 Ctrl+Z
SIGTTIN      21         /* Background read from tty (POSIX).  */        停止进程     后台进程读终端
SIGTTOU      22         /* Background write to tty (POSIX).  */         停止进程     后台进程写终端
SIGURG       23         /* Urgent condition on socket (4.2 BSD).  */    忽略信号     I/O紧急信号
SIGXCPU      24         /* CPU limit exceeded (4.2 BSD).  */            终止进程     CPU时限超时
SIGXFSZ      25         /* File size limit exceeded (4.2 BSD).  */      终止进程     文件长度过长
SIGVTALRM    26         /* Virtual alarm clock (4.2 BSD).  */           终止进程     虚拟计时器到时
SIGPROF      27         /* Profiling alarm clock (4.2 BSD).  */         终止进程     统计分布图用计时器到时
SIGWINCH     28         /* Window size change (4.3 BSD, Sun).  */       忽略信号     窗口大小发生变化
SIGPOLL      SIGIO      /* Pollable event occurred (System V).  */
SIGIO        29         /* I/O now possible (4.2 BSD).  */              忽略信号     描述符上可以进行I/O
SIGPWR       30         /* Power failure restart (System V).  */
SIGSYS       31         /* Bad system call.  */
SIGUNUSED    31
关于信号0
暂停某个进程:
kill中的SIGSTOP信号可暂停进程, SIGCONT可继续进程
[hhtxzzj@localhost shellTest]$ ps -elf | grep "shellTest2.sh"
0 S hhtxzzj    2601   2275  0  80   0 - 28323 do_wai 11:21 pts/3    00:00:00 /bin/bash ./shellTest2.sh
0 R hhtxzzj    2608   2251  0  80   0 - 28204 -      11:23 pts/0    00:00:00 grep --color=auto shellTest2.sh
[hhtxzzj@localhost shellTest]$ kill -s SIGSTOP 2601
[hhtxzzj@localhost shellTest]$ ps -elf | grep "shellTest2.sh"
0 T hhtxzzj    2601   2275  0  80   0 - 28323 do_sig 11:21 pts/3    00:00:00 /bin/bash ./shellTest2.sh
0 S hhtxzzj    2610   2251  0  80   0 - 28204 pipe_w 11:23 pts/0    00:00:00 grep --color=auto shellTest2.sh
[hhtxzzj@localhost shellTest]$ kill -s SIGCONT 2601
[hhtxzzj@localhost shellTest]$ ps -elf | grep "shellTest2.sh"
0 S hhtxzzj    2601   2275  0  80   0 - 28323 do_wai 11:21 pts/3    00:00:00 /bin/bash ./shellTest2.sh
0 S hhtxzzj    2614   2251  0  80   0 - 28204 pipe_w 11:23 pts/0    00:00:00 grep --color=auto shellTest2.sh
[hhtxzzj@localhost shellTest]$
可以看到, 进程状态由do_wai 变成了do_sig
查看进程的退出状态:
这就用到了之前的返回值获取 $?
[hhtxzzj@localhost shellTest]$ ./shellTest2.sh
sleep 600 start
^C
[hhtxzzj@localhost shellTest]$ echo $?
127
可以看到, 终止脚本之后, 返回值为127, 非0
进程通信:
在编程时, 常用到进程通信
管道
无名管道pipe
$ ps -ef | grep init
这个常用, 不细说
有名管道named pipe
这个在之前的文件属性部分有介绍过
[hhtxzzj@localhost shellTest]$ ls -l
......
prw-rw-r--. 1 hhtxzzj hhtxzzj        0 May 13 10:29 pipeFile
......
如果试图读一个没有内容的有名管道,那么就会被阻塞,同样地,如果试图往一个有名管道里写东西,而当前没有程序试图读它,也会被阻塞
测试时可以使用两个terminal进行读写, 当没有echo > pipeFile时, cat pipefile将被阻塞
$ echo "fewfefe" > pipeFile
#试图往fifo_test文件中写入内容,但是被阻塞,要另开一个终端继续下面的操作
$ cat pipeFile        #另开一个终端,记得,另开一个。试图读出fifo_test的内容
fewfefe
这样一种通信方式非常适合某些特定情况:
例如一个架构由两个应用程序构成,其中一个通过循环不断读取 fifo_test 中的内容,以便判断下一步要做什么, 另外一个则作为一个控制程序不断地往 fifo_test 中写入一些控制信息,以便告诉之前的那个程序该做什么
如果这个管道没有内容,那么它就会被阻塞在那里,而不会因死循环而耗费资源.
信号 Signal:
之前讲kill的时候涉及到了信号机制
除了kill之外, 也可以通过键盘发送一些信号,比如 CTRL+C 可能触发 SGIINT 信号,而 CTRL+ 可能触发 SGIQUIT 信号等,除此之外,内核在某些情况下也会给进程发送信号,比如在访问内存越界时产生 SGISEGV 信号
进程本身也可以通过 kill,raise 等函数给自己发送信号
对于有些信号,进程会有默认的响应动作,而有些信号,进程可能直接会忽略
使用trap 命令, 可以对某些信号设置专门的处理函数
语法结构:
trap command signal
它有三种形式分别对应三种不同的信号回应方式
trap "commands" signal-list
当脚本收到signal-list清单内列出的信号时,trap命令执行双引号中的命令
trap signal-list
trap不指定任何命令,接受信号的默认操作,默认操作是结束进程的运行
trap " " signal-list
栗子:
function signal_handler {
    echo "get SIGINT."
}
trap signal_handler SIGINT
sleep 60
[hhtxzzj@localhost shellTest]$ ./shellTest.sh
^Cget SIGINT.
Signal 0:
在上头的kill -l 中, 可以看到并没有Signal 0
Signal 0 是一个特别的型号, POSIX.1 中定义为空信号, 当程序退出时被触发, 常用来确定一个进程是否存在
仍然可以用trap进行动作指定
栗子:
function signal_handler {
    echo "get SIGNAL 0."
    echo "sleep done."
}
trap signal_handler 0
echo "sleep 5s"
for((i=0;i<5;++i))
do
    echo $[5-$[i]]
    sleep 1
done
[hhtxzzj@localhost ~]$  /bin/bash "/home/hhtxzzj/shellTest/shellTest.sh"
sleep 5s
5
4
3
2
1
get SIGNAL 0.
sleep done.
作业 & 作业控制:
当我们为完成一些复杂的任务而将多个命令通过 |,>,<, ;, (,) 等组合在一起时,通常这个命令序列会启动多个进程,它们间通过管道等进行通信。而有时在执行一个任务的同时,还有其他的任务需要处理,那么就经常会在命令序列的最后加上一个&,或者在执行命令后,按下 CTRL+Z 让前一个命令暂停。以便做其他的任务。等做完其他一些任务以后,再通过 fg 命令把后台任务切换到前台。这样一种控制过程通常被成为作业控制,而那些命令序列则被成为作业,这个作业可能涉及一个或者多个程序,一个或者多个进程。
创建后台进程, 获取进程的作业号 & 进程号
之前讲到, 在命令后头加上一个 & 就能将命令切换到后台执行
此时命令行会返回一个进程的作业号 & 进程号, 如下
[hhtxzzj@localhost shellTest]$ sleep 60 &
[1] 2810
小栗子:
function signal_handler {
    echo "get SIGNAL 0."
    echo "sleep done."
}
trap signal_handler 0
sleepTime=10
echo "sleep ${sleepTime}s"
for((i=0;i<${sleepTime};++i))
do
    echo $[${sleepTime}-$[i]]
    sleep 1
done
[hhtxzzj@localhost shellTest]$ ./shellTest.sh
sleep 10s
10
9
^Z
[1]+  Stopped                 ./shellTest.sh
[hhtxzzj@localhost shellTest]$ jobs
[1]+  Stopped                 ./shellTest.sh
[hhtxzzj@localhost shellTest]$ fg %1
./shellTest.sh
8
7
6
5
4
3
2
1
get SIGNAL 0.
sleep done.
完成了以下操作
-
运行一个进程shellTest.sh
-
暂停该进程
使用
Ctrl+Z可暂停当前在前台执行的进程 -
查看当前作业情况
使用
jobs命令jobs用于显示放到后台执行的进程
常用参数:
无参数: 显示 【任务ID】 状态status 程序名 -l 显示后台进程的信息,显示格式 [Job ID] [+-] PID CMD (当前任务用+表示,其他非当前为-) -p 只显示PID -r 只显示运行重的进程,任务的状态可为running、Terminated、stopped、done等 -
启动该进程并移至前台进行
使用fg命令
bg
将一个在后台暂停的命令,变成继续执行fg
将后台中的命令调至前台继续运行语法格式:
fg %工作号
bg %工作号
其中工作号就是
jobs中显示出的任务ID
网络操作:
这里要和计网联动
教程中这部分内容很少, 基本上没啥有用的
主要涉及到各个命令的使用
这里直接看教程
范例:通过dhclient获取IP地址
如果所在的局域网有 DHCP 服务,那么可以这么获取,N 是设备名称,如果只有一块网卡,一般是 0 或者 1 。
$ dhclient ethN
范例:静态配置IP地址
当然,也可以考虑采用静态配置的方式,ip_address 是本地主机的 IP 地址,gw_ip_address 是接入网络的网关的 IP 地址。
$ ifconfig eth0 ip_address on
$ route add deafult gw gw_ip_address
如果上面不工作,记得通过 ifconfig/mii-tool/ethtool 等工具检查网卡是否有被驱动起来,然后通过 lspci/dmesg 等检查网卡类型(或者通过主板手册和独立网卡自带的手册查看),接着安装或者编译相关驱动,最后把驱动通过 insmod/modprobe 等工具加载到内核中。
用 Linux 搭建网桥
网桥工作在 OSI 模型的第二层,即数据链路层,它只需要知道目标主机的 MAC 地址就可以工作。 Linux 内核在 2.2 开始就已经支持了这个功能,具体怎么配置看看后续参考资料吧。如果要把 Linux 主机配置成一个网桥,至少需要两个网卡。
网桥的作用相当于一根网线,用户无须关心里头有什么东西,把它的两个网口连接到两个主机上就可以让这两个主机支持相互通信。不过它比网线更厉害,如果配上防火墙,就可以隔离连接在它两端的网段(注意这里是网络,因为它不识别 IP),另外,如果这个网桥有多个网口,那么可以实现一个功能复杂的交换机,而如果有效组合多个网桥,则有可能实现一个复杂的可实现流量控制和负载平衡的防火墙系统。
用 Linux 做路由
路由工作在 OSI 模型的第三层,即网络层,通过 router 可以配置 Linux 的路由,当然,Linux 下也有很多工具支持动态路由的。相关的资料在网路中铺天盖地,由于时间关系,这里不做介绍。
用 Linux 搭建各种常规的网络服务
需要什么网络服务呢?
- 给局域网弄个
DHCP服务器,那就弄个dhcpd,看看参考资料; - 如果想弄个邮件发送服务器,那就安装个
sendmail或者exim4; - 如果再想弄个邮件列表服务器呢,那就装个
mailman; - 如果想弄个接收邮件的服务器呢,那就安装个
pop3服务器; - 如果想弄个
web站点,那就弄个apache或者nginx服务器; - 如果想弄上防火墙服务,那么通过
iptables工具配置netfilter就可以
What’s more?如果你能想到,Linux上基本都有相应的实现。
Linux 下网络问题诊断与维护
如果出现网络问题,不要惊慌,逐步检查网络的各个层次:物理链接、链路层、网络层直到应用层,熟悉使用各种如下的工具,包括 ethereal/tcpdump,hping,nmap,netstat,netpipe,netperf,vnstat,ntop 等。
关于这些工具的详细用法和网络问题诊断和维护的相关知识,请看后续相关资料。
Linux 下网络编程与开发
如果想做网络编程开发,比如:
- 要实现一个客户端
/服务器架构的应用,可以采用 Linux 下的socket编程了; - 如果想写一个数据包抓获和协议分析的程序,可以采用
libpap等函数库; - 如果想实现某个协议呢,那就可以参考相关的
RFC文档,并通过socket编程来实现。
这个可以参考相关的 Linux socket 编程等资料。
最后
以上就是生动保温杯最近收集整理的关于Shell编程实战范例前言:数值运算:布尔运算字符串操作:文件操作:文件系统操作:进程操作:网络操作:的全部内容,更多相关Shell编程实战范例前言内容请搜索靠谱客的其他文章。


发表评论 取消回复