文章目录
- 1. Torchvison模型推理
- 2. Pytorch -> Onnx
- 3. Opencv 调用 Onnx
- 4. Onnxruntime 调用 Onnx
- 5. C++调用Onnx
- 6. Onnx模型查看器:
1. Torchvison模型推理
import torch
import torchvision
import cv2
import onnx
import numpy as np
import timm
import os
from PIL import Image
from torchvision import transforms
import onnxruntime
from onnxsim import simplify

print(torch.__version__)
print(cv2.__version__)
print(np.__version__)
print(onnx.__version__)
classes = None
class_file = r'F:PycharmPyCharm_StudyOthersONNXOpencv-Onnxclassification_classes_ILSVRC2012.txt'
with open(class_file, 'rt') as f:
    classes = f.read().rstrip('n').split('n')

def init_model(model_name):
    if model_name == 'alexnet':
        model = torchvision.models.alexnet(pretrained=True)
    if model_name == 'densnet':
        model = torchvision.models.densenet121(pretrained=True)
    if model_name == 'resnet':
        model = torchvision.models.resnet50(pretrained=True)
    if model_name == 'mobilenet':
        model = torchvision.models.mobilenet_v2(pretrained=True)
    if model_name == 'squeezenet':
        model = torchvision.models.squeezenet1_1(pretrained=True)
    if model_name == 'inception':
        model = torchvision.models.inception_v3(pretrained=False)
    if model_name == 'googlenet':
        model = torchvision.models.googlenet(pretrained=True)
    if model_name == 'vgg16':
        model = torchvision.models.vgg16(pretrained=True)
    if model_name == 'vgg19':
        model = torchvision.models.vgg19(pretrained=True)
    if model_name == 'shufflenet':
        model = torchvision.models.shufflenet_v2_x1_0(pretrained=True)
    if model_name == 'cspdarknet53':
        model = timm.create_model('cspdarknet53', pretrained=True)
    if model_name == 'seresnet18':
        model = timm.create_model('seresnet18', pretrained=True)
    if model_name == 'senet154':
        model = timm.create_model('senet154', pretrained=True)
    if model_name == 'seresnet50':
        model = timm.create_model('seresnet50', pretrained=True)
    if model_name == 'resnest50d':
        model = timm.create_model('resnest50d', pretrained=True)
    if model_name == 'skresnet50':
        model = timm.create_model('skresnet50', pretrained=True)
    model.eval()
    if model_name == 'inception':
        dummy = torch.randn(1, 3, 299, 299)
    else:
        dummy = torch.randn(1, 3, 224, 224)
    return model, dummy

device = torch.device("cuda:0" if torch.cuda.is_available() else "cpu")
model, dummy = init_model('vgg16')
model = model.to(device)
dummy = dummy.to(device)

img_file = r'F:PycharmPyCharm_StudyOthersONNXOpencv-Onnxdog.jpg'

################################torchvison模型推理#####################################
transform = transforms.Compose([  # [1]
    transforms.Resize(256),  # [2]
    transforms.CenterCrop(224),  # [3]
    transforms.ToTensor(),  # [4]
    transforms.Normalize(  # [5]
        mean=[0.485, 0.456, 0.406],  # [6]
        std=[0.229, 0.224, 0.225]  # [7]
    )])

img = Image.open(img_file)
img_t = transform(img).to(device) # 输入给模型的图像数据要先进行转换
batch_t = torch.unsqueeze(img_t, 0)
tc_out = model(batch_t).detach().cpu().numpy()
# Get a class with a highest score.
tc_out = tc_out.flatten()
classId = np.argmax(tc_out)
confidence = tc_out[classId]

label = '%s: %.4f' % (classes[classId] if classes else 'Class #%d' % classId, confidence)
print(label)
################################ torchvison模型推理 ######################################
classification_classes_ILSVRC2012.txt: 下载链接
dog.jpg:

Torchvison模型推理的结果:
French bulldog: 19.8963
2. Pytorch -> Onnx
################################ pytorch转Onnx ######################################
onnx_name = 'vgg16.onnx'
torch.onnx.export(model, dummy, onnx_name)

# 模型测试(可跳过)
print("----- 模型测试 -----")
# 可以跳过该步骤,一般不会有问题
# 检查输出
def check_onnx_output(filename, input_data, torch_output):
    session = onnxruntime.InferenceSession(filename)
    input_name = session.get_inputs()[0].name
    result = session.run([], {input_name: input_data.detach().cpu().numpy()})
    for test_result, gold_result in zip(result, torch_output.values()):
        np.testing.assert_almost_equal(
            gold_result.cpu().numpy(), test_result, decimal=3,
        )
    return result
# 检查模型
def check_onnx_model(model, onnx_filename, input_image):
    with torch.no_grad():
        torch_out = {"output": model(input_image)}
    check_onnx_output(onnx_filename, input_image, torch_out)
    onnx_model = onnx.load(onnx_filename)
    onnx.checker.check_model(onnx_model)
    print("模型测试成功")
    return onnx_model
# 检测导出的onnx模型是否完整
# 一般出现问题程序直接报错,不过很少出现问题
onnx_model = check_onnx_model(model, onnx_name, dummy)

# -----  模型简化
print("-----  模型简化 -----")
# 基于onnx-simplifier简化模型,https://github.com/daquexian/onnx-simplifier
# 也可以命令行输入python3 -m onnxsim input_onnx_model output_onnx_model
# 或者使用在线网站直接转换https://convertmodel.com/

# 输出模型名
filename = onnx_name + "sim.onnx"
# 简化模型
# 设置skip_fuse_bn=True表示跳过融合bn层,pytorch高版本融合bn层会出错
simplified_model, check = simplify(onnx_model, skip_fuse_bn=True)
onnx.save_model(simplified_model, filename)
onnx.checker.check_model(simplified_model)
# 如果出错
assert check, "简化模型失败"
print("模型简化成功")
################################ pytorch转Onnx ######################################
3. Opencv 调用 Onnx
################################ Opencv dnn 调用 Onnx #####################################
# 载入onnx模块
model_ = onnx.load(onnx_name)
# 检查IR是否良好
onnx.checker.check_model(model_)
# opencv dnn加载
net = cv2.dnn.readNetFromONNX(onnx_name)

frame = cv2.imread(img_file)
# Create a 4D blob from a frame.
inpWidth = dummy.shape[-2]
inpHeight = dummy.shape[-2]
# blob = cv2.dnn.blobFromImage(frame, size=(inpWidth, inpHeight), crop=False)
blob = cv2.dnn.blobFromImage(frame,
                             scalefactor=1.0 / 255,
                             size=(inpWidth, inpHeight),
                             mean=[0.485, 0.456, 0.406],
                             swapRB=True,
                             crop=False)
# Run a model
net.setInput(blob)
out = net.forward()
print(out.shape)        # 得到推理的结果

# Get a class with a highest score.
out = out.flatten()
classId = np.argmax(out)
confidence = out[classId]

# Put efficiency information.
t, _ = net.getPerfProfile()
label = 'Inference time: %.2f ms' % (t * 1000.0 / cv2.getTickFrequency())
print(label)
cv2.putText(frame, label, (0, 15), cv2.FONT_HERSHEY_SIMPLEX, 0.5, (0, 0, 255))

# Print predicted class.
label = '%s: %.4f' % (classes[classId] if classes else 'Class #%d' % classId, confidence)
print(label)
cv2.putText(frame, label, (0, 40), cv2.FONT_HERSHEY_SIMPLEX, 0.5, (0, 0, 255))
winName = 'onnx'

cv2.imshow(winName, frame)
cv2.waitKey(0)
cv2.destroyAllWindows()
################################ Opencv dnn 调用 Onnx #####################################
结果:
Inference time: 118.06 ms
diaper, nappy, napkin: 11.8783

对比Torchvision推理结果出现错误。
4. Onnxruntime 调用 Onnx
################################ Onnxruntime 调用 Onnx #####################################
transform = transforms.Compose([  # [1]
    transforms.Resize(256),  # [2]
    transforms.CenterCrop(224),  # [3]
    transforms.ToTensor(),  # [4]
    transforms.Normalize(  # [5]
        mean=[0.485, 0.456, 0.406],  # [6]
        std=[0.229, 0.224, 0.225]  # [7]
    )])
img = Image.open(img_file)
img_t = transform(img)              # 输入给模型的图像数据要先进行转换
batch_t = torch.unsqueeze(img_t, 0)
img_np = batch_t.cpu().numpy()


OnnxR_model = 'vgg16.onnx'
session = onnxruntime.InferenceSession(OnnxR_model)
#compute ONNX Runtime output prediction
inputs = {session.get_inputs()[0].name: img_np}
outs = session.run(None, inputs)[0]

# Get a class with a highest score.
outs = outs.flatten()
classId = np.argmax(outs)
print(classId)
confidence = outs[classId]

# Print predicted class.
label = '%s: %.4f' % (classes[classId] if classes else 'Class #%d' % classId, confidence)
print(label)
img = cv2.cvtColor(np.asarray(img),cv2.COLOR_RGB2BGR)    # PIL转OpenCV格式
cv2.putText(img, label, (0, 15), cv2.FONT_HERSHEY_SIMPLEX, 0.5, (0, 0, 255))
winName = 'onnx'

cv2.imshow(winName, img)
cv2.waitKey(0)
cv2.destroyAllWindows()
################################ Onnxruntime 调用 Onnx #####################################
结果:
French bulldog: 19.8963
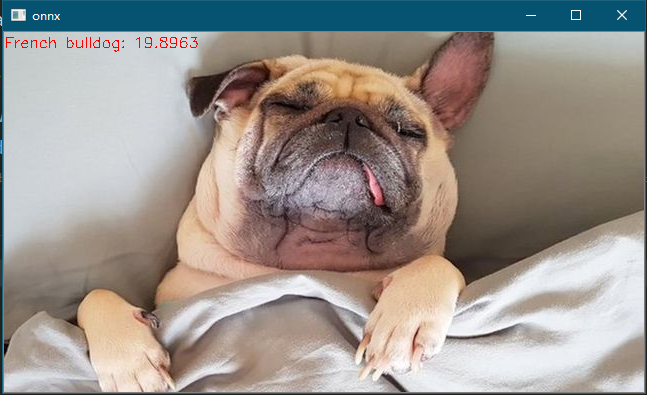
结果与Torchvision推理结果一致
小结:
1 .cv2.dnn调用Onnx结果出现错误(某位大佬推测:opencv的那个包只能做二维的pooling层,不能做三维的。)
2. 使用onnxruntime调用onnx,预测的结果更准确
5. C++调用Onnx
//###############################c++ 调用 Onnx#####################################
c++调用onnx的推理结果
// opencv 推理
cv::dnn::Net net = cv::dnn::readNetFromONNX("save.onnx");  // 加载训练好的识别模型
cv::Mat image = cv::imread("numbers/1.bmp");  // 读取图片
cv::Mat blob = cv::dnn::blobFromImage(image);  // 由图片加载数据 这里还可以进行缩放、归一化等预处理
net.setInput(blob);  // 设置模型输入
cv::Mat predict = net.forward(); // 推理出结果
//###############################c++ 调用 Onnx#####################################
亲测: https://blog.csdn.net/qq_44747572/article/details/121467657
6. Onnx模型查看器:
Onnx模型在线查看器:https://netron.app/
app下载:https://www.electronjs.org/apps/netron
参考:
1.https://blog.csdn.net/weixin_44391370/article/details/120804541?spm=1001.2014.3001.5501
2.https://blog.csdn.net/ouening/article/details/109245243
3.https://blog.csdn.net/MrTianShu/article/details/118219547
4.https://blog.csdn.net/weixin_34910922/article/details/113956622
5.https://blog.csdn.net/LuohenYJ/article/details/110940031
最后
以上就是沉默发卡最近收集整理的关于Pytorch网络模型转Onnx格式,多种方法(opencv、onnxruntime、c++)调用Onnx1. Torchvison模型推理2. Pytorch -> Onnx3. Opencv 调用 Onnx4. Onnxruntime 调用 Onnx5. C++调用Onnx6. Onnx模型查看器:的全部内容,更多相关Pytorch网络模型转Onnx格式,多种方法(opencv、onnxruntime、c++)调用Onnx1.内容请搜索靠谱客的其他文章。


发表评论 取消回复