我是靠谱客的博主 唠叨钢笔,这篇文章主要介绍Java web验证码——kaptcha的三种配置方式Java web验证码——kaptcha的使用(1)Java web验证码——kaptcha的使用(2)Java web验证码——kaptcha的使用(3),现在分享给大家,希望可以做个参考。
Java web验证码——kaptcha的3种使用方式
Java web验证码——kaptcha的3种使用方式
- Java web验证码——kaptcha的使用(1)
- ——通过XML配置文件配置
- 一. 配置kaptcha的jar包
- pom.xml配置:
- commons-fileupload配置:
- 二.kaptcha样式配置
- web.xml:配置kaptcha的servlet及部分样式
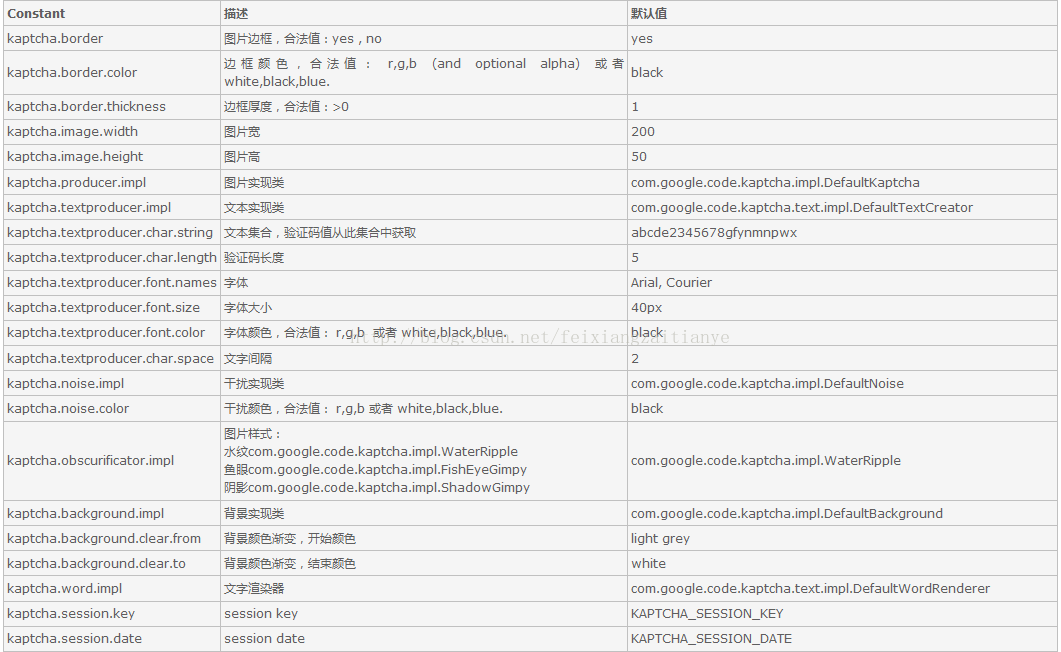
- kaptcha详细参数:
- 三.后端验证
- 前端页面:
- 前端部分js代码:
- 四.注意(记得配置文件解析)
- Java web验证码——kaptcha的使用(2)
- ——创建kaptcha 的配置文件对应实体类
- 一. 配置kaptcha的jar包
- 二.kaptcha样式配置
- Java web验证码——kaptcha的使用(3)
- ——创建kaptcha 的配置文件对应实体类
- 一. 配置kaptcha的jar包
- 二.kaptcha样式配置
- application.yml/application.properties中文件配置:
- 配置类 MvcConfiguration.java
- Controller层验证:
代码资源可从本博客资源中下载,地址:https://download.csdn.net/download/weixin_43666414/14170054
通过调用kaptcha依赖使用验证码本人总结有3中方式:
1:直接通过XML配置文件使用:使用.xml的配置方式配置生成kaptcha的bean对象,在启动类上@ImportResource这个xml文件
2:创建实体Bean对象:把kaptcha作为工程的一个类,加上@component注解在返回kaptcha的方法中加上@Bean注解,再在controller中注入其对象。
3:使用属性文件*.yml配置相关验证码属性
下面介绍第一种方法:
Java web验证码——kaptcha的使用(1)
——通过XML配置文件配置
方式一借鉴自其他作者:[创建原作者链接](https://www.cnblogs.com/lyq-biu/p/10853830.html)
通过使用.xml的配置方式配置生成kaptcha的bean对象,在启动类上@ImportResource这个xml文件;在controller中注入其对象并使用
一. 配置kaptcha的jar包

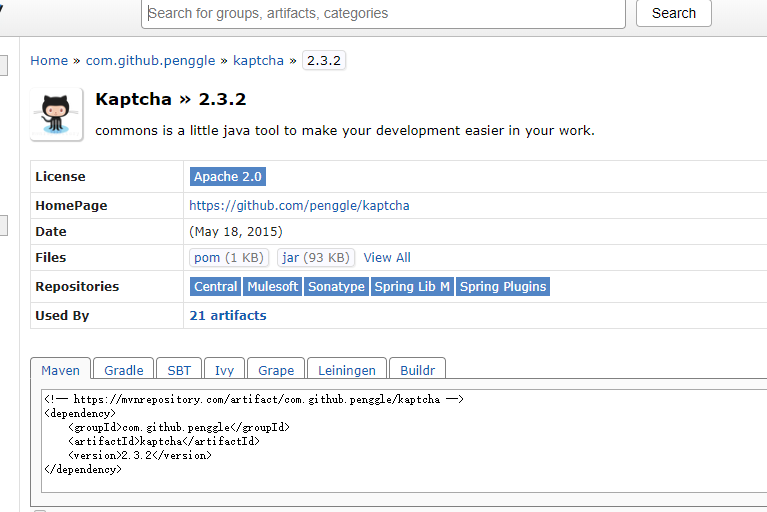
pom.xml配置:
<-- 目前只有2.3.2版本-->
<!-- https://mvnrepository.com/artifact/com.github.penggle/kaptcha -->
        <dependency>
            <groupId>com.github.penggle</groupId>
            <artifactId>kaptcha</artifactId>
            <version>2.3.2</version>
        </dependency>
依赖jar包 (commons-fileupload):支持多文件上传
commons-fileupload配置:
<!-- https://mvnrepository.com/artifact/commons-fileupload/commons-fileupload -->
        <!-- 上传文件 -->
        <dependency>
            <groupId>commons-fileupload</groupId>
            <artifactId>commons-fileupload</artifactId>
            <version>1.4</version>
        </dependency>
二.kaptcha样式配置
web.xml:配置kaptcha的servlet及部分样式
<servlet>
        <servlet-name>Kaptcha</servlet-name>
        <servlet-class>com.google.code.kaptcha.servlet.KaptchaServlet</servlet-class>
        <!-- 定义验证码样式 -->
        <!-- 是否有边框 -->
        <init-param>
            <param-name>kaptcha.border</param-name>
            <!-- 没有边框 no -->
            <param-value>no</param-value>
        </init-param>
        <!-- 字体颜色 -->
        <init-param>
            <param-name>kaptcha.textproducer.font.color</param-name>
            <param-value>red</param-value>
        </init-param>
        <!-- 图片宽度 -->
        <init-param>
            <param-name>kaptcha.image.width</param-name>
            <param-value>135</param-value>
        </init-param>
        <!-- 使用哪些字符生成验证码 -->
        <init-param>
            <param-name>kaptcha.textProducer.char.string</param-name>
            <param-value>ACDEFHKPRSTWX345679</param-value>
        </init-param>
        <!-- 图片高度 -->

        <init-param>
            <param-name>kaptcha.image.height</param-name>
            <param-value>50</param-value>
        </init-param>
        <!-- 字体大小 -->
        <init-param>
            <param-name>kaptcha.textproducer.font.size</param-name>
            <param-value>43</param-value>
        </init-param>
        <!-- 干扰线的颜色 -->
        <init-param>
            <param-name>kaptcha.noise.color</param-name>
            <param-value>black</param-value>
        </init-param>
        <!-- 验证码字符个数 -->
        <init-param>
            <param-name>kaptcha.textproducer.char.length</param-name>
            <param-value>4</param-value>
        </init-param>
            <!-- 字体 -->
        <init-param>
            <param-name>kaptcha.textproducer.font.names</param-name>
            <param-value>Aria</param-value>
        </init-param>
    </servlet>
    <servlet-mapping>
    <servlet-name>Kaptcha</servlet-name>
    <url-pattern>/Kaptcha</url-pattern>
    </servlet-mapping>
kaptcha详细参数:

三.后端验证
从前端接收验证码并验证是否正确:
import javax.servlet.http.HttpServletRequest;

public class CodeUtil {
    public static boolean checkVerifyCode(HttpServletRequest request) {
        String verifyCodeExpected = (String) request.getSession()
                .getAttribute(com.google.code.kaptcha.Constants.KAPTCHA_SESSION_KEY);
        String verifyCodeActual = HttpServletRequestUtil.getString(request, "verifyCodeActual");
        if (verifyCodeActual == null || !verifyCodeActual.equals(verifyCodeExpected)) {
            return false;

        }
        return true;
    }
}
前端页面:
<!DOCTYPE html>
<html lang="en">
<head>
<meta charset="utf-8"/>
<meta http-equiv="X-UA-Compatible" content="IE=edge"/>
<title>SUI Mobile Demo</title>
<meta name="description"
      content="MSUI: Build mobile apps with simple HTML, CSS, and JS components."/>
<meta name="author" content="阿里巴巴国际UED前端"/>
<meta name="viewport" content="initial-scale=1, maximum-scale=1"/>
<link rel="shortcut icon" href="/favicon.ico"/>
<meta name="apple-mobile-web-app-capable" content="yes"/>
<meta name="apple-mobile-web-app-status-bar-style" content="black"/>
<meta name="format-detection" content="telephone=no"/>
<!-- Google Web Fonts -->
<link rel="stylesheet"
      href="//g.alicdn.com/msui/sm/0.6.2/css/sm.min.css"/>
<link rel="stylesheet"
      href="//g.alicdn.com/msui/sm/0.6.2/css/sm-extend.min.css"/>
<link rel="apple-touch-icon-precomposed"
      href="/assets/img/apple-touch-icon-114x114.png"/>
</head>
<body>
    <h2>HHHHHHHHHHHHHHHHHHHHHHHHHHHHHHHHH</h2>
    <div class="item-content">
        <div class="item-inner">
            <div class="item-title label">验证码</div>
            <input type="text" id="j_captcha" placeholder="验证码"/>
            <div class="item-input">
                <img id="captcha_img" alt="点击更换" title="点击更换"
                     onclick="changeVerifyCode(this)" src="../Kaptcha" />
            </div>
        </div>
    </div>

    <script type='text/javascript'
            src='//g.alicdn.com/sj/lib/zepto/zepto.min.js' charset='utf-8'></script>
    <script type='text/javascript'
            src='//g.alicdn.com/msui/sm/0.6.2/js/sm.min.js' charset='utf-8'></script>
    <script type='text/javascript'
            src='//g.alicdn.com/msui/sm/0.6.2/js/sm-extend.min.js' charset='utf-8'></script>
    <script type="text/javascript">
        function changeVerifyCode(img) {
            img.src = "../Kaptcha?" + Math.floor(Math.random() * 100);
        }

        $('#submit').click(function(){
            var verifyCodeActual = $('#j-kaptcha').val();
            if(!verifyCodeActual) {
                $.toast('请输入验证码');
                return;
            }
            formData.append('verifyCodeActual', verifyCodeActual);
            $.ajax({
                url: registerShopUrl,
                type: 'POST',
                data: formData,
                contentType: false,
                processData: false,
                cache: false,
                success: function(data) {
                    if(data.success) {
                        $.toast('提交成功!');
                    }else {
                        $.toast('提交失败!' + data.errMsg);
                    }
                    $('kaptcha-img').click();
                }
            });
        });
    </script>
</body>
</html>
前端部分js代码:
.....
<!-- 获取输入框验证码-->
var verifyCodeActual=$('#j_captcha').val();
            if(!verifyCodeActual){
                $.toast("请输出验证码");
                return;
            }
<!--通过ajax异步提交-->
            formData.append('verifyCodeActual',verifyCodeActual);
            $ajax({
                url:registerShopUrl,
                type:'POST',
                data:formData,
                contentType:false,
                processData:false,
                cacche:false,
                success:function(data){
                     if(data.success){
                         $.toast("提交成功");
                     }
                     else{
                         $.toast("提交失败:"+data.errMsg);
                     }
                     $('#captcha_img').click();
                }
            })
四.注意(记得配置文件解析)
#### 文件解析器配置(不然获取到的验证码为空):
<!-- 文件上传解析器 -->
    <bean id="multipartResolver"
        class="org.springframework.web.multipart.commons.CommonsMultipartResolver">
        <!-- 默认编码 -->
        <property name="defaultEncoding" value="utf-8"></property>
        <!-- 上传文件的最大 尺寸(单位是字节)-->
        <!-- 1024*1024*20=20971520 -->
        <property name="maxUploadSize" value="20971520"></property>
        <!-- 允许写在内存中的最大值 -->
        <property name="maxInMemorySize" value="20971520"></property>

    </bean>
Java web验证码——kaptcha的使用(2)
——创建kaptcha 的配置文件对应实体类
把kaptcha作为工程的一个类,加上@component注解在返回kaptcha的方法中加上@Bean注解,再在controller中注入其对象。
一. 配置kaptcha的jar包
区别主要在第二步,其余步骤基本同上方式一相同,在此省略。
二.kaptcha样式配置
package com.cun.conf;

import java.util.Properties;

import org.springframework.context.annotation.Bean;
import org.springframework.stereotype.Component;

import com.google.code.kaptcha.impl.DefaultKaptcha;
import com.google.code.kaptcha.util.Config;

@Component
public class KaptchaConfig {
	@Bean
	public DefaultKaptcha getDefaultKaptcha() {
		com.google.code.kaptcha.impl.DefaultKaptcha defaultKaptcha = new com.google.code.kaptcha.impl.DefaultKaptcha();
		Properties properties = new Properties();
		// 图片边框
		properties.setProperty("kaptcha.border", "yes");
		// 边框颜色
		properties.setProperty("kaptcha.border.color", "105,180,90");
		// 字体颜色
		properties.setProperty("kaptcha.textproducer.font.color", "red");
		// 图片宽
		properties.setProperty("kaptcha.image.width", "135");
		// 图片高
		properties.setProperty("kaptcha.image.height", "50");
		// 字体大小
		properties.setProperty("kaptcha.textproducer.font.size", "45");
		// session key
		properties.setProperty("kaptcha.session.key", "code");
		// 验证码长度
		properties.setProperty("kaptcha.textproducer.char.length", "4");
		// 字体
		properties.setProperty("kaptcha.textproducer.font.names", "Aria,楷体,微软雅黑");
		Config config = new Config(properties);
		defaultKaptcha.setConfig(config);

		return defaultKaptcha;
	}
}
Java web验证码——kaptcha的使用(3)
——创建kaptcha 的配置文件对应实体类
一. 配置kaptcha的jar包
区别主要在第二步,其余步骤基本同上方式一相同,在此省略。在这里插入代码片
二.kaptcha样式配置
application.yml/application.properties中文件配置:
server.port=8080
#以 http://localhost:8080/o2o/ 访问
server.context-path=/
#spring.thymeleaf.prefix=classpath:/templates/
spring.mvc.view.prefix=classpath:/templates/
spring.mvc.view.suffix=.html
#Kaptcha的配置
kaptcha.border=1
kaptcha.textproducer.font.color=red
kaptcha.image.width=135
kaptcha.textproducer.char.string=ACDEFHKPRSTWX345679
kaptcha.image.height=50
kaptcha.textproducer.font.size=43
kaptcha.noise.color=black
kaptcha.textproducer.char.length=4
kaptcha.textproducer.font.names=Arial
配置类 MvcConfiguration.java
package com.example.kaptcha1.config;

import com.google.code.kaptcha.servlet.KaptchaServlet;
import org.springframework.beans.BeansException;
import org.springframework.beans.factory.annotation.Value;
import org.springframework.boot.web.servlet.ServletRegistrationBean;
import org.springframework.context.ApplicationContext;
import org.springframework.context.ApplicationContextAware;
import org.springframework.context.annotation.Bean;
import org.springframework.context.annotation.Configuration;
import org.springframework.web.servlet.config.annotation.EnableWebMvc;
import org.springframework.web.servlet.config.annotation.WebMvcConfigurerAdapter;

import javax.servlet.ServletException;

@Configuration
@EnableWebMvc
public class MvcConfiguration extends WebMvcConfigurerAdapter implements ApplicationContextAware {
    // 获取Spring容器
    private ApplicationContext applicationContext;

    @Value("${kaptcha.border}")
    private String border;

    @Value("${kaptcha.textproducer.font.color}")
    private String fcolor;

    @Value("${kaptcha.image.width}")
    private String width;

    @Value("${kaptcha.textproducer.char.string}")
    private String cString;

    @Value("${kaptcha.image.height}")
    private String height;

    @Value("${kaptcha.textproducer.font.size}")
    private String fsize;

    @Value("${kaptcha.noise.color}")
    private String nColor;

    @Value("${kaptcha.textproducer.char.length}")
    private String clength;

    @Value("${kaptcha.textproducer.font.names}")
    private String fnames;

    /**
     * 由于web.xml不生效了,需要在这里配置Kaptcha验证码Servlet
     */
    @Bean
    public ServletRegistrationBean servletRegistrationBean() throws ServletException {
        ServletRegistrationBean servlet = new ServletRegistrationBean(new KaptchaServlet(), "/Kaptcha");
        servlet.addInitParameter("kaptcha.border", border);// 无边框
        servlet.addInitParameter("kaptcha.textproducer.font.color", fcolor); // 字体颜色
        servlet.addInitParameter("kaptcha.image.width", width);// 图片宽度
        servlet.addInitParameter("kaptcha.textproducer.char.string", cString);// 使用哪些字符生成验证码
        servlet.addInitParameter("kaptcha.image.height", height);// 图片高度
        servlet.addInitParameter("kaptcha.textproducer.font.size", fsize);// 字体大小
        servlet.addInitParameter("kaptcha.noise.color", nColor);// 干扰线的颜色
        servlet.addInitParameter("kaptcha.textproducer.char.length", clength);// 字符个数
        servlet.addInitParameter("kaptcha.textproducer.font.names", fnames);// 字体
        return servlet;
    }


    @Override
    public void setApplicationContext(ApplicationContext applicationContext) throws BeansException {
        this.applicationContext = applicationContext;
    }
}
Controller层验证:
package com.example.kaptcha1.Controller;

import com.google.code.kaptcha.Constants;
import com.google.code.kaptcha.Producer;
import org.springframework.beans.factory.annotation.Autowired;
import org.springframework.stereotype.Controller;
import org.springframework.web.bind.annotation.RequestMapping;

import javax.imageio.ImageIO;
import javax.servlet.ServletOutputStream;
import javax.servlet.http.HttpServletRequest;
import javax.servlet.http.HttpServletResponse;
import javax.servlet.http.HttpSession;
import java.awt.image.BufferedImage;

@Controller
public class CodeController {
    @Autowired
    private Producer captchaProducer = null;
    @RequestMapping("/kaptcha")
    public void getKaptchaImage(HttpServletRequest request, HttpServletResponse response) throws Exception {
        HttpSession session = request.getSession();
        response.setDateHeader("Expires", 0);
        response.setHeader("Cache-Control", "no-store, no-cache, must-revalidate");
        response.addHeader("Cache-Control", "post-check=0, pre-check=0");
        response.setHeader("Pragma", "no-cache");
        response.setContentType("image/jpeg");
        //生成验证码
        String capText = captchaProducer.createText();
        session.setAttribute(Constants.KAPTCHA_SESSION_KEY, capText);
        //向客户端写出
        BufferedImage bi = captchaProducer.createImage(capText);
        ServletOutputStream out = response.getOutputStream();
        ImageIO.write(bi, "jpg", out);
        try {
            out.flush();
        } finally {
            out.close();
        }
    }
}
###至此 三种kaptcha配置验证码的方式介绍完毕(码字不易,如果有帮助请给上小星星,嘻嘻)。
最后
以上就是唠叨钢笔最近收集整理的关于Java web验证码——kaptcha的三种配置方式Java web验证码——kaptcha的使用(1)Java web验证码——kaptcha的使用(2)Java web验证码——kaptcha的使用(3)的全部内容,更多相关Java内容请搜索靠谱客的其他文章。
本图文内容来源于网友提供,作为学习参考使用,或来自网络收集整理,版权属于原作者所有。


发表评论 取消回复