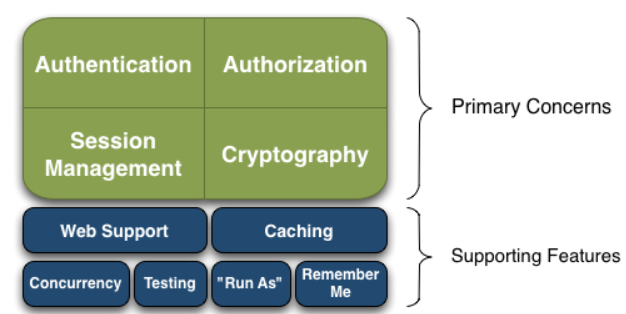
Shiro是java的一个安全框架,提供了认证、授权、加密和会话管、与web集成、缓存理等功能,对于任何一个应用程序,Shiro都可以提供全面的安全管理服务。并且Shiro相对简单些。其基本功能点如下图所示:
 Shiro不会去维护用户、维护权限;这些需要我们自己去设计/提供;然后通过相应的接口注入给Shiro即可
从应用程序角度Shiro是如何完成工作的?
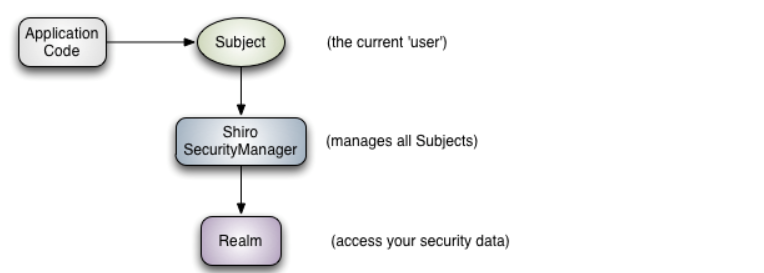

也就是说对于我们而言,最简单的一个 Shiro 应用:
-
应用代码通过 Subject 来进行认证和授权,而 Subject 又委托给 SecurityManager;
- 我们需要给 Shiro 的 SecurityManager 注入 Realm,从而让 SecurityManager 能得到合法的用户及其权限进行判断。
从以上也可以看出,Shiro 不提供维护用户 / 权限,而是通过 Realm 让开发人员自己注入。
Shiro的架构理解
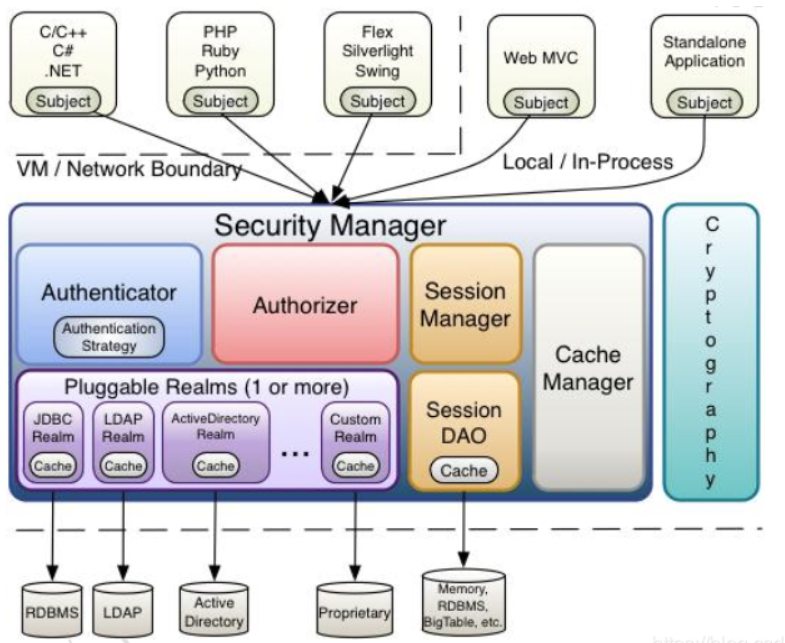
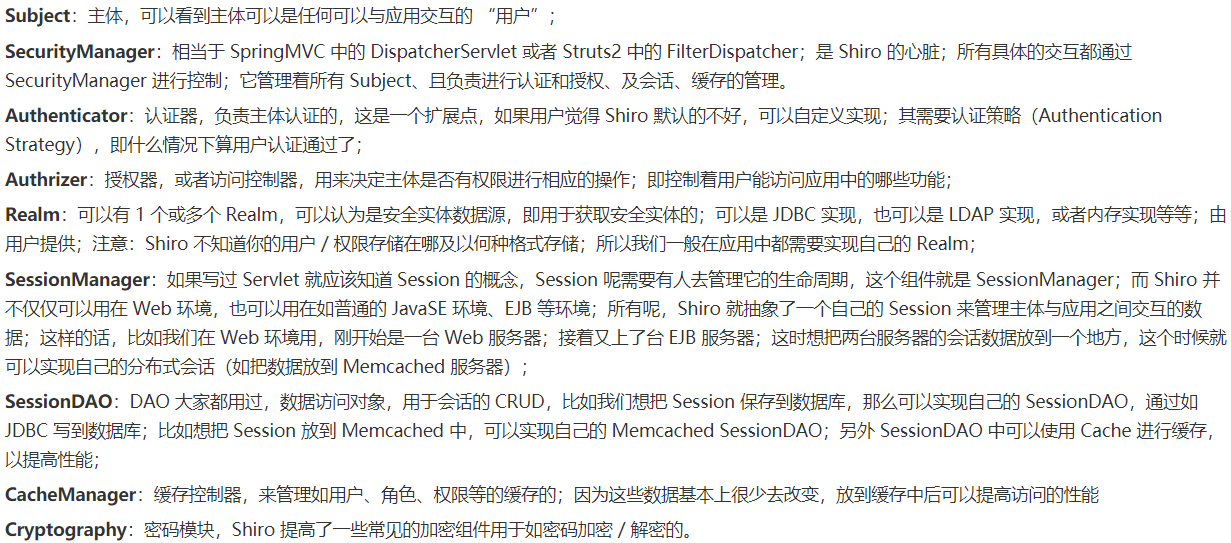
个人是这样看的,不使用框架时,需要我们自定义的完成认证(用户校验)与授权。现在由Shiro帮助我们完成这些功能,简化了我们的开发,只需要按照Shiro的API进行操作即可。直接上代码:
Spring整合Shiro时需要导入的依赖
    <dependency>
		<groupId>org.apache.shiro</groupId>
		<artifactId>shiro-core</artifactId>
		<version>1.2.3</version>
	</dependency>

	<dependency>
		<groupId>org.apache.shiro</groupId>
		<artifactId>shiro-web</artifactId>
		<version>1.2.3</version>
	</dependency>
	<dependency>
		<groupId>org.apache.shiro</groupId>
		<artifactId>shiro-spring</artifactId>
		<version>1.2.3</version>
	</dependency>
	<dependency>
		<groupId>org.apache.shiro</groupId>
		<artifactId>shiro-ehcache</artifactId>
		<version>1.2.3</version>
	</dependency>
	<dependency>
		<groupId>org.apache.shiro</groupId>
		<artifactId>shiro-quartz</artifactId>
		<version>1.2.3</version>
	</dependency>
在web.xml中配置shiroFilter
 <!-- 配置 shiro 拦截器 DelegatingFilterProxy通过代理模式将spring容器中的bean和filter关联起来
	  -->
     <filter>
        <filter-name>shiroFilter</filter-name>
        <filter-class>org.springframework.web.filter.DelegatingFilterProxy</filter-class>
      <!--  设置由Servlet容器控制filter的生命周期  -->
        <init-param>
            <param-name>targetFilterLifecycle</param-name>
            <param-value>true</param-value>
        </init-param>
        <!--  设置由Spring容器filter的bean id,如果不设置则找与filter-name一致的bean -->
        <init-param>
            <param-name>targetBeanName</param-name>
            <param-value>shiroFilter</param-value>
        </init-param>
    </filter>
    <filter-mapping>
        <filter-name>shiroFilter</filter-name>
        <url-pattern>/*</url-pattern>
	</filter-mapping>
添加spring-shiro.xml配置
<?xml version="1.0" encoding="UTF-8"?>
<beans xmlns="http://www.springframework.org/schema/beans"
	xmlns:xsi="http://www.w3.org/2001/XMLSchema-instance" xmlns:p="http://www.springframework.org/schema/p"
	xmlns:context="http://www.springframework.org/schema/context"
	xmlns:aop="http://www.springframework.org/schema/aop" xmlns:jee="http://www.springframework.org/schema/jee"
	xmlns:mvc="http://www.springframework.org/schema/mvc"
	xsi:schemaLocation="
			http://www.springframework.org/schema/beans http://www.springframework.org/schema/beans/spring-beans.xsd
			http://www.springframework.org/schema/context http://www.springframework.org/schema/context/spring-context.xsd
			http://www.springframework.org/schema/jee http://www.springframework.org/schema/jee/spring-jee.xsd
			http://www.springframework.org/schema/aop http://www.springframework.org/schema/aop/spring-aop.xsd
			http://www.springframework.org/schema/mvc http://www.springframework.org/schema/mvc/spring-mvc.xsd">
<!-- 配置 shiro 的核心组件:securityManager -->
	<bean id="securityManager"
	class="org.apache.shiro.web.mgt.DefaultWebSecurityManager">
	    <!-- 配置缓存 -->
	     <property name="cacheManager" ref="cacheManager"/>
	    <!-- 配置域realm,用户名,密码,角色都保存在域里:实现从数据库中获取用户信息,需要我们自己创建一个类(实现Realm接口) -->
	    <property name="realm" ref="usershiroRealm"/>
	    <!-- 会话管理 -->
	    <property name="sessionManager" ref="sessionManager"></property>
	</bean>

<!-- 配置ehcache缓存bean,导入ehcache并新建配置文件 -->
    <bean id="cacheManager" class="org.apache.shiro.cache.ehcache.EhCacheManager">
		<property name="cacheManagerConfigFile" value="classpath:shiro-ehcache.xml"/>
    </bean>

<!-- 配置自己域realm实现  -->
    <bean id="usershiroRealm" class="自己义realm的类路径">
    	<property name="credentialsMatcher" ref="credentialsMatcher" />
    </bean>
<!--加密器-->
	<bean id="credentialsMatcher"
	class="org.apache.shiro.authc.credential.HashedCredentialsMatcher">
		<!--加密算法-->
		<!-- <property name="hashAlgorithmName" value="md5" /> -->
		<!--散列次数-->
		<!-- <property name="hashIterations" value="2" /> -->
	</bean>
<!-- 配置shiro的一些拦截规则,id必须和web.xml中的 shiro 拦截器名一致 -->
    <bean id="shiroFilter" class="org.apache.shiro.spring.web.ShiroFilterFactoryBean">
		<!-- shiro的核心安全接口 -->
		<property name="securityManager" ref="securityManager" />
		<!-- loginUrl认证提交地址,如果没有认证将会请求此地址进行认证,
		请求此地址将由formAuthenticationFilter进行表单认证 -->
		 <property name="loginUrl" value="登录方法的路径" />
		<!-- 权限认证失败,则跳转到指定页面  及 登录后访问没有权限的页面后跳转的页面 -->
		 <property name="unauthorizedUrl"  value="/index.jsp" />
		<!-- Shiro连接约束配置,即过滤链的定义
		         注意:规则是有顺序的,从上到下,拦截范围必须是从小到大的 -->
		<property name="filterChainDefinitions">
			<value>
			<!--  url = 拦截规则(anon为匿名,authc为要登录后,才能访问,logout登出过滤) -->
				<!-- 匿名访问 -->
				login/forget.html=anon
				<!-- 静态资源放行 -->
				/static/**=anon
				/page/**=anon
				<!-- 不需要拦截的方法 -->
				/login=anon
				<!--退出   请求这个地址,shiro会自动清除session  -->
				/logout = logout
				<!-- 配置记住我,设置此路径可以在下一次登录时成功 -->

				<!--所有的URL都必须认证才可以访问
				认证时第一个参数是用户名是可以生成cookie.如果是用户对象user 就会失败,-->
			 	 /**=authc
				<!--/**= anon 所有的URL都可以匿名访问-->
			</value>
		</property>
	</bean>
<!-- 定义需要特殊处理的异常,用类名或完全路径名作为key,异常页名作为值 -->
	<!--shiro权限异常处理-->
	<bean class="org.springframework.web.servlet.handler.SimpleMappingExceptionResolver">
		<property name="exceptionMappings">
			<props>
				<!-- 异常处理器,当系统抛出该异常之后跳转的页面。 -->
				<prop key="org.apache.shiro.authz.UnauthorizedException">redirect:/nopermission.jsp</prop>
			</props>
		</property>
	</bean>
	 <!-- session管理器 -->
    <bean id="sessionManager" class="org.apache.shiro.web.session.mgt.DefaultWebSessionManager">
        <property name="globalSessionTimeout" value="300000"/><!--单位毫秒  -->
        <property name="deleteInvalidSessions" value="true"/><!--删除无效session  -->
	</bean>
	<!--配置authc过滤器  -->
	<bean id="authc" class="org.apache.shiro.web.filter.authc.FormAuthenticationFilter">
	<!--改变默认的username,password  -->
	<!-- <property name="usernameParam" value="name"></property>
	<property name="passwordParam" value="pwd"></property> -->
	</bean>
  </beans>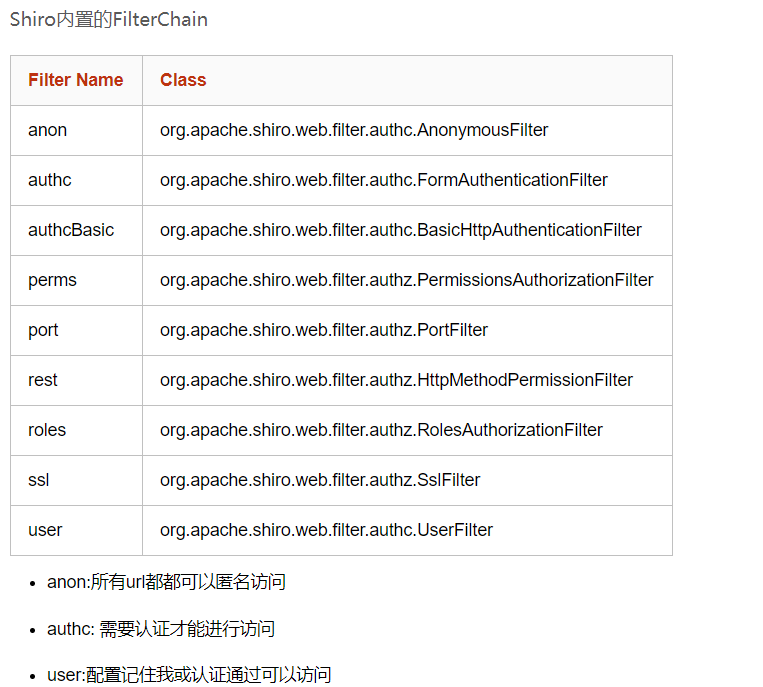
ehcache配置文件
<?xml version="1.0" encoding="UTF-8"?>
<ehcache>
    <!-- 指定一个目录:当 EHCache 把数据写到硬盘上时, 将把数据写到这个目录下.-->
    <diskStore path="d:\tempDirectory"/>
    <!-- 设置缓存的默认数据过期策略 -->
	<defaultCache
			maxElementsInMemory="1000"
			eternal="false"
			timeToIdleSeconds="120"
			timeToLiveSeconds="120"
			memoryStoreEvictionPolicy="LRU">
	</defaultCache>
</ehcache>
 <!--
        name: 设置缓存的名字,它的取值为类的全限定名或类的集合的名字
        maxElementsInMemory: 设置基于内存的缓存中可存放的对象最大数目

        eternal: 设置对象是否为永久的, true表示永不过期, 此时将忽略timeToIdleSeconds 和         timeToLiveSeconds属性; 默认值是false
       timeToIdleSeconds:设置对象空闲最长时间,以秒为单位, 超过这个时间,对象过期。当对象过期时,EHCache会把它从缓存中清除。如果此值为0,表示对象可以无限期地                  处于空闲状态。
        timeToLiveSeconds:设置对象生存最长时间,超过这个时间,对象过期。如果此值为0,表示对象可以无限期地存在于缓存中.
                该属性值必须大于或等于 timeToIdleSeconds 属性值

        overflowToDisk:设置基于内存的缓存中的对象数目达到上限后,是否把溢出的对象写到基于硬盘的缓存中
    -->
自定义的ShiroRealm域
public class UserShiro extends AuthorizingRealm{
	@Autowired
	private UserService  userServiceImp;

	@Autowired
	private PersissionService persissionServiceImp;

	//设置Realm名字
	public void setName(String name) {
		super.setName("usershiroRealm");
	}
	@Override
	protected AuthenticationInfo doGetAuthenticationInfo(AuthenticationToken token) throws AuthenticationException {
		// 从token中取出身份信息  token是用户输入的信息
		String userCode = (String) token.getPrincipal();
		System.out.println("========AuthenticationInfo身份信息======userCode: "+userCode);
		//从数据库查出来的数据      根据用户输入的userCode从数据库查询
		User user = userServiceImp.findUserByName(userCode);
		System.out.println("=====从数据库查出来的user========="+user);
	    //如果用户不存在 返回null
		if(user == null) {
			throw new UnknownAccountException("用户名或密码有误!");
		}
		//如果用户存在,返回认证信息AuthenticationInfo
		SimpleAuthenticationInfo simpleAuthenticationInfo =
				new SimpleAuthenticationInfo(user,user.getPassword(),this.getName());
		System.out.println("执行了认证方法");
		return simpleAuthenticationInfo;
	}
	@Override
	protected AuthorizationInfo doGetAuthorizationInfo(PrincipalCollection principals) {
		//从principals中获取主身份信息   在认证时已经设置
		 User user =  (User) principals.getPrimaryPrincipal();
		System.out.println("授权部分:"+user);
		if(null == user) {
			return null;
		}
		List<Persission> persission = persissionServiceImp.findPersissionById(user.getUid());
		if(persission== null || persission.size()==0) {
			return null;
		}
		//查到权限数据,返回
		SimpleAuthorizationInfo simpleAuthorizationInfo =
				new SimpleAuthorizationInfo();
		//将查到的授权信息填充到simpleAuthorizationInfo对象中
		for(Persission s:persission) {
			simpleAuthorizationInfo.addStringPermission(s.getPercode());
			System.out.println("===查到权限数据:======"+s.getPercode());
		}
		return simpleAuthorizationInfo;
	}
	//清理缓存的方法
	/*@Override  //默认清理缓存的方法  也可以自己通过当前用户去获取
	protected void clearCache(PrincipalCollection principals) {
		super.clearCache(principals);
	}*/
	public void clearCache() {
		Subject subject = SecurityUtils.getSubject();
		super.clearCache(subject.getPrincipals());
	}

}
常用的权限注解
@RequiresAuthentication
表示当前 Subject 已经通过 login 进行了身份验证;即 Subject. isAuthenticated()返回 true
@RequiresUser
表示当前 Subject 已经身份验证或者通过记住我登录的。
@RequiresGuest
表示当前 Subject 没有身份验证或通过记住我登录过,即是游客身份
@RequiresRoles(value={“admin”, “user”}, logical= Logical.AND)
表示当前 Subject 需要角色 admin 和 user。
@RequiresPermissions (value={“user:a”, “user:b”}, logical= Logical.OR)
表示当前 Subject 需要权限 user:a 或 user:b
Controller层
@SystemControllerLog(operatePoint=OperatePointConstants.LOGIN, operateType=OperateTypeConstants.LOGIN)
   @PostMapping("/login")
   @CsrfToken(remove = true)
   @ResponseBody
   public Object loginPost(String username, String password) {
       logger.info("POST请求登录");

       if (StringUtils.isBlank(username)) {
           return renderError("用户名不能为空");
       }
       if (StringUtils.isBlank(password)) {
           return renderError("密码不能为空");
       }else{
       password = SymmetricEncoder.encryptStr(secretkey, password);
        LOGGER.info(password);
       }
       Subject user = SecurityUtils.getSubject();
       UsernamePasswordToken token = new UsernamePasswordToken(username,password);
       Result result=new Result();
       try {
           user.login(token);                                                                                                                                                          //在这一步跳入入自己实现的域即shiroDbRealm中验证
           return renderSuccess();
       } catch (UnknownAccountException e) {
       result.setMsg("账号不存在");
       return result;
           /*throw new RuntimeException("账号不存在!", e);*/
       } catch (DisabledAccountException e) {
       result.setMsg("账号未启用");
       return result;
           /*throw new RuntimeException("账号未启用", e);*/
       } catch (IncorrectCredentialsException e) {
       result.setMsg("密码错误,请重试");
       return result;
           /*throw new RuntimeException("密码错误,请重试", e);*/
       } catch (Throwable e) {
       result.setMsg("未知错误,请联系管理员");
       return result;
          throw new RuntimeException("未知错误,请联系管理员", e);
       }

   }
最后
以上就是英俊黄蜂最近收集整理的关于Shiro权限框架详解的全部内容,更多相关Shiro权限框架详解内容请搜索靠谱客的其他文章。


发表评论 取消回复