介绍
ganglia分三个部分,gmond,gmetad、gweb。gmond是安装到每一台机器,负责收集数据。gmetad不用安装到每一台,他负责接收gmond收集的数据,gweb也不用安装到每一台,主要负责展现gmetad的数据。
Ganglia下载
1.默认源找不到安装包,所以要安装epel源,安装命令如下
yum -y install epel-release
2.下载gmond
yum -y install ganglia-gmond
3.下载gmetad
yum -y install ganglia-gmetad
4.下载 gweb
sudo -y yum install httpd php # 需要额外安装httpd、php
sudo -y yum install ganglia-web
5.修改配置文件 sudo vim /etc/httpd/conf.d/ganglia.conf
 # Ganglia monitoring system php web frontend
Alias /ganglia /usr/share/ganglia
<Location /ganglia>
 Order deny,allow
 #Deny from all
 Allow from all
 # Allow from 127.0.0.1
 # Allow from ::1
 # Allow from .example.com
</Location>
6.修改配置文件/etc/ganglia/gmetad.conf
修改内容:
data_source “hadoop202” 192.168.88.202
7.修改配置文件/etc/ganglia/gmond.conf
[atguigu@hadoop102 flume]$ sudo vim /etc/ganglia/gmond.conf
修改为:
cluster {
 name = "hadoop202"
 owner = "unspecified"
 latlong = "unspecified"
 url = "unspecified"
}
udp_send_channel {
 #bind_hostname = yes # Highly recommended, soon to be default.
 # This option tells gmond to use a source
address
 # that resolves to the machine's hostname.
Without
 # this, the metrics may appear to come from any
 # interface and the DNS names associated with
 # those IPs will be used to create the RRDs.
 # mcast_join = 239.2.11.71
 host = 192.168.88.202
 port = 8649
 ttl = 1
}
udp_recv_channel {
 # mcast_join = 239.2.11.71
 port = 8649
 bind = 192.168.88.202
 retry_bind = true
 # Size of the UDP buffer. If you are handling lots of metrics you
really
 # should bump it up to e.g. 10MB or even higher.
 # buffer = 10485760
}
注: 修改的内容主要有name,host,bind这三个
8.修改配置文件/etc/selinux/config
SELINUX=disabled # 解决冲突
提示: selinux 本次生效关闭必须重启,如果此时不想重启,可以临时生效之:
sudo setenforce 0
9.启动Ganglia
sudo systemctl start httpd.service
sudo systemctl start gmetad.service
sudo systemctl start gmond.service
10.问题:
浏览网站: http://192.168.88.202/ganglia , 到这里能打开就ok了
但是也可能会出现权限问题,无法访问
1.先确认您的防火墙是关闭的
2.修改ganglia文件的权限
sudo chmod -R 777 /var/lib/ganglia
3.修改上面的sudo vim /etc/httpd/conf.d/ganglia.conf 文件
#
# Ganglia monitoring system php web frontend
#

Alias /ganglia /usr/share/ganglia

#<Location /ganglia>
 # Order deny,allow
  #Deny from all
 # Allow from all
 # Allow from 127.0.0.1
 # Allow from ::1
  # Allow from .example.com
#</Location>

<Location /ganglia>
  #Order deny,allow
 # Deny from all
 # Allow from all
  # Allow from 127.0.0.1
  # Allow from ::1
  # Allow from .example.com
    Require all granted
</Location>
这三种都做一下,如果还是没有解决权限问题, 我就没办法帮助你了!
将flume配置到监控
修改 flume/conf/flume-env.sh 文件,添加下面内容, 注意地址
JAVA_OPTS="-Dflume.monitoring.type=ganglia -Dflume.monitoring.hosts=192.168.9.102:8649 -Xms100m -Xmx200m"
开启flume监控
bin/flume-ng agent -c conf/ -n a1 -f job/netcat-flume-logger.conf
-Dflume.root.logger==INFO,console
-Dflume.monitoring.type=ganglia
-Dflume.monitoring.hosts=192.168.88.202:8649
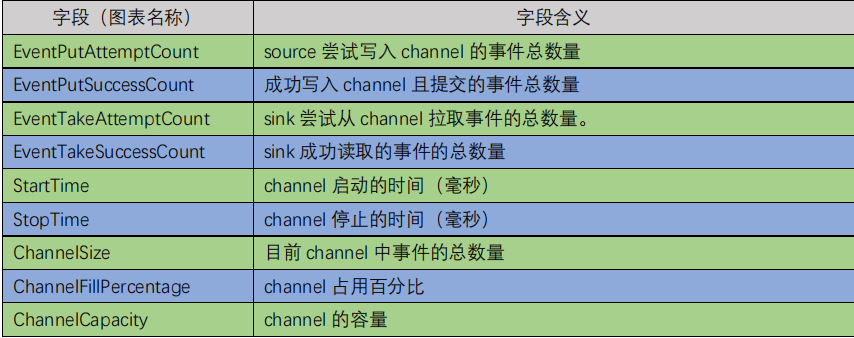
监控的字段说明:
最后
以上就是深情发夹最近收集整理的关于Ganglia在linux上的下载安装的全部内容,更多相关Ganglia在linux上内容请搜索靠谱客的其他文章。


发表评论 取消回复