配置本地yum源
- 2. Centos6.5.配置本地yum源
- 2.1. 更换Centos6.5的yum源配置
- 2.1.1. 使用阿里云开源镜像站
- 2.1.2. 使用清华大学开源镜像站
2. Centos6.5.配置本地yum源
本文同步阿里/清华大学的开源镜像站,同步到本地进行搭建本地yum源,并非使用挂载方式。
2.1. 更换Centos6.5的yum源配置
[yangqi@second ~]$ cd /etc/yum.repos.d/
[yangqi@second yum.repos.d]$ ll
可以看到自己的目录下有很多的.repo结尾的文件,将这些文件进行备份。
[yangqi@second yum.repos.d]$ sudo rename .repo .repo.bak *.repo
使用sudo之前,必须要给普通用户配置sudo的权限,如果不会配置,我之后会分享
指令解析:将.repo改为.repo.bak,匹配文件名为*.repo,表示以所有的repo结尾的文件
2.1.1. 使用阿里云开源镜像站
阿里云: https://opsx.alibaba.com/mirror
# 如果使用阿里云开源镜像站,可以使用curl
[yangqi@second yum.repos.d]$ sudo crul -O http://mirrors.aliyun.com/repo/Centos-6.repo
下载完成之后,可以看到自己的
/etc/yum.repos.d/目录下多了一个Centos-6.repo文件为了方便期间,可以将名字更名为Aliyun.repo
[yangqi@second yum.repos.d]$ sudo rename Centos-6.repo Aliyun.repo
之后可以使用
sudo yum clean all将之前的yum清空一下,显示如下类似信息即可
[yangqi@second yum.repos.d]$ sudo yum clean all
Loaded plugins: fastestmirror, refresh-packagekit, security
Cleaning repos: localrepo
Cleaning up Everything
[yangqi@second yum.repos.d]$ yum list

使用
yum list查看是否可以查看yum源仓库的所有rpm安装包,如果可以访问,则这一步已经成功接下来,开始下载阿里云开源镜像站的所有的rpm包到本地磁盘
建议:新建一个目录,存放要下载的所有的rpm包,建议在
/opt/yum/centos/6/os/,如果没有可以自行创建此目录
[yangqi@second yum.repo.d]$ cd /opt/yum/centos/6/os/
[yangqi@second os]$ ll
此时目录为空,做好了所有的准备工作

在
/opt/yum/centos/6/os/目录下创建/x86_64/目录,建立索引
[yangqi@second os]$ sudo mkdir x86_64/
使用
createrepo指令创建索引,如果和我的一样,没有,先进行安装
[yangqi@second os]$ createrepo
-bash: createrepo: command not found
[yangqi@second os]$ yum list all | grep createrepo
createrepo.noarch                       0.9.9-18.el6                   localrepo
[yangqi@second os]$ sudo yum -y install createrepo.noarch
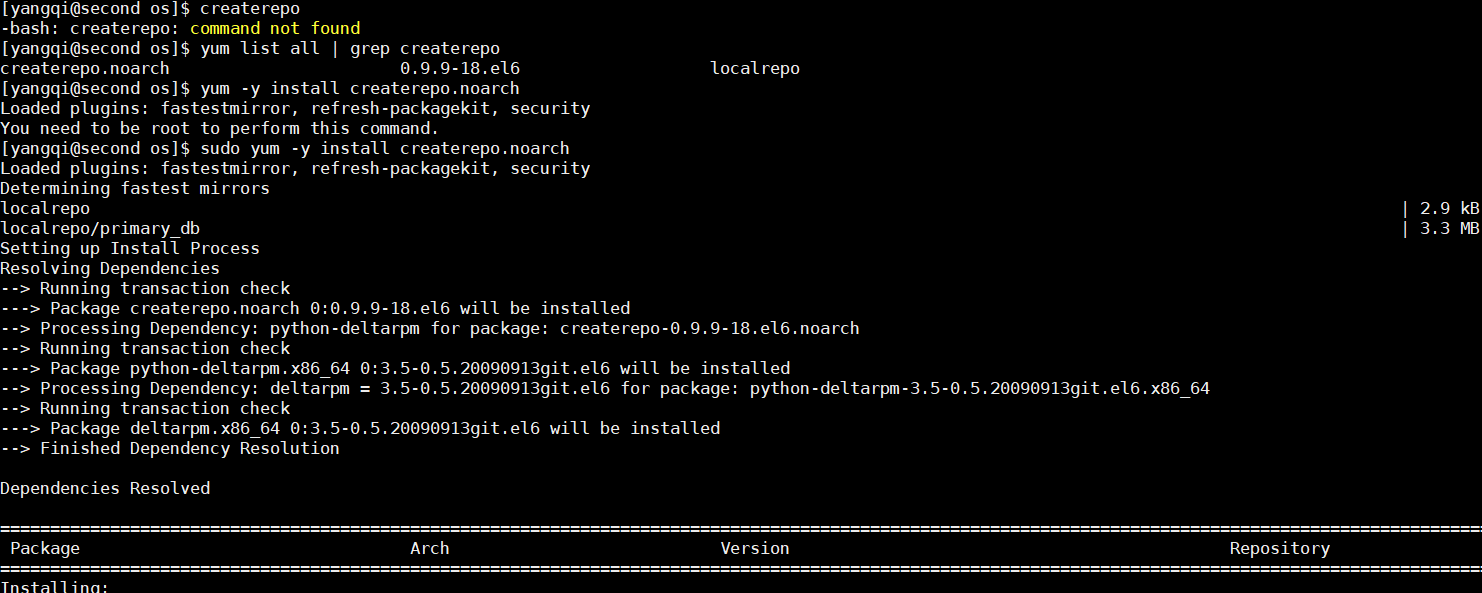
最后显示如下,则表示安装成功

接下来创建索引
[yangqi@second os]$ sudo createrepo /opt/yum/centos/6/os/x86_64/
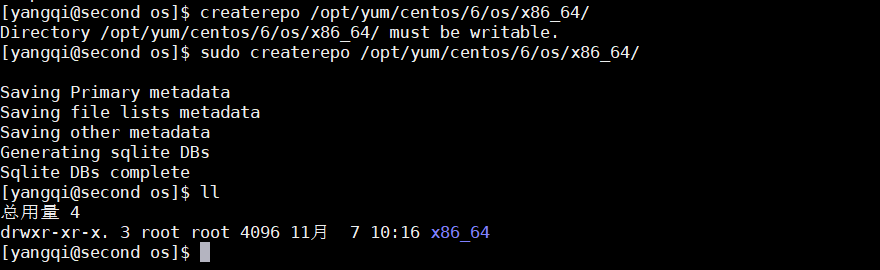
这样,索引已经建立成功,开始搞事情(网速一定要跟得上),不要像我一样,龟速
[yangqi@second os]$ reposync -r base -p /opt/yum/centos/6/os/x86_64
第一次同步可能比较慢,需要耐心等待,等同步完之后可以将索引再重新更新一次
[yangqi@second os]$ sudo createrepo --update /opt/yum/centos/6/os/x86_64/
下载完成后,准备配置使用本地yum源
进入这个目录,使用apache服务器进行配置
[yangqi@second os]$ cd /var/www/html/
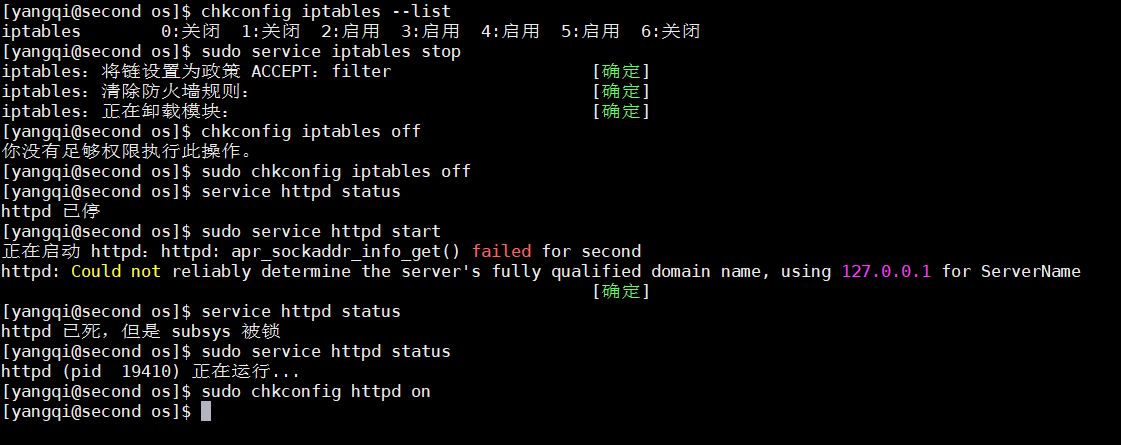
确保电脑开启了httpd服务,并且已经关闭了防火墙
建议:最好将httpd服务设置为开机自启,防火墙设置为永久关闭
# 检查防火墙状态
[yangqi@second html]$ chkconfig iptables --list
# 关闭防火墙
[yangqi@second html]$ sudo service iptables stop
# 设置防火墙开机自启为off
[yangqi@second html]$ sudo chkconfig iptables off
# 检查httpd服务状态
[yangqi@second html]$ chkconfig httpd status
# 开启httpd服务
[yangqi@second html]$ sudo service httpd start
# 设置httpd服务开机自启
[yangqi@second html]$ sudo chkconfig httpd on
创建软链接,指向
/opt/yum/centos/6/os/x86_64
[yangqi@second html]$ sudo ln -s /opt/yum/centos/6/os/x86_64/ localrepo

清空缓存数据
[yangqi@second html]$ sudo yum clean all
使用vi编辑local.repo文件
# 切换回/opt/yum/centos/6/os/
[yangqi@second os]$ sudo vi local.repo
这里的ipaddress写自己作为本地yum源的那台机器的ip地址即可
后面的验证方式,暂时先取消,设置为0,否则校验不通过没法安装
[localrepo]
name=localrepo
failovermethod=priority
baseurl=http://ipaddress/localrepo
enabled=1
gpgcheck=0
gpgkey=file:///etc/pki/rpm-gpg/RPM-GPG-KEY-CentOS-6
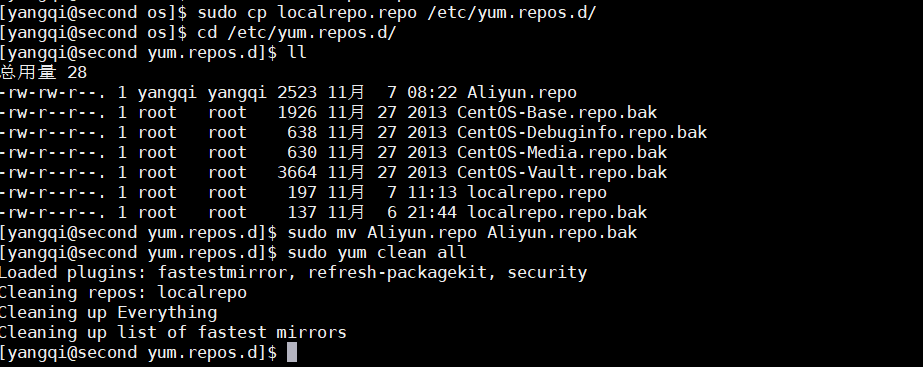
因为只开了一台虚拟机,所以就用这台进行测试,如果你开了多太,可以将这个文件发送到另一台虚拟机,放到
/etc/yum.repos.d/目录下,将其余的yum全部备份,操作步骤一样
[yangqi@second os]$ sudo cp localrepo.repo /etc/yum.repos.d/
[yangqi@second os]$ cd /etc/yum.repos.d/
[yangqi@second yum.repos.d]$ ll
[yangqi@second yum.repos.d]$ sudo mv Aliyun.repo Aliyun.repo.bak
[yangqi@second yum.repos.d]$ sudo yum clean all
执行
yum list,如果显示所有的rpm来源为localrepo,就是刚才localrepo.repo文件中的[localrepo],则表示成功
[yangqi@second yum.repos.d]$ yum list
至此,基于阿里云的本地yum源搭建完成
2.1.2. 使用清华大学开源镜像站
清华大学开源镜像站: https://mirrors.tuna.tsinghua.edu.cn/
只需要修改几步,即可。清华大学开源镜像站,没有现成的.repo文件,可以自己在
/etc/yum.repos.d/目录下新建一个Tsinghua.repo
[yangqi@second yum.repos.d]$ sudo touch Tsinghua.repo
输入以下内容,其余的步骤和使用阿里云开源镜像站一样
链接: https://mirrors.tuna.tsinghua.edu.cn/help/centos/
# CentOS-Base.repo
#
# The mirror system uses the connecting IP address of the client and the
# update status of each mirror to pick mirrors that are updated to and
# geographically close to the client.  You should use this for CentOS updates
# unless you are manually picking other mirrors.
#
# If the mirrorlist= does not work for you, as a fall back you can try the
# remarked out baseurl= line instead.
#
#

[base]
name=CentOS-$releasever - Base
baseurl=https://mirrors.tuna.tsinghua.edu.cn/centos/$releasever/os/$basearch/
#mirrorlist=http://mirrorlist.centos.org/?release=$releasever&arch=$basearch&repo=os
gpgcheck=1
gpgkey=file:///etc/pki/rpm-gpg/RPM-GPG-KEY-CentOS-6

#released updates
[updates]
name=CentOS-$releasever - Updates
baseurl=https://mirrors.tuna.tsinghua.edu.cn/centos/$releasever/updates/$basearch/
#mirrorlist=http://mirrorlist.centos.org/?release=$releasever&arch=$basearch&repo=updates
gpgcheck=1
gpgkey=file:///etc/pki/rpm-gpg/RPM-GPG-KEY-CentOS-6

#additional packages that may be useful
[extras]
name=CentOS-$releasever - Extras
baseurl=https://mirrors.tuna.tsinghua.edu.cn/centos/$releasever/extras/$basearch/
#mirrorlist=http://mirrorlist.centos.org/?release=$releasever&arch=$basearch&repo=extras
gpgcheck=1
gpgkey=file:///etc/pki/rpm-gpg/RPM-GPG-KEY-CentOS-6

#additional packages that extend functionality of existing packages
[centosplus]
name=CentOS-$releasever - Plus
baseurl=https://mirrors.tuna.tsinghua.edu.cn/centos/$releasever/centosplus/$basearch/
#mirrorlist=http://mirrorlist.centos.org/?release=$releasever&arch=$basearch&repo=centosplus
gpgcheck=1
enabled=0
gpgkey=file:///etc/pki/rpm-gpg/RPM-GPG-KEY-CentOS-6

#contrib - packages by Centos Users
[contrib]
name=CentOS-$releasever - Contrib
baseurl=https://mirrors.tuna.tsinghua.edu.cn/centos/$releasever/contrib/$basearch/
#mirrorlist=http://mirrorlist.centos.org/?release=$releasever&arch=$basearch&repo=contrib
gpgcheck=1
enabled=0
gpgkey=file:///etc/pki/rpm-gpg/RPM-GPG-KEY-CentOS-6
最后
以上就是唠叨黑夜最近收集整理的关于配置本地yum源的全部内容,更多相关配置本地yum源内容请搜索靠谱客的其他文章。


发表评论 取消回复