目标: 安装配置ganglia监控系统, 对集群中的节点状态信息进行监控,特别是flume日志采集程序的运行情况进行汇总.
集群安装拓扑结构规划:

flume在node1-node4上运行,所以ganglia的客户端程序gmond也要安装配置到四个节点.
-----------------------------------------------------------------------------------------------------------------------
一. ganglia简介
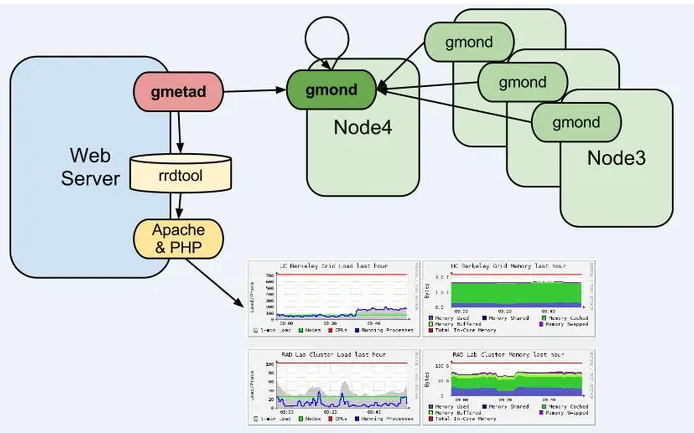
ganglia是一款为HPC(高性能计算) 集群设计的可扩展性 的分布式监控系统,它可以监视和显示集群中节点的各种状态信息,他由运行在各个节点上的gmond守护进程来采集 CPU、内存、磁盘利用率、I/O负载、网络流量情况等方面的数据。然后汇总到gmetad守护进程下,使用rrdtool存储数据,然后将历史数据以曲线方式通过PHP页面呈现。
它由UC Berkeley创建并开源。Ganglia的中文意思是神经中枢,现在支持多部分操作系统(包括linux、unix、windows),可支持2000个节点的网络监控
ganglia的官网:http://ganglia.info 下载链接:http://ganglia.info/?page_id=66
二. ganglia中的组件介绍:

gmetad: 服务器, 用于轮询gmond节点存储的信息
gmond: 数据采集客户端, 用于节点信息的收集和存储
rrdtool: 一个数据存储模块,用于存储数据和画图
gweb: 一个web前端站点,用于可视化收集到的数据,一般与gmetad安装在同一个节点.
Apache+php: 一个Web服务器,作为gweb的运行环境。
三. Ganglia管理节点的层次化结构:

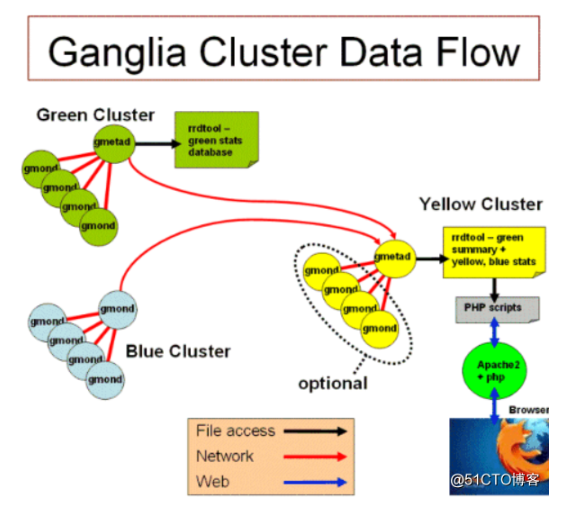
Ganglia的层次化结构做的非常好,由小到大可以分为node -> cluster -> grid,这三个层次。
1、一个node就是一个需要监控的节点,一般是个主机,用IP表示。每个node上运行一个gmond进程用来采集数据,并提交给gmetad。
2、一个cluster由多个node组成,就是一个集群,我们可以给集群定义名字。一个集群可以选一个node运行gmetad进程,汇总/拉取gmond提交的数据,并部署web front,将gmetad采集的数据用图表展示出来。
3、一个grid由多个cluster组成,是一个更高层面的概念,我们可以给grid定义名字。grid中可以定义一个顶级的gmetad进程,汇总/拉取多个gmond、子gmetad提交的数据,部署web front,将顶级gmetad采集的数据用图表展示出来。
四. ganglia工作模式:
- 单播/unicast:发送自己收集到的监控数据到特定的一台或几台机器上,可以跨网段。
- 多播/multicast:发送自己收集到的监控数据到同一网段内所有的机器上,同时收集同一网段内的所有机器发送过来的监控数据。因为是以广播包的形式发送,因此需要同一网段内。但同一网段内,又可以定义不同的发送通道。
五。安装准备:
我边里因为四个节点都要做数据采集,所以全部执行了以下操作:
设置或停止防火墙:
[root@localhost ~]# systemctl stop firewalld.service
[root@localhost ~]# systemctl disable firewalld.service

关闭selinux:
临时关闭:
[root@localhost ~]# setenforce 0

永久关闭(修改配置文件):
[root@localhost ~]# vi /etc/selinux/config
改成SELINUX=disabled

卸载系统默认安装的Apache软件包:
[root@localhost ~]# rpm -qa httpd*
[root@localhost ~]# rpm -e --nodeps 包名

有多个httpd*,用脚本删除for name in `rpm -qa httpd*`;do rpm -e --nodeps $name;done
安装依赖包:
[root@localhost ~]# rpm -Uvh https://dl.fedoraproject.org/pub/epel/epel-release-latest-7.noarch.rpm
[root@localhost ~]# yum install wget lrzsz vim lynx lsof netstat-tools unzip -y

时区设置:
[root@localhost ~]timedatectl
[root@localhost ~]timedatectl list-timezones  #该命令列出了所有的时区
[root@localhost ~]timedatectl set-timezone Asia/Shanghai #该命令把时区设置为上海

时间同步:  yum安装此命令ntpdate命令, 再设置定时器定时同步时间
[root@localhost ~]# crontab -e
* */1 * * * /usr/sbin/ntpdate ntp1.aliyun.com >/dev/null 2>&1
六. Gmetad服务端安装:
我这里的服务器都是centos7 ,它不能使用rpm方式安装ganglia, 只能以手工编译源码的方式来安装.
下面的安装在node1节点上进行,此节点为Gmetad服务所在节点.
[root@localhost ~]# yum -y install apr-devel apr-util check-devel cairo-devel pango-devel libxml2-devel rpm-build glib2-devel dbus-devel freetype-devel fontconfig-devel gcc gcc-c++ expat-devel python-devel libXrender-devel
[root@localhost ~]# yum install -y libart_lgpl-devel pcre-devel libtool
[root@localhost ~]# yum install  -y rrdtool rrdtool-devel
[root@localhost ~]# mkdir /tools
[root@localhost ~]# cd  /tools/
[root@localhost ~]# wget http://www.mirrorservice.org/sites/download.savannah.gnu.org/releases/confuse/confuse-2.7.tar.gz
[root@localhost ~]# tar zxvf confuse-2.7.tar.gz
[root@localhost ~]# cd confuse-2.7
[root@localhost ~]# ./configure  --prefix=/usr/local/ganglia-tools/confuse CFLAGS=-fPIC --disable-nls --libdir=/usr/local/ganglia-tools/confuse/lib64
[root@localhost ~]# make && make install
[root@localhost ~]# cd /tools/
[root@localhost ~]# wget https://sourceforge.net/projects/ganglia/files/ganglia%20monitoring%20core/3.7.2/ganglia-3.7.2.tar.gz
[root@localhost ~]# tar zxf ganglia-3.7.2.tar.gz
[root@localhost ~]# cd ganglia-3.7.2
[root@localhost ~]# ./configure --prefix=/usr/local/ganglia --enable-gexec --enable-status --with-gmetad --with-libconfuse=/usr/local/ganglia-tools/confuse  #enable-gexec是gmond节点
[root@localhost ~]# make && make install
[root@localhost ~]# cp gmetad/gmetad.init /etc/init.d/gmetad
[root@localhost ~]# ln -s /usr/local/ganglia/sbin/gmetad /usr/sbin/gmetad
七. gweb服务安装
我这里Gweb服务器安装到node1上。
[root@localhost x86_64]# yum install httpd httpd-devel php -y
[root@localhost x86_64]# yum -y install rsync
[root@localhost x86_64]# cd /tools/
[root@localhost tools]# wget https://sourceforge.net/projects/ganglia/files/ganglia-web/3.7.2/ganglia-web-3.7.2.tar.gz
[root@localhost tools]# tar zxvf /tools/ganglia-web-3.7.2.tar.gz -C /var/www/html/
[root@localhost tools]# cd /var/www/html/
[root@localhost html]# mv ganglia-web-3.7.2 ganglia
[root@localhost html]# cd /var/www/html/ganglia/
[root@localhost ganglia]# useradd -M -s /sbin/nologin www-data
[root@localhost ganglia]# make install  #执行这步,会创建相关的目录
[root@localhost ganglia]# chown root:root -R /var/lib/ganglia-web/
修改配置
修改启动脚本
[root@localhost ganglia]# vi /etc/init.d/gmetad
GMETAD=/usr/sbin/gmetad  #这句话可以自行更改gmetad的命令,当然也能向我们前面做了软连接
start() {
    [ -f /usr/local/ganglia/etc/gmetad.conf  ] || exit 6  #这里将配置文件改成现在的位置,不然启动没反应

创建rrds目录, 这个目录里面保存集群节点信息
[root@localhost ganglia]# mkdir /var/lib/ganglia/rrds -p
[root@localhost ganglia]# chown -R nobody:nobody  /var/lib/ganglia/rrds

修改gmetad配置文件
因为我们这里就先让它当一个单纯的gweb节点和gmetad节点,不给其启动gmond服务,假设它没有再哪个多播集群里。
[root@localhost ganglia]# vi /usr/local/ganglia/etc/gmetad.conf
data_source "ycganglia" 192.168.76.200 192.168.76.201  192.168.76.202 192.168.76.203   #这也是我们以后经常修改的地方,""里面是组名称  后面是去哪个IP的那个端口去采集gmond数据  这里的四个ip正好是我的node1,node2,node3,node4 的ip

修改配置文件/etc/httpd/conf.d/ganglia.conf
[root@localhost ganglia]# vi /etc/httpd/conf.d/ganglia.conf
Alias /ganglia /var/www/html/ganglia/
<Location /ganglia>
           Require all granted
           Allow from all
        #  Order deny,allow
        #  Deny from all
        #  Allow from ::1
   # Allow from .example.com
</Location>
八. 服务端及web程序启动
[root@localhost ganglia]# mkdir -p /usr/local/ganglia/var/run
[root@localhost ganglia]# /etc/init.d/gmetad restart
[root@localhost ganglia]# systemctl restart httpd
[root@localhost tools]# netstat -luntp
Active Internet connections (only servers)
Proto Recv-Q Send-Q Local Address           Foreign Address         State       PID/Program name
tcp        0      0 0.0.0.0:8651            0.0.0.0:*               LISTEN      16547/gmetad
tcp        0      0 0.0.0.0:8652            0.0.0.0:*               LISTEN      16547/gmetad
tcp        0      0 0.0.0.0:22              0.0.0.0:*               LISTEN      1433/sshd
tcp        0      0 127.0.0.1:25            0.0.0.0:*               LISTEN      1741/master
tcp6       0      0 :::80                   :::*                    LISTEN      16344/httpd
tcp6       0      0 :::22                   :::*                    LISTEN      1433/sshd
tcp6       0      0 ::1:25                  :::*                    LISTEN      1741/master
udp        0      0 0.0.0.0:47154           0.0.0.0:*                           1242/dhclient
udp        0      0 0.0.0.0:68              0.0.0.0:*                           1242/dhclient
udp6       0      0 :::2514                 :::*                                1242/dhclient
能观察到httpd及gmetad服务.
九. gmond数据采集客户端安装:
我这里须要分别在node1,node2,node3,node4上完成,但因为node1有一部依赖已经安装好了,所以可以不用重复安装.
[root@localhost ~]# yum -y install apr-devel apr-util check-devel cairo-devel pango-devel libxml2-devel rpm-build glib2-devel dbus-devel freetype-devel fontconfig-devel gcc gcc-c++ expat-devel python-devel libXrender-devel
[root@localhost ~]# yum install -y libart_lgpl-devel pcre-devel libtool
[root@localhost ~]# mkdir /tools
[root@localhost ~]# cd  /tools/
[root@localhost tools]# wget http://www.mirrorservice.org/sites/download.savannah.gnu.org/releases/confuse/confuse-2.7.tar.gz
[root@localhost tools]# tar zxvf confuse-2.7.tar.gz
[root@localhost tools]# cd confuse-2.7
[root@localhost confuse-2.7]# ./configure  --prefix=/usr/local/ganglia-tools/confuse CFLAGS=-fPIC --disable-nls --libdir=/usr/local/ganglia-tools/confuse/lib64
[root@localhost confuse-2.7]# make && make install
[root@localhost confuse-2.7]# cd /tools/
[root@localhost tools]# wget https://sourceforge.net/projects/ganglia/files/ganglia%20monitoring%20core/3.7.2/ganglia-3.7.2.tar.gz
[root@localhost tools]# tar zxvf ganglia-3.7.2.tar.gz
[root@localhost tools]# cd ganglia-3.7.2
[root@localhost ganglia-3.7.2]# ./configure --prefix=/usr/local/ganglia --enable-gexec --enable-status  --with-libconfuse=/usr/local/ganglia-tools/confuse  #enable-gexec是gmond节点
[root@localhost ganglia-3.7.2]# make && make install

#以上在node1中不用重复操作,其它三个节点全部要操作

[root@localhost ganglia-3.7.2]# /usr/local/ganglia/sbin/gmond -t >/usr/local/ganglia/etc/gmond.conf  #生成gmond配置文件
[root@localhost ganglia-3.7.2]# cp /tools/ganglia-3.7.2/gmond/gmond.init /etc/init.d/gmond
[root@localhost ganglia-3.7.2]# mkdir -p /usr/local/ganglia/var/run
[root@localhost ganglia-3.7.2]# vi /usr/local/ganglia/etc/gmond.conf   #此文件较大,改以下部分
cluster {
  name = "ycganglia"         #与前面在gmetad.con中配置的集群名一样
  owner = "unspecified"
  latlong = "unspecified"
  url = "unspecified"
}
udp_send_channel {
  #bind_hostname = yes # Highly recommended, soon to be default.
                       # This option tells gmond to use a source address
                       # that resolves to the machine's hostname.  Without
                       # this, the metrics may appear to come from any
                       # interface and the DNS names associated with
                       # those IPs will be used to create the RRDs.
  #mcast_join = 239.2.11.71
  host=192.168.76.200     #此处代表gmetad服务器地址,它用于收集此集群各节点信息
  port = 8649
  ttl = 1
}
udp_recv_channel {
  #mcast_join = 239.2.11.71
  bind=0.0.0.0           #此处代表将gmond与本机绑定,通过8649发送udp数据包,写0.0.0.0的话,所有的客户端都不用改了.
  port = 8649
  #bind = 239.2.11.71
  retry_bind = true
  # Size of the UDP buffer. If you are handling lots of metrics you really
  # should bump it up to e.g. 10MB or even higher.
  # buffer = 10485760
}


[root@localhost ganglia-3.7.2]# /etc/init.d/gmond restart
[root@localhost ganglia-3.7.2]# netstat -luntp
Active Internet connections (only servers)
Proto Recv-Q Send-Q Local Address           Foreign Address         State       PID/Program name
tcp        0      0 127.0.0.1:9000          0.0.0.0:*               LISTEN      1056/php-fpm: maste
tcp        0      0 0.0.0.0:8649            0.0.0.0:*               LISTEN      15476/gmond
tcp        0      0 0.0.0.0:2222            0.0.0.0:*               LISTEN      1061/sshd
tcp        0      0 0.0.0.0:22              0.0.0.0:*               LISTEN      1061/sshd
tcp        0      0 127.0.0.1:25            0.0.0.0:*               LISTEN      1683/master
tcp6       0      0 :::50088                :::*                    LISTEN      1375/httpd
tcp6       0      0 :::3306                 :::*                    LISTEN      1410/mysqld
tcp6       0      0 :::2222                 :::*                    LISTEN      1061/sshd
tcp6       0      0 :::22                   :::*                    LISTEN      1061/sshd
tcp6       0      0 ::1:25                  :::*                    LISTEN      1683/master
tcp6       0      0 :::50080                :::*                    LISTEN      1375/httpd
udp        0      0 0.0.0.0:50614           0.0.0.0:*                           855/dhclient
udp        0      0 239.2.11.71:8649        0.0.0.0:*                           15476/gmond
udp        0      0 0.0.0.0:68              0.0.0.0:*                           855/dhclient
udp6       0      0 :::6727                 :::*                                855/dhclient
以后启动和关闭服务,查看服务状态,可以使用以下命令:
service httpd restart
service gmetad restart
service gmond restart

service httpd status
service gmetad status
service gmond status
十. web访问
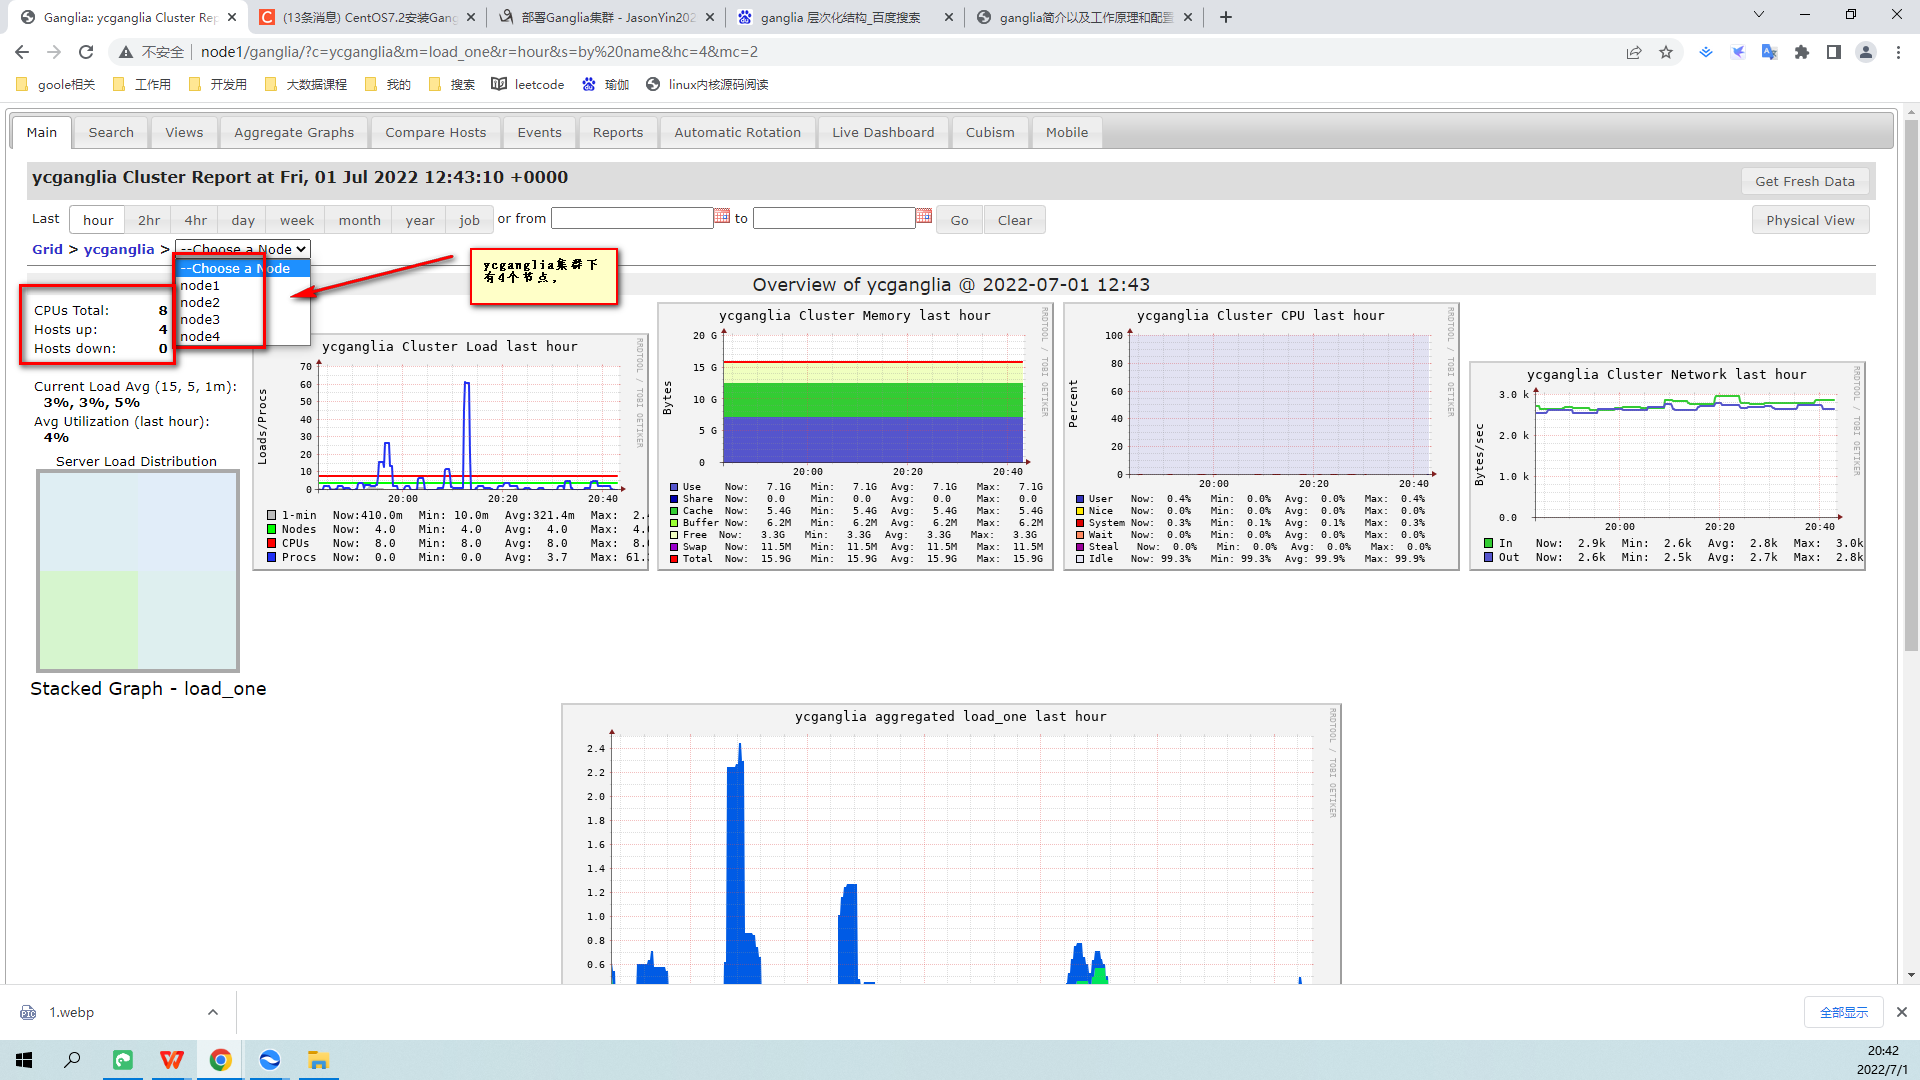
http://node1/ganglia/
十一. 监控信息解读:
柴少鹏的官方网站-Centos7.2 ganglia(二)之web界面介绍
柴少鹏的官方网站-Centos7.2 ganglia(三)之详解和扩展
备注: gmond.conf客户端配置文件的配置项详解:
各字段解释如下:
globals字段:
daemonize:
是否后台运行,默认值为yes。
setuid:
是否设置运行用户的UID,在windows操作系统下建议设置为no。
user:
设置运行ganglia服务的用户名称,若不设置默认为nobody,官方已经显式帮我们设置为ganglia用户,该用户必须在当前操作系统中存在,而在安装gmod服务时,会自动帮咱们创建出该用户哟。
debug_level:
设置调试级别,默认值为0,表示不输出任何日志。
max_udp_msg_len:
最大UDP消息长度,默认值为1472。
mute:
是否发送监控数据到其他节点,设置为yes则表示本节点不再发送自己的监控数据到其他节点,默认值为no。
deaf:
表示是否接受其他节点发送过来的监控数据,设置为yes则表示本节点不再接受其他节点发送来的监控数据,默认值为no。
allow_extra_data:
是否接受额外的数据信息,默认值为yes,当设置为no时可以有效的节省带宽,但也意味着不再接受额外的数据。
host_dmax:
默认值是86400秒,即主机在1天内过期(从web界面删除)。若设置为0,则永不删除主机信息。
host_tmax:
指定TMAX的时间长度,默认值是20秒,TMAX的属性我也不是很清楚,但我发现在"/etc/ganglia/gmetad.conf"配置文件中关于"data_source"关键字的注释信息中有提到了它。
cleanup_threshold:
设置gmod清理过期数据的时间,默认300秒。
gexec:
当设置为yes时,运行执行gexec Job,默认值为no。
send_metadata_interval:
默认值为0秒,如果不使用多播,则应将此值设置为0以外的值。否则,如果重新启动aggregator gmond,将得到空的图。60秒是合理的。
换句话说,在单播环境中,如果将该值设置为0,当某个节点的gmod重启后,gmod的获取节点(即gmetad)将不再接受该节点的数据,如果设置大于0,可以保证gmod节点关闭或重启后,在设定的阈值时间内gmetad节点可以重新获取gmod发送的数据。
cluster字段:
name:
定义集群的名称,该名称必须和"/etc/ganglia/gmetad.conf"配置文件中的"data_source"关键字指定的唯一标识符同名,默认值为"unspecified"
owner :
默认值为"unspecified",无需修改,
latlong:
默认值为"unspecified",无需修改。
url:
默认值为"unspecified",无需修改。
host 字段:
location:
默认值为 "unspecified",无需修改。
udp_send_channel字段:
mcast_join :
默认值是一个D类地址,即239.2.11.71。在网络环境比较复杂的情况下建议使用单播模式,即使用host来定义。
host:
指定单播地址。该地址指定的是gmetad服务器的地址。
port:
指定gmod的UDP监听端口,默认值为8649
ttl:
指定UDP发送通道的ttl,默认值为1,无需修改。udp_recv_channel字段
mcast_join:
默认值是一个D类地址,即239.2.11.71,如果udp_send_channle字段使用的是单播地址(即host字段),则建议注释该字段。
port:
指定本机端口,默认值为8649
bind:
指定绑定本机的地址,hadoop101.yinzhengjie.com。
retry_bind:
尝试重试绑定,默认值为true,无需修改。
buffer:
指定UDP的buffer大小,默认是10485760字节(即10MB),无需修改。
tcp_accept_channel 字段
port :
指定TCP的监听端口,默认值为 8649
gzip_output :
是否启用gzip压缩,默认值为no。
后记:
Ganglia的仅能起到监控作用,无法发出警报功能,若想要发出警报信息可以借助Nagios发出警报信息哟~

  Nagios是一个开源监控系统,可以帮助我们检验系统的运行状况,是一个非常好的警报和监视工具。可以使用Nagios来监测家禽资源和应用程序的状态以及CPU,磁盘和内存等系统资源。

  虽然Ganglia主要用来收集和跟踪指标,但Nagios可以依靠其内置的通知系统发警报。

  Nagios支持以下功能:
    (1)获取关于集群基础设施的最新信息;
    (2)生成故障报警;
    (3)检测潜在问题;
    (4)监控资源可用性;

  博主推荐使用监控,警报功能一体的开源监控系统,比如国外的zabbix服务,如果您的集群在10000台以内的话,分布式zabbix监控系统应该是hold住的。如果集群规模较大可以考虑使用Open Falcon。
最后
以上就是漂亮小甜瓜最近收集整理的关于centos7安装ganglia监控的全部内容,更多相关centos7安装ganglia监控内容请搜索靠谱客的其他文章。


发表评论 取消回复