10.19 iptables规则备份和恢复
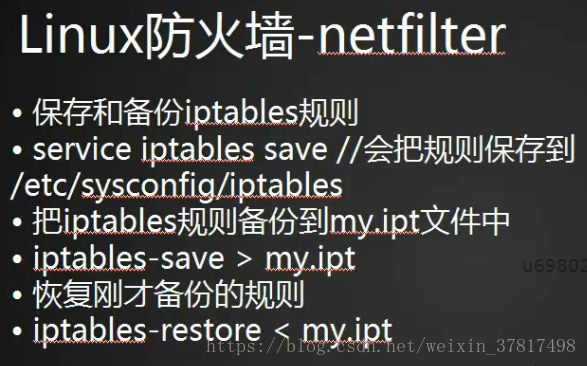
备份iptables规则,名字自定义 iptables-save > /tmp/ipt.txt
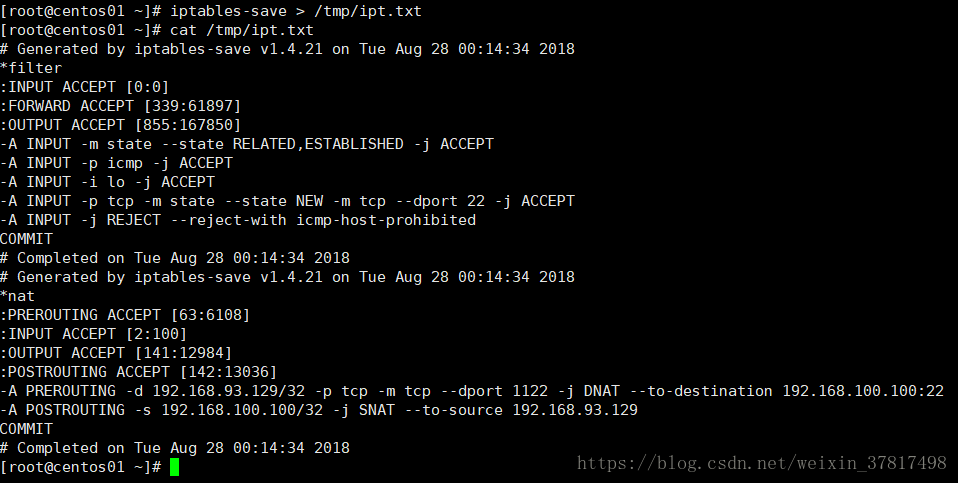

恢复备份的规则 iptables-restore < /tmp/ipt.txt

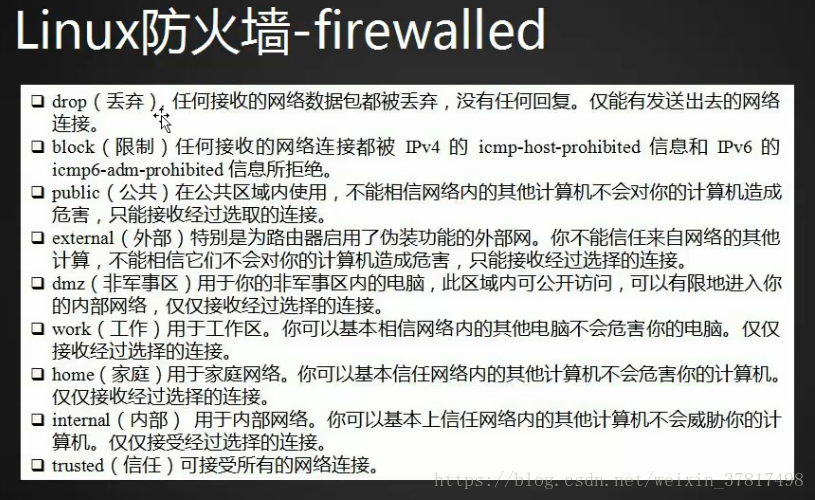
10.20 firewalld的9个zone
关闭iptables
systemctl disable iptables.service
systemctl stop iptables.service

打开firewalld
systemctl enable firewalld.service
systemctl start firewalld.service

firewall-cmd --get-zones 查看所有zone

firewall-cmd --get-default-zone 查看默认的zone

10.21 firewalld关于zone的操作

firewall-cmd --set-default-zone=work 设定默认zone

firewall-cmd --get-zone-of-interface=ens33 查看指定网卡的zone

firewall-cmd --zone=dmz --add-interface=ens37 给指定网卡设置zone

![]()
firewall-cmd --zone=public --add-interface=lo

firewall-cmd --zone=block --change-interface=ens37 更改指定网卡的zone
![]()
![]()
firewall-cmd --zone=block --remove-interface=ens37 删除指定网卡的zone

firewall-cmd --get-active-zones 查看系统所有网卡所在的zone

10.22 firewalld关于service的操作
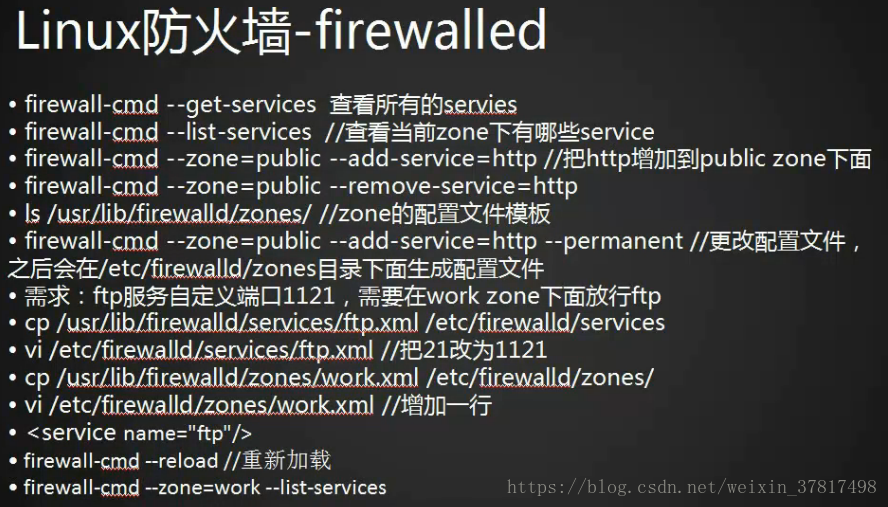
firewall-cmd --get-services 查看所有的service

firewall-cmd --list-services 查看当前zone下有哪些service

firewall-cmd --zone=public --list-services

firewall-cmd --zone=public --add-service=http 把http增加到public zone 下

firewall-cmd --zone=public --add-service=ftp --permanent 写入到配置文件里

cat /etc/firewalld/zones/public.xml

zone的配置文件模板

ls /usr/lib/firewalld/zones/ zone的配置文件模板
![]()
ls /usr/lib/firewalld/services/ service的配置文件模板

cp /usr/lib/firewalld/services/ftp.xml /etc/firewalld/services/ 拷贝services的配置文件
vi /etc/firewalld/services/ftp.xml 更改端口

cp /usr/lib/firewalld/zones/work.xml /etc/firewalld/zones/ 拷贝zone的配置文件
vim /etc/firewalld/zones/work.xml 增加 service
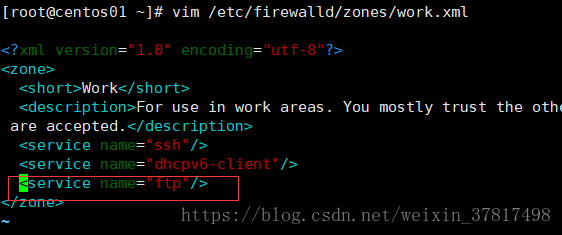
firewall-cmd --reload 重新加载

firewall-cmd --zone=work --list-services 查看services

10.23 linux任务计划cron
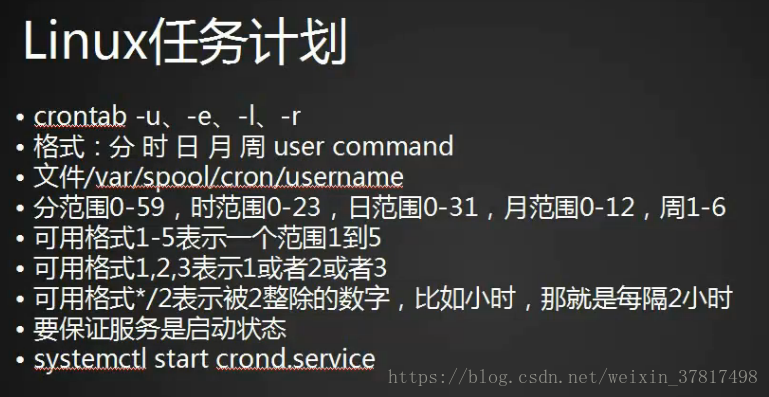
cat /etc/crontab
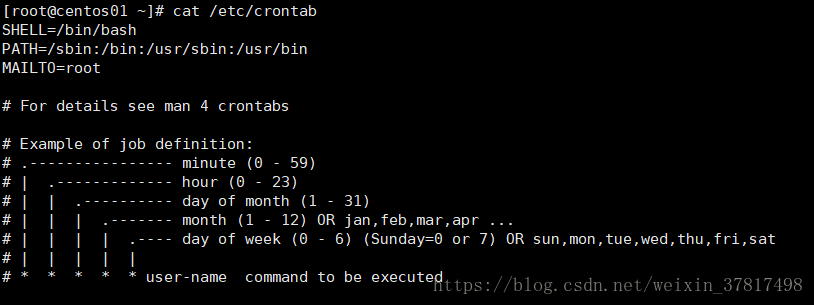
crontab -e 编辑一个任务计划
crontab -l 查看当前用户的任务计划
crontab -r 删除任务计划
crontab -u 指定用户
1-5 指定一个范围
*/2 被2整除的数,例子里面是双月
2,5代表 第二周和第五周

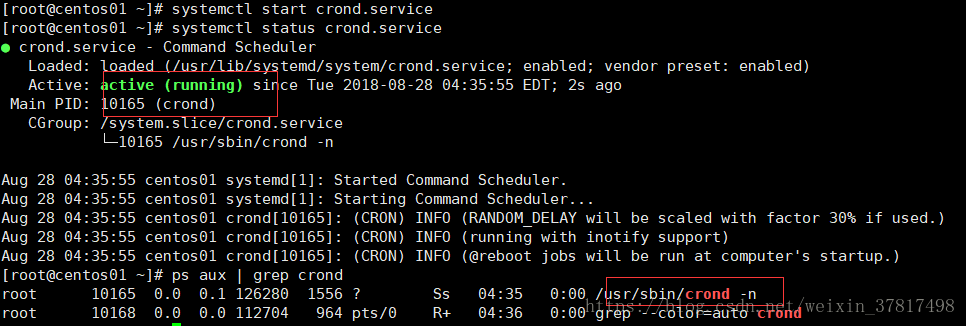
systemctl start crond.service 启动crond 服务
10.24 chkconfig工具
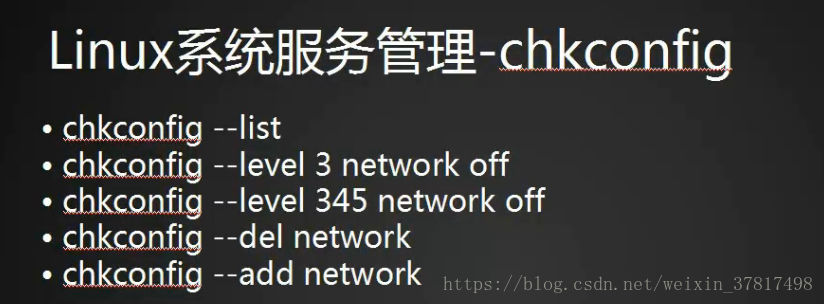
chkconfig --list

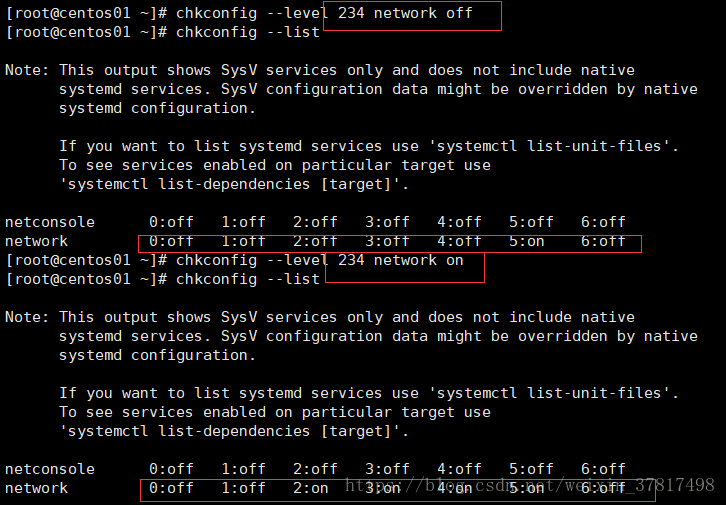
chkconfig --level 234 network off 关闭服务的启动级别
chkconfig --level 234 network on 开启服务的启动级别
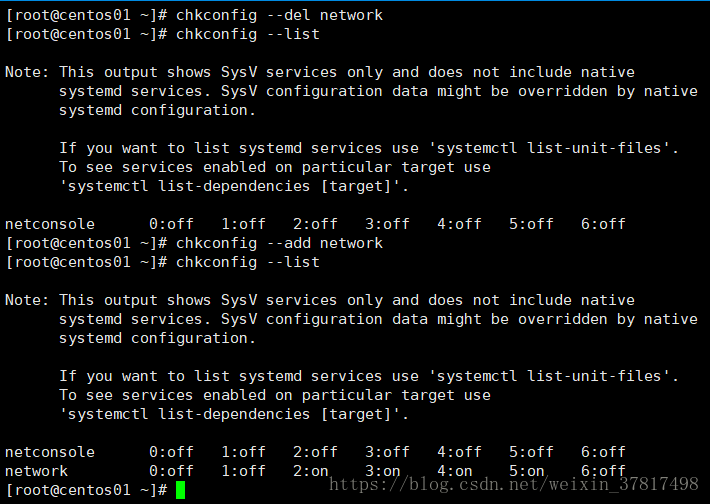
chkconfig --del network 删除系统服务
chkconfig --add network 添加系统服务
cp network 123 拷贝一个服务脚本

脚本里面包括这两行才会被识别
# chkconfig: 2345 10 90
# description: Activates/Deactivates all network interfaces configured to
# start at boot time.

chkconfig --add 123
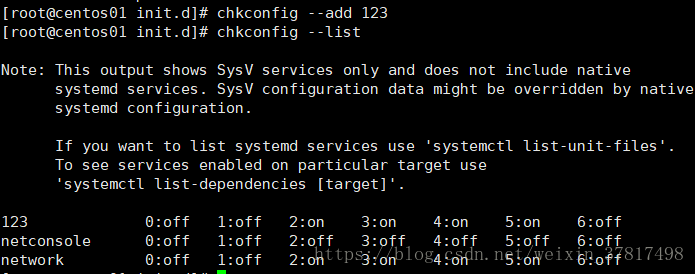
10.25 systemd管理服务
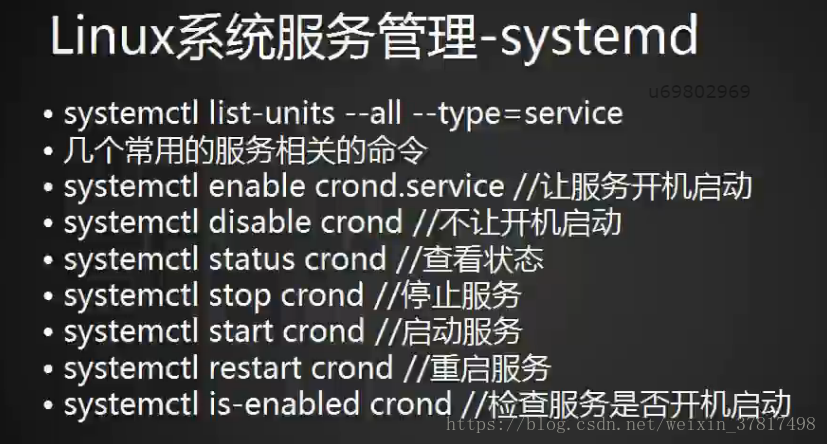
systemctl list-units --all --type=service 列出系统所有的服务

systemctl enable crond.service // 让某个服务开机启动(.service 可以省略)
systemctl disable crond.service // 设为开机不启动
systemctl status crond.service // 查看服务状态
systemctl start crond.service // 启动某个服务
systemctl stop crond.service // 停止某个服务
systemctl is-enabled crond //查看某个服务是否开机启动

/usr/lib/systemd/system/crond.service 启动脚本的实际位置
启动的时候会创建一个软链接


10.26 unit介绍
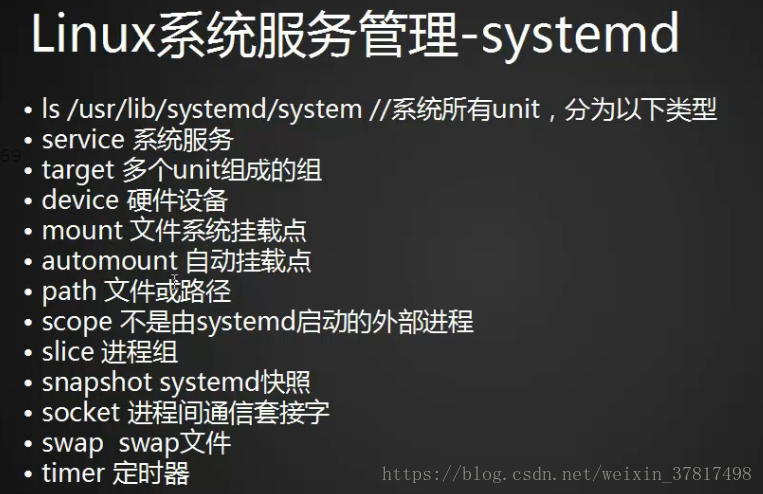
/usr/lib/systemd/system

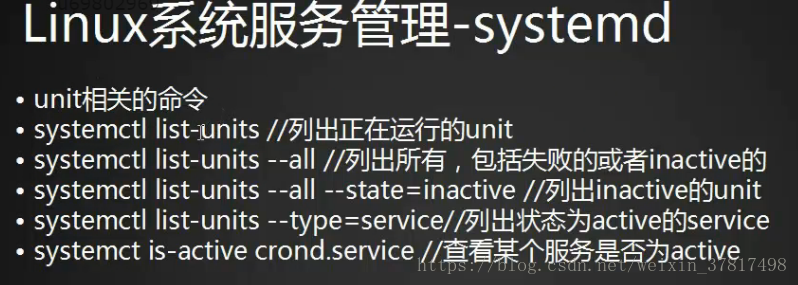
systemctl list-units 列出正在运行的unit

systemctl list-units -all 列出所有,包括失败的或inactive的

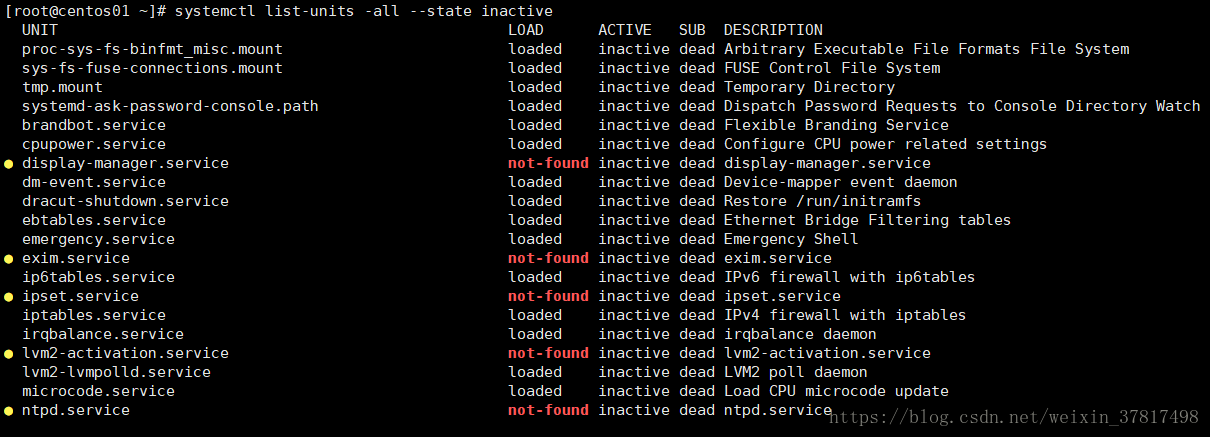
systemctl list-units -all --state inactive 列出inactive的unit
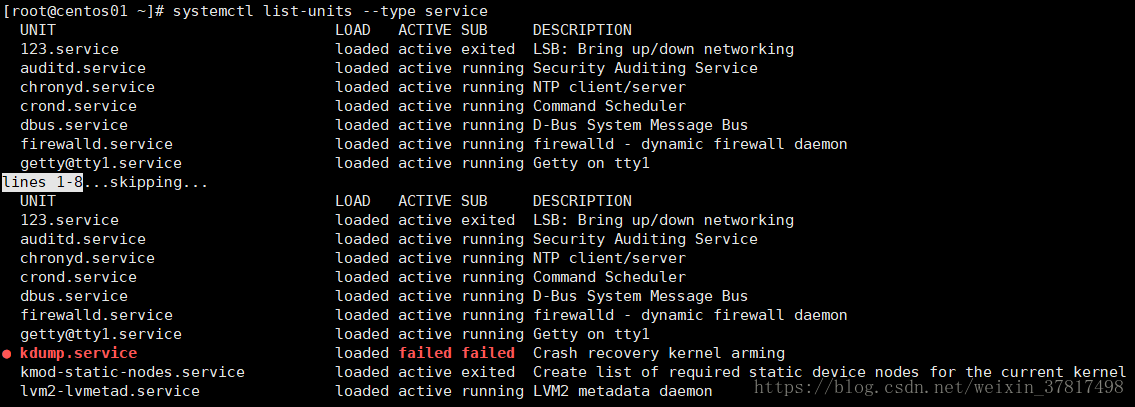
systemctl list-units --type service 列出状态为active的service
systemctl is-active crond.service 查看服务是否为active
systemctl is-enabled crond.service 查看服务是否为enabled

10.27 target介绍
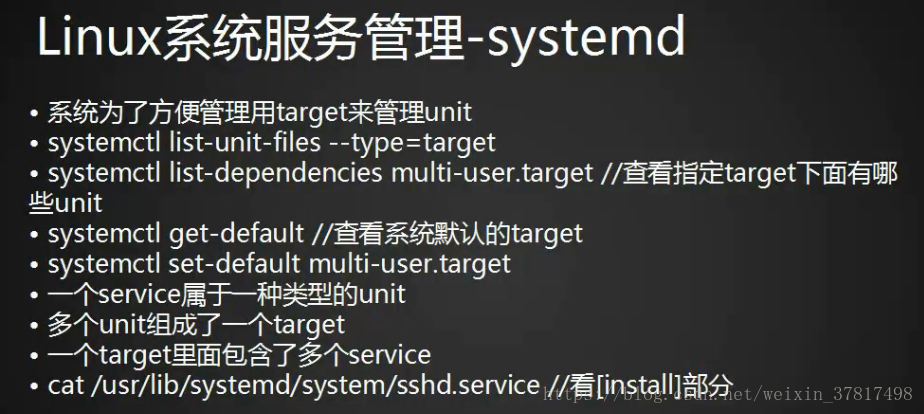
systemctl list-unit-files --type target 列出系统中所有的target
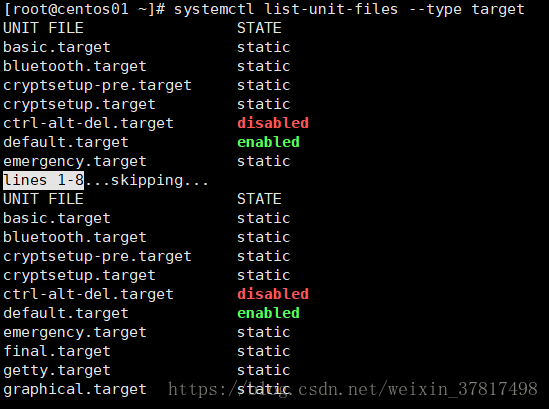
systemctl list-dependencies multi-user.target 查看target下有哪些unit
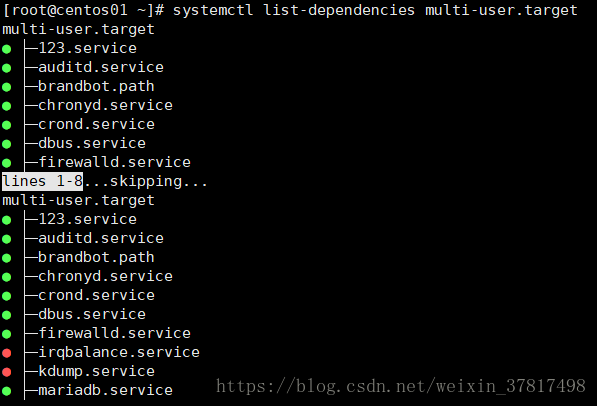
systemctl get-default 查看系统的默认target

systemctl set-default multi-user.target 设置默认

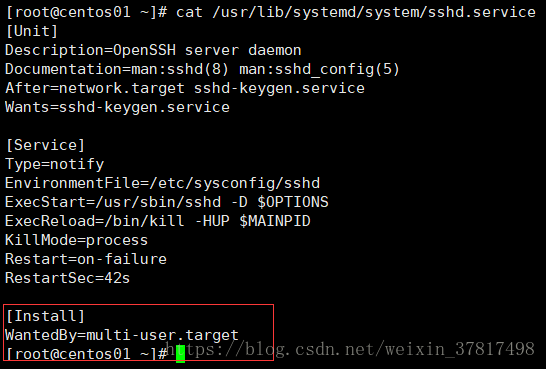
cat /usr/lib/systemd/system/sshd.service 看Install 部分
课堂笔记
一、iptables规则备份和恢复
二、firewalld的9个zone
三、firewalld关于zone的操作
四、firewalld关于service的操作
五、linux任务计划cron
六、chkconfig工具
七、systemd管理服务
八、unit介绍
九、target介绍
一、iptables规则备份和恢复
设定的防火墙规则只是保存在内存中,并没有保存到配置文件中,也就说当系统重启后以前设定的规则就没有了,所以
设定好规则后要先保存规则,以免重启后规则丢失。
[root@lanquark ~]# service iptables save
iptables: Saving firewall rules to /etc/sysconfig/iptables:[ OK ]
//etc/sysconfig/iptables为iptables的配置文件
iptables规则备份、恢复
//插入一条演示用规则
[root@lanquark ~]# iptables A INPUT p tcp s 192.168.1.9 dport 22 j ACCEPT
[root@lanquark ~]# iptables nvL
Chain INPUT (policy ACCEPT 5 packets, 2173 bytes)
pkts bytes target prot opt in out source destination
53 3524 ACCEPT tcp * * 192.168.1.9 0.0.0.0/0 tcp dpt:22
Chain FORWARD (policy ACCEPT 0 packets, 0 bytes)
pkts bytes target prot opt in out source destination
Chain OUTPUT (policy ACCEPT 28 packets, 2736 bytes)
pkts bytes target prot opt in out source destination
//保存规则
[root@lanquark ~]# service iptables save
iptables: Saving firewall rules to /etc/sysconfig/iptables:[ OK ]
[root@lanquark ~]# cat /etc/sysconfig/iptables
# Generated by iptablessave v1.4.21 on Thu Jun 14 22:12:34 2018
*nat
:PREROUTING ACCEPT [6:788]
:INPUT ACCEPT [6:788]
:OUTPUT ACCEPT [3:228]
:POSTROUTING ACCEPT [3:228]
A POSTROUTING s 192.168.2.0/24 o ens32 j MASQUERADE
COMMIT
# Completed on Thu Jun 14 22:12:34 2018
# Generated by iptablessave v1.4.21 on Thu Jun 14 22:12:34 2018
*filter
:INPUT ACCEPT [45:20141]
:FORWARD ACCEPT [0:0]
:OUTPUT ACCEPT [55:5772]
A INPUT s 192.168.1.9/32 p tcp m tcp dport 22 j ACCEPT
COMMIT
# Completed on Thu Jun 14 22:12:34 2018
//通过iptablessave命令备份规则
[root@lanquark ~]# iptablessave >iptablesscript
[root@lanquark ~]# cat iptablesscript
# Generated by iptablessave v1.4.21 on Thu Jun 14 22:15:28 2018
*nat
:PREROUTING ACCEPT [7:1017]
:INPUT ACCEPT [7:1017]
:OUTPUT ACCEPT [4:304]
:POSTROUTING ACCEPT [4:304]
A POSTROUTING s 192.168.2.0/24 o ens32 j MASQUERADE
COMMIT
# Completed on Thu Jun 14 22:15:28 2018
# Generated by iptablessave v1.4.21 on Thu Jun 14 22:15:28 2018
*filter
:INPUT ACCEPT [148:66443]
:FORWARD ACCEPT [0:0]
:OUTPUT ACCEPT [88:9236]
A INPUT s 192.168.1.9/32 p tcp m tcp dport 22 j ACCEPT
COMMIT
# Completed on Thu Jun 14 22:15:28 2018
//为演示出效果,清空当前防火墙规则
[root@lanquark ~]# iptables F
[root@lanquark ~]# iptables nvL
Chain INPUT (policy ACCEPT 24 packets, 2438 bytes)
pkts bytes target prot opt in out source destination
Chain FORWARD (policy ACCEPT 0 packets, 0 bytes)
pkts bytes target prot opt in out source destination
Chain OUTPUT (policy ACCEPT 12 packets, 1152 bytes)
pkts bytes target prot opt in out source destination
//通过iptablesrestore规则集到数据包过滤表中
[root@lanquark ~]# iptablesrestore iptablesscript
[root@lanquark ~]# iptables nvL
Chain INPUT (policy ACCEPT 2 packets, 986 bytes)
pkts bytes target prot opt in out source destination
21 1412 ACCEPT tcp * * 192.168.1.9 0.0.0.0/0 tcp dpt:22
Chain FORWARD (policy ACCEPT 0 packets, 0 bytes)
pkts bytes target prot opt in out source destination
Chain OUTPUT (policy ACCEPT 12 packets, 1152 bytes)
pkts bytes target prot opt in out source destination
二、firewalld的9个zone
在Centos7中使用firewalld防火墙
//停止iptables防火墙
[root@lanquark ~]# systemctl stop iptables.service
//取消iptables的开机启动
[root@lanquark ~]# systemctl disable iptables.service
Removed symlink /etc/systemd/system/basic.target.wants/iptables.service.
//验证iptables的状态已关闭
[root@lanquark ~]# systemctl status iptables.service
● iptables.service IPv4 firewall with iptables
Loaded: loaded (/usr/lib/systemd/system/iptables.service; disabled; vendor preset: disabled)
Active: inactive (dead) since Thu 20180614 22:29:10 CST; 41s ago
Main PID: 731 (code=exited, status=0/SUCCESS)
Jun 13 19:50:33 lanquark.com systemd[1]: Starting IPv4 firewall with iptables...
Jun 13 19:50:33 lanquark.com iptables.init[731]: iptables: Applying firewall rules: [ OK ]
Jun 13 19:50:33 lanquark.com systemd[1]: Started IPv4 firewall with iptables.
Jun 14 22:29:09 lanquark.com systemd[1]: Stopping IPv4 firewall with iptables...
Jun 14 22:29:09 lanquark.com iptables.init[3516]: iptables: Setting chains to policy ACCEPT: nat filter [ OK ]
Jun 14 22:29:09 lanquark.com iptables.init[3516]: iptables: Flushing firewall rules: [ OK ]
Jun 14 22:29:10 lanquark.com iptables.init[3516]: iptables: Unloading modules: [ OK ]
Jun 14 22:29:10 lanquark.com systemd[1]: Stopped IPv4 firewall with iptables.
//启动firewalld
[root@lanquark ~]# systemctl start firewalld.service
//将firewalld设为开机启动
[root@lanquark ~]# systemctl enable firewalld.service
Created symlink from /etc/systemd/system/dbusorg.fedoraproject.FirewallD1.service to
/usr/lib/systemd/system/firewalld.service.
Created symlink from /etc/systemd/system/multiuser.target.wants/firewalld.service to
/usr/lib/systemd/system/firewalld.service.
//验证firewalld状态
[root@lanquark ~]# systemctl status firewalld.service
● firewalld.service firewalld dynamic firewall daemon
Loaded: loaded (/usr/lib/systemd/system/firewalld.service; enabled; vendor preset: enabled)
Active: active (running) since Thu 20180614 22:30:19 CST; 3min 6s ago
Docs: man:firewalld(1)
Main PID: 3726 (firewalld)
CGroup: /system.slice/firewalld.service
└─
3726 /usr/bin/python Es /usr/sbin/firewalld nofork nopid
Jun 14 22:30:18 lanquark.com systemd[1]: Starting firewalld dynamic firewall daemon...
Jun 14 22:30:19 lanquark.com systemd[1]: Started firewalld dynamic firewall daemon.
Jun 14 22:30:19 lanquark.com firewalld[3726]: WARNING: ICMP type 'beyondscope' is not supported by the kernel for ipv6.
Jun 14 22:30:19 lanquark.com firewalld[3726]: WARNING: beyondscope: INVALID_ICMPTYPE: No supported ICMP type.,
ignorin...time.
Jun 14 22:30:19 lanquark.com firewalld[3726]: WARNING: ICMP type 'failedpolicy' is not supported by the kernel for ipv6.
Jun 14 22:30:19 lanquark.com firewalld[3726]: WARNING: failedpolicy: INVALID_ICMPTYPE: No supported ICMP type.,
ignori...time.
Jun 14 22:30:19 lanquark.com firewalld[3726]: WARNING: ICMP type 'rejectroute' is not supported by the kernel for ipv6.
Jun 14 22:30:19 lanquark.com firewalld[3726]: WARNING: rejectroute: INVALID_ICMPTYPE: No supported ICMP type.,
ignorin...time.
Hint: Some lines were ellipsized, use l to show in full.
firewalld默认的9个zone说明
| 区域 | 说明 |
| drop(丢弃) | 任何接收的网络数据包都被丢弃,没有任何回复。仅能有发送出去的网络连 接。 |
| block(限制) | 任何接收的网络连接都被 IPv4 的 icmp-host-prohibited 信息和 IPv6 的 icmp6-adm-prohibited 信息所拒绝。 |
| public(公共) | 在公共区域内使用,不能相信网络内的其他计算机不会对您的计算机造成危 害,只能接收经过选取的连接。 |
| external(外部) | 特别是为路由器启用了伪装功能的外部网。您不能信任来自网络的其他计算, 不能相信它们不会对您的计算机造成危害,只能接收经过选择的连接。 |
| dmz(非军事区) | 用于您的非军事区内的电脑,此区域内可公开访问,可以有限地进入您的内部 网络,仅仅接收经过选择的连接。 |
| work(工作) | 用于工作区。您可以基本相信网络内的其他电脑不会危害您的电脑。仅仅接收 经过选择的连接。 |
| home(家庭) | 用于家庭网络。您可以基本信任网络内的其他计算机不会危害您的计算机。仅 仅接收经过选择的连接。 |
| internal(内部) | 用于内部网络。您可以基本上信任网络内的其他计算机不会威胁您的计算机。 仅仅接受经过选择的连接。 |
| trusted(信任) | 可接受所有的网络连接。 |
安装时,firewalld 里的默认zone被设定为公共区域。
查看所有zone命令:firewallcmd getzones
[root@lanquark ~]# firewallcmd getzones
block dmz drop external home internal public trusted work
查看默认的区域
[root@lanquark ~]# firewallcmd getdefaultzone
public
三、firewalld关于zone的操作
firewalld有两个基础的概念,分别是zone和service,每一个zone里面有不同的iptables规则。
设定系统默认的zone
//设定默认zone为work
[root@lanquark ~]# firewallcmd setdefaultzone=work
success
//验证设定成功
[root@lanquark ~]# firewallcmd getdefaultzone
work
查看指定网卡的zone
//查看本地网卡
[root@lanquark ~]# ifconfig
ens32: flags=4163<UP,BROADCAST,RUNNING,MULTICAST> mtu 1500
inet 192.168.1.211 netmask 255.255.255.0 broadcast 192.168.1.255
inet6 fe80::5114:2b77:d59a:bc78 prefixlen 64 scopeid 0x20<link>
ether 00:0c:29:2f:92:ee txqueuelen 1000 (Ethernet)
RX packets 79214 bytes 20799087 (19.8 MiB)
RX errors 0 dropped 26 overruns 0 frame 0
TX packets 9103 bytes 1472245 (1.4 MiB)
TX errors 0 dropped 0 overruns 0 carrier 0 collisions 0
ens34: flags=4163<UP,BROADCAST,RUNNING,MULTICAST> mtu 1500
inet 192.168.2.1 netmask 255.255.255.0 broadcast 192.168.2.255
inet6 fe80::1e53:526f:a4af:a29d prefixlen 64 scopeid 0x20<link>
ether 00:0c:29:2f:92:f8 txqueuelen 1000 (Ethernet)
RX packets 1272 bytes 107520 (105.0 KiB)
RX errors 0 dropped 0 overruns 0 frame 0
TX packets 121 bytes 7464 (7.2 KiB)
TX errors 0 dropped 0 overruns 0 carrier 0 collisions 0
lo: flags=73<UP,LOOPBACK,RUNNING> mtu 65536
inet 127.0.0.1 netmask 255.0.0.0
inet6 ::1 prefixlen 128 scopeid 0x10<host>
loop txqueuelen 1 (Local Loopback)
RX packets 64 bytes 5312 (5.1 KiB)
RX errors 0 dropped 0 overruns 0 frame 0
TX packets 64 bytes 5312 (5.1 KiB)
TX errors 0 dropped 0 overruns 0 carrier 0 collisions 0
[root@lanquark ~]# firewallcmd getzoneofinterface=ens32
work
[root@lanquark ~]# firewallcmd getzoneofinterface=ens34
work
给指定网卡设置zone
[root@lanquark ~]# firewallcmd zone=public addinterface=ens32
The interface is under control of NetworkManager, setting zone to 'public'.
success
[root@lanquark ~]# firewallcmd getzoneofinterface=ens32
public
给指定网卡变更zone
The interface is under control of NetworkManager, setting zone to 'public'.
success
[root@lanquark ~]# firewallcmd getzoneofinterface=ens34
public
[root@lanquark ~]# firewallcmd zone=public changeinterface=ens34
删除指定网卡的zone
//ens34接口当前所在zone为public
[root@lanquark ~]# firewallcmd getzoneofinterface=ens34
public
//删除ens34接口所在的zone,ens34接口变为默认zone
[root@lanquark ~]# firewallcmd zone=public removeinterface=ens34
The interface is under control of NetworkManager, setting zone to default.
success
[root@lanquark ~]# firewallcmd getzoneofinterface=ens34
work
查看活动zone的列表
[root@lanquark ~]# firewallcmd getactivezones
work
interfaces: ens34
public
interfaces: ens32
查看某区域下绑定的接口
[root@lanquark ~]# firewallcmd zone=public listinterfaces
ens32
查看指定区域的所有设置
[root@lanquark ~]# firewallcmd zone=public listall
public (active)
target: default
icmpblockinversion: no
interfaces: ens32
sources:
services: ssh dhcpv6client
ports:
protocols:
masquerade: no
forwardports:
sourceports:
icmpblocks:
rich rules:
查看指定区域开放的端口
//将8080端口加入dmz区域
[root@lanquark ~]# firewallcmd zone=dmz addport=8080/tcp
success
//验证
[root@lanquark ~]# firewallcmd zone=dmz listports
8080/tcp
四、firewalld关于service的操作
一项服务可以是本地和目的地端口的列表,如果服务被允许的话,也可以是一系列自动加载的防火墙辅助模块。预先定
义的服务的使用,让客户更容易被允许或者被禁止进入服务。与对开放端口或者值域,或者端口截然不同,使用预先定
义服务,或者客户限定服务,或许能够让管理更容易。
列出系统里所有的service
[root@lanquark ~]# firewallcmd getservices
RHSatellite6 amandaclient amandak5client bacula baculaclient bitcoin bitcoinrpc bitcointestnet bitcointestnetrpc ceph cephmon cfengine condorcollector ctdb dhcp dhcpv6 dhcpv6client dns dockerregistry dropboxlansync
elasticsearch freeipaldap freeipaldaps freeipareplication freeipatrust ftp gangliaclient gangliamaster highavailability http https imap imaps ipp ippclient ipsec iscsitarget kadmin kerberos kibana klogin kpasswd kshell ldap
ldaps libvirt libvirttls managesieve mdns mosh mountd mswbt mssql mysql nfs nrpe ntp openvpn ovirtimageio ovirtstorageconsole ovirtvmconsole pmcd pmproxy pmwebapi pmwebapis pop3 pop3s postgresql privoxy proxydhcp ptp pulseaudio
puppetmaster quassel radius rpcbind rsh rsyncd samba sambaclient sane sip sips smtp smtpsubmission smtps snmp snmptrap
spideroaklansync squid ssh synergy syslog syslogtls telnet tftp tftpclient tinc torsocks transmissionclient vdsm
vncserver wbemhttps xmppbosh xmppclient xmpplocal xmppserver
//或者[root@lanquark ~]# ls l /usr/lib/firewalld/services/ | awk '{print $9}' | sed r 's#(.*).xml$#1#'
查看默认zone下的service
[root@lanquark ~]# firewallcmd listservices
ssh dhcpv6client
查看指定zone下的service
[root@lanquark ~]# firewallcmd zone=work listservices
ssh dhcpv6client
给指定zone来添加服务
//可增加 permanent选项并重新加载防火墙,使之成为永久性设置。
//firewallcmd reload重载防火墙不中断已建立连接
//firewallcmd completereload不仅仅中断您已经移除的服务,还会中断所有已经建立的连接。
[root@lanquark ~]# firewallcmd zone=public addservice=ftp
success
//验证
[root@lanquark ~]# firewallcmd zone=public listservices
ssh dhcpv6client ftp
//或在/etc/firewalld/zones/public.xml文件中增加如下行
//<service name="ftp"/>
从指定zone移除服务
[root@lanquark ~]# firewallcmd zone=public listservices
ssh dhcpv6client ftp
[root@lanquark ~]# firewallcmd zone=public removeservice=ftp
success
[root@lanquark ~]# firewallcmd zone=public listservices
ssh dhcpv6client
//或从/etc/firewalld/zones/public.xml文件中移除如下行
// <service name="ftp"/>
将添加后的服务保存到配置文件(会在/etc/firewalld/zones目录生成一个配置文件)
//permanent 写入配置文件永久生效
[root@lanquark ~]# firewallcmd zone=public addservice=ftp permanent
success
/etc/firewalld/zones目录下的配置文件说明
[root@lanquark ~]# ls /etc/firewalld/zones/
public.xml public.xml.old
//以.old结尾的文件类似模板,当你第一次使用permanent的时候他会重新写一份配置文件,之后添加服务都会添加到xml这个配置文件里。
zones模板路径:/usr/lib/firewalld/zones(9种,这些文件不能编辑)
[root@lanquark ~]# ls /usr/lib/firewalld/zones/
block.xml drop.xml home.xml public.xml work.xml
dmz.xml external.xml internal.xml trusted.xml
//默认区的文件
[root@lanquark ~]# ls /etc/firewalld/zones/
public.xml public.xml.old
//如需加入工作区文件,需将/usr/lib/firewalld/zones中文件复制到/etc/firewalld/zones/
//cp /usr/lib/firewalld/zones/work.xml /etc/firewalld/zones/
// /etc/firewalld/zones/work.xml可编辑
service模板路径:/usr/lib/firewalld/service
[root@lanquark ~]# ls /usr/lib/firewalld/services/
RHSatellite6.xml iscsitarget.xml puppetmaster.xml
amandaclient.xml kadmin.xml quassel.xml
amandak5client.xml kerberos.xml radius.xml
baculaclient.xml kibana.xml rpcbind.xml
bacula.xml klogin.xml rsh.xml
bitcoinrpc.xml kpasswd.xml rsyncd.xml
bitcointestnetrpc.xml kshell.xml sambaclient.xml
bitcointestnet.xml ldap.xml samba.xml
bitcoin.xml ldaps.xml sane.xml
cephmon.xml libvirttls.xml sip.xml
ceph.xml libvirt.xml sips.xml
cfengine.xml managesieve.xml smtpsubmission.xml
condorcollector.xml mdns.xml smtp.xml
ctdb.xml mosh.xml smtps.xml
dhcp.xml mountd.xml snmp.xml
dhcpv6client.xml mswbt.xml snmptrap.xml
dhcpv6.xml mssql.xml spideroaklansync.xml
dns.xml mysql.xml squid.xml
dockerregistry.xml nfs.xml ssh.xml
dropboxlansync.xml nrpe.xml synergy.xml
elasticsearch.xml ntp.xml syslogtls.xml
freeipaldap.xml openvpn.xml syslog.xml
freeipaldaps.xml ovirtimageio.xml telnet.xml
freeipareplication.xml ovirtstorageconsole.xml tftpclient.xml
freeipatrust.xml ovirtvmconsole.xml tftp.xml
ftp.xml pmcd.xml tinc.xml
gangliaclient.xml pmproxy.xml torsocks.xml
gangliamaster.xml pmwebapi.xml transmissionclient.xml
highavailability.xml pmwebapis.xml vdsm.xml
http.xml pop3.xml vncserver.xml
https.xml pop3s.xml wbemhttps.xml
imap.xml postgresql.xml xmppbosh.xml
imaps.xml privoxy.xml xmppclient.xml
ippclient.xml proxydhcp.xml xmpplocal.xml
ipp.xml ptp.xml xmppserver.xml
ipsec.xml pulseaudio.xml
扩展练习:
需求:ftp服务自定义端口改为1121,在work,zone下面放行ftp
1.首先先将 /usr/lib/firewalld/services/ftp.xml复制到/etc/firewalld/services/下
[root@lanquark ~]# cp /usr/lib/firewalld/services/ftp.xml /etc/firewalld/services/
[root@lanquark ~]# ls l /etc/firewalld/services/ftp.xml
rwrr 1 root root 374 Jun 15 07:26 /etc/firewalld/services/ftp.xml
2.编辑/etc/firewalld/services/ftp.xml文件
[root@lanquark ~]# vim /etc/firewalld/services/ftp.xml
<?xml version="1.0" encoding="utf8"?>
<service>
<short>FTP</short>
<description>FTP is a protocol used for remote file transfer. If you plan to make your FTP server publicly available,
enable t
his option. You need the vsftpd package installed for this option to be useful.</description>
//将port="21"修改为port="1121",保存退出
<port protocol="tcp" port="21"/>
<module name="nf_conntrack_ftp"/>
</service>
3.将/usr/lib/firewalld/zones/work.xml拷贝到 /etc/firewalld/zones/
[root@lanquark ~]# cp /usr/lib/firewalld/zones/work.xml /etc/firewalld/zones/
[root@lanquark ~]# ls l /etc/firewalld/zones/work.xml
rwrr 1 root root 311 Jun 15 07:32 /etc/firewalld/zones/work.xml
4.编辑/etc/firewalld/zones/work.xml文件
[root@lanquark ~]# vim /etc/firewalld/zones/work.xml
<?xml version="1.0" encoding="utf8"?>
<zone>
<short>Work</short>
<description>For use in work areas. You mostly trust the other computers on networks to not harm your computer. Only
selected
incoming connections are accepted.</description>
<service name="ssh"/>
<service name="dhcpv6client"/>
//增加一行<service name="ftp"/>,保存,退出
<service name="ftp"/>
</zone>
5.重载防火墙
[root@lanquark ~]# firewallcmd reload
success
6.验证
[root@lanquark ~]# firewallcmd zone=work listservices
ssh dhcpv6client ftp
总结:zone是一个规则集合,每个zone下面有不同的service,而每个sevice下面可以设定不同的服务(如ftp、http),
service也是可以自定义的。(多数是端口)
五、linux任务计划cron
对于需要周期性执行的任务可以使用crontab命令,该命令所使用的服务是crond。因此在使用之前一定要先启动crond服
务。
[root@lanquark ~]# systemctl status crond.service
● crond.service Command Scheduler
Loaded: loaded (/usr/lib/systemd/system/crond.service; enabled; vendor preset: enabled)
Active: active (running) since Thu 20180614 20:49:47 EDT; 34min ago
Main PID: 700 (crond)
CGroup: /system.slice/crond.service
└─
700 /usr/sbin/crond n
Jun 14 20:49:47 lanquark.com systemd[1]: Started Command Scheduler.
Jun 14 20:49:47 lanquark.com systemd[1]: Starting Command Scheduler...
Jun 14 20:49:48 lanquark.com crond[700]: (CRON) INFO (RANDOM_DELAY will be scaled with factor 27% if used.)
Jun 14 20:49:49 lanquark.com crond[700]: (CRON) INFO (running with inotify support)
//如果没有启动,则通过systemctl start crond.service 命令启动
当使用者执行crontab命令时,系统会按如下步骤操作
1.先查找/etc/corn.allow文件,在该文件中存在的用户可以使用crontab,不在该文件中的用户不能使用crontab(即使用没
有写在/etc/cron.deny中)
2.如果没有/etc/cron.allow就寻找/etc/cron.deny文件,在该文件中存在的用户不能使用crontab,在该文件中不存的用户就
可以用crontab
3.如果两个文件都不存在,则只有root可以使用crontab。
多数linux版本默认的文件是/etc/cron.deny,而且该文件为空
[root@lanquark ~]# ls /etc/cron.*
/etc/cron.deny
/etc/cron.d:
0hourly sysstat
/etc/cron.daily:
logrotate mandb.cron
/etc/cron.hourly:
0anacron
/etc/cron.monthly:
/etc/cron.weekly:
[root@lanquark ~]# cat /etc/cron.deny
[root@lanquark ~]#
crontab建立例行性任务的方式
1.针对用户的例行性任务,用crontab e命令来管理任务
2.针对系统的例行性任务,可以通过/etc/crontab文件来管理任务
针对用户的例行性任务
语法: crontab [u username] [l|e|r]
选项说明
u 只用root才有权限使用这个参数,用于帮助其他用户建立或删除crontab
e 编辑crontab的工作内容,即进入crontab编辑模式
l 查看crontab的工作内容
r 移除crontab的工作内容,如果要删除某一项的内容,只能使用crontab e手动删除
crontab的模式是:分 时 日 月 周 命令
分范围059,时范围023,日范围131,月范围112,周17
""表示一个时间段范围,可用格式15表示一个范围1到5
","表示分割时段的意思,可用格式1,2,3表示1或者2或者3
"*"表示任何时间都能够接受,任何时间都可以执行该命令可用格式。"/n"代表每隔n个时间单位。*/2表示被2整除的数字,
比如小时,那就是每隔2小时
查看计划任务列表: crontab l
[root@lanquark ~]# crontab l
0 10 * * * mail root s "crontab test at 10"
0 2,4 * * * mail hjm s "crontab test at 2 and 4"
*/20 * * * * mail root s "crontab test every 20 minites"
添加计划任务: crontab e
[root@lanquark ~]# crontab e
//使用方式类似vim
//格式: 分 时 日 月 周 命令
//命令最好使用绝对路径
//每天凌晨三点,执行123.sh脚本文件,正确的和错误的日志都输出到123.log文件中
0 3 * * * /bin/bash /usr/local/sbin/123.sh >/tmp/123.log 2>/tmp/123.log
//因为是每天三点执行脚本,所以可以写成追加,每天都去记录日志
0 3 * * * /bin/bash /usr/local/sbin/123.sh >>/tmp/123.log 2>>/tmp/123.log
//若想110号,双月去执行该脚本,后面就不在执行了——>只要 被2 整除,就符合条件
0 3 110 */2 * /bin/bash /usr/local/sbin/123.sh >>/tmp/123.log 2>>/tmp/123.log
//只要周2和周5执行该文件
0 3 110 */2 2,5 /bin/bash /usr/local/sbin/123.sh >>/tmp/123.log 2>>/tmp/123.log
删除计划任务: crontab r
[root@lanquark ~]# crontab r
[root@lanquark ~]# crontab l
no crontab for root
针对系统的例行性任务
直接编辑/etc/crontab。基本上这个服务的最低侦测限制是分钟。cron会每分钟读取一次/etc/crontab与/var/spool/cron里的
资料内容。
[root@lanquark ~]# cat /etc/crontab
SHELL=/bin/bash
PATH=/sbin:/bin:/usr/sbin:/usr/bin
MAILTO=root
# For details see man 4 crontabs
# Example of job definition:
# . minute (0 59)
# | . hour (0 23)
# | | . day of month (1 31)
# | | | . month (1 12) OR jan,feb,mar,apr ...
# | | | | . day of week (0 6) (Sunday=0 or 7) OR sun,mon,tue,wed,thu,fri,sat
# | | | | |
# * * * * * username command to be executed
//PATH表示输入执行文件的搜索路径
//MAILTO表示/etc/crontab中命令发生错误时或执行结果有STDOUT/STDERR时,发送一封邮件给root用户
/etc/crontab文件中的命令支持两种执行命令的方式
1.直接执行命令
[root@lanquark ~]# crontab e
no crontab for root using an empty one
//用法和vim差不多
2.目录规则
//以建立一个每隔5分钟执行一次的命令为例
//建立/root/five目录
[root@lanquark ~]# mkdir /root/five
[root@lanquark ~]# vim /etc/crontab
//增加*/5 * * * *root runparts /root/file
SHELL=/bin/bash
PATH=/sbin:/bin:/usr/sbin:/usr/bin
MAILTO=root
# For details see man 4 crontabs
# Example of job definition:
# . minute (0 59)
# | . hour (0 23)
# | | . day of month (1 31)
# | | | . month (1 12) OR jan,feb,mar,apr ...
# | | | | . day of week (0 6) (Sunday=0 or 7) OR sun,mon,tue,wed,thu,fri,sat
# | | | | |
# * * * * * username command to be executed
*/5 * * * *root runparts /root/file
格式中为何没有年份?
因为用星期就可以确定日期的唯一性,比如说今年的6月18号和明年的6月18号的星期肯定是不同的,这样就可以确定某
一天的唯一性
任务计划不执行的原因分析
不执行的原因很有可能是你写的脚本里面,没有使用绝对路径导致不执行。如果你使用的命令不在PATH里面,就无法找
到该命令。所以要么将命令写一个绝对路径,要么将命令的路径加入到PATH变量里面去
建议:
命令都用绝对路径的形式
写脚本的时候,添加日志记录功能。
六、chkconfig工具
Centos6及以前版本系统中运行级
等级0表示:表示关机
等级1表示:单用户模式
等级2表示:多用户模式,少nfs服务
等级3表示:多用户模式,不带图形
等级4表示:是一种保留的级别
等级5表示:带图形界面的多用户模式
等级6表示:重新启动
在centos6中的 /etc/inittab 中定义开机的默认运行级别
在centos7中,已经没有用运行级的概念了,只是为了向上兼容。
系统服务的脚本存放在 /etc/init.d/ 下面
[root@lanquark ~]# ls /etc/init.d/
functions mysql mysqld netconsole network README
chkconfig命令主要用来查询或设置系统服务的运行级别,但是并不会立即启动或停止一个服务。chkconfig主要用在
Centos6及以前的系统中,Centos7中使用的比较少,已经在向systemd过渡。
用法
chkconfig [list] [type 类型] [名称]
chkconfig add 名称
chkconfig del 名称
chkconfig override 名称
chkconfig [level 级别] [type 类型] 名称 on|off|resetpriorities
显示系统服务列表
[root@lanquark ~]# chkconfig list
Note: This output shows SysV services only and does not include native
systemd services. SysV configuration data might be overridden by native
systemd configuration.
If you want to list systemd services use 'systemctl listunitfiles'.
To see services enabled on particular target use
'systemctl listdependencies [target]'.
mysql 0:off 1:off 2:on 3:on 4:on 5:on 6:off
netconsole 0:off 1:off 2:off 3:off 4:off 5:off 6:off
network 0:off 1:off 2:on 3:on 4:on 5:on 6:off
关闭指定服务的自动启动
[root@lanquark ~]# chkconfig mysql off
[root@lanquark ~]# chkconfig list mysql
Note: This output shows SysV services only and does not include native
systemd services. SysV configuration data might be overridden by native
systemd configuration.
If you want to list systemd services use 'systemctl listunitfiles'.
To see services enabled on particular target use
'systemctl listdependencies [target]'.
mysql 0:off 1:off 2:off 3:off 4:off 5:off 6:off
[root@lanquark ~]# chkconfig mysql on
[root@lanquark ~]# chkconfig list mysql
Note: This output shows SysV services only and does not include native
systemd services. SysV configuration data might be overridden by native
systemd configuration.
If you want to list systemd services use 'systemctl listunitfiles'.
To see services enabled on particular target use
'systemctl listdependencies [target]'.
mysql 0:off 1:off 2:on 3:on 4:on 5:on 6:off
指定服务在某一运行级的关闭与开启
//要2级别关闭
[root@lanquark ~]# chkconfig mysql off level 2
[root@lanquark ~]# chkconfig list mysql
Note: This output shows SysV services only and does not include native
systemd services. SysV configuration data might be overridden by native
systemd configuration.
If you want to list systemd services use 'systemctl listunitfiles'.
To see services enabled on particular target use
'systemctl listdependencies [target]'.
mysql 0:off 1:off 2:off 3:on 4:on 5:on 6:off
//开启
[root@lanquark ~]# chkconfig mysql on level 2
[root@lanquark ~]# chkconfig list mysql
Note: This output shows SysV services only and does not include native
systemd services. SysV configuration data might be overridden by native
systemd configuration.
If you want to list systemd services use 'systemctl listunitfiles'.
To see services enabled on particular target use
'systemctl listdependencies [target]'.
mysql 0:off 1:off 2:on 3:on 4:on 5:on 6:off
0和1和6级别不能设置成开
0级别在关机状态是不可能开启的
1级别是单用户模式,服务是不可能开启的
6级别在重启的时候,是不可能开启的——>重启相当于先关闭在启动(重启的那一刻是先关闭才对)。
一个脚本加入到服务列表中
首先该启动脚本要放入到 /etc/init.d 这个目录下——>只有在这个目录下,才可以添加到服务列表中去
其次脚本格式有如下要求
1.是一个shell脚本
2.固定格式:
//启动和关闭顺序自己定义即可,这里是 64 36
# chkconfig: 2345 64 36
# description: A very fast and reliable SQL database engine.
最后用chkconfig add将相应的脚本加入到服务列表
[root@lanquark ~]# chkconfig list
Note: This output shows SysV services only and does not include native
systemd services. SysV configuration data might be overridden by native
systemd configuration.
If you want to list systemd services use 'systemctl listunitfiles'.
To see services enabled on particular target use
'systemctl listdependencies [target]'.
netconsole 0:off 1:off 2:off 3:off 4:off 5:off 6:off
network 0:off 1:off 2:on 3:on 4:on 5:on 6:off
[root@lanquark ~]# chkconfig add mysql
//验证
[root@lanquark ~]# chkconfig list
Note: This output shows SysV services only and does not include native
systemd services. SysV configuration data might be overridden by native
systemd configuration.
If you want to list systemd services use 'systemctl listunitfiles'.
To see services enabled on particular target use
'systemctl listdependencies [target]'.
mysql 0:off 1:off 2:on 3:on 4:on 5:on 6:off
netconsole 0:off 1:off 2:off 3:off 4:off 5:off 6:off
network 0:off 1:off 2:on 3:on 4:on 5:on 6:off
删除服务列表中的服务
[root@lanquark ~]# chkconfig del mysql
[root@lanquark ~]# chkconfig list
Note: This output shows SysV services only and does not include native
systemd services. SysV configuration data might be overridden by native
systemd configuration.
If you want to list systemd services use 'systemctl listunitfiles'.
To see services enabled on particular target use
'systemctl listdependencies [target]'.
netconsole 0:off 1:off 2:off 3:off 4:off 5:off 6:off
network 0:off 1:off 2:on 3:on 4:on 5:on 6:off
七、systemd管理服务
Systemd 是 Linux 系统中最新的初始化系统(init),它主要的设计目标是克服 sysvinit 固有的缺点,提高系统的启动速
度。
systemd 的目标是:
尽可能启动更少的进程
尽可能将更多进程并行启动
查看systemd信息
显示单元依赖关系
[root@lanquark ~]# systemctl listdependencies
default.target
● ├─abrtccpp.service
● ├─abrtoops.service
● ├─abrtvmcore.service
● ├─abrtxorg.service
● ├─abrtd.service
● ├─auditd.service
● ├─brandbot.path
● ├─chronyd.service
● ├─crond.service
...下略...
显示sockets信息和哪些是活动的
[root@lanquark ~]# systemctl listsockets
LISTEN UNIT ACTIVATES
/dev/log systemdjournald.socket systemdjournald.service
/run/systemd/initctl/fifo systemdinitctl.socket systemdinitctl.service
/run/systemd/journal/socket systemdjournald.socket systemdjournald.service
/run/systemd/journal/stdout systemdjournald.socket systemdjournald.service
/run/systemd/shutdownd systemdshutdownd.socket systemdshutdownd.service
/run/udev/control systemdudevdcontrol.socket systemdudevd.service
/var/run/dbus/system_bus_socket dbus.socket dbus.service
kobjectuevent 1 systemdudevdkernel.socket systemdudevd.service
8 sockets listed.
Pass all to see loaded but inactive sockets, too.
查看活动的system任务
[root@lanquark ~]# systemctl listjobs
No jobs running.
查看单元文件及状态
[root@lanquark ~]# systemctl listunitfiles
UNIT FILE STATE
procsysfsbinfmt_misc.automount static
devhugepages.mount static
devmqueue.mount static
procsysfsbinfmt_misc.mount static
sysfsfuseconnections.mount static
syskernelconfig.mount static
syskerneldebug.mount static
tmp.mount disabled
brandbot.path disabled
...下略...
显示单元是否载入及状态
[root@lanquark ~]# systemctl listunits
UNIT LOAD ACTIVE SUB DESCRIPTION
procsysfsbinfmt_misc.automount loaded active waiting Arbitrary Executable File
Formats File System Automount Point
sysdevicespci0000:000000:00:07.1ata2host1target1:0:01:0:0:0blocksr0.device loaded active plugged
VMware_Virtual_IDE_CDROM_Drive CentOS_7_x86_64
sysdevicespci0000:000000:00:10.0host2target2:0:02:0:0:0blocksdasda1.device loaded active plugged
VMware_Virtual_S 1
sysdevicespci0000:000000:00:10.0host2target2:0:02:0:0:0blocksdasda2.device loaded active plugged
VMware_Virtual_S 2
sysdevicespci0000:000000:00:10.0host2target2:0:02:0:0:0blocksdasda3.device loaded active plugged
VMware_Virtual_S 3
sysdevicespci0000:000000:00:10.0host2target2:0:02:0:0:0blocksda.device loaded active plugged VMware_Virtual_S
sysdevicespci0000:000000:00:11.00000:02:00.0netens32.device loaded active plugged 82545EM Gigabit Ethernet
Controller (Copper) (PRO/1000 MT Single P
| sysdevicesplatformserial8250ttyttyS0.device | loaded active plugged |
| /sys/devices/platform/serial8250/tty/ttyS0 |
| sysdevicesplatformserial8250ttyttyS1.device | loaded active plugged |
| /sys/devices/platform/serial8250/tty/ttyS1 |
| sysdevicesplatformserial8250ttyttyS2.device | loaded active plugged |
| /sys/devices/platform/serial8250/tty/ttyS2 |
| sysdevicesplatformserial8250ttyttyS3.device | loaded active plugged |
| /sys/devices/platform/serial8250/tty/ttyS3 | |
| ...下略... | |
| 显示默认的目标 | |
| [root@lanquark ~]# systemctl getdefault | |
| multiuser.target |
管理服务
列出所有的服务
[root@lanquark ~]# systemctl listunits all type=service
UNIT LOAD ACTIVE SUB DESCRIPTION
abrtccpp.service loaded active exited Install ABRT coredump hook
abrtoops.service loaded active running ABRT kernel log watcher
abrtvmcore.service loaded inactive dead Harvest vmcores for ABRT
abrtxorg.service loaded inactive dead ABRT Xorg log watcher
abrtd.service loaded active running ABRT Automated Bug Reporting Tool
auditd.service loaded active running Security Auditing Service
brandbot.service loaded inactive dead Flexible Branding Service
chronyd.service loaded active running NTP client/server
cpupower.service loaded inactive dead Configure CPU power related settings
crond.service loaded active running Command Scheduler
dbus.service loaded active running DBus System Message Bus
● displaymanager.service notfound inactive dead displaymanager.service
...下略...
查看服务状态
[root@lanquark ~]# systemctl status firewalld.service
● firewalld.service firewalld dynamic firewall daemon
Loaded: loaded (/usr/lib/systemd/system/firewalld.service; enabled; vendor preset: enabled)
Active: active (running) since Thu 20180614 22:36:31 EDT; 1min 32s ago
Docs: man:firewalld(1)
Process: 2403 ExecReload=/bin/kill HUP $MAINPID (code=exited, status=0/SUCCESS)
Main PID: 2270 (firewalld)
CGroup: /system.slice/firewalld.service
└─
2270 /usr/bin/python Es /usr/sbin/firewalld nofork nopid
Jun 14 22:36:32 lanquark.com firewalld[2270]: WARNING: failedpolicy: INVALID_ICMPTYPE: No supported ICMP type., ignoring
for runtime.
Jun 14 22:36:32 lanquark.com firewalld[2270]: WARNING: ICMP type 'rejectroute' is not supported by the kernel for ipv6.
Jun 14 22:36:32 lanquark.com firewalld[2270]: WARNING: rejectroute: INVALID_ICMPTYPE: No supported ICMP type., ignoring
for runtime.
Jun 14 22:37:14 lanquark.com systemd[1]: Reloaded firewalld dynamic firewall daemon.
Jun 14 22:37:15 lanquark.com firewalld[2270]: WARNING: ICMP type 'beyondscope' is not supported by the kernel for ipv6.
Jun 14 22:37:15 lanquark.com firewalld[2270]: WARNING: beyondscope: INVALID_ICMPTYPE: No supported ICMP type., ignoring
for runtime.
Jun 14 22:37:15 lanquark.com firewalld[2270]: WARNING: ICMP type 'failedpolicy' is not supported by the kernel for ipv6.
Jun 14 22:37:15 lanquark.com firewalld[2270]: WARNING: failedpolicy: INVALID_ICMPTYPE: No supported ICMP type., ignoring
for runtime.
Jun 14 22:37:15 lanquark.com firewalld[2270]: WARNING: ICMP type 'rejectroute' is not supported by the kernel for ipv6.
Jun 14 22:37:15 lanquark.com firewalld[2270]: WARNING: rejectroute: INVALID_ICMPTYPE: No supported ICMP type., ignoring
for runtime.
停止服务
[root@lanquark ~]# systemctl status firewalld.service
● firewalld.service firewalld dynamic firewall daemon
Loaded: loaded (/usr/lib/systemd/system/firewalld.service; enabled; vendor preset: enabled)
Active: active (running) since Thu 20180614 22:34:17 EDT; 7s ago
Docs: man:firewalld(1)
Main PID: 1919 (firewalld)
CGroup: /system.slice/firewalld.service
└─
1919 /usr/bin/python Es /usr/sbin/firewalld nofork nopid
Jun 14 22:34:16 lanquark.com systemd[1]: Starting firewalld dynamic firewall daemon...
Jun 14 22:34:17 lanquark.com systemd[1]: Started firewalld dynamic firewall daemon.
Jun 14 22:34:17 lanquark.com firewalld[1919]: WARNING: ICMP type 'beyondscope' is not supported by the kernel for ipv6.
Jun 14 22:34:17 lanquark.com firewalld[1919]: WARNING: beyondscope: INVALID_ICMPTYPE: No supported ICMP type., ignoring
for runtime.
Jun 14 22:34:17 lanquark.com firewalld[1919]: WARNING: ICMP type 'failedpolicy' is not supported by the kernel for ipv6.
Jun 14 22:34:17 lanquark.com firewalld[1919]: WARNING: failedpolicy: INVALID_ICMPTYPE: No supported ICMP type., ignoring
for runtime.
Jun 14 22:34:17 lanquark.com firewalld[1919]: WARNING: ICMP type 'rejectroute' is not supported by the kernel for ipv6.
Jun 14 22:34:17 lanquark.com firewalld[1919]: WARNING: rejectroute: INVALID_ICMPTYPE: No supported ICMP type., ignoring
for runtime.
//停止防火墙服务
[root@lanquark ~]# systemctl stop firewalld.service
[root@lanquark ~]# systemctl status firewalld.service
● firewalld.service firewalld dynamic firewall daemon
Loaded: loaded (/usr/lib/systemd/system/firewalld.service; enabled; vendor preset: enabled)
Active: inactive (dead) since Thu 20180614 22:35:11 EDT; 1s ago
Docs: man:firewalld(1)
Process: 1919 ExecStart=/usr/sbin/firewalld nofork nopid $FIREWALLD_ARGS (code=exited, status=0/SUCCESS)
Main PID: 1919 (code=exited, status=0/SUCCESS)
Jun 14 22:34:16 lanquark.com systemd[1]: Starting firewalld dynamic firewall daemon...
Jun 14 22:34:17 lanquark.com systemd[1]: Started firewalld dynamic firewall daemon.
Jun 14 22:34:17 lanquark.com firewalld[1919]: WARNING: ICMP type 'beyondscope' is not supported by the kernel for ipv6.
Jun 14 22:34:17 lanquark.com firewalld[1919]: WARNING: beyondscope: INVALID_ICMPTYPE: No supported ICMP type., ignoring
for runtime.
Jun 14 22:34:17 lanquark.com firewalld[1919]: WARNING: ICMP type 'failedpolicy' is not supported by the kernel for ipv6.
Jun 14 22:34:17 lanquark.com firewalld[1919]: WARNING: failedpolicy: INVALID_ICMPTYPE: No supported ICMP type., ignoring
for runtime.
Jun 14 22:34:17 lanquark.com firewalld[1919]: WARNING: ICMP type 'rejectroute' is not supported by the kernel for ipv6.
Jun 14 22:34:17 lanquark.com firewalld[1919]: WARNING: rejectroute: INVALID_ICMPTYPE: No supported ICMP type., ignoring
for runtime.
Jun 14 22:35:10 lanquark.com systemd[1]: Stopping firewalld dynamic firewall daemon...
Jun 14 22:35:11 lanquark.com systemd[1]: Stopped firewalld dynamic firewall daemon.
启动服务
[root@lanquark ~]# systemctl start firewalld.service
[root@lanquark ~]# systemctl status firewalld.service
● firewalld.service firewalld dynamic firewall daemon
Loaded: loaded (/usr/lib/systemd/system/firewalld.service; enabled; vendor preset: enabled)
Active: active (running) since Thu 20180614 22:35:53 EDT; 1s ago
Docs: man:firewalld(1)
Main PID: 2100 (firewalld)
CGroup: /system.slice/firewalld.service
└─
2100 /usr/bin/python Es /usr/sbin/firewalld nofork nopid
Jun 14 22:35:53 lanquark.com systemd[1]: Starting firewalld dynamic firewall daemon...
Jun 14 22:35:53 lanquark.com systemd[1]: Started firewalld dynamic firewall daemon.
Jun 14 22:35:54 lanquark.com firewalld[2100]: WARNING: ICMP type 'beyondscope' is not supported by the kernel for ipv6.
Jun 14 22:35:54 lanquark.com firewalld[2100]: WARNING: beyondscope: INVALID_ICMPTYPE: No supported ICMP type., ignoring
for runtime.
Jun 14 22:35:54 lanquark.com firewalld[2100]: WARNING: ICMP type 'failedpolicy' is not supported by the kernel for ipv6.
Jun 14 22:35:54 lanquark.com firewalld[2100]: WARNING: failedpolicy: INVALID_ICMPTYPE: No supported ICMP type., ignoring
for runtime.
Jun 14 22:35:54 lanquark.com firewalld[2100]: WARNING: ICMP type 'rejectroute' is not supported by the kernel for ipv6.
Jun 14 22:35:54 lanquark.com firewalld[2100]: WARNING: rejectroute: INVALID_ICMPTYPE: No supported ICMP type., ignoring
for runtime.
重启服务
[root@lanquark ~]# systemctl restart firewalld.service
[root@lanquark ~]#
重载服务的配置文件
[root@lanquark ~]# systemctl reload firewalld.service
[root@lanquark ~]#
将服务取消开机自动启动
[root@lanquark ~]# systemctl disable firewalld.service
Removed symlink /etc/systemd/system/multiuser.target.wants/firewalld.service.
Removed symlink /etc/systemd/system/dbusorg.fedoraproject.FirewallD1.service.
将服务设置为开机自动启动
[root@lanquark ~]# systemctl enable firewalld.service
Created symlink from /etc/systemd/system/dbusorg.fedoraproject.FirewallD1.service to
/usr/lib/systemd/system/firewalld.service.
Created symlink from /etc/systemd/system/multiuser.target.wants/firewalld.service to
/usr/lib/systemd/system/firewalld.service.
检查是否开机启动
[root@lanquark ~]# systemctl isenabled firewalld.service
enabled
显示服务或单元详细信息
[root@lanquark ~]# systemctl show firewalld.service
Type=dbus
Restart=no
NotifyAccess=none
RestartUSec=100ms
TimeoutStartUSec=1min 30s
TimeoutStopUSec=1min 30s
WatchdogUSec=0
WatchdogTimestamp=Thu 20180614 22:36:31 EDT
WatchdogTimestampMonotonic=6439173189
StartLimitInterval=10000000
...下略...
改变系统状态
重启
systemctl reboot
关机
systemctl poweroff
进入紧急模式
systemctl emergency
恢复默认目标
systemctl default
查看日志消息
显示收集的所有日志消息
[root@lanquark ~]# journalctl
Logs begin at Thu 20180614 20:49:15 EDT, end at Thu 20180614 22:40:01 EDT.
Jun 14 20:49:15 localhost.localdomain systemdjournal[94]: Runtime journal is using 6.1M (max allowed 48.8M, trying to
leave 73.2M free of 482.0M available →
Jun 14 20:49:15 localhost.localdomain kernel: Initializing cgroup subsys cpuset
Jun 14 20:49:15 localhost.localdomain kernel: Initializing cgroup subsys cpu
Jun 14 20:49:15 localhost.localdomain kernel: Initializing cgroup subsys cpuacct
Jun 14 20:49:15 localhost.localdomain kernel: Linux version 3.10.0693.el7.x86_64 (builder@kbuilder.dev.centos.org) (gcc
version 4.8.5 20150623 (Red Hat 4.8.
Jun 14 20:49:15 localhost.localdomain kernel: Command line: BOOT_IMAGE=/vmlinuz3.10.0693.el7.x86_64 root=UUID=f31ae553
a4e6437d986ca90738ca8583 ro rhgb
Jun 14 20:49:15 localhost.localdomain kernel: Disabled fast string operations
Jun 14 20:49:15 localhost.localdomain kernel: e820: BIOSprovided physical RAM map:
...下略...
查看网络服务的消息
[root@lanquark ~]# journalctl u network.service
Logs begin at Thu 20180614 20:49:15 EDT, end at Thu 20180614 22:40:01 EDT.
Jun 14 20:49:54 lanquark.com systemd[1]: Starting LSB: Bring up/down networking...
Jun 14 20:49:55 lanquark.com network[913]: Bringing up loopback interface: [ OK ]
Jun 14 20:49:55 lanquark.com network[913]: Bringing up interface ens32: [ OK ]
Jun 14 20:49:55 lanquark.com systemd[1]: Started LSB: Bring up/down networking.
动态跟踪消息(类似于tail f /var/log/message)
[root@lanquark ~]# journalctl f
Logs begin at Thu 20180614 20:49:15 EDT.
Jun 14 22:38:56 lanquark.com systemd[1]: Reloading.
Jun 14 22:38:56 lanquark.com systemdsysvgenerator[2449]: Overwriting existing symlink
/run/systemd/generator.late/mysql.service with real service
Jun 14 22:38:56 lanquark.com polkitd[668]: Unregistered Authentication Agent for unixprocess:2435:658356 (system bus
name :1.64, object path /org/freedesktop/PolicyKit1/AuthenticationAgent, locale en_US.UTF8) (disconnected from bus)
Jun 14 22:39:31 lanquark.com polkitd[668]: Registered Authentication Agent for unixprocess:2452:661839 (system bus name
:1.65 [/usr/bin/pkttyagent notifyfd 5 fallback], object path /org/freedesktop/PolicyKit1/AuthenticationAgent, locale
en_US.UTF8)
Jun 14 22:39:31 lanquark.com systemd[1]: Reloading.
Jun 14 22:39:31 lanquark.com systemdsysvgenerator[2466]: Overwriting existing symlink
/run/systemd/generator.late/mysql.service with real service
Jun 14 22:39:31 lanquark.com polkitd[668]: Unregistered Authentication Agent for unixprocess:2452:661839 (system bus
name :1.65, object path /org/freedesktop/PolicyKit1/AuthenticationAgent, locale en_US.UTF8) (disconnected from bus)
Jun 14 22:40:01 lanquark.com systemd[1]: Started Session 15 of user root.
Jun 14 22:40:01 lanquark.com systemd[1]: Starting Session 15 of user root.
Jun 14 22:40:01 lanquark.com CROND[2471]: (root) CMD (/usr/lib64/sa/sa1 1 1)
仅仅显示内核消息
[root@lanquark ~]# journalctl k
Logs begin at Thu 20180614 20:49:15 EDT, end at Thu 20180614 22:40:01 EDT.
Jun 14 20:49:15 localhost.localdomain kernel: Initializing cgroup subsys cpuset
Jun 14 20:49:15 localhost.localdomain kernel: Initializing cgroup subsys cpu
Jun 14 20:49:15 localhost.localdomain kernel: Initializing cgroup subsys cpuacct
Jun 14 20:49:15 localhost.localdomain kernel: Linux version 3.10.0693.el7.x86_64 (builder@kbuilder.dev.centos.org) (gcc
version 4.8.5 20150623 (Red Hat 4.8.
Jun 14 20:49:15 localhost.localdomain kernel: Command line: BOOT_IMAGE=/vmlinuz3.10.0693.el7.x86_64 root=UUID=f31ae553
a4e6437d986ca90738ca8583 ro rhgb
Jun 14 20:49:15 localhost.localdomain kernel: Disabled fast string operations
Jun 14 20:49:15 localhost.localdomain kernel: e820: BIOSprovided physical RAM map:
...下略...
八、unit介绍
系统初始化需要做的事情非常多。需要启动后台服务,比如启动 SSHD 服务;需要做配置工作,比如挂载文件系统。这
个过程中的每一步都被 systemd 抽象为一个配置单元,即 unit。可以认为一个服务是一个配置单元;一个挂载点是一个
配置单元;一个交换分区的配置是一个配置单元;等等。systemd 将配置单元归纳为以下一些不同的类型
service 系统服务
target 多个unit组成的组
device 硬件设备
mount 文件系统挂载点
automount 自动挂载点
path 文件或路径
scope 不是由systemd启动的外部进程
slice 进程组
snapshot systemd快照
socket 进程间通信套接字
swap swap文件
timer 定时器
systemd中与unit相关的命令
列出正在运行的unit
[root@lanquark ~]# systemctl listunits
UNIT LOAD ACTIVE SUB DESCRIPTION
procsysfsbinfmt_misc.automount loaded active waiting Arbitrary Executable File
Formats File System Automount Point
sysdevicespci0000:000000:00:07.1ata2host1target1:0:01:0:0:0blocksr0.device loaded active plugged
VMware_Virtual_IDE_CDROM_Drive CentOS_7_x86_64
sysdevicespci0000:000000:00:10.0host2target2:0:02:0:0:0blocksdasda1.device loaded active plugged
VMware_Virtual_S 1
sysdevicespci0000:000000:00:10.0host2target2:0:02:0:0:0blocksdasda2.device loaded active plugged
VMware_Virtual_S 2
sysdevicespci0000:000000:00:10.0host2target2:0:02:0:0:0blocksdasda3.device loaded active plugged
VMware_Virtual_S 3
sysdevicespci0000:000000:00:10.0host2target2:0:02:0:0:0blocksda.device loaded active plugged VMware_Virtual_S
sysdevicespci0000:000000:00:11.00000:02:00.0netens32.device loaded active plugged 82545EM Gigabit Ethernet
Controller (Copper) (PRO/1000 MT Single P
| sysdevicesplatformserial8250ttyttyS0.device | loaded active plugged |
| /sys/devices/platform/serial8250/tty/ttyS0 |
| sysdevicesplatformserial8250ttyttyS1.device | loaded active plugged |
| /sys/devices/platform/serial8250/tty/ttyS1 |
| sysdevicesplatformserial8250ttyttyS2.device | loaded active plugged |
| /sys/devices/platform/serial8250/tty/ttyS2 | |
| ...下略... | |
| //若要列出所有的units,则需要加 all | |
| 列出所有,包括失败的或者inactive的 | |
| [root@lanquark ~]# systemctl listunits all |
UNIT LOAD ACTIVE SUB DESCRIPTION
procsysfsbinfmt_misc.automount loaded active waiting Arbitrary Executable File
Formats File System Automount Point
devcdrom.device loaded active plugged
VMware_Virtual_IDE_CDROM_Drive CentOS_7_x86_64
devdiskbyx2didatax2dVMware_Virtual_IDE_CDROM_Drive_10000000000000000001.device loaded active plugged
VMware_Virtual_IDE_CDROM_Drive CentOS_7_x8
devdiskbyx2dlabelCentOSx5cx207x5cx20x86_64.device loaded active plugged
VMware_Virtual_IDE_CDROM_Drive CentOS_7_x86_64
devdiskbyx2dpathpcix2d0000:00:07.1x2datax2d2.0.device loaded active plugged
VMware_Virtual_IDE_CDROM_Drive CentOS_7_x86_64
devdiskbyx2dpathpcix2d0000:00:10.0x2dscsix2d0:0:0:0.device loaded active plugged VMware_Virtual_S
devdiskbyx2dpathpcix2d0000:00:10.0x2dscsix2d0:0:0:0x2dpart1.device loaded active plugged
VMware_Virtual_S 1
devdiskbyx2dpathpcix2d0000:00:10.0x2dscsix2d0:0:0:0x2dpart2.device loaded active plugged
VMware_Virtual_S 2
devdiskbyx2dpathpcix2d0000:00:10.0x2dscsix2d0:0:0:0x2dpart3.device loaded active plugged
VMware_Virtual_S 3
devdiskbyx2duuid2017x2d09x2d06x2d10x2d51x2d00x2d00.device loaded active plugged
VMware_Virtual_IDE_CDROM_Drive CentOS_7_x86_64
devdiskbyx2duuid9cd1151ex2d3afdx2d4d1bx2d9b20x2d1fc6c19441cb.device loaded active plugged
VMware_Virtual_S 1
devdiskbyx2duuidc17e0848x2d125fx2d4d68x2db59ax2d381bf40baf24.device loaded active plugged
VMware_Virtual_S 2
devdiskbyx2duuidf31ae553x2da4e6x2d437dx2d986cx2da90738ca8583.device loaded active plugged
VMware_Virtual_S 3
...下略...
列出inactive的unit
[root@lanquark ~]# systemctl listunits all
UNIT LOAD ACTIVE SUB DESCRIPTION
procsysfsbinfmt_misc.automount loaded active waiting Arbitrary Executable File
Formats File System Automount Point
devcdrom.device loaded active plugged
VMware_Virtual_IDE_CDROM_Drive CentOS_7_x86_64
devdiskbyx2didatax2dVMware_Virtual_IDE_CDROM_Drive_10000000000000000001.device loaded active plugged
VMware_Virtual_IDE_CDROM_Drive CentOS_7_x8
devdiskbyx2dlabelCentOSx5cx207x5cx20x86_64.device loaded active plugged
VMware_Virtual_IDE_CDROM_Drive CentOS_7_x86_64
devdiskbyx2dpathpcix2d0000:00:07.1x2datax2d2.0.device loaded active plugged
VMware_Virtual_IDE_CDROM_Drive CentOS_7_x86_64
devdiskbyx2dpathpcix2d0000:00:10.0x2dscsix2d0:0:0:0.device loaded active plugged VMware_Virtual_S
devdiskbyx2dpathpcix2d0000:00:10.0x2dscsix2d0:0:0:0x2dpart1.device loaded active plugged
VMware_Virtual_S 1
devdiskbyx2dpathpcix2d0000:00:10.0x2dscsix2d0:0:0:0x2dpart2.device loaded active plugged
VMware_Virtual_S 2
devdiskbyx2dpathpcix2d0000:00:10.0x2dscsix2d0:0:0:0x2dpart3.device loaded active plugged
VMware_Virtual_S 3
devdiskbyx2duuid2017x2d09x2d06x2d10x2d51x2d00x2d00.device loaded active plugged
VMware_Virtual_IDE_CDROM_Drive CentOS_7_x86_64
devdiskbyx2duuid9cd1151ex2d3afdx2d4d1bx2d9b20x2d1fc6c19441cb.device loaded active plugged
VMware_Virtual_S 1
devdiskbyx2duuidc17e0848x2d125fx2d4d68x2db59ax2d381bf40baf24.device loaded active plugged
VMware_Virtual_S 2
devdiskbyx2duuidf31ae553x2da4e6x2d437dx2d986cx2da90738ca8583.device loaded active plugged
VMware_Virtual_S 3
...下略...
列出状态为active的service
[root@lanquark ~]# systemctl listunits type=service
UNIT LOAD ACTIVE SUB DESCRIPTION
abrtccpp.service loaded active exited Install ABRT coredump hook
abrtoops.service loaded active running ABRT kernel log watcher
abrtd.service loaded active running ABRT Automated Bug Reporting Tool
auditd.service loaded active running Security Auditing Service
chronyd.service loaded active running NTP client/server
crond.service loaded active running Command Scheduler
dbus.service loaded active running DBus System Message Bus
firewalld.service loaded active running firewalld dynamic firewall daemon
...下略...
//其中failed是一个特例,也会列出来
查看某个服务是否为active
[root@lanquark ~]# systemctl isactive firewalld.service
active
九、target介绍
在Centos7之前的版本,使用运行级别代表特定的操作模式。运行级别被定义为七个级别,用数字0到6表示,每个级别可
以启动特定的一些服务。Centos7使用target替换运行级别。
一个service属于一种类型的unit
多个unit组成了一个target
一个target里面包含了多个service
列出系统中所有的target
[root@lanquark ~]# systemctl listunitfiles type=target
UNIT FILE STATE
basic.target static
bluetooth.target static
cryptsetuppre.target static
cryptsetup.target static
ctrlaltdel.target disabled
default.target enabled
emergency.target static
final.target static
getty.target static
graphical.target static
halt.target disabled
...下略...
查看指定target下面有哪些unit
[root@lanquark ~]# systemctl listdependencies multiuser.target
multiuser.target
● ├─abrtccpp.service
● ├─abrtoops.service
● ├─abrtvmcore.service
● ├─abrtxorg.service
● ├─abrtd.service
...下略...
查看所有的target
[root@lanquark ~]# systemctl listunits type=target all
UNIT LOAD ACTIVE SUB DESCRIPTION
basic.target loaded active active Basic System
cryptsetup.target loaded active active Encrypted Volumes
emergency.target loaded inactive dead Emergency Mode
final.target loaded inactive dead Final Step
getty.target loaded active active Login Prompts
graphical.target loaded inactive dead Graphical Interface
localfspre.target loaded active active Local File Systems (Pre)
localfs.target loaded active active Local File Systems
multiuser.target loaded active active MultiUser System
networkonline.target loaded active active Network is Online
networkpre.target loaded active active Network (Pre)
network.target loaded active active Network
nssuserlookup.target loaded inactive dead User and Group Name Lookups
paths.target loaded active active Paths
remotefspre.target loaded inactive dead Remote File Systems (Pre)
remotefs.target loaded active active Remote File Systems
rescue.target loaded inactive dead Rescue Mode
shutdown.target loaded inactive dead Shutdown
slices.target loaded active active Slices
sockets.target loaded active active Sockets
swap.target loaded active active Swap
sysinit.target loaded active active System Initialization
● syslog.target notfound inactive dead syslog.target
timesync.target loaded inactive dead System Time Synchronized
timers.target loaded active active Timers
umount.target loaded inactive dead Unmount All Filesystems
LOAD = Reflects whether the unit definition was properly loaded.
ACTIVE = The highlevel unit activation state, i.e. generalization of SUB.
SUB = The lowlevel unit activation state, values depend on unit type.
26 loaded units listed.
To show all installed unit files use 'systemctl listunitfiles'.
查看系统默认的target
[root@lanquark ~]# systemctl getdefault
multiuser.target
设置默认的target
[root@lanquark ~]# systemctl setdefault multiuser.target
Removed symlink /etc/systemd/system/default.target.
Created symlink from /etc/systemd/system/default.target to /usr/lib/systemd/system/multiuser.target.
cat /usr/lib/systemd/system/sshd.service 看[install]部分
[root@lanquark ~]# cat /usr/lib/systemd/system/sshd.service
[Unit]
Description=OpenSSH server daemon
Documentation=man:sshd(8) man:sshd_config(5)
After=network.target sshdkeygen.service
Wants=sshdkeygen.service
[Service]
Type=notify
EnvironmentFile=/etc/sysconfig/sshd
ExecStart=/usr/sbin/sshd D $OPTIONS
ExecReload=/bin/kill HUP $MAINPID
KillMode=process
Restart=onfailure
RestartSec=42s
[Install]
WantedBy=multiuser.target
十、扩展
扩展链接:
Anacron
https://www.jianshu.com/p/3009a9b7d024?from=timeline
xinetd守护进程
http://blog.sina.com.cn/s/blog_465bbe6b010000vi.html
systemd自定义启动脚本
http://www.jb51.net/article/100457.htm
参考:
http://www.jinbuguo.com/systemd/systemd.html
http://mtoou.info/hingsystemd/
http://fedoraproject.org/wiki/Systemd/zhcn
https://www.ibm.com/developerworks/cn/linux/1407_liuming_init3/index.html
https://www.freedesktop.org/wiki/Software/systemd/
最后
以上就是缥缈寒风最近收集整理的关于第十章Linux日常运维管理(下)预习笔记的全部内容,更多相关第十章Linux日常运维管理(下)预习笔记内容请搜索靠谱客的其他文章。


发表评论 取消回复