Android 5.0(M)新控件——TextInputLayout
介绍之前,先直观的看一下效果
TextInputLayout其实是一个容器,他继承自LinearLayout,该容器是作用于TextView的,TextInputLayout只能包裹一个子节点,类似于ScrollView。
本文以EditText举例,实现的效果如上效果图,EditText输入内容以后,hint内容移动至编辑框上方。
实现
导入依赖
因为TextInputLayout是Android 5.0以后新加的库的控件(Android Design Support Library),所以在使用前先要将Library导入到项目中来
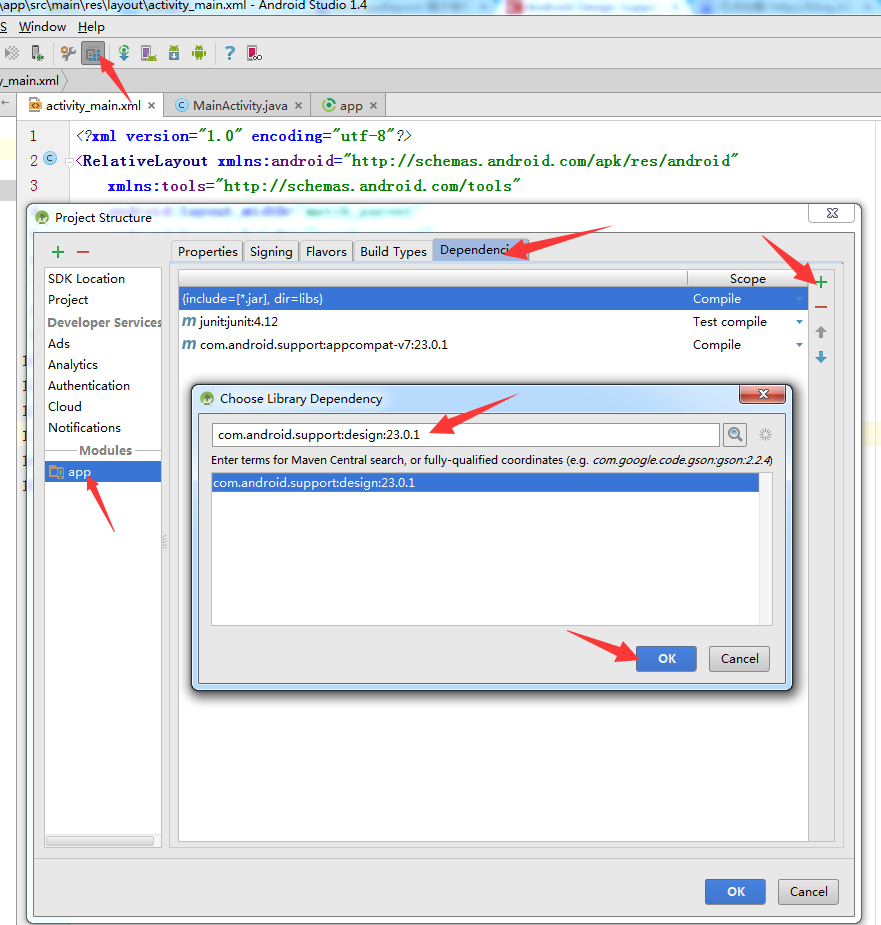
或者在gradle下添加依赖
compile 'com.android.support:design:23.0.1'XML
   <android.support.design.widget.TextInputLayout
       android:layout_width="match_parent"
       android:layout_height="wrap_content">

       <EditText
           android:id="@+id/et_pwd"
           android:layout_width="match_parent"
           android:layout_height="wrap_content"
           android:hint="密码" />
   </android.support.design.widget.TextInputLayout>
到此为止,如果你运行,会发现已经有了动画效果

使用
XML布局
<?xml version="1.0" encoding="utf-8"?>
<LinearLayout xmlns:android="http://schemas.android.com/apk/res/android"
    xmlns:tools="http://schemas.android.com/tools"
    android:layout_width="match_parent"
    android:layout_height="match_parent"
    xmlns:app="http://schemas.android.com/apk/res-auto"
    android:orientation="vertical"
    android:paddingBottom="@dimen/activity_vertical_margin"
    android:paddingLeft="@dimen/activity_horizontal_margin"
    android:paddingRight="@dimen/activity_horizontal_margin"
    android:paddingTop="@dimen/activity_vertical_margin"
    tools:context=".MainActivity">

    <android.support.design.widget.TextInputLayout
        android:id="@+id/til_username"
        android:layout_width="match_parent"
        app:hintTextAppearance="@style/FloatingStyle"
        app:hintAnimationEnabled="false"
        android:layout_height="wrap_content">

        <EditText
            android:id="@+id/et_username"
            android:layout_width="match_parent"
            android:layout_height="wrap_content"
            android:textColor="#F00F0F"/>
    </android.support.design.widget.TextInputLayout>

    <android.support.design.widget.TextInputLayout
        android:layout_width="match_parent"
        android:layout_height="wrap_content">

        <EditText
            android:id="@+id/et_pwd"
            android:layout_width="match_parent"
            android:layout_height="wrap_content"
            android:hint="密码" />
    </android.support.design.widget.TextInputLayout>

    <Button
        android:layout_width="match_parent"
        android:layout_height="wrap_content"
        android:onClick="ok"
        android:text="确定" />

</LinearLayout>
测试类
package com.example.kongqw.myapplication;

import android.support.design.widget.TextInputLayout;
import android.support.v7.app.AppCompatActivity;
import android.os.Bundle;
import android.view.View;
import android.widget.EditText;
import android.widget.Toast;

public class MainActivity extends AppCompatActivity {

    private EditText mUserName;
    private EditText mPassWord;
    private TextInputLayout mTextInputLayout;

    @Override
    protected void onCreate(Bundle savedInstanceState) {
        super.onCreate(savedInstanceState);
        setContentView(R.layout.activity_main);
        mTextInputLayout = (TextInputLayout) findViewById(R.id.til_username);
        // mUserName = (EditText) findViewById(R.id.et_username);
        mPassWord = (EditText) findViewById(R.id.et_pwd);
        // 通过TextInputLayout设置hint内容,也可以通过直接设置EditText的hint属性
        mTextInputLayout.setHint("用户名");
    }

    // 确认按钮123123
    public void ok(View view) {
        // 方式一:通过TextInputLayout获取到里面的子控件EditText后在获取编辑的内容
        String username = mTextInputLayout.getEditText().getText().toString();
        // 方式二:直接通过EditText获取到里面的编辑内容
        String pwd = mPassWord.getText().toString();
        Toast.makeText(this, "username = " + username + "npwd = " + pwd, Toast.LENGTH_SHORT).show();
        // 显示错误信息
        mTextInputLayout.setError("错误提示信息");
    }
}
那么如何修改他的样式呢,我做了如下简单的总结
修改样式
取消动画
可以通过TextInputLayout对象,执行setHintAnimationEnabled(boolean enabled)方法
// false 关闭动画 true 开启动画
mTextInputLayout.setHintAnimationEnabled(false);
或者在xml里添加hintAnimationEnabled属性设置
<!-- false 关闭动画 true 开启动画 -->
app:hintAnimationEnabled="false"- 效果

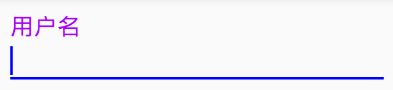
设置hint移动到上方以后的颜色和字体大小
在XML里对应的TextInputLayout标签下添加hintTextAppearance属性
<android.support.design.widget.TextInputLayout
    ……
    app:hintTextAppearance="@style/FloatingStyle">

    <EditText
        …… />
</android.support.design.widget.TextInputLayout>
然后在res->values->styles.xml下添加一个style
<style name="FloatingStyle" parent="@android:style/TextAppearance">
    <!-- 字体颜色 -->
    <item name="android:textColor">#AA00FF</item>
    <!-- 字体大小 -->
    <item name="android:textSize">20sp</item>
</style>- 效果(#AA00FF,20sp)
设置编辑文字的颜色
这个就是设置EditText的颜色
<android.support.design.widget.TextInputLayout
    ……>

    <EditText
        ……
        android:textColor="#FF0000" />
</android.support.design.widget.TextInputLayout>
但是hint字体颜色,在EditText里设置就不起作用,目前我还没有找到用什么方法修改,感谢哪位大神能指点一二
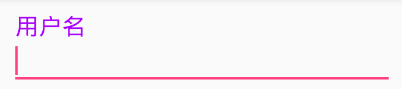
设置下划线的颜色
修改res->values->styles.xml下”AppTheme”里的colorAccent属性
<!-- Base application theme. -->
<style name="AppTheme" parent="Theme.AppCompat.Light.DarkActionBar">
    <!-- Customize your theme here. -->
    ……
    <item name="colorAccent">#0000FF</item>
</style>- 效果(#0000FF)
设置错误提示的字体样式
目前还没发现怎样修改,找到方法以后再续……
最后
以上就是粗心白开水最近收集整理的关于Android 5.0新控件——TextInputLayoutAndroid 5.0(M)新控件——TextInputLayout的全部内容,更多相关Android内容请搜索靠谱客的其他文章。


发表评论 取消回复