参考
目录
PyTorch基础
为什么选择PyTorch+PyTorch的安装配置
Numpy与Tensor
Tensor概述
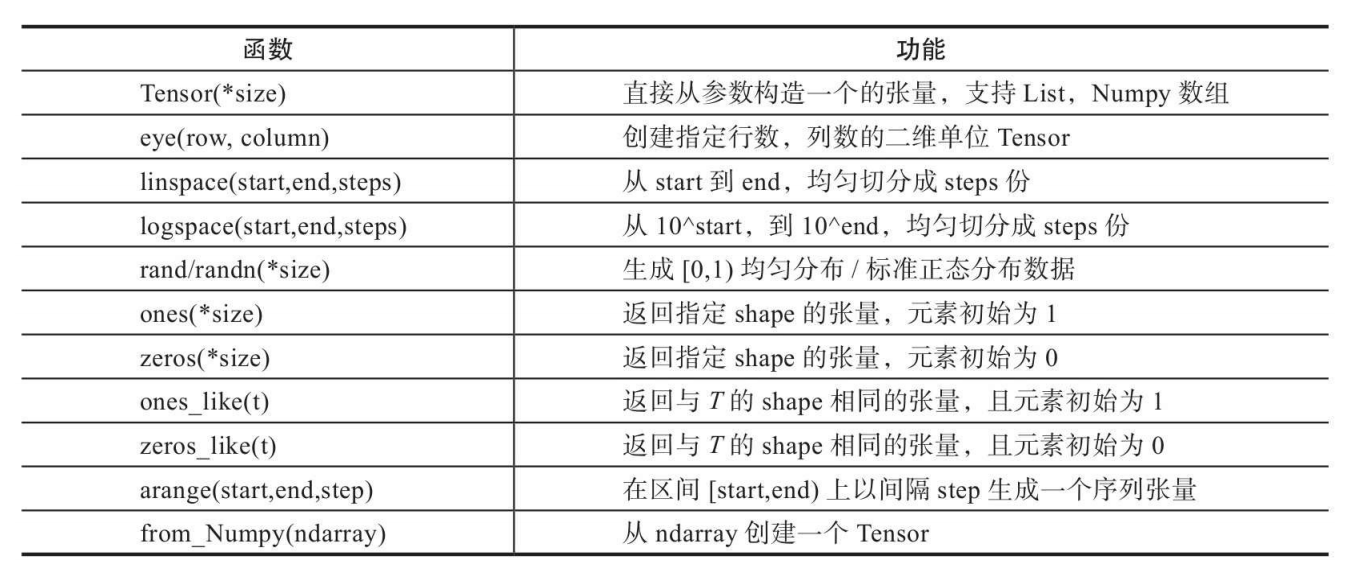
创建Tensor
修改Tensor的形状
索引操作
广播机制
逐元素操作(element-wise)
归并操作
比较操作
矩阵操作
PyTorch与Numpy比较
PyTorch基础
PyTorch是Facebook团队于2017年1月发布的一个深度学习框架,虽然晚于TensorFlow、Keras等框架,但自发布之日起,其关注度就在不断上升,目前在GitHub上的热度已超过Theano、Caffe、MXNet等框架。
PyTorch采用Python语言接口来实现编程,非常容易上手。它就像带GPU的Numpy,与Python一样都属于动态框架。PyTorch继承了Torch灵活、动态的编程环境和用户友好的界面,支持以快速和灵活的方式构建动态神经网络,还允许在训练过程中快速更改代码而不妨碍其性能,支持动态图形等尖端AI模型的能力,是快速实验的理想选择。
为什么选择PyTorch+PyTorch的安装配置
PyTorch是一个建立在Torch库之上的Python包,旨在加速深度学习应用。它提供一种类似Numpy的抽象方法来表征张量(或多维数组),可以利用GPU来加速训练。
PyTorch官网:https://PyTorch.org/
具体原因分析可见 PyTorch还是TensorFlow?这有一份新手深度学习框架选择指南 - 知乎
import torch
print(torch.__version__)
1.6.0
Numpy与Tensor
Tensor自称为神经网络界的Numpy,它与Numpy相似,二者可以共享内存,且之间的转换非常方便和高效。不过它们也有不同之处,最大的区别就是Numpy会把ndarray放在CPU中进行加速运算,而由Torch产生的Tensor会放在GPU中进行加速运算(假设当前环境有GPU)。
Tensor概述
对Tensor的操作很多,从接口的角度来划分,可以分为两类:
1)torch.function,如torch.sum、torch.add等;
2)tensor.function,如tensor.view、tensor.add等。
这些操作对大部分Tensor都是等价的,如torch.add(x,y)与x.add(y)等价。
如果从修改方式的角度来划分,可以分为以下两类:
1)不修改自身数据,如x.add(y),x的数据不变,返回一个新的Tensor。
2)修改自身数据,如x.add_(y)(运行符带下划线后缀),运算结果存在x中,x被修改。
x = torch.tensor([1,2,3])
y = torch.tensor([4,5,6])
z = x.add(y)
print(z)
z = torch.add(x,y)
print(z)
x.add_(y)
print(x)
tensor([5, 7, 9])
tensor([5, 7, 9])
tensor([5, 7, 9])
创建Tensor

x = torch.Tensor(2,3)
print(x)
print(x.size())
print(x.shape)
tensor([[9.8091e-45, 0.0000e+00, 0.0000e+00],
        [0.0000e+00, 0.0000e+00, 0.0000e+00]])
torch.Size([2, 3])
torch.Size([2, 3])
y = torch.Tensor(x.size())
print(y.size())
torch.Size([2, 3])
注意torch.Tensor与torch.tensor的几点区别:
1)torch.Tensor是torch.empty和torch.tensor之间的一种混合,但是,当传入数据时,torch.Tensor使用全局默认dtype(FloatTensor),而torch.tensor是从数据中推断数据类型。
2)torch.tensor(1)返回一个固定值1,而torch.Tensor(1)返回一个大小为1的张量,它是随机初始化的值。
x = torch.Tensor(1)
y = torch.tensor(1)
print(x)
print(x.type())
print(y)
print(y.type())
tensor([5.6687e-34])
torch.FloatTensor
tensor(1)
torch.LongTensor
x = torch.eye(2,2)
print(x)
tensor([[1., 0.],
        [0., 1.]])
x = torch.zeros(2,3)
print(x)
tensor([[0., 0., 0.],
        [0., 0., 0.]])
x = torch.linspace(1,10,10)
print(x)
tensor([ 1., 2., 3., 4., 5., 6., 7., 8., 9., 10.])
x = torch.rand(2,3)
print(x)
x = torch.randn(2,3)
print(x)
tensor([[0.4624, 0.4173, 0.8935],
        [0.1000, 0.4286, 0.0069]])
tensor([[ 1.1595,  1.1701,  0.0564],
        [-1.5159,  0.7730,  1.9790]])
修改Tensor的形状
![[外链图片转存失败,源站可能有防盗链机制,建议将图片保存下来直接上传(img-sj70gitE-1605945971792)(attachment:%E6%88%AA%E5%B1%8F2020-11-20%20%E4%B8%8A%E5%8D%889.49.47.png)]](https://www.shuijiaxian.com/files_image/2023060522/20201121160724532.png)
x = torch.randn(2,3)
print(x.size())
print(x.dim())
torch.Size([2, 3])
2
新版本新增了reshape方法,类似于numpy
y = x.reshape(3,2)
print(x)
print(y)
tensor([[ 0.1842,  0.2380, -0.2833],
        [ 0.8476, -0.5895,  0.3825]])
tensor([[ 0.1842,  0.2380],
        [-0.2833,  0.8476],
        [-0.5895,  0.3825]])
最新版本的view貌似不像书里面说的那样了,也不改变原来的
x.view(3,2)
print(x)
tensor([[ 0.1842,  0.2380, -0.2833],
        [ 0.8476, -0.5895,  0.3825]])
view(-1)变成一维张量后,shape就只有一个数字了【N】,N表示元素个数
y = x.view(-1)#
print(x)
print(y)
print(y.shape)
tensor([[ 0.1842,  0.2380, -0.2833],
        [ 0.8476, -0.5895,  0.3825]])
tensor([ 0.1842,  0.2380, -0.2833,  0.8476, -0.5895,  0.3825])
torch.Size([6])
增加一个维度,多加一个[]变成二维张量,【1,N】
z = y.unsqueeze(0)
print(z)
print(z.shape)
print(z.numel())
tensor([[ 0.1842,  0.2380, -0.2833,  0.8476, -0.5895,  0.3825]])
torch.Size([1, 6])
6
强制类型转换float(小数点,默认小数点后四位)–>long(直接保留整数部分,没有小数点)
z = z.long()
print(z)
tensor([[0, 0, 0, 0, 0, 0]])
索引操作
![[外链图片转存失败,源站可能有防盗链机制,建议将图片保存下来直接上传(img-qG0gAseW-1605945971794)(attachment:image.png)]](https://www.shuijiaxian.com/files_image/2023060522/202011211611182.png)
x = torch.randn(2,3)
print(x)
tensor([[ 1.1864, -0.9864,  2.3644],
        [-0.8501,  0.2563,  1.3528]])
print(x[0,:]) #第一行
print(x[:,-1]) #最后一列
tensor([ 1.1864, -0.9864,  2.3644])
tensor([2.3644, 1.3528])
masked_select默认是一维张量
mask = (x>0)
y = x.masked_select(mask)
print(y)
tensor([1.1864, 2.3644, 0.2563, 1.3528])
获取指定索引对应的值gather,输出根据以下规则得到

index = torch.LongTensor([[0,0,1]])
y = x.gather(0,index)
print(y)
tensor([[ 1.1864, -0.9864, 1.3528]])
index = torch.LongTensor([[0,1,1],
                          [1,1,1]])
y = x.gather(1,index)
print(y)
tensor([[ 1.1864, -0.9864, -0.9864],
        [ 0.2563,  0.2563,  0.2563]])
广播机制
x = torch.arange(0,40,10).reshape(4,1)
print(x)
print(x.shape)
y = torch.arange(0,3,1)
print(y)
print(y.shape)
tensor([[ 0],
        [10],
        [20],
        [30]])
torch.Size([4, 1])
tensor([0, 1, 2])
torch.Size([3])
z = x+y
print(z)
tensor([[ 0,  1,  2],
        [10, 11, 12],
        [20, 21, 22],
        [30, 31, 32]])
numpy和tensor之间的转换
- numpy [[]]
- tensor ([[,],])
a = x.numpy()
print(a)
print(type(a))
[[ 0]
 [10]
 [20]
 [30]]
<class 'numpy.ndarray'>
b = torch.from_numpy(a)
print(b)
print(type(b))
tensor([[ 0],
        [10],
        [20],
        [30]])
<class 'torch.Tensor'>
逐元素操作(element-wise)
![[外链图片转存失败,源站可能有防盗链机制,建议将图片保存下来直接上传(img-BYozPb3Z-1605945971796)(attachment:%E6%88%AA%E5%B1%8F2020-11-20%20%E4%B8%8B%E5%8D%882.16.06.png)]](https://www.shuijiaxian.com/files_image/2023060522/20201121161134527.png)
这些操作均会创建新的Tensor,如果需要就地操作,可以使用这些方法的下划线版本,例如abs_。
import torch
x = torch.Tensor([[1,2,3]])
y = torch.Tensor([[4],
                  [5],
                  [6]])
print(x)
print(y)
z = x.add(y)
print(z)
z = x.mul(y)
print(z)
tensor([[1., 2., 3.]])
tensor([[4.],
        [5.],
        [6.]])
tensor([[5., 6., 7.],
        [6., 7., 8.],
        [7., 8., 9.]])
tensor([[ 4.,  8., 12.],
        [ 5., 10., 15.],
        [ 6., 12., 18.]])
z = x.exp()
print(z)
tensor([[ 2.7183, 7.3891, 20.0855]])
z = x.sigmoid()
print(z)
z = x.softmax(dim=1)
print(z)
print(z.sum(dim=1).item())
tensor([[0.7311, 0.8808, 0.9526]])
tensor([[0.0900, 0.2447, 0.6652]])
1.0
归并操作
![[外链图片转存失败,源站可能有防盗链机制,建议将图片保存下来直接上传(img-Ep3f80fx-1605945971797)(attachment:%E6%88%AA%E5%B1%8F2020-11-20%20%E4%B8%8B%E5%8D%882.38.21.png)]](https://www.shuijiaxian.com/files_image/2023060522/20201121161151548.png)
- 归并操作一般涉及一个dim参数,指定沿哪个维进行归并。
- 另一个参数是keepdim,说明输出结果中是否保留维度1,缺省情况是False,即不保留。
x = torch.arange(0,6,1)
y = x.view(2,3)
print(y)
z = y.sum(dim=0,keepdim=True)
print(z)
z = y.sum(dim=0,keepdim=False)
print(z)
z = y.sum(dim=1) #按照行相加
print(z)
tensor([[0, 1, 2],
        [3, 4, 5]])
tensor([[3, 5, 7]])
tensor([3, 5, 7])
tensor([ 3, 12])
z = y.float().norm(dim=0,p=2)
print(z)
z = y.float().norm(dim=1,p=2)
print(z)
tensor([3.0000, 4.1231, 5.3852])
tensor([2.2361, 7.0711])
比较操作
![[外链图片转存失败,源站可能有防盗链机制,建议将图片保存下来直接上传(img-S7R51KHa-1605945971798)(attachment:%E6%88%AA%E5%B1%8F2020-11-20%20%E4%B8%8B%E5%8D%883.03.03.png)]](https://www.shuijiaxian.com/files_image/2023060522/20201121161203101.png)
print(y)
tensor([[0, 1, 2],
        [3, 4, 5]])
z = y.max(dim=0) #按列比较,返回行索引
print(z)
z = y.max(dim=1) #按照行计算,返回列索引
print(z)
torch.return_types.max(
values=tensor([3, 4, 5]),
indices=tensor([1, 1, 1]))


torch.return_types.max(
values=tensor([2, 5]),
indices=tensor([2, 2]))
z = y.topk(1,dim=0)
print(z)
z = y.topk(1,dim=1)
print(z)
torch.return_types.topk(
values=tensor([[3, 4, 5]]),
indices=tensor([[1, 1, 1]]))


torch.return_types.topk(
values=tensor([[2],
        [5]]),
indices=tensor([[2],
        [2]]))
dim等于几,从数组的角度看那个维度的值就在不断变化,其他维度保持不变
矩阵操作
![[外链图片转存失败,源站可能有防盗链机制,建议将图片保存下来直接上传(img-PmcfHLwZ-1605945971799)(attachment:%E6%88%AA%E5%B1%8F2020-11-20%20%E4%B8%8B%E5%8D%883.11.12.png)]](https://www.shuijiaxian.com/files_image/2023060522/20201121161224112.png)
1)Torch的dot与Numpy的dot有点不同,Torch中的dot是对两个为1D张量进行点积运算,Numpy中的dot无此限制。
2)mm是对2D的矩阵进行点积,bmm对含batch的3D进行点积运算。
3)转置运算会导致存储空间不连续,需要调用contiguous方法转为连续。
x = torch.arange(0,6,1)
y = torch.arange(5,11,1)
print(x)
print(y)
z =x.dot(y)
print(z)
tensor([0, 1, 2, 3, 4, 5])
tensor([ 5,  6,  7,  8,  9, 10])
tensor(130)
mm才是矩阵乘法!!!
x = x.view(2,3)
y = y.view(3,2)
print(x)
print(y)
z = x.mm(y)
print(z)
tensor([[0, 1, 2],
        [3, 4, 5]])
tensor([[ 5,  6],
        [ 7,  8],
        [ 9, 10]])
tensor([[ 25,  28],
        [ 88, 100]])
x = x.unsqueeze(0) #前面加一个维度1,变成三维
y = y.unsqueeze(0) #前面加一个维度1,变成三维
print(x.shape)
print(y.shape)
z = x.bmm(y)
print(z)
torch.Size([1, 2, 3])
torch.Size([1, 3, 2])
tensor([[[ 25,  28],
         [ 88, 100]]])
PyTorch与Numpy比较
![[外链图片转存失败,源站可能有防盗链机制,建议将图片保存下来直接上传(img-EqWXVQT1-1605945971800)(attachment:%E6%88%AA%E5%B1%8F2020-11-20%20%E4%B8%8B%E5%8D%883.23.19.png)]](https://www.shuijiaxian.com/files_image/2023060522/20201121161241468.png)
PyTorch张量的创建与基本类型
最后
以上就是不安唇膏最近收集整理的关于Python学习-pytorch中张量等基础计算PyTorch基础的全部内容,更多相关Python学习-pytorch中张量等基础计算PyTorch基础内容请搜索靠谱客的其他文章。


发表评论 取消回复