nginx下载地址:http://nginx.org/en/download.html
openssl下载地址:http://slproweb.com/products/Win32OpenSSL.html
官网地址:https://www.openssl.org/source/
我本地环境使用的phpStudy集成环境,可以方便的切换各种版本及apache和nginx、IIS之间切换,个人感觉比WAMP要好用。
- 开启php的openssl支持,这个不细说,不会的上网搜下哈。
配置环境变量
我的电脑-》属性-》高级系统设置-》环境变量-》用户变量(如果想要所有用户通用的话可以在系统变量里面配置 )变量名: OPENSSL_HOME 变量值:C:OpenSSL-Win64bin; (变量值为openssl安装位置,我的 )
在path变量结尾添加如下 : %OPENSSL_HOME%;

生成证书
在 nginx安装目录中创建ssl文件夹用于存放证书。我的文件目录是 D:phpStudynginxssl,运行命令窗口,cmd,进入D:phpStudynginxssl中。
创建私钥
在命令行中执行命令:
openssl genrsa -des3 -out lifes.key 1024(lifes文件名可以自定义),如下图所示:

输入密码后,再次重复输入确认密码。记住此密码,后面会用到。
创建csr证书
在命令行中执行命令:
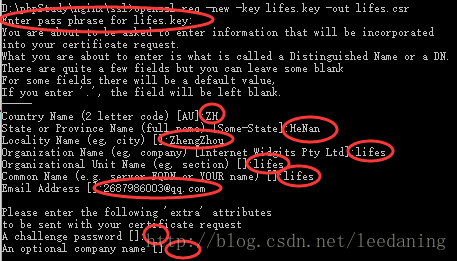
openssl req -new -key lifes.key -out lifes.csr(key文件为刚才生成的文件,lifes为自定义文件名

如上图所示,执行上述命令后,需要输入信息。

以上步骤完成后,ssl文件夹内出现两个文件:
lifes.key、lifes.csr去除密码
在加载SSL支持的Nginx并使用上述私钥时除去必须的口令,否则会在启动nginx的时候需要输入密码。复制
lifes.key并重命名为lifes.key.org可以使用此命令行,也可以使用鼠标操作
copy lifes.key lifes.key.org
去除口令,在命令行中执行此命令:
openssl rsa -in lifes.key.org -out lifes.key(lifes为自定义文件名)如下图所示,此命令需要输入刚才设置的密码。

生成crt证书
在命令行中执行此命令:
openssl x509 -req -days 365 -in lifes.csr -signkey lifes.key -out lifes.crt(lifes为自定义文件名)
证书生成完毕,ssl文件夹中一共生成如下4个文件:
lifes.key、lifes.csr、lifes.key.org、lifes.crt,我们需要使用到的是lifes.crt和lifes.key。
修改nginx.conf文件
找到该文件中如下代码的位置进行修改: 保证本机的端口不被占用 443 和 80,http默认端口80,https默认端口443。
    # HTTPS server
    #
    #server {
    #    listen       443;
    #    server_name  localhost;

    #    ssl                  on;
    #    ssl_certificate      cert.pem;
    #    ssl_certificate_key  cert.key;

    #    ssl_session_timeout  5m;

    #    ssl_protocols  SSLv2 SSLv3 TLSv1;
    #    ssl_ciphers  HIGH:!aNULL:!MD5;
    #    ssl_prefer_server_ciphers   on;

    #    location / {
    #        root   html;
    #        index  index.html index.htm;
    #    }
    #}
改为:
    server {

        listen       443;
        server_name  www.lifes.com;

        ssl_certificate      D:/phpStudy/nginx/ssl/lifes.crt;
        ssl_certificate_key  D:/phpStudy/nginx/ssl/lifes.key;

        ssl                  on;

        ssl_protocols  SSLv2 SSLv3 TLSv1;
        ssl_ciphers  HIGH:!aNULL:!MD5;
        ssl_prefer_server_ciphers   on;

    }
重启nginx之后访问页面如下:

没有到项目的默认页面下,需要加上指向的默认路径
        location / {
            root   D:/WWW/Lifes/public;
            index  index.html index.htm index.php;
        }
然而,这样重启之后访问是直接下载的,问题在于在https server{ }中没有解析php的代码块,需要加上如下代码:
        location ~ .*.(php|php5)?$ {

            root           D:/WWW/Lifes/public/;

            fastcgi_pass   127.0.0.1:9000;
            fastcgi_index  index.php;
            fastcgi_param  HTTPS   on;
            fastcgi_param  SCRIPT_FILENAME    $document_root$fastcgi_script_name;
            include        fastcgi_params;

            #new line
            include fastcgi.conf;

        }
完整的代码如下:
    server {

        listen       443;
        server_name  www.lifes.com;

        ssl_certificate      D:/phpStudy/nginx/ssl/lifes.crt;
        ssl_certificate_key  D:/phpStudy/nginx/ssl/lifes.key;

        ssl                  on;

        ssl_protocols  SSLv2 SSLv3 TLSv1;
        ssl_ciphers  HIGH:!aNULL:!MD5;
        ssl_prefer_server_ciphers   on;

        location / {
            root   D:/WWW/Lifes/public;
            index  index.html index.htm index.php;
        }

        location ~ .*.(php|php5)?$ {

            root           D:/WWW/Lifes/public/;

            fastcgi_pass   127.0.0.1:9000;
            fastcgi_index  index.php;
            fastcgi_param  HTTPS   on;
            fastcgi_param  SCRIPT_FILENAME    $document_root$fastcgi_script_name;
            include        fastcgi_params;

            #new line
            include fastcgi.conf;

        }

}如果需要http:///www.lifes.com也指向https://www.lifes.com的话需要在虚拟主机配置文件vhosts.conf中加入代码:rewrite ^(.*) https://$server_name$1 permanent;重定向到https。
如:
server {
        listen       80;
        server_name  www.lifes.com;

        rewrite ^(.*) https://$server_name$1 permanent;

        root   "D:/WWW/Lifes/public";

        index  index.html index.htm index.php;

        location / {
            try_files $uri $uri/ /index.php?$query_string;
        }

        location ~ .php(.*)$ {
            fastcgi_pass   127.0.0.1:9000;
            fastcgi_index  index.php;
            fastcgi_split_path_info  ^((?U).+.php)(/?.+)$;
            fastcgi_param  SCRIPT_FILENAME  $document_root$fastcgi_script_name;
            fastcgi_param  PATH_INFO  $fastcgi_path_info;
            fastcgi_param  PATH_TRANSLATED  $document_root$fastcgi_path_info;
            include        fastcgi_params;
        }
}
Author:leedaning
本文地址:http://blog.csdn.net/leedaning/article/details/71125559
最后
以上就是酷炫洋葱最近收集整理的关于windows下nginx支持https的全部内容,更多相关windows下nginx支持https内容请搜索靠谱客的其他文章。


发表评论 取消回复