koa 框架 《概念、路由、中间件、请求》
Koa – 基于 Node.js 平台的下一代 web 开发框架
快速入门 koa
//安装koa 包
npm i koa


-------------
//导入koa包
 const Koa = require('Koa')
//实例化app对象
const app = new Koa()
//编写 中间件
app.use((ctx, next) =>{
    console.log('中间件1')
    next()
})
app.use((ctx, next) =>{
    console.log('中间件2')
    next()
})
app.use((ctx) =>{
    ctx.body = '执行了 1 2 中间件 hello koa2'
})
//启动服务
app.listen(3000, ()=>{
    console.log('server is running http://localhost:3000')
})
链式调用
//安装koa 包
npm i koa


-------------
//导入koa包
 const Koa = require('Koa')
//实例化app对象
const app = new Koa()
//编写 中间件
app.use((ctx, next) =>{
    console.log('中间件1')
    next()
}).use((ctx, next) =>{
    console.log('中间件2')
    next()
}).use((ctx) =>{
    ctx.body = '执行了 1 2 中间件 hello koa2'
})
//启动服务
app.listen(3000, ()=>{
    console.log('server is running http://localhost:3000')
})
异步处理
async await
async:声明异步函数
await 后跟一个promise 对象
Promise 理解
ES2015正式发布(也就是ES6,ES6是它的乳名),其中Promise被列为正式规范。作为ES6中最重要的特性之一,我们有必要掌握并理解透彻。
[外链图片转存失败,源站可能有防盗链机制,建议将图片保存下来直接上传(img-dPbHQ9tV-1668003470635)(C:UsersljcomputerAppDataRoamingTyporatypora-user-images1667307591159.png)]
Promise是一个构造函数,自己身上有all、reject、resolve这些方法,原型上有then、catch等方法
async 是“异步”的简写,而 await 可以认为是 async wait 的简写。所以应该很好理解 async 用于申明一个 function 是异步的,而 await 用于等待一个异步方法执行完成。
简单理解:
async是让方法变成异步。
await是等待异步方法执行完成。
详细说明:
async是让方法变成异步,在终端里用node执行这段代码,你会发现输出了Promise { ‘Hello async’ },这时候会发现它返回的是Promise。
async function testAsync(){
return 'Hello async';
}
const result = testAsync();
console.log(result);


PS E:codeBXShop> node async.js
Promise { 'Hello async' }
async/await同时使用
async 会将其后的函数(函数表达式或 Lambda)的返回值封装成一个 Promise 对象,而 await 会等待这个 Promise 完成,并将其 resolve 的结果返回出来。
function findData() {
return new Promise(resolve => {
setTimeout(() => resolve("long_time_value"), 1000);
});
}

async function test() {
const v = await findData();
console.log(v);
}

test();
koa2源码核心文件分析
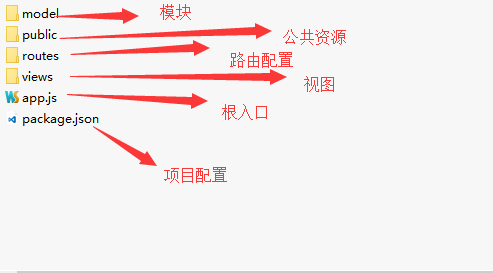
├── lib
│ ├── application.js
│ ├── context.js
│ ├── request.js
│ └── response.js
└── package.json
这个就是 GitHub https://github.com/koajs/koa上开源的koa2源码的源文件结构,核心代码就是lib目录下的四个文件
application.js 是整个koa2 的入口文件,封装了context,request,response,以及最核心的中间件处理流程。
context.js 处理应用上下文,里面直接封装部分request.js和response.js的方法
request.js 处理http请求
response.js 处理http响应
正常情况下面我们不需要关注上面的文件,我们可以用koa应用生成器生成对应的目录:
npm install koa-generator -g
koa koa_demo
koa2路由及中间件
由(Routing)是由一个 URI(或者叫路径)和一个特定的 HTTP 方法(GET、POST 等)组成的,涉及到应用如何响应客户端对某个网站节点的访问。
npm install --save koa-router
const Koa = require('koa');
const router = require('koa-router')();  //注意:引入的方式
const app = new Koa();
router.get('/', function (ctx, next) {
ctx.body="Hello koa";
})


router.get('/news,(ctx,next)=>{
ctx.body="新闻page"
});


app.use(router.routes()); //作用:启动路由
app.use(router.allowedMethods()); // 作用: 这是官方文档的推荐用法,我们可以看到router.allowedMethods()用在了路由匹配router.routes()之后,所以在当所有路由中间件最后调用.此时根据ctx.status设置response响应头
app.listen(3000,()=>{
console.log('starting at port 3000');
});
二、Koa路由get传值
在koa2中GET传值通过request接收,但是接收的方法有两种:query和querystring。
const Koa = require('koa');
const Router = require('koa-router');

const app = new Koa();
const router = new Router();
router.get('/', function (ctx, next) {
	ctx.body="Hello koa";
})
router.get('/newscontent,(ctx,next)=>{

	let url =ctx.url;
		//从request中获取GET请求
		let request =ctx.request;
		let req_query = request.query;
		let req_querystring = request.querystring;
		//从上下文中直接获取
		let ctx_query = ctx.query;
		let ctx_querystring = ctx.querystring;
		ctx.body={
		url,
		req_query,
		req_querystring,
		ctx_query,
		ctx_querystring
	}

});
app.use(router.routes()); //作用:启动路由
app.use(router.allowedMethods()); //作用: 当请求出错时的处理逻辑
app.listen(3000,()=>{
	console.log('starting at port 3000');
});
三、Koa动态路由
//请求方式   http://域名/product/123
router.get('/product/:aid',async (ctx)=>{
   console.log(ctx.params); //{ aid: '123' }  //获取动态路由的数据
   ctx.body='这是商品页面';
})
一、什么是Koa的中间件
通俗的讲:中间件就是匹配路由之前或者匹配路由完成后做的一系列的操作,我们就可以把它叫做中间件。
Koa的中间件(Middleware) 是一个函数,它可以访问请求对象(request object (req)), 响应对象(response object (res))。在 Koa中处理请求、响应循环流程的变量一般被命名为 next 变量。
如果我们的get、post回调函数中,没有next参数,那么匹配到这个路由就不会继续往下匹配了。如果想往下匹配的话,那么需要写next()
**二、Koa应用可使用如下几种中间件:**应用级中间件路由级中间件错误处理中间件第三方中间件
1.应用级中间件
const Koa = require('koa');
const Router = require('koa-router');

const app = new Koa();
const router = new Router();
app.use(async (ctx,next)=>{
	console.log(new Date());
	await next();
})
router.get('/', function (ctx, next) {
	ctx.body="Hello koa";
})
router.get('/news',(ctx,next)=>{
	ctx.body="新闻页面"
});
app.use(router.routes()); //作用:启动路由
app.use(router.allowedMethods()); //作用: 当请求出错时的处理逻辑
app.listen(3000,()=>{
	console.log('starting at port 3000');
});
2、路由中间件
router.get('/', async(ctx, next)=>{
	console.log(1)
	next()
})
router.get('/', function (ctx) {
	ctx.body="Hello koa";
})
3、错误处理中间件
app.use(async (ctx,next)=> {
	next();
	if(ctx.status==404){
	ctx.status = 404;
	ctx.body="这是一个404页面"
}
});
4、第三方中间件
const static = require('koa-static');
	const staticPath = './static';
	app.use(static(
	path.join( __dirname, staticPath)
))

const bodyParser = require('koa-bodyparser');
app.use(bodyParser());
三、Koa中间件的执行顺序
Koa 的中间件和 Express 不同,Koa 选择了洋葱圈模型。
请求数据获取
在ko2a中,获取GET请求数据源头是koa中request对象中的query方法或querystring方法,query返回是格式化好的参数对象,querystring返回的是请求字符串,由于ctx对request的API有直接引用的方式,所以获取GET请求数据有两个途径。
1.是从上下文中直接获取
请求对象ctx.query,返回如 { a:1, b:2 }
请求字符串 ctx.querystring,返回如 a=1&b=2
2.是从上下文的request对象中获取
请求对象ctx.request.query,返回如 { a:1, b:2 }
3、Koa Get传值完整代码:
const Koa = require('koa');

var Router = require('@koa/router');

const app = new Koa();

const router = new Router();

router.get('/', (ctx, next)=>{

    ctx.body = "Hello koa";

})

router.get('/newscontent',(ctx,next)=>{

    let url = ctx.url;

    //从request中获取GET请求

    let request = ctx.request;

    let req_query = request.query;

    let req_querystring = request.querystring;

    //从上下文中直接获取

    let ctx_query = ctx.query;

    let ctx_querystring = ctx.querystring;

    ctx.body = {

        url,

        req_query,

        req_querystring,

        ctx_query,

        ctx_querystring

    }

});

app.use(router.routes()); //作用:启动路由

app.use(router.allowedMethods()); //作用: 当请求出错时的处理逻辑

app.listen(3000, () => {

    console.log('starting at port 3000');

});
POST请求参数获取原理
对于POST请求的处理,koa2没有封装获取参数的方法,需要通过解析上下文context中的原生node.js请求对象req,将POST表单数据解析成query string(例如:a=1&b=2&c=3),再将query string 解析成JSON格式(例如:{“a”:“1”, “b”:“2”, “c”:“3”})
**注意:**ctx.request是context经过封装的请求对象,ctx.req是context提供的node.js原生HTTP请求对象,同理ctx.response是context经过封装的响应对象,ctx.res是context提供的node.js原生HTTP请求对象。
具体koa2 API文档可见 https://github.com/koajs/koa/blob/master/docs/api/context.md#ctxreq
解析出POST请求上下文中的表单数据
demo源码
https://github.com/ChenShenhai/koa2-note/blob/master/demo/request/post.js
// 解析上下文里node原生请求的POST参数
function parsePostData( ctx ) {
  return new Promise((resolve, reject) => {
    try {
      let postdata = "";
      ctx.req.addListener('data', (data) => {
        postdata += data
      })
      ctx.req.addListener("end",function(){
        let parseData = parseQueryStr( postdata )
        resolve( parseData )
      })
    } catch ( err ) {
      reject(err)
    }
  })
}

// 将POST请求参数字符串解析成JSON
function parseQueryStr( queryStr ) {
  let queryData = {}
  let queryStrList = queryStr.split('&')
  console.log( queryStrList )
  for (  let [ index, queryStr ] of queryStrList.entries()  ) {
    let itemList = queryStr.split('=')
    queryData[ itemList[0] ] = decodeURIComponent(itemList[1])
  }
  return queryData
}
上面是原生nodejs接收Post请求,我们也可以通过koa-bodyparser来接收Post
对于POST请求的处理,koa-bodyparser中间件可以把koa2上下文的formData数据解析到ctx.request.body中
koa-bodyparser模块的使用:
1、安装 koa-bodyparser
npm install --save koa-bodyparser
2、安装 koa-bodyparser 引入配置中间件
var Koa = require(‘koa’);
var bodyParser = require('koa-bodyparser');
var app = new Koa();
app.use(bodyParser());

app.use(async ctx => {
  ctx.body = ctx.request.body;
});
3、通过ctx.request.body 获取post提交的数据
ctx.request.body 获取post提交的数据
最后
以上就是孤独豌豆最近收集整理的关于不可抗力/(ㄒoㄒ)/~~ 开始学习node全栈<五>Koa框架的全部内容,更多相关不可抗力/(ㄒoㄒ)/~~内容请搜索靠谱客的其他文章。


发表评论 取消回复