文章目录
- 一、上篇回顾
- 二、接口认证逻辑
- JWT认证过滤器
- 配置过滤器连
- 三、请求演示
- 接口定义
- 未登录时
- 登录之后
- 四、系列文章
- Spring Security 系列
- Spring Security OAuth 系列
一、上篇回顾
在 手把手教你如何使用Spring Security(上):登录授权 文章我们配置了如何登录,以及登录后获取JWT令牌,但是对于普通的请求依然无法访问,原因是我们并没有去校验令牌去认证请求的合法性,这一篇就来说说请求的认证。
二、接口认证逻辑
我们再来捋一下流程,首先用户进行登录授权之后会返回JWT令牌,客户端请求资源接口需要带上这个令牌,而后台要做的就是
校验这个令牌的有效性。所以本篇需求也很清晰,校验JWT,其实也是只需要写一个JWT过滤器,将过滤器同上一篇一样的方式配置到过滤器链中。Github项目地址:spring-security-demo,修改记录:
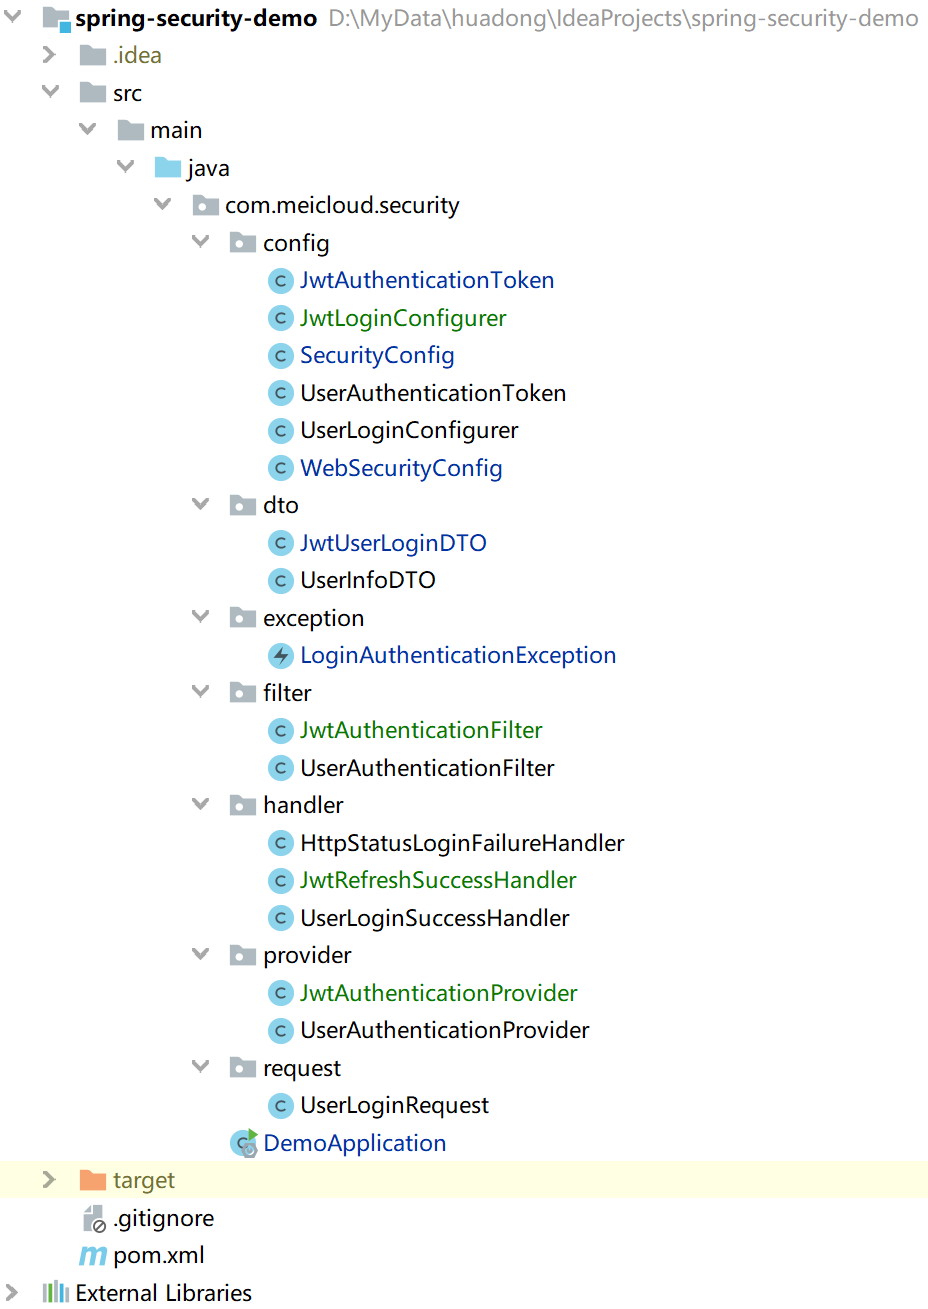
JWT认证过滤器
和登录时候创建过滤器一样,包括JWT过滤器本身(
JwtAuthenticationFilter),认证用的Provider(JwtAuthenticationProvider),登录成功处理器(JwtRefreshSuccessHandler),登录失败处理器(共用HttpStatusLoginFailureHandler),还有最后一个过滤器配置器(JwtLoginConfigurer)。
- JWT过滤器:和登录过滤器不一样,它继承的是
OncePerRequestFilter,这里主要进行一个流程控制,URL白名单、匿名用户URL判断
public class JwtAuthenticationFilter extends OncePerRequestFilter{

	private String tokenName;

	/**
	 * 白名单
	 */
	private List<RequestMatcher> permissiveRequestMatchers;

	/**
	 * 匿名登录也可以访问
	 */
	private List<RequestMatcher> anonymityRequestMatchers;

	private AuthenticationManager authenticationManager;

	private AuthenticationSuccessHandler successHandler = new SavedRequestAwareAuthenticationSuccessHandler();
	private AuthenticationFailureHandler failureHandler = new SimpleUrlAuthenticationFailureHandler();

	public JwtAuthenticationFilter(String tokenName) {
		this.tokenName = tokenName;
	}

	@Override
	public void afterPropertiesSet() {
		Assert.notNull(authenticationManager, "AuthenticationManager must be specified");
		Assert.notNull(successHandler, "AuthenticationSuccessHandler must be specified");
		Assert.notNull(failureHandler, "AuthenticationFailureHandler must be specified");
	}

	protected String getJwtToken(HttpServletRequest request) {
		return request.getHeader(tokenName);
	}

	@Override
	protected void doFilterInternal(HttpServletRequest request, HttpServletResponse response, FilterChain filterChain)
			throws ServletException, IOException {

		// 是否是白名单URL
		if (permissiveRequest(request)) {
			filterChain.doFilter(request, response);
			return;
		}

		Authentication authResult = null;
		AuthenticationException failed = null;
		try {
			String token = getJwtToken(request);
			if (StringUtils.isNotBlank(token)) {
				JwtAuthenticationToken authToken = new JwtAuthenticationToken(JWT.decode(token));
				authResult = this.getAuthenticationManager().authenticate(authToken);
			} else {
				failed = LoginAuthenticationException.JWT_IS_EMPTY;
			}
		} catch (JWTDecodeException e) {

			logger.error("JWT format error", e);
			failed = LoginAuthenticationException.JWT_FORMAT_ERROR;

		} catch (InternalAuthenticationServiceException e) {

			logger.error("An internal error occurred while trying to authenticate the user.");
			failed = LoginAuthenticationException.AUTH_ERROR;

		} catch (AuthenticationException e) {

			failed = e;
		}

		if (authResult != null) {
			successfulAuthentication(request, response, filterChain, authResult);
		} else {
			// 是否是匿名用户访问的URL
			if (!anonymityRequest(request)) {
				unsuccessfulAuthentication(request, response, failed);
				return;
			}
		}

		filterChain.doFilter(request, response);
	}


	protected void unsuccessfulAuthentication(HttpServletRequest request,
											  HttpServletResponse response, AuthenticationException failed)
			throws IOException, ServletException {
		SecurityContextHolder.clearContext();
		failureHandler.onAuthenticationFailure(request, response, failed);
	}

	protected void successfulAuthentication(HttpServletRequest request,
											HttpServletResponse response, FilterChain chain, Authentication authResult)
			throws IOException, ServletException {
		SecurityContextHolder.getContext().setAuthentication(authResult);
		successHandler.onAuthenticationSuccess(request, response, authResult);
	}

	protected AuthenticationManager getAuthenticationManager() {
		return authenticationManager;
	}

	public void setAuthenticationManager(AuthenticationManager authenticationManager) {
		this.authenticationManager = authenticationManager;
	}

	protected boolean requiresAuthentication(HttpServletRequest request,
											 HttpServletResponse response) {
		return StringUtils.isNotBlank(this.getJwtToken(request));
	}

	/**
	 * 白名单
	 *
	 * @param request
	 * @return
	 */
	protected boolean permissiveRequest(HttpServletRequest request) {
		if (permissiveRequestMatchers == null) {
			return false;
		}

		for (RequestMatcher permissiveMatcher : permissiveRequestMatchers) {
			if (permissiveMatcher.matches(request)) {
				return true;
			}
		}
		return false;
	}

	public void setPermissiveUrl(String... urls) {
		if (permissiveRequestMatchers == null) {
			permissiveRequestMatchers = new ArrayList<>();
		}

		for (String url : urls) {
			permissiveRequestMatchers.add(new AntPathRequestMatcher(url));
		}

	}

	/**
	 * 匿名登录可访问的URL
	 *
	 * @param request
	 * @return
	 */
	protected boolean anonymityRequest(HttpServletRequest request) {
		if (anonymityRequestMatchers == null) {
			return false;
		}

		for (RequestMatcher anonymityMatcher : anonymityRequestMatchers) {
			if (anonymityMatcher.matches(request)) {
				return true;
			}
		}
		return false;
	}

	public void setAnonymityRequestMatchers(String... urls) {
		if (anonymityRequestMatchers == null) {
			anonymityRequestMatchers = new ArrayList<>();
		}

		for (String url : urls) {
			anonymityRequestMatchers.add(new AntPathRequestMatcher(url));
		}
	}

	public void setAuthenticationSuccessHandler(
			AuthenticationSuccessHandler successHandler) {
		Assert.notNull(successHandler, "successHandler cannot be null");
		this.successHandler = successHandler;
	}

	public void setAuthenticationFailureHandler(
			AuthenticationFailureHandler failureHandler) {
		Assert.notNull(failureHandler, "failureHandler cannot be null");
		this.failureHandler = failureHandler;
	}

	protected AuthenticationSuccessHandler getSuccessHandler() {
		return successHandler;
	}

	protected AuthenticationFailureHandler getFailureHandler() {
		return failureHandler;
	}

}
- JWT认证Provider:主要校验令牌是否过期,对令牌进行解密校验是否合法。
public class JwtAuthenticationProvider implements AuthenticationProvider{

	private SecurityConfig securityConfig;

	public JwtAuthenticationProvider(SecurityConfig securityConfig) {
		this.securityConfig = securityConfig;
	}

	@Override
	public Authentication authenticate(Authentication authentication) throws AuthenticationException {

		DecodedJWT jwt = ((JwtAuthenticationToken) authentication).getToken();
		// 令牌过期
		if(jwt.getExpiresAt().before(Calendar.getInstance().getTime())) {
			throw LoginAuthenticationException.JWT_EXPIRED;
		}

		try {
			// 校验令牌的合法性
			Algorithm algorithm = Algorithm.HMAC256(securityConfig.getTokenEncryptSalt());
			JwtUserLoginDTO loginResultDTO = JwtUserLoginDTO.fromDecodeJWT(jwt, algorithm);
			return new JwtAuthenticationToken(loginResultDTO, jwt, null);
        } catch (Exception e) {
            throw new BadCredentialsException("JWT token verify fail", e);
        }
	}

	@Override
	public boolean supports(Class<?> authentication) {
		return authentication.isAssignableFrom(JwtAuthenticationToken.class);
	}

}
- 认证成功处理器:主要校验是否需要刷新,需要的话用最新的过期时间重新生成JWT给到客户端。
public class JwtRefreshSuccessHandler implements AuthenticationSuccessHandler{

	private SecurityConfig securityConfig;

	public JwtRefreshSuccessHandler(SecurityConfig securityConfig) {
		this.securityConfig = securityConfig;
	}

	@Override
	public void onAuthenticationSuccess(HttpServletRequest request, HttpServletResponse response,
										Authentication authentication) throws IOException, ServletException {

		DecodedJWT jwt = ((JwtAuthenticationToken) authentication).getToken();
		boolean shouldRefresh = shouldTokenRefresh(jwt.getIssuedAt());

		if (shouldRefresh) {
			Algorithm algorithm = Algorithm.HMAC256(securityConfig.getTokenEncryptSalt());
			Date expiredDate = new Date(System.currentTimeMillis() + securityConfig.getTokenExpireTimeInSecond() * 1000);
			// 重新生成一个JWT返回给客户端
			String token = ((JwtAuthenticationToken) authentication).getJwtUserLoginDTO().sign(algorithm, expiredDate);
			response.setHeader(securityConfig.getTokenName(), token);
		}
	}

	protected boolean shouldTokenRefresh(Date issueAt){
        LocalDateTime issueTime = LocalDateTime.ofInstant(issueAt.toInstant(), ZoneId.systemDefault());
        return LocalDateTime.now().minusSeconds(securityConfig.getTokenRefreshIntervalInSecond()).isAfter(issueTime);
    }

}
- 过滤器配置器:和登录时配置一样,继承
AbstractHttpConfigurer抽象类,实现configure()方法。主要配置成功处理器和失败处理器,同时将JWT过滤器配置进HttpSecurity,注意还要将白名单URL匿名用户URL传入。
public class JwtLoginConfigurer<T extends JwtLoginConfigurer<T, B>, B extends HttpSecurityBuilder<B>> extends AbstractHttpConfigurer<T, B> {

	private SecurityConfig securityConfig;

	public JwtLoginConfigurer(SecurityConfig securityConfig) {
		this.securityConfig = securityConfig;
	}

	@Override
	public void configure(B http) throws Exception {

		JwtAuthenticationFilter authFilter = new JwtAuthenticationFilter(securityConfig.getTokenName());
		authFilter.setAuthenticationManager(http.getSharedObject(AuthenticationManager.class));

		// 配置白名单
		authFilter.setPermissiveUrl(securityConfig.getPermitUrls());
		// 配置匿名用户可访问的接口
		authFilter.setAnonymityRequestMatchers(securityConfig.getAnonymousUrls());

		// 成功处理器
		authFilter.setAuthenticationSuccessHandler(new JwtRefreshSuccessHandler(securityConfig));
		// 失败处理器
		authFilter.setAuthenticationFailureHandler(new HttpStatusLoginFailureHandler());

		JwtAuthenticationFilter filter = postProcess(authFilter);
		http.addFilterAfter(filter, AnonymousAuthenticationFilter.class);
	}

}
配置过滤器连
- 和登录一样的,将
JwtLoginConfigurer配置进过滤器链。
@EnableWebSecurity
@EnableGlobalMethodSecurity(prePostEnabled = true)
public class WebSecurityConfig extends WebSecurityConfigurerAdapter {

	@Autowired
	private SecurityConfig securityConfig;

	@Override
	protected void configure(HttpSecurity http) throws Exception {
		http.authorizeRequests()
				// 配置白名单(比如登录接口)
				.antMatchers(securityConfig.getPermitUrls()).permitAll()
				// 匿名访问的URL,即不用登录也可以访问(比如广告接口)
				.antMatchers(securityConfig.getAnonymousUrls()).permitAll()
				// 其他URL需要认证通过才能访问后台资源
				.anyRequest().authenticated()
				.and()
				// 禁用跨站点伪造请求
				.csrf().disable()
				// 启用跨域资源共享
				.cors()
				.and()
				// 添加请求头
				.headers().addHeaderWriter(
				new StaticHeadersWriter(Collections.singletonList(
						new Header("Access-control-Allow-Origin", "*"))))
				.and()
				// 自定义的登录过滤器,不同的登录方式创建不同的登录过滤器,一样的配置方式
				.apply(new UserLoginConfigurer<>(securityConfig))
				.and()
				// 自定义的JWT令牌认证过滤器
				.apply(new JwtLoginConfigurer<>(securityConfig))
				.and()
				// 登出过滤器
				.logout()
				// 登出成功处理器
				.logoutSuccessHandler(new HttpStatusReturningLogoutSuccessHandler())
				.and()
				// 禁用Session会话机制(我们这个demo用的是JWT令牌的方式)
				.sessionManagement().disable()
				// 禁用SecurityContext,这个配置器实际上认证信息会保存在Session中,但我们并不用Session机制,所以也禁用
				.securityContext().disable();
	}

	@Override
	protected void configure(AuthenticationManagerBuilder auth) throws Exception {
		auth.authenticationProvider(userAuthenticationProvider())
				.authenticationProvider(jwtAuthenticationProvider());
	}

	@Bean
	protected AuthenticationProvider userAuthenticationProvider() throws Exception {
		return new UserAuthenticationProvider();
	}

	@Bean
	protected AuthenticationProvider jwtAuthenticationProvider() throws Exception {
		return new JwtAuthenticationProvider(securityConfig);
	}

	@Override
	public AuthenticationManager authenticationManagerBean() throws Exception {
		return super.authenticationManagerBean();
	}

	@Bean
	protected CorsConfigurationSource corsConfigurationSource() {
		CorsConfiguration configuration = new CorsConfiguration();
		configuration.setAllowedOrigins(Collections.singletonList("*"));
		configuration.setAllowedMethods(Arrays.asList("GET", "POST", "HEAD", "DELETE", "PUT", "OPTION"));
		configuration.setAllowedHeaders(Collections.singletonList("*"));
		UrlBasedCorsConfigurationSource source = new UrlBasedCorsConfigurationSource();
		source.registerCorsConfiguration("/**", configuration);
		return source;
	}

}
三、请求演示
接口定义
定义了三个接口,其中前两个是登录之后才能访问,后面那个广告接口不用登录的匿名用户也能访问。
- Demo类接口定义
@SpringBootApplication
@RestController
public class DemoApplication {

    public static void main(String[] args) {
        SpringApplication.run(DemoApplication.class, args);
    }

    /**
     * 用户登录才可访问
     *
     * @return
     */
    @GetMapping("/hello")
    public String hello() {
        return "Hello Spring Security!";
    }

    /**
     * 用户登录才可访问
     *
     * @return
     */
    @GetMapping("/bye")
    public String bye() {
        return "Bye Spring Security!";
    }

    /**
     * 广告接口,匿名用户可以访问
     *
     * @return
     */
    @GetMapping("/ad")
    public String no() {
        return "妈妈再也不用担心我的学习!";
    }
}
- 配置白名单URL和匿名用户URL
public class SecurityConfig {

    /**
     * 配置白名单(比如登录接口)
     */
    protected String[] permitUrls = Arrays.asList("/user/login").toArray(new String[1]);

    /**
     * 匿名访问的URL,即不用登录也可以访问(比如广告接口)
     */
    protected String[] anonymousUrls = Arrays.asList("/ad").toArray(new String[1]);

}
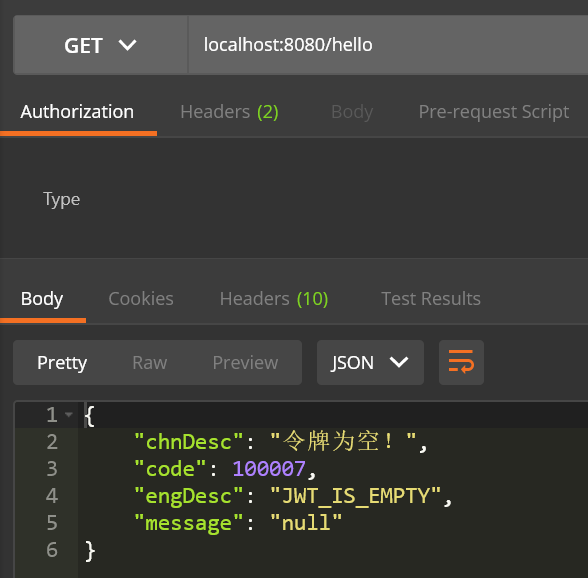
未登录时
- hello接口:
/hello
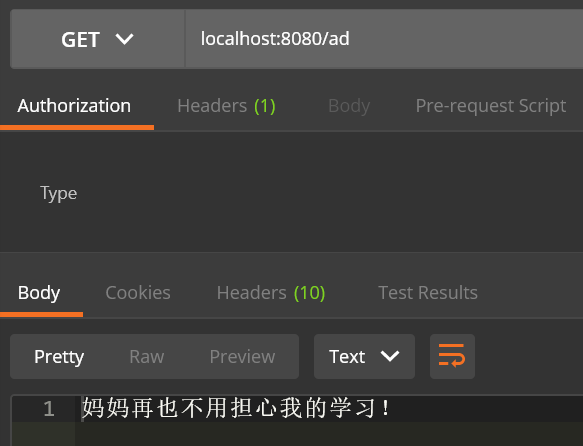
- 广告接口(匿名用户可访问):
/ad
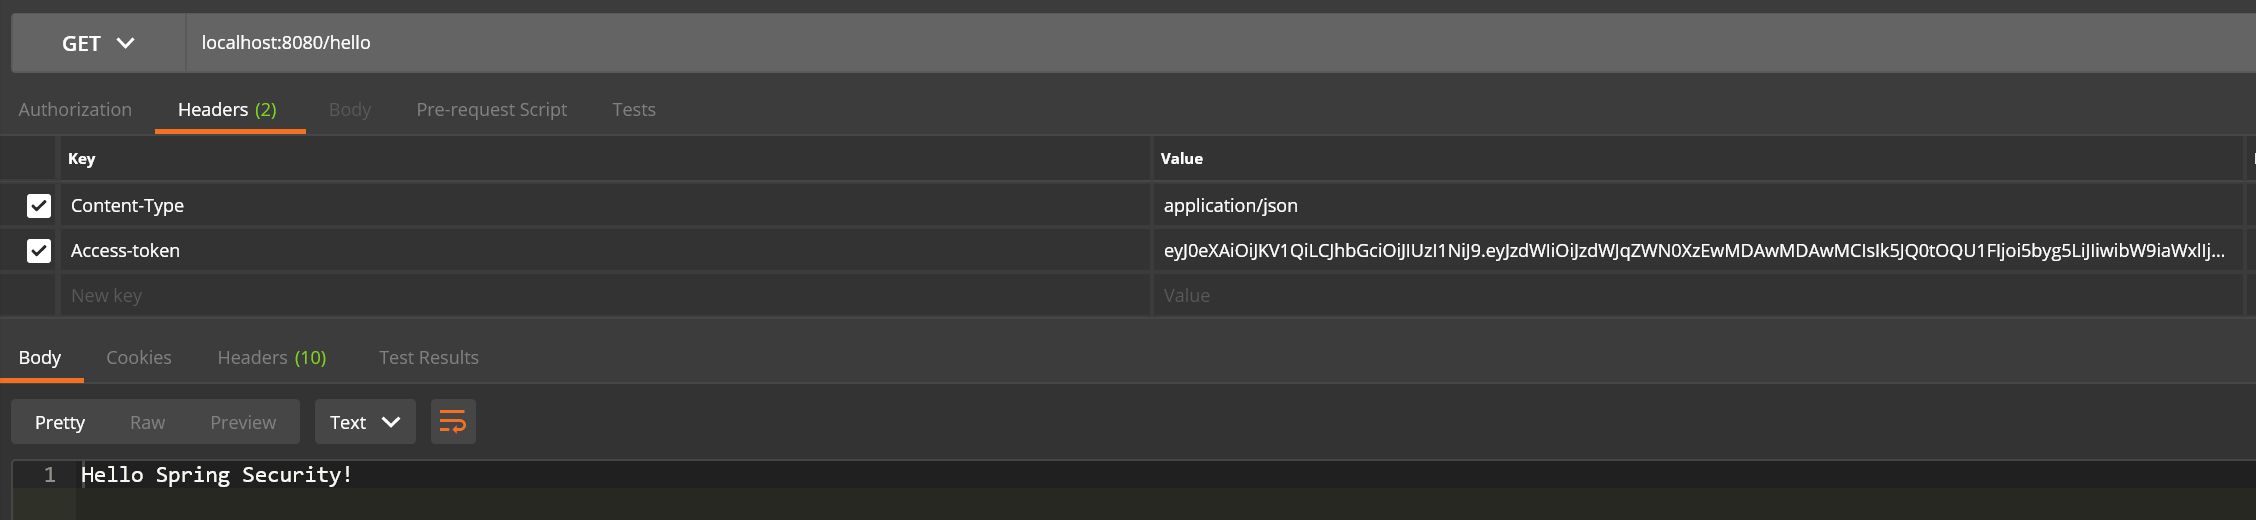
登录之后
- hello接口:
/hello,将JWT令牌加入请求头(注意请求头名称是后台设置的)
四、系列文章
Spring Security 系列
- 《手把手教你如何使用Spring Security(上):登录授权》
- 《手把手教你如何使用Spring Security(中):接口认证》
- 《手把手教你如何使用Spring Security(下):访问控制》
- 《Spring Security源码(一):整体框架设计》
- 《Spring Security源码(二):建造者详解》
- 《Spring Security源码(三):HttpSecurity详解》
- 《Spring Security源码(四):配置器详解》
- 《Spring Security源码(五):FilterChainProxy是如何创建的?》
- 《Spring Security源码(六):FilterChainProxy是如何运行的?》
- 《Spring Security源码(七):设计模式在框架中的应用》
- 《Spring Security源码(八):登录认证源码流程》
- 《Spring Security源码(九):过滤器链上的过滤器是如何排序的?》
- 《Spring Security源码(十):权限访问控制是如何做到的?》
Spring Security OAuth 系列
- 《Spring Security OAuth:客户端模式超简单实现》
- 《Spring Security OAuth:源码解析之还是内味儿》
最后
以上就是淡淡蜜蜂最近收集整理的关于手把手教你如何使用Spring Security(中):接口认证一、上篇回顾二、接口认证逻辑三、请求演示四、系列文章的全部内容,更多相关手把手教你如何使用Spring内容请搜索靠谱客的其他文章。
本图文内容来源于网友提供,作为学习参考使用,或来自网络收集整理,版权属于原作者所有。


发表评论 取消回复