
程序员的成长之路
互联网/程序员/技术/资料共享
关注
阅读本文大概需要 5 分钟。
来自:blog.csdn.net/weixin_38802061/article/details/105458047
简介
无论在什么系统中,日志管理模块都属于十分重要的部分,接下来会通过注解+AOP+MQ的方式实现一个简易的日志管理系统
思路
注解: 标记需要记录日志的方法
AOP: 通过AOP增强代码,利用后置/异常通知的方式获取相关日志信息,最后使用MQ将日志信息发送到专门处理日志的系统
RabbitMQ: 利用解耦、异步的特性,协调完成各个微服务系统之间的通信
1、日志表结构
表结构(sys_log):
CREATE TABLE `sys_log` (
  `id` int(11) NOT NULL AUTO_INCREMENT COMMENT '唯一ID',
  `opt_id` int(11) DEFAULT NULL COMMENT '操作用户id',
  `opt_name` varchar(50) DEFAULT NULL COMMENT '操作用户名',
  `log_type` varchar(20) DEFAULT NULL COMMENT '日志类型',
  `log_message` varchar(255) DEFAULT NULL COMMENT '日志信息(具体方法名)',
  `create_time` datetime DEFAULT NULL COMMENT '创建时间',
  PRIMARY KEY (`id`)
) ENGINE=InnoDB AUTO_INCREMENT=17 DEFAULT CHARSET=utf8 COMMENT='系统日志表';
实体类(SysLog):
@Data
public class SysLog  {

    private static final long serialVersionUID = 1L;

    /**
     * 唯一ID
     */
    @TableId(value = "id", type = IdType.AUTO)
    private Integer id;
    /**
     * 操作用户id
     */
    private Integer optId;
    /**
     * 操作用户名
     */
    private String optName;
    /**
     * 日志类型
     */
    private String logType;
    /**
     * 日志信息(具体方法名)
     */
    private String logMessage;
    /**
     * 创建时间
     */
    private Date createTime;

}
2、注解
注解(SystemLog):
仅作为标记的作用,目的让JVM可以识别,然后可以从中获取相关信息
@Target: 定义注解作用的范围,这里是方法
@Retention: 定义注解生命周期,这里是运行时
@Target(ElementType.METHOD)
@Retention(RetentionPolicy.RUNTIME)
public @interface SystemLog {

    SystemLogEnum type();

}
枚举(SystemLogEnum):
限定日志类型范围
public enum SystemLogEnum {

    SAVE_LOG("保存"),
    DELETE_LOG("删除"),
    REGISTER_LOG("注册"),
    LOGIN_LOG("登录"),
    LAUD_LOG("点赞"),
    COLLECT_LOG("收藏"),
    THROW_LOG("异常"),
    ;
    private String type;

    SystemLogEnum(String type) {
        this.type = type;
    }

    public String getType() {
        return type;
    }
}
3、AOP切面
AOP(SysLogAspect):
实现代码的增强,主要通过动态代理方式实现的代码增强。拦截注解,并获取拦截到的相关信息,封装成日志对象发送到MQ队列(生产端)
Component
@Aspect
@Slf4j
public class SysLogAspect {

    @Autowired
    MqStream stream;

    //切点
    @Pointcut("@annotation(cn.zdxh.commons.utils.SystemLog)")
    public void logPointcut(){}

    //后置通知
    @After("logPointcut()")
    public void afterLog(JoinPoint joinPoint) {
        //一般日志
        SysLog sysLog = wrapSysLog(joinPoint);

        log.info("Log值:"+sysLog);

        //发送mq消息
        stream.logOutput().send(MessageBuilder.withPayload(sysLog).build());

    }

    //异常通知
    @AfterThrowing(value = "logPointcut()", throwing = "e")
    public void throwingLog(JoinPoint joinPoint, Exception e) {
        //异常日志
        SysLog sysLog = wrapSysLog(joinPoint);
        sysLog.setLogType(SystemLogEnum.THROW_LOG.getType());
        sysLog.setLogMessage(sysLog.getLogMessage()+"==="+e);

        log.info("异常Log值:"+sysLog);

        //发送mq消息
        stream.logOutput().send(MessageBuilder.withPayload(sysLog).build());
    }

    /**
     * 封装SysLog对象
     * @param joinPoint
     * @return
     */
    public SysLog wrapSysLog(JoinPoint joinPoint){
        //获取请求响应对象
        ServletRequestAttributes attributes = (ServletRequestAttributes) RequestContextHolder.getRequestAttributes();
        HttpServletRequest request = attributes.getRequest();
        MethodSignature signature = (MethodSignature)joinPoint.getSignature();
        SysLog sysLog = new SysLog();

        //获取方法全路径
        String methodName = signature.getDeclaringTypeName()+"."+signature.getName();
        //获取注解参数值
        SystemLog systemLog = signature.getMethod().getAnnotation(SystemLog.class);
        //从header取出token
        String token = request.getHeader("token");
        if (!StringUtils.isEmpty(token)) {
            //操作人信息
            Integer userId = JwtUtils.getUserId(token);
            String username = JwtUtils.getUsername(token);
            sysLog.setOptId(userId);
            sysLog.setOptName(username);
        }
        if (!StringUtils.isEmpty(systemLog.type())){
            sysLog.setLogType(systemLog.type().getType());
        }
        sysLog.setLogMessage(methodName);
        sysLog.setCreateTime(new Date());
        return sysLog;
    }

}
3、RabbitMQ消息队列
MQ:
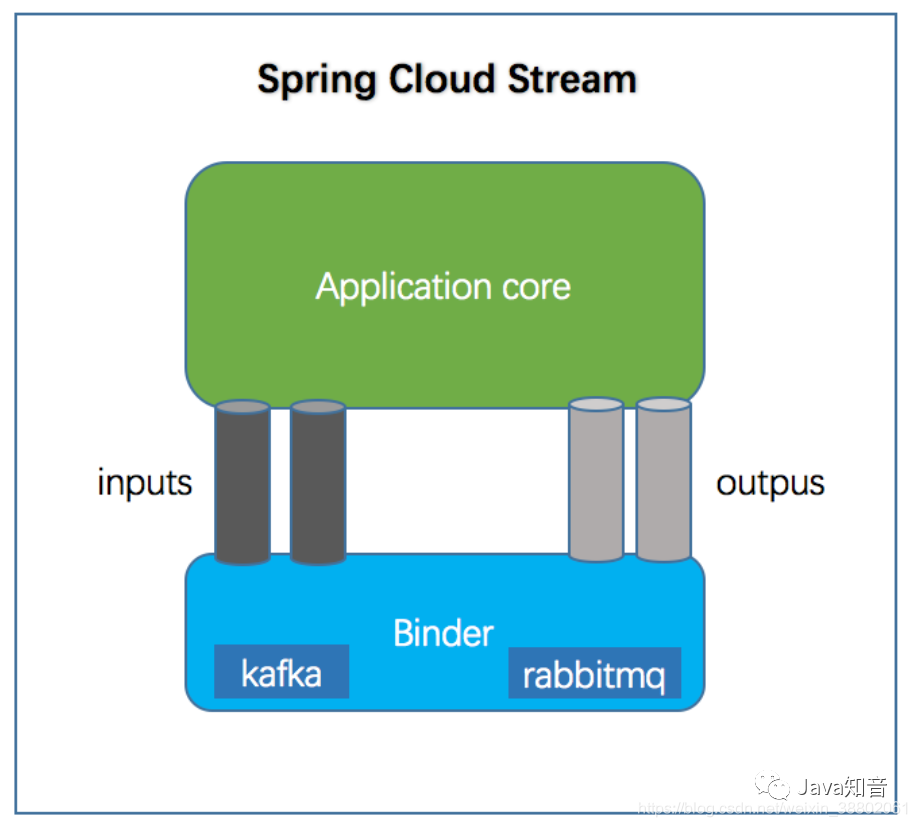
这里主要是通过Spring Cloud Stream集成的RabbitMQ
Spring Cloud Stream:
作为MQ的抽象层,已屏蔽各种MQ的各自名词,统称为input、output两大块。可以更方便灵活地切换各种MQ,如 kafka、RocketMQ等
(1)定义Input/Ouput接口(MqStream)
@Component
public interface MqStream {

    String LOG_INPUT = "log_input";

    String LOG_OUTPUT = "log_output";

    @Input(LOG_INPUT)
    SubscribableChannel logInput();

    @Output(LOG_OUTPUT)
    MessageChannel logOutput();

}
(2)MQ生产者
注:这里使用到AOP切面的微服务,都属于MQ生产者服务
引入依赖:
这里没有版本号的原因是spring cloud已经帮我们管理好各个版本号,已无需手动定义版本号
<!--Spring Cloud Stream-->
<dependency>
    <groupId>org.springframework.cloud</groupId>
     <artifactId>spring-cloud-stream</artifactId>
</dependency>
<dependency>
    <groupId>org.springframework.cloud</groupId>
    <artifactId>spring-cloud-stream-binder-rabbit</artifactId>
</dependency>
在程序入口开启MQ的Input/Output绑定:
@SpringBootApplication(scanBasePackages = {"cn.zdxh.user","cn.zdxh.commons"})
@EnableEurekaClient
@MapperScan("cn.zdxh.user.mapper")
@EnableBinding(MqStream.class) //开启绑定
@EnableFeignClients
public class YouquServiceProviderUserApplication {

    public static void main(String[] args) {
        SpringApplication.run(YouquServiceProviderUserApplication.class, args);
    }

}
yml配置:
在生产者端设置output
destination: 相当于
rabbitmq的exchangegroup: 相当于rabbitmq的
queue,不过是和destination一起组合成的queue名binder: 需要绑定的
MQ
#Spring Cloud Stream相关配置
spring:
  cloud:
    stream:
      bindings: # exchange与queue绑定
        log_output: # 日志生产者设置output
          destination: log.exchange
          content-type: application/json
          group: log.queue
          binder: youqu_rabbit #自定义名称
      binders:
        youqu_rabbit:  #自定义名称
          type: rabbit
          environment:
            spring:
              rabbitmq:
                host: localhost
                port: 5672
                username: guest
                password: 25802580
注:完成以上操作,即完成MQ生产端的所有工作
(3)MQ消费者
引入依赖、开启Input/Output绑定:均和生产者的设置一致
yml配置:
在生产者端设置input
spring:
  cloud:  # Spring Cloud Stream 相关配置
    stream:
      bindings: # exchange与queue绑定
        log_input: # 日志消费者设置input
          destination: log.exchange
          content-type: application/json
          group: log.queue
          binder: youqu_rabbit
      binders:
        youqu_rabbit:
          type: rabbit
          environment:
            spring:
              rabbitmq:
                host: localhost
                port: 5672
                username: guest
                password: 25802580
消费者监听(LogMqListener):
监听生产者发过来的日志信息,将信息添加到数据库即可
@Service
@Slf4j
public class LogMqListener {

    @Autowired
    SysLogService sysLogService;

    @StreamListener(MqStream.LOG_INPUT)
    public void input(SysLog sysLog)  {
        log.info("开始记录日志========================");

        sysLogService.save(sysLog);

        log.info("结束记录日志========================");

    }
}
注:完成以上操作,即完成MQ消费端的所有工作
4、应用
简述:
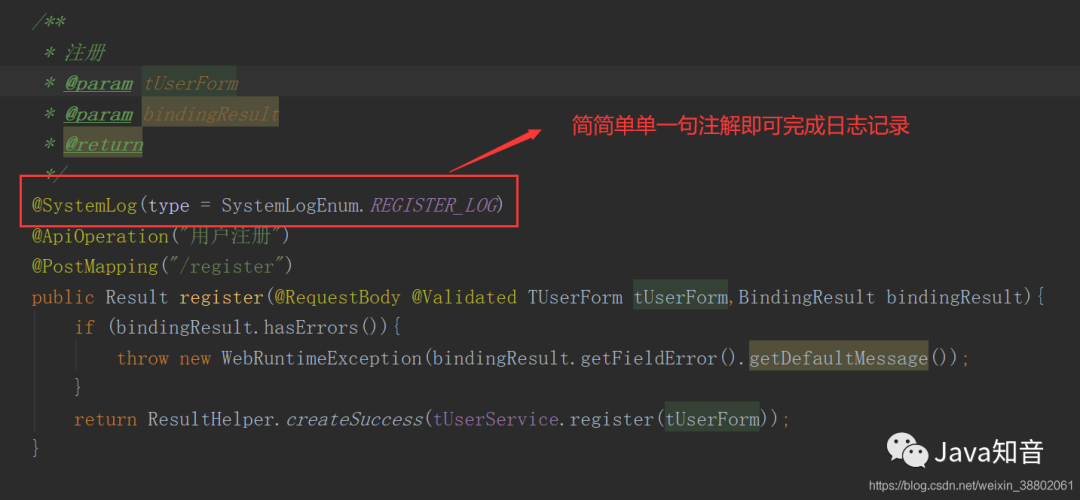
只需将@SystemLog(type = SystemLogEnum.REGISTER_LOG),标记在需要记录的方法上,当有客户端访问该方法时,就可以自动完成日志的记录
5、总结
流程:
注解标记--->AOP拦截--->日志发送到MQ--->专门处理日志的系统监听MQ消息 --->日志插入到数据库
<END>
推荐阅读:
林俊杰的元宇宙房地产塌房,周杰伦站台的NFT稀碎
Java/Spring/Dubbo三种SPI机制,谁更好?
互联网初中高级大厂面试题(9个G)
内容包含Java基础、JavaWeb、MySQL性能优化、JVM、锁、百万并发、消息队列、高性能缓存、反射、Spring全家桶原理、微服务、Zookeeper......等技术栈!
⬇戳阅读原文领取!                                  朕已阅
最后
以上就是温暖月光最近收集整理的关于SpringCloud使用注解+AOP+MQ来实现日志管理模块的全部内容,更多相关SpringCloud使用注解+AOP+MQ来实现日志管理模块内容请搜索靠谱客的其他文章。


发表评论 取消回复