前言
销售拉了个小活,让我将采集的设备数据送到第三方搭建的mqtt服务器平台上。
找了个C# mqtt demo, 不确定是否将数据送到了第三方平台上。
因为他们是封装好的网页UI, 必须符合他们的格式才能显示出来。
查资料,看到用mosquitto搭建 mqtt服务端很容易。
搭好后,测试了一下(启动mqtt服务,订阅消息,上传消息),好使。
这样的话,我可以测试自己用C#写的插件,是否可以送数据到mosquitto搭建的mqtt server. 送到了就OK.
剩下的事,就是送出的数据符合第三方约定的格式即可。
试验
试验环境
win10x64专业版最新
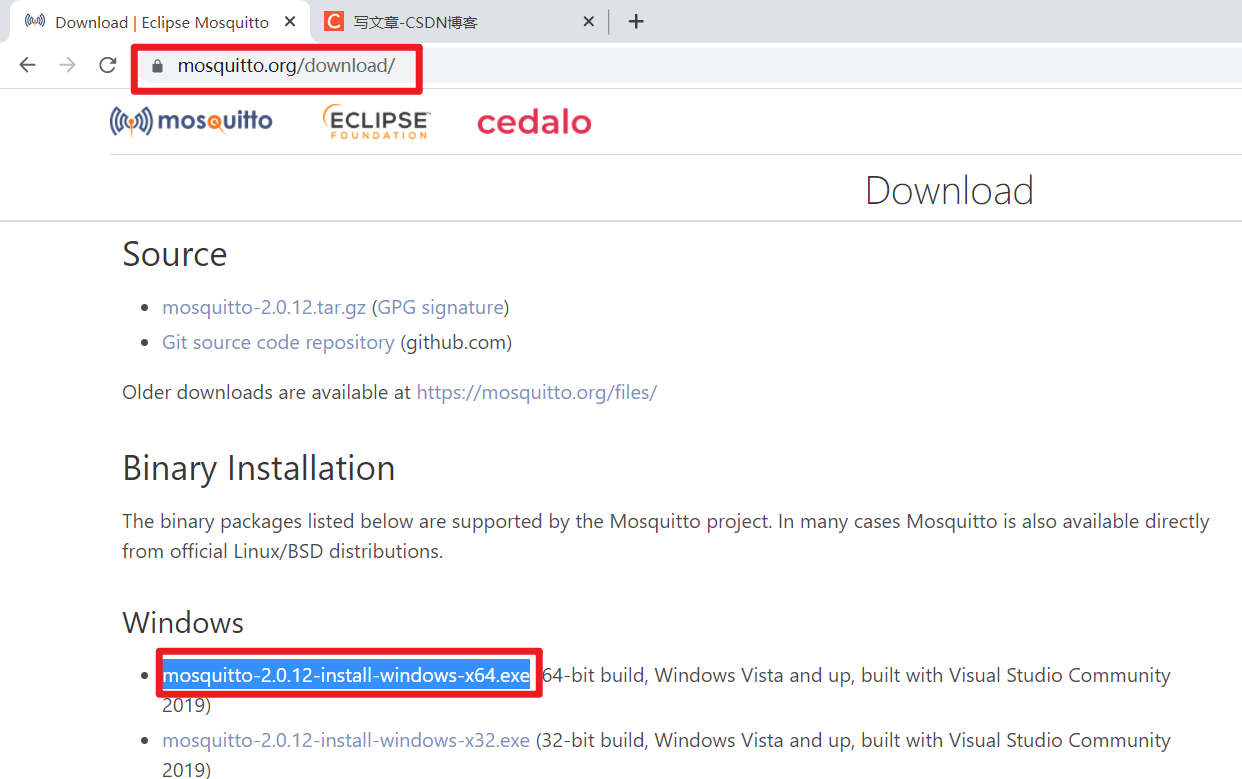
下载mosquitto
https://mosquitto.org/download/
mosquitto-2.0.12-install-windows-x64.exe
安装
双击 mosquitto-2.0.12-install-windows-x64.exe 进行安装
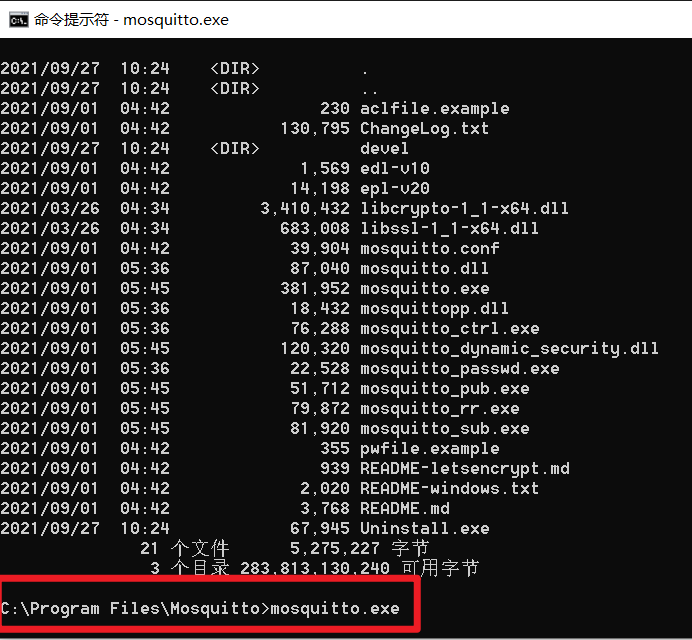
安装后的默认位置 C:Program FilesMosquitto
安装后的目录文件列表
Microsoft Windows [版本 10.0.19043.1237]
(c) Microsoft Corporation。保留所有权利。

C:Userschenx>cd /d C:Program FilesMosquitto

C:Program FilesMosquitto>dir
 驱动器 C 中的卷是 os
 卷的序列号是 6645-A63C

 C:Program FilesMosquitto 的目录

2021/09/27  10:24    <DIR>          .
2021/09/27  10:24    <DIR>          ..
2021/09/01  04:42               230 aclfile.example
2021/09/01  04:42           130,795 ChangeLog.txt
2021/09/27  10:24    <DIR>          devel
2021/09/01  04:42             1,569 edl-v10
2021/09/01  04:42            14,198 epl-v20
2021/03/26  04:34         3,410,432 libcrypto-1_1-x64.dll
2021/03/26  04:34           683,008 libssl-1_1-x64.dll
2021/09/01  04:42            39,904 mosquitto.conf
2021/09/01  05:36            87,040 mosquitto.dll
2021/09/01  05:45           381,952 mosquitto.exe
2021/09/01  05:36            18,432 mosquittopp.dll
2021/09/01  05:36            76,288 mosquitto_ctrl.exe
2021/09/01  05:45           120,320 mosquitto_dynamic_security.dll
2021/09/01  05:36            22,528 mosquitto_passwd.exe
2021/09/01  05:45            51,712 mosquitto_pub.exe
2021/09/01  05:45            79,872 mosquitto_rr.exe
2021/09/01  05:45            81,920 mosquitto_sub.exe
2021/09/01  04:42               355 pwfile.example
2021/09/01  04:42               939 README-letsencrypt.md
2021/09/01  04:42             2,020 README-windows.txt
2021/09/01  04:42             3,768 README.md
2021/09/27  10:24            67,945 Uninstall.exe
              21 个文件      5,275,227 字节
               3 个目录 283,800,928,256 可用字节

C:Program FilesMosquitto>
本地使用mosquitto
默认按照好的mosquitto只能在本地使用。
如果要在客户端计算机和远程mqtt服务器之间进行mqtt操作(订阅消息,上传消息),需要修改配置文件mosquitto.conf
在本地使用mosquitto,在安装目录中的README.md中有描述
本地启动mqtt服务
打开新的cmd
cd /d C:Program FilesMosquitto
mosquitto.exe
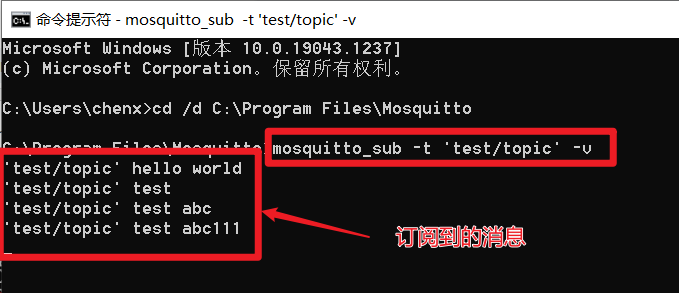
从本地mqtt服务器订阅消息
打开新的cmd
cd /d C:Program FilesMosquitto
mosquitto_sub -t 'test/topic' -v
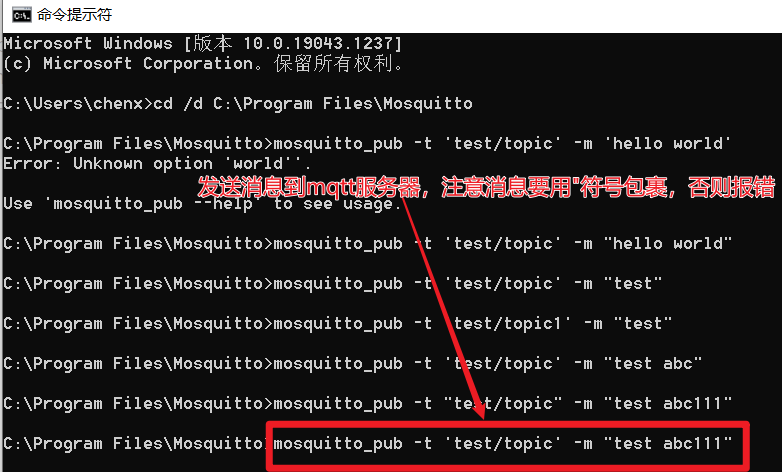
本地发送消息到本地mqtt服务器
这块文档上写的不对,会报错。原因是消息必须用"符号包裹,而不是用’符号包裹。
打开新的cmd
cd /d C:Program FilesMosquitto
mosquitto_pub -t 'test/topic' -m "hello world"
这里要注意的是发送消息时的主题,必须和订阅的主题一样才行. e.g. 都是 ‘test/topic’
效果 - 本地服务端
效果 - 订阅本地消息
效果-发送本地消息
mqtt服务器端口的问题
上述简易试验,用的mqtt端口都是默认的。
看mosquitto命令行帮助,可以看到 -p 是指定端口的选项。
-p : network port to connect to. Defaults to 1883 for plain MQTT and 8883 for MQTT over TLS.
只要命令行带上 -p 就可以指定端口
用带端口来测试一下
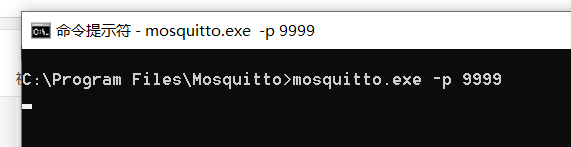
带端口启动本地mqtt服务
假设端口是9999
mosquitto.exe -p 9999
带端口订阅本地消息
mosquitto_sub -p 9999 -t 'test/topic' -v

带端口发送mqtt消息到服务器
mosquitto_pub -p 9999 -t 'test/topic' -m "test abc113"

可以看到在订阅消息的cmd窗口,已经看到推送过来的消息

发送消息带IP
发送消息的mqtt客户端和服务器一般都不是一台,所以看看怎么带IP发送消息。
mosquitto_pub --help
 -A : bind the outgoing socket to this host/ip address. Use to control which interface
      the client communicates over.
试验一下带IP, 带端口发送消息
mosquitto_pub -h 127.0.0.1 -p 9999 -t 'test/topic' -m "test abc114"

将服务装在远程计算机上,在本地发送mqtt消息
正常用的话,mqtt客户端和mqtt服务器都不在一台计算机上。
默认安装的mosquitto,是不支持从本地mqtt客户端访问远程mqtt客户端的。
假设远程装了mosquitto的计算机IP为192.168.1.8
现在远程计算机上安装mosquitto,这个步骤和本地相同。
从本地mqtt客户端访问远程mqtt服务器,需要认证,要配置用户名,口令。
用 mosquitto_passwd.exe 来配置mqtt登陆认证的存根文件,用户名是明文,口令是密文HASH, 防止有人登入mqtt服务器所在物理计算机,看到口令明文。
// 假设 生成的口令文件在mosquitto的安装目录中,叫做my_mosquitto_pwd_file.cfg
// mosquitto_passwd.exe 带的参数 -H pwd的HASH方式 -c 生成或要操作的口令文件 再带上用户名就行
// 因为mosquitto安装后的目录要管理员权限,所以先用管理员全线启动cmd
// 然后在认证文件中加一个新用户和新口令
mosquitto_passwd.exe -H sha512 -c my_mosquitto_pwd_file.cfg user1

// 上述命令行是要在my_mosquitto_pwd_file.cfg 中加入一个user1的用户,该命令回车后,输入2遍pwd就可以了。
C:Program FilesMosquitto>mosquitto_passwd.exe -H sha512 -c my_mosquitto_pwd_file.cfg user1
Password:
Reenter password:

C:Program FilesMosquitto>
// 输入口令时,就输入自己确定的实际口令,我输入了2遍pwd1
看看口令文件my_mosquitto_pwd_file.cfg的内容
user1:$6$xDVrR+1BrDbh/Uck$skhiqG88FPqOiC8b2GwJU0Xae5RDk9tcEQiFz+RM5DUkvaOSwExcCwhTRjs9u5J3vqBCEbJXWTr7nIsO68SK5Q==
可以看到用户名是user1的明文,但是口令已经做了HASH. 比较安全。
再加入一个用户user2, 口令是pwd2
C:Program FilesMosquitto>mosquitto_passwd.exe -H sha512 -c my_mosquitto_pwd_file.cfg user2
Password:
Reenter password:

C:Program FilesMosquitto>
看看口令文件my_mosquitto_pwd_file.cfg的内容
user2:$6$sYaJFfI0ggkPCXLb$IaeCU/EFLil53dAq+Iiy6Sfv17QBxjqjqMbOCWzkwVEmGZm3/uHNkDrGzBL8JRmbNuh2PHm02kWf3dMREs7CGA==
可以看到user1没有了,看来mosquitto_passwd.exe支持一个用户名和口令。
修改配置文件mosquitto.conf
修改配置文件是为了从本地mqtt客户端访问远程mqtt服务器, 默认安装完的情况是mosquitto只能在本地测试用,没有实际用场。
配置文件的修改点如下:
mosquitto启动时,监听的是本地IP和PORT
# =================================================================
# Listeners
# =================================================================

# Listen on a port/ip address combination. By using this variable
# multiple times, mosquitto can listen on more than one port. If
# this variable is used and neither bind_address nor port given,
# then the default listener will not be started.
# The port number to listen on must be given. Optionally, an ip
# address or host name may be supplied as a second argument. In
# this case, mosquitto will attempt to bind the listener to that
# address and so restrict access to the associated network and
# interface. By default, mosquitto will listen on all interfaces.
# Note that for a websockets listener it is not possible to bind to a host
# name.
#
# On systems that support Unix Domain Sockets, it is also possible
# to create a # Unix socket rather than opening a TCP socket. In
# this case, the port number should be set to 0 and a unix socket
# path must be provided, e.g.
# listener 0 /tmp/mosquitto.sock
#
# listener port-number [ip address/host name/unix socket path]
#listener
# 按照如下格式修改监听的端口,本地IP
# listener 端口 IP
listener 39999 192.168.1.8
打开日志
如果mqtt操作时报错,可以在日志中看到问题。如果没日志,就不知道报错是啥问题。
e.g. 端口没监听成功, 防火墙没放开端口,导致客户端根本没访问到mqtt服务端监听的端口,mqtt客户端访问时,认证失败…
还可以看到是哪个IP访问过mqtt服务器。
总是,打开mosquitto的运行日志,好处多多。
# =================================================================
# Logging
# =================================================================

# Places to log to. Use multiple log_dest lines for multiple
# logging destinations.
# Possible destinations are: stdout stderr syslog topic file dlt
#
# stdout and stderr log to the console on the named output.
#
# syslog uses the userspace syslog facility which usually ends up
# in /var/log/messages or similar.
#
# topic logs to the broker topic '$SYS/broker/log/<severity>',
# where severity is one of D, E, W, N, I, M which are debug, error,
# warning, notice, information and message. Message type severity is used by
# the subscribe/unsubscribe log_types and publishes log messages to
# $SYS/broker/log/M/susbcribe or $SYS/broker/log/M/unsubscribe.
#
# The file destination requires an additional parameter which is the file to be
# logged to, e.g. "log_dest file /var/log/mosquitto.log". The file will be
# closed and reopened when the broker receives a HUP signal. Only a single file
# destination may be configured.
# 按照如下格式指令安装目录中的日志文件名称
# 格式 log_dest file 日志文件名称
log_dest file my_mosquitto.log
看看日志记录的样子
1632734887: mosquitto version 2.0.12 starting
1632734887: Config loaded from mosquitto.conf.
1632734887: Opening ipv4 listen socket on port 39999.
1632734887: mosquitto version 2.0.12 running
1632734933: New connection from 192.168.1.22:13192 on port 39999.
1632734933: New client connected from 192.168.1.22:13192 as auto-BF4C1561-22D9-2D92-23B9-9F622593B370 (p2, c1, k60, u'user1').
1632735077: New connection from 192.168.1.22:7217 on port 39999.
1632735077: New client connected from 192.168.1.22:7217 as auto-0E78C9E4-27D0-9F7B-8074-385E3F9320BC (p2, c1, k60, u'user1').
1632735077: Client auto-0E78C9E4-27D0-9F7B-8074-385E3F9320BC disconnected.
打开日志记录级别
这块没细研究,就按照配置文件给出的推荐日志级别打开几个级别。如果还有报错看不到日志,可以详细看看这里的日志级别。
#
# The dlt destination is for the automotive `Diagnostic Log and Trace` tool.
# This requires that Mosquitto has been compiled with DLT support.
#
# Note that if the broker is running as a Windows service it will default to
# "log_dest none" and neither stdout nor stderr logging is available.
# Use "log_dest none" if you wish to disable logging.
#log_dest stderr

# Types of messages to log. Use multiple log_type lines for logging
# multiple types of messages.
# Possible types are: debug, error, warning, notice, information,
# none, subscribe, unsubscribe, websockets, all.
# Note that debug type messages are for decoding the incoming/outgoing
# network packets. They are not logged in "topics".
#log_type error
#log_type warning
#log_type notice
#log_type information

log_type error
log_type warning
log_type notice
log_type information
不允许匿名登陆
匿名登陆只能用在本地mqtt测试。
如果远程访问,不允许匿名登陆,必须给出用户名和口令才能登陆
# =================================================================
# Security
# =================================================================

# If set, only clients that have a matching prefix on their
# clientid will be allowed to connect to the broker. By default,
# all clients may connect.
# For example, setting "secure-" here would mean a client "secure-
# client" could connect but another with clientid "mqtt" couldn't.
#clientid_prefixes

# Boolean value that determines whether clients that connect
# without providing a username are allowed to connect. If set to
# false then a password file should be created (see the
# password_file option) to control authenticated client access.
#
# Defaults to false, unless there are no listeners defined in the configuration
# file, in which case it is set to true, but connections are only allowed from
# the local machine.
#allow_anonymous false

allow_anonymous false
给出登陆认证的存根文件
因为远程登陆,必须带用户名和口令进行mqtt操作,所以必须给出存放用户名和口令的存根文件。
这个文件,就是上面用mosquitto_passwd.exe生成的认证文件。
# -----------------------------------------------------------------
# Default authentication and topic access control
# -----------------------------------------------------------------

# Control access to the broker using a password file. This file can be
# generated using the mosquitto_passwd utility. If TLS support is not compiled
# into mosquitto (it is recommended that TLS support should be included) then
# plain text passwords are used, in which case the file should be a text file
# with lines in the format:
# username:password
# The password (and colon) may be omitted if desired, although this
# offers very little in the way of security.
#
# See the TLS client require_certificate and use_identity_as_username options
# for alternative authentication options. If a plugin is used as well as
# password_file, the plugin check will be made first.
# my_pwd_file.cfg 是用mosquitto_passwd.exe生成的
password_file my_pwd_file.cfg
配置文件就修改这么多就够了
启动mosquitto服务
启动启动mosquitto服务的方法有2种,都使用的配置文件mosquitto.conf
- 安装mosquitto后,已经安装了mosquitto服务,在服务面板中可以看到。
也可以用命令行安装
mosquitto install
安装服务后,就可以在服务面板中启动服务。如果启动失败,去看日志文件,可以看到失败原因。
- 直接用命令行启动(假设服务没启动)
因为安装后的目录需要管理员权限,先用管理员模式启动cmd
Microsoft Windows [版本 10.0.19043.1237]
(c) Microsoft Corporation。保留所有权利。

C:WINDOWSsystem32>cd /d C:Program FilesMosquitto

C:Program FilesMosquitto>mosquitto.exe -c mosquitto.conf
没有报错信息,mosquitto正在运行。
此时要检查防火墙,让mosquitto的所监听的端口的入站和出站规则都打开。
我做实验时,将其他规则都删了,添加了4条规则,将所有端口的入站/出站的TCP/UDP端口都放开了
从本地客户端访问一下这台刚配置好的远程mqtt服务器
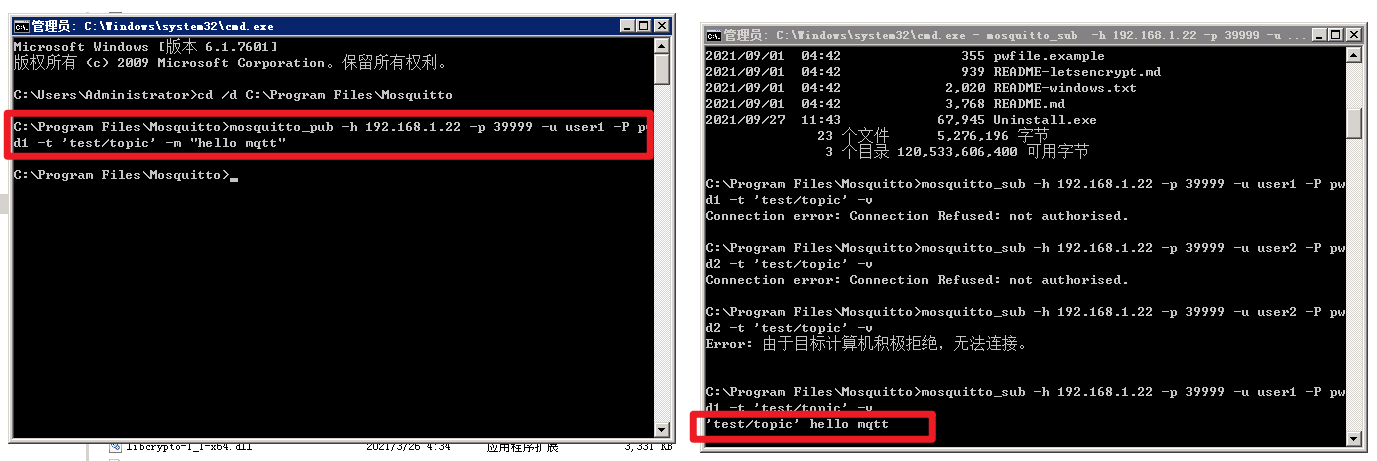
先用错误的用户名/口令访问一下远程的mqtt服务器
C:Program FilesMosquitto>mosquitto_sub -h 192.168.1.22 -p 39999 -u user1 -P pw
d1 -t 'test/topic' -v
Connection error: Connection Refused: not authorised.
去看下日志my_mosquitto.log。
1632738749: mosquitto version 2.0.12 starting
1632738749: Config loaded from mosquitto.conf.
1632738749: Opening ipv4 listen socket on port 39999.
1632738749: mosquitto version 2.0.12 running
1632739100: New connection from 192.168.1.8:49762 on port 39999.
1632739100: Client <unknown> disconnected, not authorised.
可以看到服务段启动的端口是39999.
有个客户端访问了服务器的mqtt端口,但是认证失败。
如果访问不存在的mqtt服务器,可以直接在mqtt客户端看到连接补上客户端。
C:Program FilesMosquitto>mosquitto_sub -h 192.168.1.22 -p 39999 -u user2 -P pw
d2 -t 'test/topic' -v
Error: 由于目标计算机积极拒绝,无法连接。
现在用正确的用户名口令,订阅服务器的信息。
如果不记得mqtt用户名和口令了,用mosquitto_passwd.exe再生成一次口令文件
mosquitto_passwd.exe -H sha512 -c my_mosquitto_pwd_file.cfg user1
要确认my_mosquitto_pwd_file.cfg中的password_file值和mosquitto_passwd.exe中产生的口令文件相同。
用正确的用户名口令,在客户端上订阅服务器的信息
C:Program FilesMosquitto>mosquitto_sub -h 192.168.1.22 -p 39999 -u user1 -P pw
d1 -t 'test/topic' -v
可以看到订阅操作没有报错,运行正常。

在客户端向服务端发送mqtt消息。
C:Program FilesMosquitto>mosquitto_pub -h 192.168.1.22 -p 39999 -u user1 -P pw
d1 -t 'test/topic' -m "hello mqtt"
在客户端可以看到发送消息成功,没有报错。
同时可以在客户端刚才在cmd中开的订阅窗口,得到了刚由另外一个cmd向服务器发送的消息。
收工
那这个试验就圆满完成。
剩下的事情:
- 写一个mqtt客户端工程,向自己搭建的远程mqtt服务器发送消息。如果发送到,就可以从订阅cmd窗口看到。
- 写正式工程,先发送实际数据到自己服务器,和第三方工程时讨论,看看送的数据是否合规。
- 将实际数据送到第三方服务器,看看数据是否能显示出来。
最后
以上就是直率墨镜最近收集整理的关于mqtt服务器(mosquitto)测试环境的搭建的全部内容,更多相关mqtt服务器(mosquitto)测试环境内容请搜索靠谱客的其他文章。


发表评论 取消回复