1.概述
本来想着昨天星期五可以早点休息,今天可以早点起来跑步,可没想到事情那么的多,晚上有人问我主页怎么做到点击才去加载Fragment数据,而不是一进入主页就去加载所有的数据,在这里自己就对Fragment做一个解析,这个应该可以算是很基础的东西了。
上个月的访问量已经超过了10万,坚持写这个还是很有激情的,等到总数超过100万的时候,会利用空闲的时间去录制一整套Android的视频,希望可以跟后来者一同学习。
我们还是老套路先看google官方理论以及源码,然后将其整合到项目中,看一下项目效果。附视频地址:http://pan.baidu.com/s/1mhUus56
2.官方解析
2.1 Fragment简介:
google官方简介,官方现在打开都会自动翻译,突然有点不适应一定需要翻墙,我这里就直接去copy重要部分:
Fragment 表示 Activity 中的行为或用户界面部分。您可以将多个片段组合在一个 Activity 中来构建多窗格 UI,以及在多个 Activity 中重复使用某个片段。您可以将片段视为 Activity 的模块化组成部分,它具有自己的生命周期,能接收自己的输入事件,并且您可以在 Activity 运行时添加或移除片段(有点像您可以在不同 Activity 中重复使用的“子 Activity”)。
片段必须始终嵌入在 Activity 中,其生命周期直接受宿主 Activity 生命周期的影响。 例如,当 Activity 暂停时,其中的所有片段也会暂停;当 Activity 被销毁时,所有片段也会被销毁。 不过,当 Activity 正在运行(处于已恢复生命周期状态)时,您可以独立操纵每个片段,如添加或移除它们。 当您执行此类片段事务时,您也可以将其添加到由 Activity 管理的返回栈 — Activity 中的每个返回栈条目都是一条已发生片段事务的记录。 返回栈让用户可以通过按返回按钮撤消片段事务(后退)。
当您将片段作为 Activity 布局的一部分添加时,它存在于 Activity 视图层次结构的某个 ViewGroup 内部,并且片段会定义其自己的视图布局。您可以通过在 Activity 的布局文件中声明片段,将其作为 元素插入您的 Activity 布局中,或者通过将其添加到某个现有 ViewGroup,利用应用代码进行插入。不过,片段并非必须成为 Activity 布局的一部分;您还可以将没有自己 UI 的片段用作 Activity 的不可见工作线程。
2.2 Fragment和Activity生命周期关联:
Fragment有自己的生命周期比Activity的生命周期相对来说复杂一些,但是Fragment必须依附Activity所以两者的生命周期是有关联的
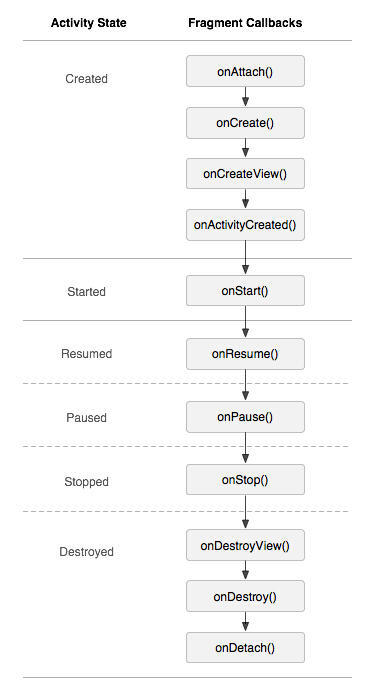
这里可以先看看不做过多的说明看源码的时候会做重点分析的。
2.3 Fragment相关API使用:
新建一个类extends Fragment这个时候会有两个包可以导,我们肯定导v4包的其实都一样,只不过v4的可以兼容Android 3.0(API 级别 11)以下的,一定要需要复写他的onCreateView()方法,该方法返回值是一个View,代表当前碎片Fragment长什么样子,到这里我们可以自己思考如果要我去实现写一个Fragment会用什么样的逻辑,因为待会我们要分析源码的。
public static class ExampleFragment extends Fragment {
@Override
public View onCreateView(LayoutInflater inflater,
ViewGroup container, Bundle savedInstanceState) {
// Inflate the layout for this fragment
return inflater.inflate(R.layout.example_fragment,
container, false);
}
}
我们的使用方式有两种一种是直接在布局文件中使用,这种并不是很常见,不做过多的说明,像使用View一样但需要小写fragment和指定name是Fragment的全类名,具体代码如下:
<?xml version="1.0" encoding="utf-8"?>
<LinearLayout xmlns:android="http://schemas.android.com/apk/res/android"
android:orientation="horizontal"
android:layout_width="match_parent"
android:layout_height="match_parent">
<fragment android:name="com.example.news.ExampleFragment"
android:id="@+id/list"
android:layout_weight="1"
android:layout_width="0dp"
android:layout_height="match_parent" />
</LinearLayout>
还有一种是重头戏,比较常见我们以上面演示的项目效果为例,下面是RadioGroup中间是四个Fragment,必须依附ViewGroup那么整个布局就是:
<?xml version="1.0" encoding="utf-8"?>
<LinearLayout xmlns:android="http://schemas.android.com/apk/res/android"
xmlns:app="http://schemas.android.com/apk/res-auto"
android:id="@+id/root_view"
android:layout_width="match_parent"
android:layout_height="match_parent"
android:clipToPadding="false"
android:fitsSystemWindows="true"
android:orientation="vertical">
<FrameLayout

android:id="@+id/main_tab_fl"
android:layout_width="wrap_content"
android:layout_height="0dp"
android:layout_weight="1" />
<RadioGroup

android:background="@color/title_bar_bg_day"
android:id="@android:id/tabs"
android:layout_width="fill_parent"
android:layout_height="@dimen/tab_height"
android:layout_alignParentBottom="true"
android:gravity="bottom"
android:orientation="horizontal">
<RadioButton

android:id="@+id/home_rb"
style="@style/home_bottom_tab_style"
android:drawableTop="@drawable/ic_tab_home"
android:text="首页" />
<RadioButton

android:id="@+id/find_rb"
style="@style/home_bottom_tab_style"
android:drawableTop="@drawable/ic_tab_discovery"
android:text="发现" />
<RadioButton

android:id="@+id/new_rb"
style="@style/home_bottom_tab_style"
android:drawableTop="@drawable/ic_tab_fresh"
android:text="新鲜" />
<RadioButton

android:id="@+id/message_rb"
style="@style/home_bottom_tab_style"
android:drawableTop="@drawable/ic_tab_msg"
android:text="消息" />
</RadioGroup>
</LinearLayout>
中间是FrameLayout,我们看官方的文档就知道只要是ViewGroup就行,当我们不断的点击下面的Tab按钮我们就有代码去动态的替换Fragment,这里需要介绍两个API ,官方这么说的:
您可以在 Activity 运行期间随时将片段添加到 Activity 布局中。您只需指定要将片段放入哪个 ViewGroup。
要想在您的 Activity 中执行片段事务(如添加、移除或替换片段),您必须使用 FragmentTransaction 中的 API。您可以像下面这样从 Activity 获取一个 FragmentTransaction 实例:
FragmentManager fragmentManager = getFragmentManager();
FragmentTransaction fragmentTransaction = fragmentManager.beginTransaction();
然后,您可以使用 add() 方法添加一个片段,指定要添加的片段以及将其插入哪个视图。例如:
HomeFragment fragment = new HomeFragment();
fragmentTransaction.add(R.id.main_tab_fl, fragment);
fragmentTransaction.commit();
传递到 add() 的第一个参数是 ViewGroup,即应该放置片段的位置,由资源 ID 指定,第二个参数是要添加的片段。
一旦您通过 FragmentTransaction 做出了更改,就必须调用 commit() 以使更改生效。添加没有 UI 的片段。如果需要做到切换就需要使用这个replace(int id, Fragment fragment)。
3.效果初步实现
新建四个Fragment,里面的内容基本一致:
public class FindFragment extends Fragment {
@Override
public View onCreateView(LayoutInflater inflater,
ViewGroup container, Bundle savedInstanceState) {
View rootView = inflater.inflate(
R.layout.fragment_layout, null);
TextView contentTv = (TextView)
rootView.findViewById(R.id.content_tv);
contentTv.setText("发现");
return rootView;
}
}
在主MainActivity中使用上面讲到的两个方法:
public class MainActivity extends AppCompatActivity implements View.OnClickListener {
private HomeFragment mHomeFragment;
private FindFragment mFindFragment;
private NewFragment mNewFragment;
private MessageFragment mMessageFragment;
@Override
protected void onCreate(Bundle savedInstanceState) {
super.onCreate(savedInstanceState);
setContentView(R.layout.activity_main);
findViewById(R.id.home_rb).setOnClickListener(this);
findViewById(R.id.find_rb).setOnClickListener(this);
findViewById(R.id.new_rb).setOnClickListener(this);
findViewById(R.id.message_rb).setOnClickListener(this);
// 默认一进入页面就添加主Fragment
FragmentManager fragmentManager = getSupportFragmentManager();
FragmentTransaction fragmentTransaction = fragmentManager.beginTransaction();
mHomeFragment = new HomeFragment();
fragmentTransaction.add(R.id.main_tab_fl, mHomeFragment);
// 最后记得提交
fragmentTransaction.commit();
}
@Override
public void onClick(View v) {
switch (v.getId()) {
case R.id.home_rb:
homeRbClick();
break;
case R.id.find_rb:
findRbClick();
break;
case R.id.new_rb:
newRbClick();
break;
case R.id.message_rb:
messageRbClick();
break;
}
}
private void homeRbClick() {
FragmentManager fragmentManager = getSupportFragmentManager();
FragmentTransaction fragmentTransaction = fragmentManager.beginTransaction();
// 替换成当前页面
fragmentTransaction.replace(R.id.main_tab_fl, mHomeFragment);
fragmentTransaction.commit();
}
private void findRbClick() {
FragmentManager fragmentManager = getSupportFragmentManager();
FragmentTransaction fragmentTransaction = fragmentManager.beginTransaction();
if (mFindFragment == null) {
mFindFragment = new FindFragment();
}
fragmentTransaction.replace(R.id.main_tab_fl, mFindFragment);
fragmentTransaction.commit();
}
private void newRbClick() {
FragmentManager fragmentManager = getSupportFragmentManager();
FragmentTransaction fragmentTransaction = fragmentManager.beginTransaction();
if (mNewFragment == null) {
mNewFragment = new NewFragment();
}
fragmentTransaction.replace(R.id.main_tab_fl, mNewFragment);
fragmentTransaction.commit();
}
private void messageRbClick() {
FragmentManager fragmentManager = getSupportFragmentManager();
FragmentTransaction fragmentTransaction = fragmentManager.beginTransaction();
if (mMessageFragment == null) {
mMessageFragment = new MessageFragment();
}
fragmentTransaction.replace(R.id.main_tab_fl, mMessageFragment);
fragmentTransaction.commit();
}
}
目前的效果是这个样子的,看似没有任何的问题,这个也是最简单的方式,下面我们就去整合到项目中,再去分析源码以及Fragment的加载流程具体请看这里:Android Fragment 从源码的角度去解析(下)
最后
以上就是魁梧大门最近收集整理的关于Android Fragment 从源码的角度去解析(上)的全部内容,更多相关Android内容请搜索靠谱客的其他文章。


发表评论 取消回复