在自定义View中有时需要测量View的尺寸,因此,了解View的Measure过成有助于我们开发自定义View。
一、目的:测量View的宽与高
在有些情况下,需要多次测量(measure)才能够最终确定View的宽高(比如父视图MeasureSpec使用UNSPECIFIED模式等),在这种情况下,通过onMeasure方法获得的宽高很可能是不准确的,因此,《Android开发艺术探索》建议在onLayout方法中去获取View的最终宽高。
二、基础:在开始了解measure过程之前,我们需要对两个传递尺寸的类做个了解
1.ViewGroup.LayoutParams类:布局参数类
作用:设置视图的宽度和高度等布局参数
| 参数 | 解释 |
|---|---|
| fill_parent | 与父视图等高(2.3之前使用) |
| match_parent | 同fill_parent,2.3及之后版本使用 |
| wrap_parent | 自适应大小 |
| 具体值 | dp/px |
2.MeasureSpec类:测量规格类,测量View大小的依据
(1)作用:决定一个视图View的尺寸
(2)类型:①宽测量规格widthMeasureSpec、②高测量规格heightMeasureSpec
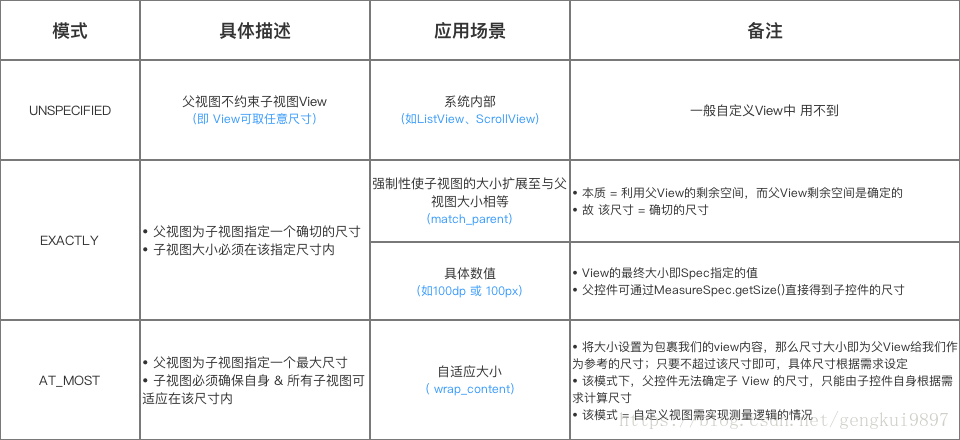
(3)组成:测量规格(MeasureSpec,32位,int类型) = 测量模式(mode,高2位) + 测量大小(size,低30位)
相关源码如下:
public class MeasureSpec {

        // 进位大小 = 2的30次方
        // int的大小为32位,所以进位30位 = 使用int的32和31位做标志位
        private static final int MODE_SHIFT = 30;

        // 运算遮罩:0x3为16进制,10进制为3,二进制为11
        // 3向左进位30 = 11 00000000000(11后跟30个0)
        // 作用:用1标注需要的值,0标注不要的值。因1与任何数做与运算都得任何数、0与任何数做与运算都得0
        private static final int MODE_MASK  = 0x3 << MODE_SHIFT;

        // UNSPECIFIED的模式设置:0向左进位30 = 00后跟30个0,即00 00000000000
        // 通过高2位
        public static final int UNSPECIFIED = 0 << MODE_SHIFT;

        // EXACTLY的模式设置:1向左进位30 = 01后跟30个0 ,即01 00000000000
        public static final int EXACTLY = 1 << MODE_SHIFT;

        // AT_MOST的模式设置:2向左进位30 = 10后跟30个0,即10 00000000000
        public static final int AT_MOST = 2 << MODE_SHIFT;

        /**
          * makeMeasureSpec()方法
          * 作用:根据提供的size和mode得到一个详细的测量结果吗,即measureSpec
          **/
            public static int makeMeasureSpec(int size, int mode) {

                return size + mode;
            // measureSpec = size + mode;此为二进制的加法 而不是十进制
            // 设计目的:使用一个32位的二进制数,其中:32和31位代表测量模式(mode)、后30位代表测量大小(size)
            // 例如size=100(4),mode=AT_MOST,则measureSpec=100+10000...00=10000..00100

            }

        /**
          * getMode()方法
          * 作用:通过measureSpec获得测量模式(mode)
          **/

            public static int getMode(int measureSpec) {

                return (measureSpec & MODE_MASK);
                // 即:测量模式(mode) = measureSpec & MODE_MASK;
                // MODE_MASK = 运算遮罩 = 11 00000000000(11后跟30个0)
                //原理:保留measureSpec的高2位(即测量模式)、使用0替换后30位
                // 例如10 00..00100 & 11 00..00(11后跟30个0) = 10 00..00(AT_MOST),这样就得到了mode的值

            }
        /**
          * getSize方法
          * 作用:通过measureSpec获得测量大小size
          **/
            public static int getSize(int measureSpec) {

                return (measureSpec & ~MODE_MASK);
                // size = measureSpec & ~MODE_MASK;
               // 原理类似上面,即 将MODE_MASK取反,也就是变成了00 111111(00后跟30个1),将32,31替换成0也就是去掉mode,保留后30位的size
            }

    }
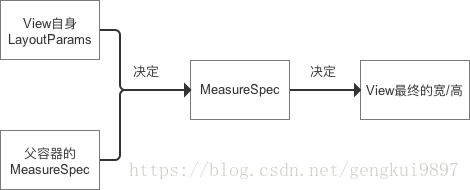
(5)计算:子View的具体大小由父View的MeasureSpec值和子View的LayoutParams属性共同决定,即:
具体的计算封装在getChildMeasureSpec里,源码如下:
/**
  * 源码分析:getChildMeasureSpec()
  * 作用:根据父视图的MeasureSpec & 布局参数LayoutParams,计算单个子View的MeasureSpec
  * 注:子view的大小由父view的MeasureSpec值 和 子view的LayoutParams属性 共同决定
  **/

    public static int getChildMeasureSpec(int spec, int padding, int childDimension) {

         //参数说明
         * @param spec 父view的详细测量值(MeasureSpec)
         * @param padding view当前尺寸的的内边距和外边距(padding,margin)
         * @param childDimension 子视图的布局参数(宽/高)

            //父view的测量模式
            int specMode = MeasureSpec.getMode(spec);

            //父view的大小
            int specSize = MeasureSpec.getSize(spec);

            //通过父view计算出的子view = 父大小-边距(父要求的大小,但子view不一定用这个值)
            int size = Math.max(0, specSize - padding);

            //子view想要的实际大小和模式(需要计算)
            int resultSize = 0;
            int resultMode = 0;

            //通过父view的MeasureSpec和子view的LayoutParams确定子view的大小


            // 当父view的模式为EXACITY时,父view强加给子view确切的值
           //一般是父view设置为match_parent或者固定值的ViewGroup
            switch (specMode) {
            case MeasureSpec.EXACTLY:
                // 当子view的LayoutParams>0,即有确切的值
                if (childDimension >= 0) {
                    //子view大小为子自身所赋的值,模式大小为EXACTLY
                    resultSize = childDimension;
                    resultMode = MeasureSpec.EXACTLY;

                // 当子view的LayoutParams为MATCH_PARENT时(-1)
                } else if (childDimension == LayoutParams.MATCH_PARENT) {
                    //子view大小为父view大小,模式为EXACTLY
                    resultSize = size;
                    resultMode = MeasureSpec.EXACTLY;

                // 当子view的LayoutParams为WRAP_CONTENT时(-2)
                } else if (childDimension == LayoutParams.WRAP_CONTENT) {
                    //子view决定自己的大小,但最大不能超过父view,模式为AT_MOST
                    resultSize = size;
                    resultMode = MeasureSpec.AT_MOST;
                }
                break;

            // 当父view的模式为AT_MOST时,父view强加给子view一个最大的值。(一般是父view设置为wrap_content)
            case MeasureSpec.AT_MOST:
                // 道理同上
                if (childDimension >= 0) {
                    resultSize = childDimension;
                    resultMode = MeasureSpec.EXACTLY;
                } else if (childDimension == LayoutParams.MATCH_PARENT) {
                    resultSize = size;
                    resultMode = MeasureSpec.AT_MOST;
                } else if (childDimension == LayoutParams.WRAP_CONTENT) {
                    resultSize = size;
                    resultMode = MeasureSpec.AT_MOST;
                }
                break;

            // 当父view的模式为UNSPECIFIED时,父容器不对view有任何限制,要多大给多大
            // 多见于ListView、GridView
            case MeasureSpec.UNSPECIFIED:
                if (childDimension >= 0) {
                    // 子view大小为子自身所赋的值
                    resultSize = childDimension;
                    resultMode = MeasureSpec.EXACTLY;
                } else if (childDimension == LayoutParams.MATCH_PARENT) {
                    // 因为父view为UNSPECIFIED,所以MATCH_PARENT的话子类大小为0
                    resultSize = 0;
                    resultMode = MeasureSpec.UNSPECIFIED;
                } else if (childDimension == LayoutParams.WRAP_CONTENT) {
                    // 因为父view为UNSPECIFIED,所以WRAP_CONTENT的话子类大小为0
                    resultSize = 0;
                    resultMode = MeasureSpec.UNSPECIFIED;
                }
                break;
            }
            return MeasureSpec.makeMeasureSpec(resultSize, resultMode);
        }
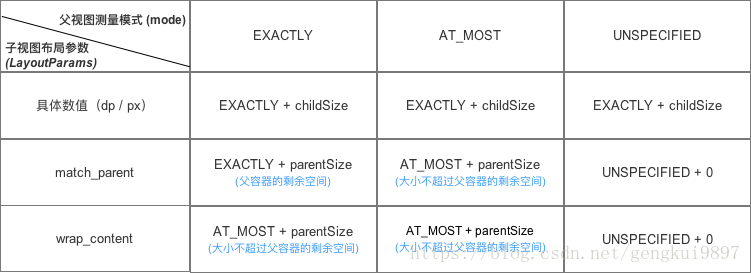
对此,我们可以总结出如下规律:
这里需要注意的是,顶级View,即DecorView的测量规格=自身布局参数+窗口尺寸
三、measure过程
measure会根据View的类型分成两种情况
| View类型 | measure过程 |
| 单一View | 只测量自身一个View |
| ViewGroup | 对ViewGroup视图中所有的子View都进行测量 |
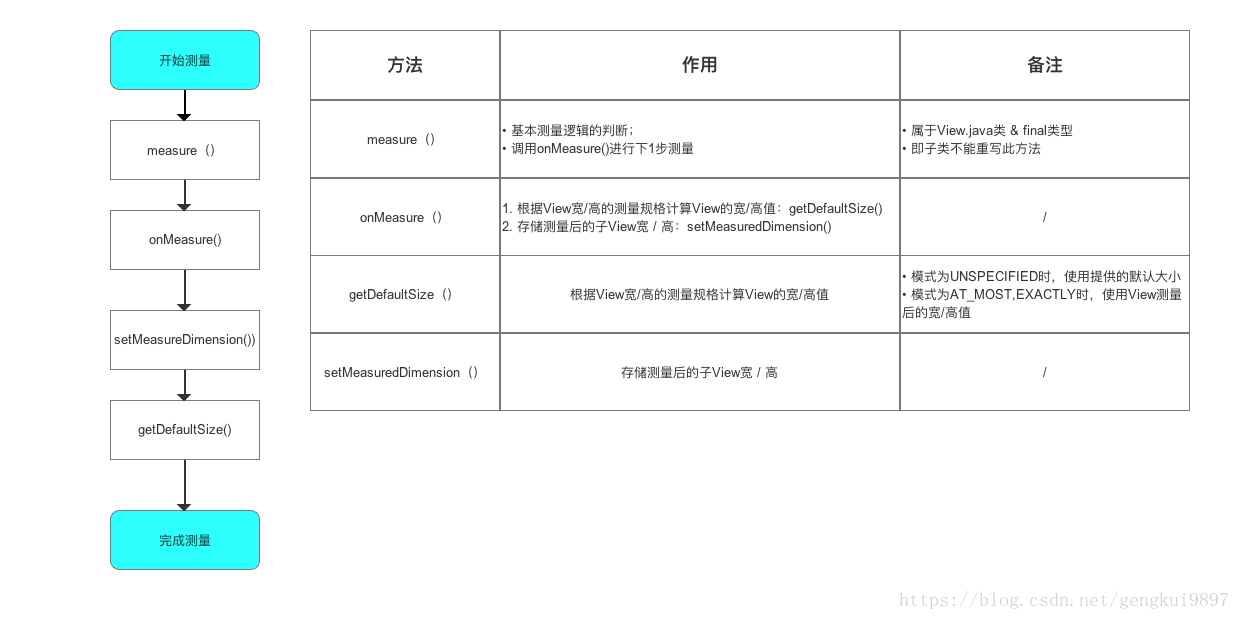
(1)我们首先来看下单一View的measure过程
场景分析:在现有View无法满足需求,需要自己实现时使用自定义单一View
具体使用:继承View、SurfaceView或其他View
具体流程:measure()→onMeasure()→setMeasureDimension()→getDefaultSize()
先来看一下这几个方法:
/**
  * 源码分析:measure()
  * 定义:Measure过程的入口;属于View.java类 & final类型,即子类不能重写此方法
  * 作用:基本测量逻辑的判断
  **/

    public final void measure(int widthMeasureSpec, int heightMeasureSpec) {

        // 参数说明:View的宽 / 高测量规格

        ...

        int cacheIndex = (mPrivateFlags & PFLAG_FORCE_LAYOUT) == PFLAG_FORCE_LAYOUT ? -1 :
                mMeasureCache.indexOfKey(key);

        if (cacheIndex < 0 || sIgnoreMeasureCache) {

            onMeasure(widthMeasureSpec, heightMeasureSpec);
            // 计算视图大小 ->>分析1

        } else {
            ...

    }

/**
  * 分析1:onMeasure()
  * 作用:a. 根据View宽/高的测量规格计算View的宽/高值:getDefaultSize()
  *      b. 存储测量后的View宽 / 高:setMeasuredDimension()
  **/
  protected void onMeasure(int widthMeasureSpec, int heightMeasureSpec) {
    // 参数说明:View的宽 / 高测量规格

    setMeasuredDimension(getDefaultSize(getSuggestedMinimumWidth(), widthMeasureSpec),
                         getDefaultSize(getSuggestedMinimumHeight(), heightMeasureSpec));
    // setMeasuredDimension() :获得View宽/高的测量值 ->>分析2
    // 传入的参数通过getDefaultSize()获得 ->>分析3
}

/**
  * 分析2:setMeasuredDimension()
  * 作用:存储测量后的View宽 / 高
  * 注:该方法即为我们重写onMeasure()所要实现的最终目的
  **/
    protected final void setMeasuredDimension(int measuredWidth, int measuredHeight) {

    //参数说明:测量后子View的宽 / 高值

        // 将测量后子View的宽 / 高值进行传递
            mMeasuredWidth = measuredWidth;
            mMeasuredHeight = measuredHeight;

            mPrivateFlags |= PFLAG_MEASURED_DIMENSION_SET;
        }
    // 由于setMeasuredDimension()的参数是从getDefaultSize()获得的
    // 下面我们继续看getDefaultSize()的介绍

/**
  * 分析3:getDefaultSize()
  * 作用:根据View宽/高的测量规格计算View的宽/高值
  **/
  public static int getDefaultSize(int size, int measureSpec) {

        // 参数说明:
        // size:提供的默认大小
        // measureSpec:宽/高的测量规格(含模式 & 测量大小)

            // 设置默认大小
            int result = size;

            // 获取宽/高测量规格的模式 & 测量大小
            int specMode = MeasureSpec.getMode(measureSpec);
            int specSize = MeasureSpec.getSize(measureSpec);

            switch (specMode) {
                // 模式为UNSPECIFIED时,使用提供的默认大小 = 参数Size
                case MeasureSpec.UNSPECIFIED:
                    result = size;
                    break;

                // 模式为AT_MOST,EXACTLY时,使用View测量后的宽/高值 = measureSpec中的Size
                case MeasureSpec.AT_MOST:
                case MeasureSpec.EXACTLY:
                    result = specSize;
                    break;
            }

         // 返回View的宽/高值
            return result;
        }
在onMeasure方法中,我们可以知道函数getSuggestedMinimumWidth()是获取默认大小,那么,我们可以看一下它具体的实现:
protected int getSuggestedMinimumWidth() {
    return (mBackground == null) ? mMinWidth : max(mMinWidth,mBackground.getMinimumWidth());
}
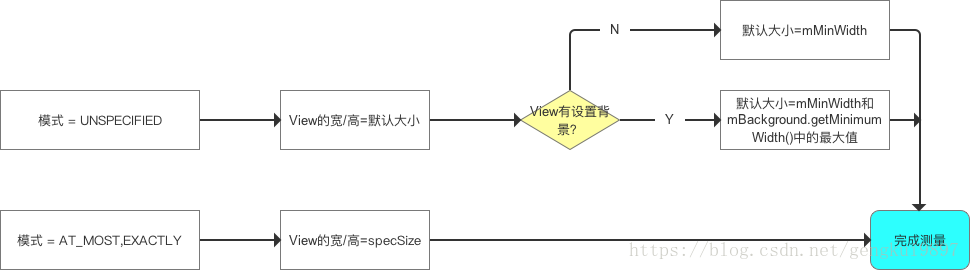
从这里我们可以知道,当View没有设置背景时,View宽度=mMinWidth(如果android:minWidth没有指定,则为0,否则为该属性所设置的值),如果View设置了背景,则View宽度为mMinWidth和mBackground.getMinimumWidth()中的最大值。
对于以上过程,我们可以使用下图理一下逻辑:
至此,单一View measure过程完成,总结一下:
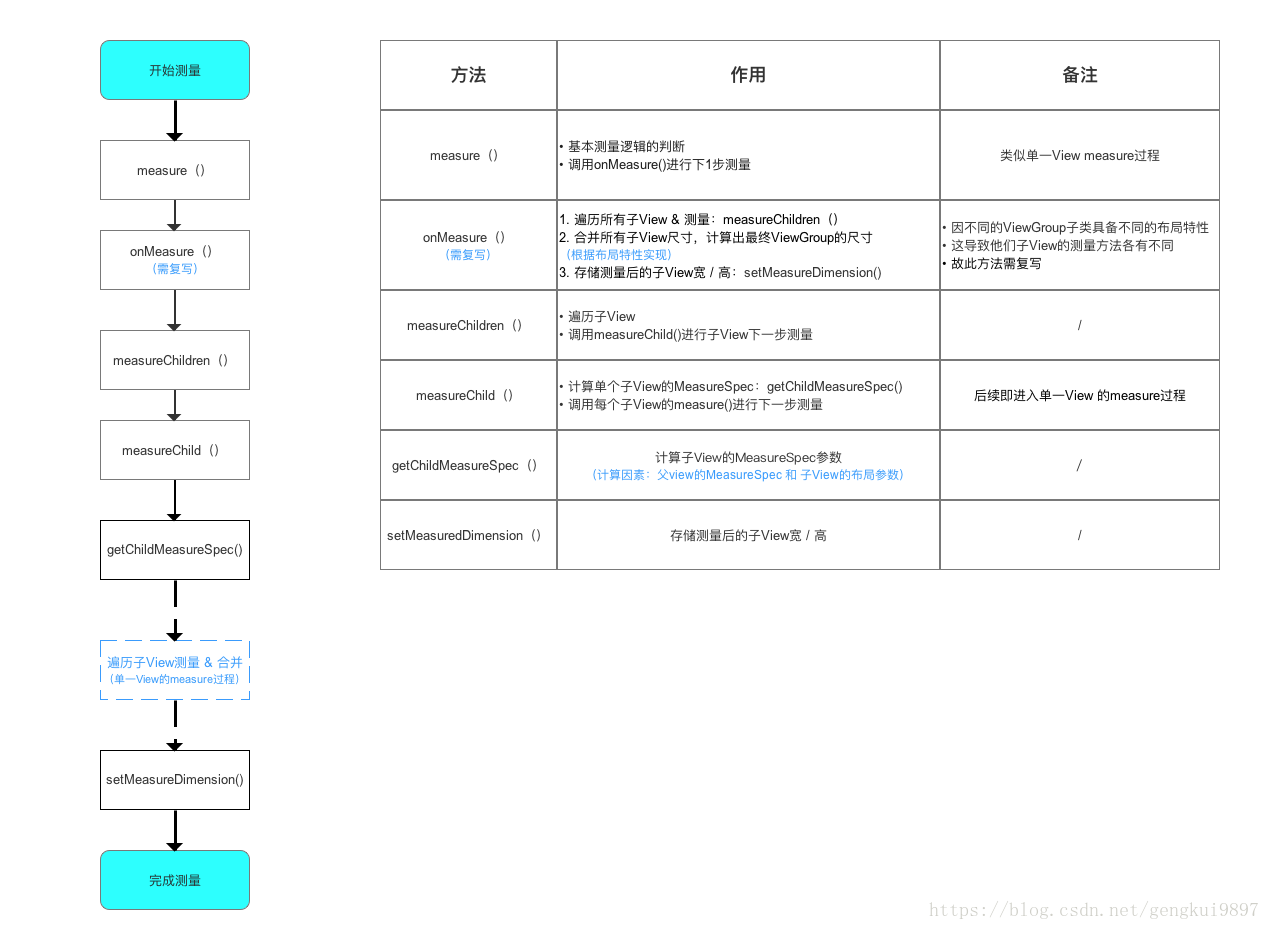
(2)ViewGroup的measure过程
场景分析:利用现有组件来组成新的组件
具体使用:继承自ViewGroup或各种Layout,可以含有子View
具体流程:measure()→onMeasure()(需要复写)→measureChildren()→measureChild()→getChildMeasureSpec()→遍历子View测量并合并→setMeasureDimension()
具体源码分析如下:
/**
  * 源码分析:measure()
  * 作用:基本测量逻辑的判断;调用onMeasure()
  * 注:与单一View measure过程中讲的measure()一致
  **/
  public final void measure(int widthMeasureSpec, int heightMeasureSpec) {
    ...
    int cacheIndex = (mPrivateFlags & PFLAG_FORCE_LAYOUT) == PFLAG_FORCE_LAYOUT ? -1 :
            mMeasureCache.indexOfKey(key);
    if (cacheIndex < 0 || sIgnoreMeasureCache) {

        // 调用onMeasure()计算视图大小
        onMeasure(widthMeasureSpec, heightMeasureSpec);
        mPrivateFlags3 &= ~PFLAG3_MEASURE_NEEDED_BEFORE_LAYOUT;
    } else {
        ...
}

/**
  * 根据自身的测量逻辑复写onMeasure(),分为3步
  * 1. 遍历所有子View & 测量:measureChildren()
  * 2. 合并所有子View的尺寸大小,最终得到ViewGroup父视图的测量值(自身实现)
  * 3. 存储测量后View宽/高的值:调用setMeasuredDimension()
  **/

  @Override
  protected void onMeasure(int widthMeasureSpec, int heightMeasureSpec) {

        // 定义存放测量后的View宽/高的变量
        int widthMeasure ;
        int heightMeasure ;

        // 1. 遍历所有子View & 测量(measureChildren())
        // ->> 分析1
        measureChildren(widthMeasureSpec, heightMeasureSpec);

        // 2. 合并所有子View的尺寸大小,最终得到ViewGroup父视图的测量值
         void measureCarson{
             ... // 自身实现
         }

        // 3. 存储测量后View宽/高的值:调用setMeasuredDimension()
        // 类似单一View的过程,此处不作过多描述
        setMeasuredDimension(widthMeasure,  heightMeasure);
  }
  // 从上可看出:
  // 复写onMeasure()有三步,其中2步直接调用系统方法
  // 需自身实现的功能实际仅为步骤2:合并所有子View的尺寸大小

/**
  * 分析1:measureChildren()
  * 作用:遍历子View & 调用measureChild()进行下一步测量
  **/

    protected void measureChildren(int widthMeasureSpec, int heightMeasureSpec) {
        // 参数说明:父视图的测量规格(MeasureSpec)

                final int size = mChildrenCount;
                final View[] children = mChildren;

                // 遍历所有子view
                for (int i = 0; i < size; ++i) {
                    final View child = children[i];
                     // 调用measureChild()进行下一步的测量 ->>分析1
                    if ((child.mViewFlags & VISIBILITY_MASK) != GONE) {
                        measureChild(child, widthMeasureSpec, heightMeasureSpec);
                    }
                }
            }

/**
  * 分析2:measureChild()
  * 作用:a. 计算单个子View的MeasureSpec
  *      b. 测量每个子View最后的宽 / 高:调用子View的measure()
  **/
  protected void measureChild(View child, int parentWidthMeasureSpec,
            int parentHeightMeasureSpec) {

        // 1. 获取子视图的布局参数
        final LayoutParams lp = child.getLayoutParams();

        // 2. 根据父视图的MeasureSpec & 布局参数LayoutParams,计算单个子View的MeasureSpec
        final int childWidthMeasureSpec = getChildMeasureSpec(parentWidthMeasureSpec,// 获取 ChildView 的 widthMeasureSpec
                mPaddingLeft + mPaddingRight, lp.width);
        final int childHeightMeasureSpec = getChildMeasureSpec(parentHeightMeasureSpec,// 获取 ChildView 的 heightMeasureSpec
                mPaddingTop + mPaddingBottom, lp.height);

        // 3. 将计算好的子View的MeasureSpec值传入measure(),进行最后的测量
        // 下面的流程即类似单一View的过程,此处不作过多描述
        child.measure(childWidthMeasureSpec, childHeightMeasureSpec);
    }
    // 回到调用原处
为了更好理解,我们可以看一下LinearLayout复写的onMeasure代码分析:
protected void onMeasure(int widthMeasureSpec, int heightMeasureSpec) {

      // 根据不同的布局属性进行不同的计算
      // 此处只选垂直方向的测量过程,即measureVertical()->>分析1
      if (mOrientation == VERTICAL) {
          measureVertical(widthMeasureSpec, heightMeasureSpec);
      } else {
          measureHorizontal(widthMeasureSpec, heightMeasureSpec);
      }


}

  /**
    * 分析1:measureVertical()
    * 作用:测量LinearLayout垂直方向的测量尺寸
    **/
  void measureVertical(int widthMeasureSpec, int heightMeasureSpec) {

      /**
       *  其余测量逻辑
       **/
          // 获取垂直方向上的子View个数
          final int count = getVirtualChildCount();

          // 遍历子View获取其高度,并记录下子View中最高的高度数值
          for (int i = 0; i < count; ++i) {
              final View child = getVirtualChildAt(i);

              // 子View不可见,直接跳过该View的measure过程,getChildrenSkipCount()返回值恒为0
              // 注:若view的可见属性设置为VIEW.INVISIBLE,还是会计算该view大小
              if (child.getVisibility() == View.GONE) {
                 i += getChildrenSkipCount(child, i);
                 continue;
              }

              // 记录子View是否有weight属性设置,用于后面判断是否需要二次measure
              totalWeight += lp.weight;

              if (heightMode == MeasureSpec.EXACTLY && lp.height == 0 && lp.weight > 0) {
                  // 如果LinearLayout的specMode为EXACTLY且子View设置了weight属性,在这里会跳过子View的measure过程
                  // 同时标记skippedMeasure属性为true,后面会根据该属性决定是否进行第二次measure
                // 若LinearLayout的子View设置了weight,会进行两次measure计算,比较耗时
                  // 这就是为什么LinearLayout的子View需要使用weight属性时候,最好替换成RelativeLayout布局

                  final int totalLength = mTotalLength;
                  mTotalLength = Math.max(totalLength, totalLength + lp.topMargin + lp.bottomMargin);
                  skippedMeasure = true;
              } else {
                  int oldHeight = Integer.MIN_VALUE;
     /**
       *  步骤1:遍历所有子View & 测量:measureChildren()
       *  注:该方法内部,最终会调用measureChildren(),从而 遍历所有子View & 测量
       **/
            measureChildBeforeLayout(

                   child, i, widthMeasureSpec, 0, heightMeasureSpec,
                   totalWeight == 0 ? mTotalLength : 0);
                   ...
            }

      /**
       *  步骤2:合并所有子View的尺寸大小,最终得到ViewGroup父视图的测量值(自身实现)
       **/
              final int childHeight = child.getMeasuredHeight();

              // 1. mTotalLength用于存储LinearLayout在竖直方向的高度
              final int totalLength = mTotalLength;

              // 2. 每测量一个子View的高度, mTotalLength就会增加
              mTotalLength = Math.max(totalLength, totalLength + childHeight + lp.topMargin +
                     lp.bottomMargin + getNextLocationOffset(child));

              // 3. 记录LinearLayout占用的总高度
              // 即除了子View的高度,还有本身的padding属性值
              mTotalLength += mPaddingTop + mPaddingBottom;
              int heightSize = mTotalLength;

      /**
       *  步骤3:存储测量后View宽/高的值:调用setMeasuredDimension()
       **/
       setMeasureDimension(resolveSizeAndState(maxWidth,width))

    ...

  }
到这里,ViewGroup的measure讲完了,我们来总结一下:
最后
以上就是不安冥王星最近收集整理的关于Android自定义View(一)-Measure原理篇的全部内容,更多相关Android自定义View(一)-Measure原理篇内容请搜索靠谱客的其他文章。


发表评论 取消回复