开发环境
VS2013 + OpenCV3.4.1 + Qt5.8.0
实验准备
yolov2-tiny.cfg
yolov2-tiny.weights
或
yolov2.cfg
yolov2.weights
或
yolov2-voc.cfg
yolov2-tiny-voc.weights
以上数据的下载地址戳这里,或者直接下载我的工程(注意:由于*.weights文件过大,无法一并上传到CSDN,*.weights还是需要自行下载,*.weights下载方法如下图)
主要代码
加载网络和标签
string modelCfg;
string modelBin;
string classFilename;

if (idx == 0){

	modelCfg = "yolo/yolov2-tiny.cfg";
	modelBin = "yolo/yolov2-tiny.weights";
	classFilename = "yolo/darknet-master/data/coco.names";
}
if (idx == 1){

	modelCfg = "yolo/yolov2.cfg";
	modelBin = "yolo/yolov2.weights";
	classFilename = "yolo/darknet-master/data/coco.names";
}
if (idx == 2){

	modelCfg = "yolo/yolov2-voc.cfg";
	modelBin = "yolo/yolov2-tiny-voc.weights";
	classFilename = "yolo/darknet-master/data/voc.names";
}
try{

	net = dnn::readNetFromDarknet(modelCfg, modelBin);
}catch (cv::Exception &ee){

	QMessageBox::warning(this, "Exception", ee.what());
	if (net.empty()){

		QMessageBox::warning(this, "Exception", "Can't load the network by using the flowing files.");
		return;
	}
}

// Load Label
classNamesVec.clear();
ifstream classNamesFile(classFilename);
if (classNamesFile.is_open()){

	string className = "";
	while (std::getline(classNamesFile, className))
		classNamesVec.push_back(className);
}
else{

	QMessageBox::warning(this, "Exception", "Load label failed.");
	return;
}
前向识别
Mat frame;
image.copyTo(frame);
if (frame.empty()){

	QMessageBox::warning(this, "Warning", "image is empty, please check!");
	return;
}
if (frame.channels() == 4) cvtColor(frame, frame, COLOR_BGRA2BGR);

double ttt = (double)cvGetTickCount();

Mat inputBlob = blobFromImage(frame, 1 / 255.F, Size(416, 416), Scalar(), true, false); //Convert Mat to batch of images
net.setInput(inputBlob, "data");                   //set the network input]
Mat detectionMat = net.forward("detection_out");   //compute output

ttt = (double)cvGetTickCount() - ttt;
ui.labelTime->setText(toChinese("识别时间:") + QString::number(ttt / (cvGetTickFrequency() * 1000000)) + toChinese("秒"));

float confidenceThreshold = ui.dsbConfidence->value();
for (int i = 0; i < detectionMat.rows; i++){

	const int probability_index = 5;
	const int probability_size = detectionMat.cols - probability_index;
	float *prob_array_ptr = &detectionMat.at<float>(i, probability_index);

	size_t objectClass = max_element(prob_array_ptr, prob_array_ptr + probability_size) - prob_array_ptr;
	float confidence = detectionMat.at<float>(i, (int)objectClass + probability_index);

	if (confidence > confidenceThreshold){

		float x_center = detectionMat.at<float>(i, 0) * frame.cols;
		float y_center = detectionMat.at<float>(i, 1) * frame.rows;
		float width = detectionMat.at<float>(i, 2) * frame.cols;
		float height = detectionMat.at<float>(i, 3) * frame.rows;
		Point p1(cvRound(x_center - width / 2), cvRound(y_center - height / 2));
		Point p2(cvRound(x_center + width / 2), cvRound(y_center + height / 2));
		Rect object(p1, p2);

		Scalar object_roi_color(0, 255, 0);

		if (1)//
		{
			rectangle(frame, object, object_roi_color);
		}
		else
		{
			Point p_center(cvRound(x_center), cvRound(y_center));
			line(frame, object.tl(), p_center, object_roi_color, 1);
		}

		String className = objectClass < classNamesVec.size() ? classNamesVec[objectClass] : cv::format("unknown(%d)", objectClass);
		String label = format("%s: %.2f", className.c_str(), confidence);
		int baseLine = 0;
		Size labelSize = getTextSize(label, FONT_HERSHEY_SIMPLEX, 0.5, 1, &baseLine);
		rectangle(frame, Rect(p1, Size(labelSize.width, labelSize.height + baseLine)), object_roi_color, FILLED);
		putText(frame, label, p1 + Point(0, labelSize.height), FONT_HERSHEY_SIMPLEX, 0.5, Scalar(0, 0, 0));
	}
}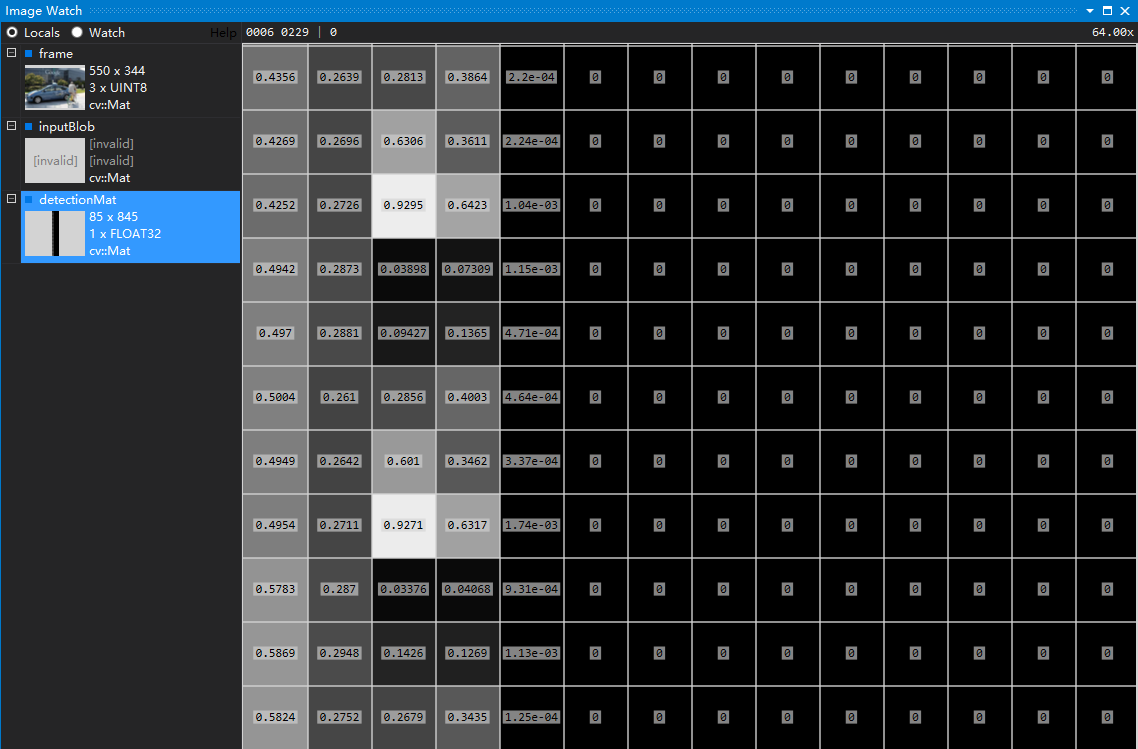
行向量解析:前面4个元素是用来标记目标在图像上的位置的(被归一化了),第5个元素是置信概率,值域为[0-1](用来与阈值作比较决定是否标记目标),后面80个为基于COCO数据集的80分类的标记权重,最大的为输出分类。
列向量解析:为什么是845个?因为YOLO会把图像分成13*13的网格,每个网格预测5个BOX(所以就是13*13*5=845)。每个BOX就是一个行向量(详细的网络细节参考这里)。
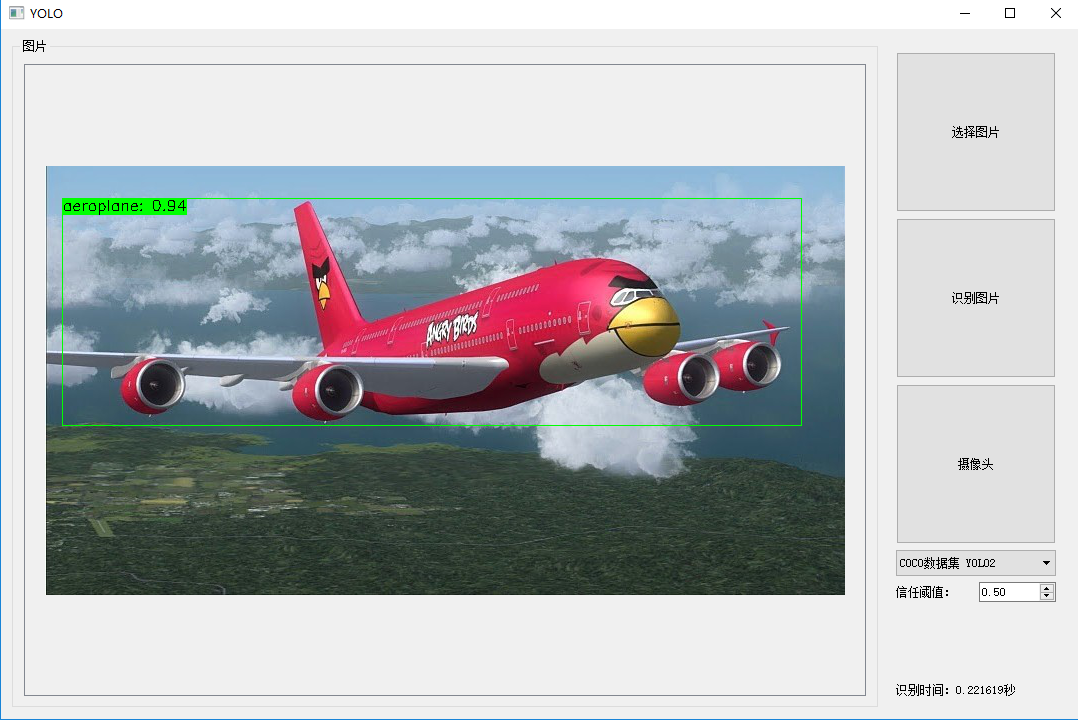
实验效果
本地图片
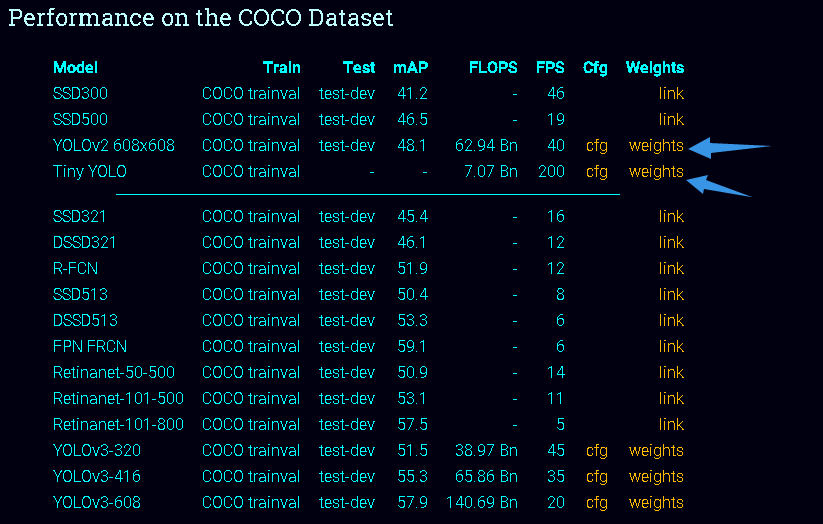
和SSD网络对比

同等条件下和SSD网络比较,识别速度会更快。
附件
源代码工程戳这里(注:release下的可执行程序可以直接运行,但是要先下载对应的*.weights文件,因为*.weights文件太大,无法一并上传)。
最后
以上就是怡然鼠标最近收集整理的关于OpenCV-DNN使用YOLO网络目标检测开发环境实验准备主要代码实验效果附件的全部内容,更多相关OpenCV-DNN使用YOLO网络目标检测开发环境实验准备主要代码实验效果附件内容请搜索靠谱客的其他文章。
本图文内容来源于网友提供,作为学习参考使用,或来自网络收集整理,版权属于原作者所有。


发表评论 取消回复