2022/10更新
不知道vite哪个版本更新之后,select a variaint步骤可以类似vue-cli那样选择添加一些基础库,少了一些麻烦
而且全局scss可以直接在main.ts里import了,其他没试,这个文章目前来看已经落后了,仅供参考吧。。。
记录了一下今天的尝试,仅供参考。
目前vite初始化项目还不能像vue cli那样,可以把相关配置选好后一下子出个现成的框架,顶多选个vue+ts,所以尝试了一下使用vite+pnpm整出来一个之前常用的vue项目框架,以vue3+TS为主,使用vue-class-component以class的模式写vue组件,整合了router路由和pinia(代替vuex,尝尝鲜),eslint和prettier作为格式工具,sass作为样式扩展。除了上面说的这些,还加上了axios和qs,这个就随意了。
注意,之前的习惯是vue-class-component搭配vue-property-decorator,不过目前vue-class-component适配vue3的版本依然是v8.0.0-rc.1,发布版千呼万唤两年还没出来,而vue-property-decorator是基于vue-class-component的,直接不支持vue3,所以这个项目对我来说只能算玩具,目前主力还是vue2那套。
我用的pnpm,需要提前全局安装,这里略过。
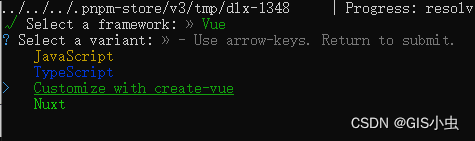
1、首先使用vite官网教程的命令行建立项目
pnpm create vite my-vue-app -- --template vue-ts
执行后可能会提示你选用什么框架,看着选,最后是vue+ts就行
2、这时你的项目目录和package.json应该是这样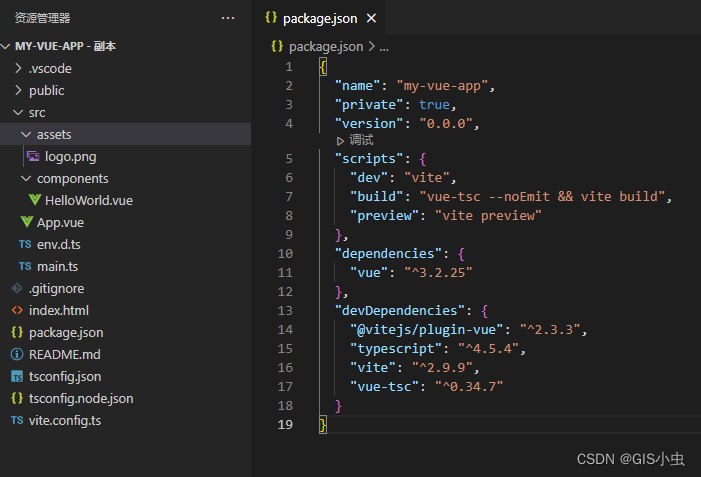
我又用vue cli建了个项目,是这样的
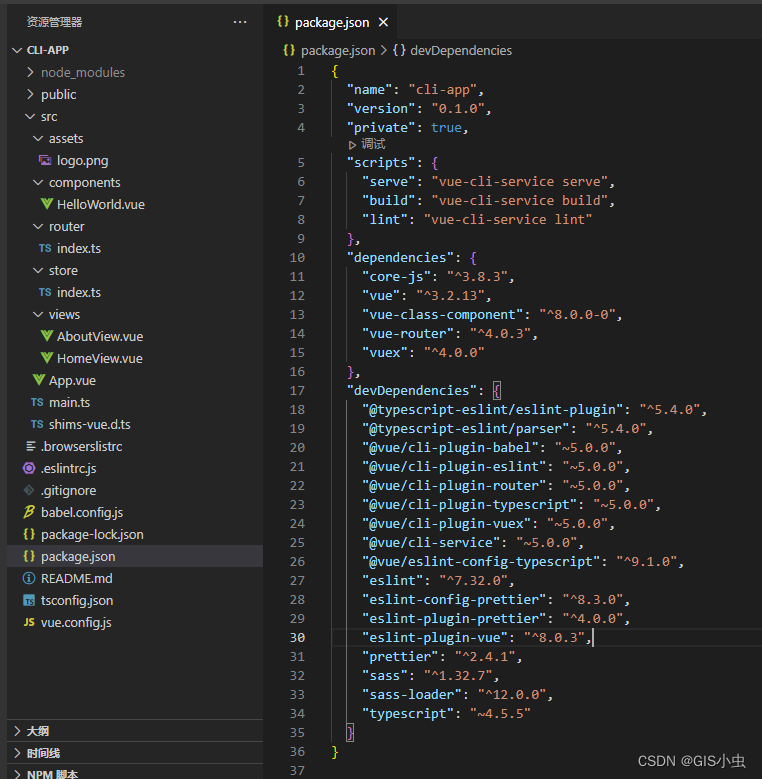
于是开始了移植和测试,过程不表,最后package.json是这样
{
  "name": "my-vue-app",
  "private": true,
  "version": "0.0.0",
  "scripts": {
    "dev": "vite",
    "build": "vite build",
    "preview": "vite preview",
    "lint": "eslint . --ext .vue,.js,.ts,.jsx,.tsx --fix"
  },
  "dependencies": {
    "axios": "^0.27.2",
    "pinia": "^2.0.14",
    "qs": "^6.10.5",
    "sass": "^1.52.3",
    "vue": "^3.2.37",
    "vue-class-component": "^8.0.0-rc.1",
    "vue-router": "^4.0.16"
  },
  "devDependencies": {
    "@types/node": "^17.0.42",
    "@types/qs": "^6.9.7",
    "@typescript-eslint/eslint-plugin": "^4.33.0",
    "@typescript-eslint/parser": "^4.33.0",
    "@vitejs/plugin-vue": "^1.10.2",
    "@vue/compiler-sfc": "^3.2.37",
    "eslint": "^7.32.0",
    "eslint-config-prettier": "^7.2.0",
    "eslint-plugin-prettier": "^3.4.1",
    "eslint-plugin-vue": "^7.20.0",
    "prettier": "^2.7.0",
    "typescript": "^4.7.3",
    "vite": "^2.9.12"
  }
}
所以,如果没意外的话,你把上边的拷过去,使用命令 pnpm up 更新一下包的版本,应该没啥问题
3、eslint和prettier的配置文件我是分开放的,分别如下,规则可以自行修改
.eslintrc.js
module.exports = {
  parser: 'vue-eslint-parser',
  parserOptions: {
    parser: '@typescript-eslint/parser',
    ecmaVersion: 2020,
    sourceType: 'module',
    ecmaFeatures: {
      jsx: true
    }
  },
  env: {
    node: true,
    es6: true,
    browser: true
  },
  globals: {
    Markdown: true
  },
  extends: [
    'plugin:vue/vue3-recommended',
    'plugin:@typescript-eslint/recommended',
    'prettier/@typescript-eslint',
    'plugin:prettier/recommended',
    'eslint:recommended'
  ],
  rules: {
    '@typescript-eslint/ban-ts-ignore': 'off',
    '@typescript-eslint/explicit-function-return-type': 'off',
    '@typescript-eslint/no-explicit-any': 'off',
    '@typescript-eslint/no-var-requires': 'off',
    '@typescript-eslint/no-empty-function': 'off',
    '@typescript-eslint/no-use-before-define': 'off',
    '@typescript-eslint/ban-ts-comment': 'off',
    '@typescript-eslint/ban-types': 'off',
    '@typescript-eslint/no-non-null-assertion': 'off',
    '@typescript-eslint/explicit-module-boundary-types': 'off',
    '@typescript-eslint/no-unused-vars': [
      'error',
      {
        argsIgnorePattern: '^h$',
        varsIgnorePattern: '^h$'
      }
    ],
    'no-unused-vars': [
      'error',
      {
        argsIgnorePattern: '^h$',
        varsIgnorePattern: '^h$'
      }
    ],
    'space-before-function-paren': 'off',
    quotes: ['error', 'single'],
    'comma-dangle': ['error', 'never'],
    'vue/require-default-prop': 'off',
    'vue/custom-event-name-casing': 'off',
    'no-use-before-define': 'off',
    'vue/comment-directive': 'off',
    'vue/singleline-html-element-content-newline': 'off',
    'vue/html-self-closing': 'off',
    'vue/max-attributes-per-line': 'off'
  }
}
.prettierrc
{
  "eslintIntegration": true,
  "printWidth": 100,
  "tabWidth": 2,
  "useTabs": false,
  "semi": false,
  "vueIndentScriptAndStyle": true,
  "singleQuote": true,
  "quoteProps": "as-needed",
  "bracketSpacing": true,
  "trailingComma": "none",
  "jsxBracketSameLine": false,
  "jsxSingleQuote": false,
  "arrowParens": "always",
  "insertPragma": false,
  "requirePragma": false,
  "proseWrap": "never",
  "htmlWhitespaceSensitivity": "strict",
  "endOfLine": "lf"
}
4、tsconfig和vite.config
tsconfig里在compilerOptions里增加了这几项
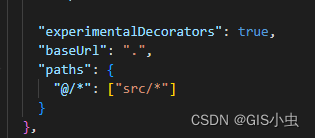
    "experimentalDecorators": true,
    "baseUrl": ".",
    "paths": {
      "@/*": ["src/*"]
    }
vite.config改动较多,带注释的都是加的
import { defineConfig } from 'vite'
import vue from '@vitejs/plugin-vue'
const path = require('path')

// https://vitejs.dev/config/
export default defineConfig({
  plugins: [vue()],
  // 项目根路径
  base: '/my-vue-app/',
  // 全局样式
  css: {
    preprocessorOptions: {
      scss: {
        additionalData: '@import "./src/assets/common.scss";'
      }
    }
  },
  // 端口和是否启动时打开页面
  server: {
    open: true,
    port: 8081
  },
  // @/指向src
  resolve: {
    alias: {
      '@': path.resolve(__dirname, 'src')
    }
  },
  // 全局变量
  define: {
    'process.env': {
      BASE_API: 'http://[ip]:[port]/api/'
    }
  }
})
5、全局样式
在src/assets下新建了common.scss,个人习惯,祖传的一堆全局样式
#app,
body,
html {
  width: 100%;
  height: 100%;
  padding: 0;
  margin: 0;
  font-family: Avenir, Helvetica, Arial, sans-serif;
  -webkit-font-smoothing: antialiased;
  -moz-osx-font-smoothing: grayscale;
  color: #2c3e50;
  overflow: hidden;
}
6、pinia和router
这个比较简单,先在main.ts里加上这俩来初始化,然后创建各自的配置文件
main.ts
import { createApp } from 'vue'
import App from './App.vue'
import router from './router'
import { createPinia } from 'pinia'

createApp(App).use(router).use(createPinia()).mount('#app')
在src下新建store/index.ts,以下是demo内容
import { defineStore } from 'pinia'

const useStore = defineStore('main', {
  state: () => ({
    count: 0
  }),
  getters: {
    doubleCount(state) {
      return state.count * 2
    }
  },
  actions: {
    increment() {
      this.count++
    }
  }
})

export default useStore
在src下新建router/index.ts,以下是内容。注意,若没有设置项目根路径,则createWebHistory参数需为空。
import { createRouter, createWebHistory, RouteRecordRaw } from 'vue-router'
import HomeView from '../views/HomeView.vue'

const routes: Array<RouteRecordRaw> = [
  {
    path: '/home',
    name: 'home',
    component: HomeView
  },
  {
    path: '/about',
    name: 'about',
    component: () => import('../views/AboutView.vue')
  }
]

const router = createRouter({
  history: createWebHistory('/my-vue-app/'),
  routes
})

export default router
7、修改vue组件
vite自动生成的demo组件不符合class-component,我把vue cli生成的项目里的组件搬运过来简单调整了下。
src/App.vue
<template>
  <nav>
    <router-link to="/home"> Home </router-link> |
    <router-link to="/about"> About </router-link>
  </nav>
  <router-view />
</template>

<style lang="scss">
  #app {
    font-family: Avenir, Helvetica, Arial, sans-serif;
    -webkit-font-smoothing: antialiased;
    -moz-osx-font-smoothing: grayscale;
    text-align: center;
    color: #2c3e50;
  }

  nav {
    padding: 30px;

    a {
      font-weight: bold;
      color: #2c3e50;

      &.router-link-exact-active {
        color: #42b983;
      }
    }
  }
</style>
src/views/HomeView.vue
<template>
  <div class="home">
    <img alt="Vue logo" src="../assets/logo.png" />
    <HelloWorld msg="Welcome to Your Vue.js + TypeScript App" />
  </div>
</template>

<script lang="ts">
  import { Options, Vue } from 'vue-class-component'
  import HelloWorld from '@/components/HelloWorld.vue' // @ is an alias to /src

  @Options({
    components: {
      HelloWorld
    }
  })
  export default class HomeView extends Vue {}
</script>
src/views/AboutView.vue
<template>
  <div class="about">
    <h1>This is an about page</h1>
  </div>
</template>
src/components/HelloWorld.vue
<template>
  <div class="hello">
    <h1>{{ msg }}</h1>
    <p>
      For a guide and recipes on how to configure / customize this project,<br />
      check out the
      <a href="https://cli.vuejs.org" target="_blank" rel="noopener">vue-cli documentation</a>.
    </p>
  </div>
  <div>
    <button @click="store.increment"> {{ store.count }} => {{ store.doubleCount }} </button>
  </div>
  <div>
    <button @click="login">登录</button>
  </div>
  <div v-if="logged">用户{{ user.username }}已登录</div>
</template>

<script lang="ts">
  import useStore from '@/store'
  import axios from '@/extension/request'
  import { Options, Vue } from 'vue-class-component'

  @Options({
    props: {
      msg: String
    }
  })
  export default class HelloWorld extends Vue {
    msg!: string
    store = useStore()
    user = {
      password: 'admin',
      username: 'admin'
    }
    logged = false
    login() {
      axios.post('user/login', this.user).then((res: any) => {
        if (res && res.success) {
          this.logged = true
        }
      })
    }
  }
</script>

<!-- Add "scoped" attribute to limit CSS to this component only -->
<style scoped lang="scss">
  .hello {
    h3 {
      margin: 40px 0 0;
    }
    ul {
      list-style-type: none;
      padding: 0;
    }
    li {
      display: inline-block;
      margin: 0 10px;
    }
    a {
      color: #42b983;
    }
  }
</style>
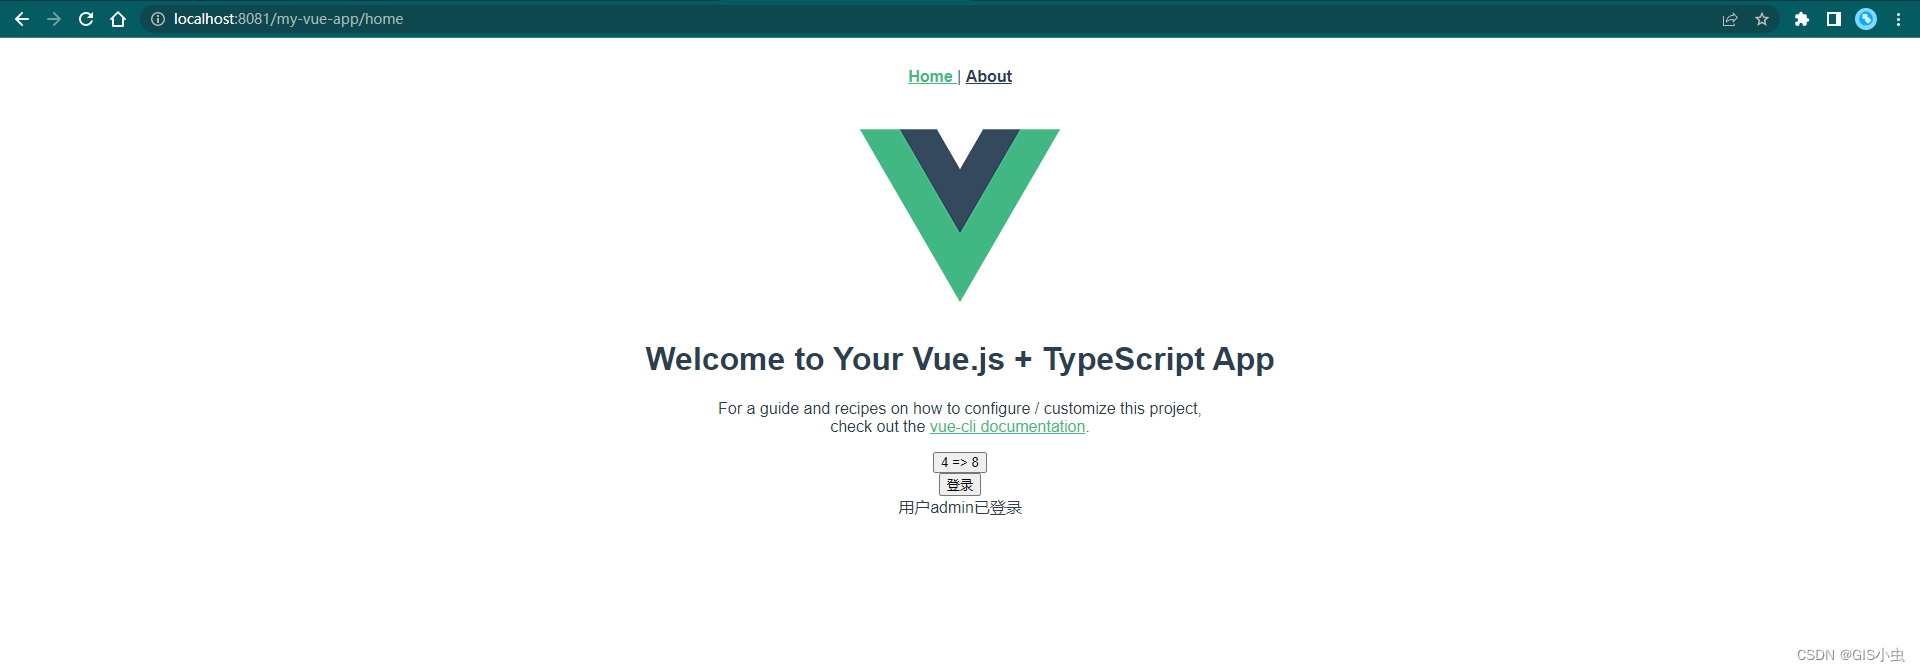
以上组件把router,pinia,axios(自己封装)都简单用了下
8、pnpm i安装依赖,或者先pnpm up升级一下,然后应该就能运行了
9、打包的话,我修改了原本的打包语句
"build": "vue-tsc --noEmit && vite build",
直接build我这里会报错:‘vue-tsc’ 不是内部或外部命令,也不是可运行的程序
所以干脆去掉了前边的vue-tsc --noEmit &&,好像也没啥毛病
我用的nginx,把dist的内容放进nginx/html/my-vue-app里,修改nginx.conf以适配router历史模式
location / {
    try_files $uri $uri/ /my-vue-app/index.html;
}
最后
以上就是耍酷鸭子最近收集整理的关于Vite+pnpm构建Vue3+TypeScript+vue-class-component+Vue router+pinia+ESLint(prettier)+sass的全部内容,更多相关Vite+pnpm构建Vue3+TypeScript+vue-class-component+Vue内容请搜索靠谱客的其他文章。


发表评论 取消回复