1 前言
最近在看公司源码,发现有些服务大量使用到了CompletableFuture,学了这么久Java,对这个类还是挺陌生的,实在惭愧。于是利用了业余时间认真学习并总结了下CompletableFuture的特性以及用法。
2 正文
CompletableFuture是JDK8中的新特性,主要用于对JDK5中加入的Future的补充。CompletableFuture实现了CompletionStage和Future接口。
2.1 JDK官方文档解释
CompletableFuture类的官方API文档解释:
CompletableFuture是JDK8中的新特性,主要用于对JDK5中加入的Future的补充。CompletableFuture实现了CompletionStage和Future接口。
CompletableFuture类的官方API文档解释:
- CompletableFuture是一个在完成时可以触发相关方法和操作的Future,并且它可以视作为CompletableStage。
- 除了直接操作状态和结果的这些方法和相关方法外(CompletableFuture API提供的方法),CompletableFuture还实现了以下的CompletionStage的相关策略:
① 非异步方法的完成,可以由当前CompletableFuture的线程提供,也可以由其他调用完方法的线程提供。
② 所有没有显示使用Executor的异步方法,会使用ForkJoinPool.commonPool()(那些并行度小于2的任务会创建一个新线程来运行)。为了简化监视、调试和跟踪异步方法,所有异步任务都被标记为CompletableFuture.AsynchronouseCompletionTask。
③ 所有CompletionStage方法都是独立于其他公共方法实现的,因此一个方法的行为不受子类中其他方法的覆盖影响。 - CompletableFuture还实现了Future的以下策略
① 不像FutureTask,因CompletableFuture无法直接控制计算任务的完成,所以CompletableFuture的取消会被视为异常完成。调用cancel()方法会和调用completeExceptionally()方法一样,具有同样的效果。isCompletedEceptionally()方法可以判断CompletableFuture是否是异常完成。
② 在调用get()和get(long, TimeUnit)方法时以异常的形式完成,则会抛出ExecutionException,大多数情况下都会使用join()和getNow(T),它们会抛出CompletionException。
小结:
- Concurrent包中的Future在获取结果时会发生阻塞,而CompletableFuture则不会,它可以通过触发异步方法来获取结果。
- 在CompletableFuture中,如果没有显示指定的Executor的参数,则会调用默认的ForkJoinPool.commonPool()。
- 调用CompletableFuture的cancel()方法和调用completeExceptionally()方法的效果一样。
在JDK5中,使用Future来获取结果时都非常的不方便,只能通过get()方法阻塞线程或者通过轮询isDone()的方式来获取任务结果,这种阻塞或轮询的方式会无畏的消耗CPU资源,而且还不能及时的获取任务结果,因此JDK8中提供了CompletableFuture来实现异步的获取任务结果。
2.2 使用下CompletableFuture的API
CompletableFuture类提供了非常多的方法供我们使用,包括了runAsync()、supplyAsync()、thenAccept()等方法。
runAsync(),异步运行,
@Test
    public void runAsyncExample() throws Exception {
        ExecutorService executorService = Executors.newSingleThreadExecutor();
        CompletableFuture cf = CompletableFuture.runAsync(() -> {
            try {
                Thread.sleep(2000);
            } catch (Exception e) {
                e.printStackTrace();
            }
            System.out.println(Thread.currentThread().getName());
        }, executorService);
        System.out.println(Thread.currentThread().getName());
        while (true) {
            if (cf.isDone()) {
                System.out.println("CompletedFuture...isDown");
                break;
            }
        }
    }
运行结果:
main
pool-1-thread-1
CompletedFuture…isDown
这里调用的runAsync()方法没有使用ForkJoinPool的线程,而是使用了Executors.newSingleThreadExecutor()中的线程。runAsync()其实效果跟单开一个线程一样。
supplyAsync()
supply有供应的意思,supplyAsync就可以理解为异步供应,查看supplyAsync()方法入参可以知道,其有两个入参:
- Supplier supplier,
- Executor executor
这里先简单介绍下Supplier接口,Supplier接口是JDK8引入的新特性,它也是用于创建对象的,只不过调用Supplier的get()方法时,才会去通过构造方法去创建对象,并且每次创建出的对象都不一样。Supplier常用语法为:
Supplier<MySupplier> sup= MySupplier::new;
再展示代码例子之前,再讲一个thenAccept()方法,可以发现thenAccept()方法的入参如下:
- Comsumer<? super T>
Comsumer接口同样是java8新引入的特性,它有两个重要接口方法:
- accept()
- andThen()
thenAccept()可以理解为接收CompletableFuture的结果然后再进行处理。
下面看下supplyAsync()和thenAccept()的例子:
public void thenApply() throws Exception {
        ExecutorService executorService = Executors.newFixedThreadPool(2);
        CompletableFuture cf = CompletableFuture.supplyAsync(() -> { //实现了Supplier的get()方法
            try {
                Thread.sleep(2000);
            } catch (Exception e) {
                e.printStackTrace();
            }
            System.out.println("supplyAsync " + Thread.currentThread().getName());
            return "hello ";
        },executorService).thenAccept(s -> { //实现了Comsumper的accept()方法
            try {
                thenApply_test(s + "world");
            } catch (Exception e) {
                e.printStackTrace();
            }
        });

        System.out.println(Thread.currentThread().getName());
        while (true) {
            if (cf.isDone()) {
                System.out.println("CompletedFuture...isDown");
                break;
            }
        }
    }
运行结果如下:
main
supplyAsync pool-1-thread-1
thenApply_test hello world
thenApply_test pool-1-thread-1
从代码逻辑可以看出,thenApply_test等到了pool-1-thread-1线程完成任务后,才进行的调用,并且拿到了supplye()方法返回的结果,而main则异步执行了,这就避免了Future获取结果时需要阻塞或轮询的弊端。
exceptionally
当任务在执行过程中报错了咋办?exceptionally()方法很好的解决了这个问题,当报错时会去调用exceptionally()方法,它的入参为:Function<Throwable, ? extends T> fn,fn为执行任务报错时的回调方法,下面看看代码示例:
public void exceptionally() {
        ExecutorService executorService = Executors.newSingleThreadExecutor();
        CompletableFuture cf = CompletableFuture.supplyAsync(() -> {
            try {
                Thread.sleep(3000);
            } catch (InterruptedException e) {
                e.printStackTrace();
            }
            if (1 == 1) {
                throw new RuntimeException("测试exceptionally...");
            }
            return "s1";
        }, executorService).exceptionally(e -> {
            System.out.println(e.getMessage());
            return "helloworld " + e.getMessage();
        });
        cf.thenAcceptAsync(s -> {
            System.out.println("thenAcceptAsync: " + s);
        });
        System.out.println("main: " + Thread.currentThread().getName());
        while (true) {}
    }
运行结果:
main: main
java.lang.RuntimeException: 测试exceptionally…
CompletableFuture is Down…helloworld java.lang.RuntimeException: 测试exceptionally…
thenAcceptAsync: helloworld java.lang.RuntimeException: 测试exceptionally…
从代码以及运行结果来看,当任务执行过程中报错时会执行exceptionally()中的代码,thenAcceptAsync()会获取抛出的异常并输出到控制台,不管CompletableFuture()执行过程中报错、正常完成、还是取消,都会被标示为已完成,所以最后CompletableFuture.isDown()为true。
在Java8中,新增的ForkJoinPool.commonPool()方法,这个方法可以获得一个公共的ForkJoin线程池,这个公共线程池中的所有线程都是Daemon线程,意味着如果主线程退出,这些线程无论是否执行完毕,都会退出系统。
2.3 源码分析
CompletableFuture类实现了Future接口和CompletionStage接口,Future大家都经常遇到,但是这个CompletionStage接口就有点陌生了,这里的CompletionStage实际上是一个任务执行的一个“阶段”,CompletionStage详细的内容在下文有介绍。
public class CompletableFuture<T> implements Future<T>, CompletionStage<T> {
	volatile Object result;       // CompletableFuture的结果值或者是一个异常的报装对象AltResult
    volatile Completion stack;    // 依赖操作栈的栈顶
    ...
    // CompletableFuture的方法
    ...
	// Unsafe mechanics
    private static final sun.misc.Unsafe UNSAFE;
    private static final long RESULT;
    private static final long STACK;
    private static final long NEXT;
    static {
        try {
            final sun.misc.Unsafe u;
            UNSAFE = u = sun.misc.Unsafe.getUnsafe();
            Class<?> k = CompletableFuture.class;
            RESULT = u.objectFieldOffset(k.getDeclaredField("result")); //计算result属性的位偏移量
            STACK = u.objectFieldOffset(k.getDeclaredField("stack")); //计算stack属性的位偏移量
            NEXT = u.objectFieldOffset
                (Completion.class.getDeclaredField("next"));  //计算next属性的位偏移量
        } catch (Exception x) {
            throw new Error(x);
        }
    }
}
在CompletableFuture中有一个静态代码块,在CompletableFuture类初始化之前就进行调用,代码块里的内容就是通过Unsafe类去获取CompletableFuture的result、stack和next属性的“偏移量”,这个偏移量主要用于Unsafe的CAS操作时进行位移量的比较。具体的Unsafe的CAS操作,可以查看Unsafe源码介绍
runAsync(Runnable, Executor) & runAsync(Runnable)
runAsync()做的事情就是异步的执行任务,返回的是CompletableFuture对象,不过CompletableFuture对象不包含结果。runAsync()方法有两个重载方法,这两个重载方法的区别是Executor可以指定为自己想要使用的线程池,而runAsync(Runnable)则使用的是ForkJoinPool.commonPool()。
下面先来看看runAsync(Runnable)的源码:
	public static CompletableFuture<Void> runAsync(Runnable runnable) {
        return asyncRunStage(asyncPool, runnable);
    }
这里的asyncPool是一个静态的成员变量:
private static final boolean useCommonPool =
        (ForkJoinPool.getCommonPoolParallelism() > 1); // 并行级别
private static final Executor asyncPool = useCommonPool ?
	ForkJoinPool.commonPool() : new ThreadPerTaskExecutor();
回到asyncRunStage()源码:
	static CompletableFuture<Void> asyncRunStage(Executor e, Runnable f) {
        if (f == null) throw new NullPointerException();
        CompletableFuture<Void> d = new CompletableFuture<Void>();
        e.execute(new AsyncRun(d, f));
        return d;
    }
看到asyncRunStage()源码,可以知道任务是由Executor来执行的,那么可想而知Async类一定是实现了Callable接口或者继承了Runnable类,查看Async类:
static final class AsyncRun extends ForkJoinTask<Void>
            implements Runnable, AsynchronousCompletionTask {
        CompletableFuture<Void> dep; Runnable fn;
        AsyncRun(CompletableFuture<Void> dep, Runnable fn) {
            this.dep = dep; this.fn = fn;
        }

        public final Void getRawResult() { return null; }
        public final void setRawResult(Void v) {}
        public final boolean exec() { run(); return true; }

        public void run() {
            CompletableFuture<Void> d; Runnable f;
            if ((d = dep) != null && (f = fn) != null) {
                dep = null; fn = null;//释放掉内存
                if (d.result == null) {
                    try {
                        f.run();
                        d.completeNull();
                    } catch (Throwable ex) {
                        d.completeThrowable(ex);
                    }
                }
                d.postComplete(); // 任务结束后,会执行所有依赖此任务的其他任务,这些任务以一个无锁并发栈的形式存在
            }
        }
    }
在AsyncRun类中,实现了Runnable接口的run()方法,在run()方法内部,会调用传进来的Runnable对象的run()方法,这里就需要用户自己去实现了,上文中的实例代码就是通过Lambda表达式来实现了Runnable接口。调用了f.run()之后,然后就是completeNull()方法了,改方法底层通过调用UNSAFE类的compareAndSwapObject()方法,来以CAS的方式将CompletableFuture的结果赋为null。postComplete()就是任务结束后,会执行所有依赖此任务的其他任务,这些任务以一个无锁并发栈的形式存在。
postComplete()的源码还是有点复杂的,先不急着分析。先看看Completion这个抽象类的数据结构组成:
Completion
下面先看看Completion的源码:
abstract static class Completion extends ForkJoinTask<Void>
        implements Runnable, AsynchronousCompletionTask {
        volatile Completion next;
        abstract CompletableFuture<?> tryFire(int mode);
        abstract boolean isLive();

        public final void run()                { tryFire(ASYNC); }
        public final boolean exec()            { tryFire(ASYNC); return true; }
        public final Void getRawResult()       { return null; }
        public final void setRawResult(Void v) {}
    }
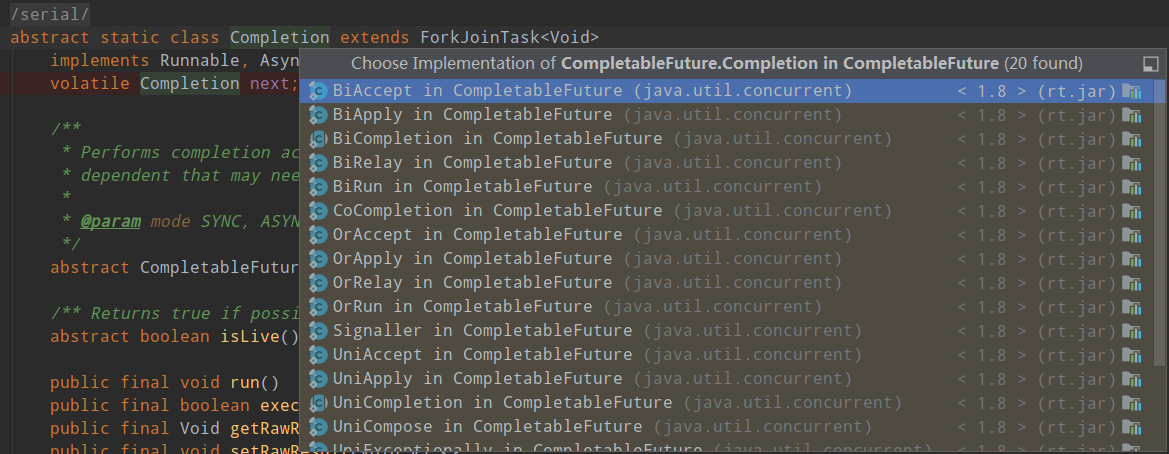
Completion是一个抽象类,分别实现了Runnable、AsynchronousCompletionTask接口,继承了ForkJoinPoolTask类,而ForJoinPoolTask抽象类又实现了Future接口,因此Completion实际上就是一个Future。可以看到Completion的抽象方法和成员方法的实现逻辑都短短一行或者没有,可以猜到这些方法的实现都是在其子类中。其实现类包括了UniCompletion、BiCompletion、UniAccept、BiAccept等,如下图:
而Completion类中还有一个非常重要的成员属性
volatile Completion next;
有印象的读者应该能记得,CompletableFuture中有一个属性——stack,就是Completion类的。
volatile Completion stack;
由这个属性可以看出,CompletableFuture其实就是一个链表的一个数据结构。
abstract static class UniCompletion<T,V> extends Completion {
        Executor executor;                 // executor to use (null if none)
        CompletableFuture<V> dep;          // 代表的依赖的CompletableFuture
        CompletableFuture<T> src;          // 代表的是源CompletableFuture

        UniCompletion(Executor executor, CompletableFuture<V> dep,
                      CompletableFuture<T> src) {
            this.executor = executor; this.dep = dep; this.src = src;
        }

        /**
         * 确保当前Completion可以被调用;并且使用ForkJoinPool标记为来确保只有一个线程可以调用,
         * 如果是异步的,则在任务启动之后通过tryFire来进行调用。tryFire方法时在UniAccept类中。
         */
        final boolean claim() {
            Executor e = executor;
            if (compareAndSetForkJoinTaskTag((short)0, (short)1)) {
                if (e == null)
                    return true;
                executor = null; // disable
                e.execute(this);
            }
            return false;
        }

        final boolean isLive() { return dep != null; }
    }
claim方法要在执行action前调用,若claim方法返回false,则不能调用action,原则上要保证action只执行一次。
static final class UniAccept<T> extends UniCompletion<T,Void> {
        Consumer<? super T> fn;
        UniAccept(Executor executor, CompletableFuture<Void> dep,
                  CompletableFuture<T> src, Consumer<? super T> fn) {
            super(executor, dep, src); this.fn = fn;
        }
        /**
         * 尝试去调用当前任务。uniAccept()方法为核心逻辑。
         */
        final CompletableFuture<Void> tryFire(int mode) {
            CompletableFuture<Void> d; CompletableFuture<T> a;
            if ((d = dep) == null ||
                !d.uniAccept(a = src, fn, mode > 0 ? null : this))
                return null;
            dep = null; src = null; fn = null;
            return d.postFire(a, mode);
        }
    }
final <S> boolean uniAccept(CompletableFuture<S> a,
                                Consumer<? super S> f, UniAccept<S> c) {
        Object r; Throwable x;
        if (a == null || (r = a.result) == null || f == null) //判断源任务是否已经完成了,a表示的就是源任务,a.result就代表的是原任务的结果。
            return false;
        tryComplete: if (result == null) {
            if (r instanceof AltResult) {
                if ((x = ((AltResult)r).ex) != null) {
                    completeThrowable(x, r);
                    break tryComplete;
                }
                r = null;
            }
            try {
                if (c != null && !c.claim())
                    return false;
                @SuppressWarnings("unchecked") S s = (S) r;
                f.accept(s);  //去调用Comsumer
                completeNull();
            } catch (Throwable ex) {
                completeThrowable(ex);
            }
        }
        return true;
    }
对于Completion的执行,还有几个关键的属性:
static final int SYNC   =  0;//同步
static final int ASYNC  =  1;//异步
static final int NESTED = -1;//嵌套
Completion在CompletableFuture中是如何工作的呢?现在先不着急了解其原理,下面再去看下一个重要的接口——CompletionStage。
CompletionStage
下面介绍下CompletionStage接口。看字面意思可以理解为“完成动作的一个阶段”,查看官方注释文档:CompletionStage是一个可能执行异步计算的“阶段”,这个阶段会在另一个CompletionStage完成时调用去执行动作或者计算,一个CompletionStage会以正常完成或者中断的形式“完成”,并且它的“完成”会触发其他依赖的CompletionStage。CompletionStage 接口的方法一般都返回新的CompletionStage,因此构成了链式的调用。
【下文中Stage代表CompletionStage】
那么在Java中什么是CompletionStage呢?
官方定义中,一个Function,Comsumer或者Runnable都会被描述为一个CompletionStage,相关方法比如有apply,accept,run等,这些方法的区别在于它们有些是需要传入参,有些则会产生“结果”。
- Funtion方法会产生结果
- Comsumer会消耗结果
- Runable既不产生结果也不消耗结果
下面看看一个Stage的调用例子:
stage.thenApply(x -> square(x)).thenAccept(x -> System.out.println(x)).thenRun(() -> System.out.println())
这里x -> square(x)就是一个Function类型的Stage,它返回了x。x -> System.out.println(x)就是一个Comsumer类型的Stage,用于接收上一个Stage的结果x。() ->System.out.println()就是一个Runnable类型的Stage,既不消耗结果也不产生结果。
一个、两个或者任意一个CompletionStage的完成都会触发依赖的CompletionStage的执行,CompletionStage的依赖动作可以由带有then的前缀方法来实现。如果一个Stage被两个Stage的完成给触发,则这个Stage可以通过相应的Combine方法来结合它们的结果,相应的Combine方法包括:thenCombine、thenCombineAsync。但如果一个Stage是被两个Stage中的其中一个触发,则无法去combine它们的结果,因为这个Stage无法确保这个结果是那个与之依赖的Stage返回的结果。
	@Test
    public void testCombine() throws Exception {
        String result = CompletableFuture.supplyAsync(() -> {
            return "hello";
        }).thenCombine(CompletableFuture.supplyAsync(() -> {
            return " world";
        }), (s1, s2) -> s1 + " " + s2).join();

        System.out.println(result);
    }
虽然Stage之间的依赖关系可以控制触发计算,但是并不能保证任何的顺序。
另外,可以用一下三种的任何一种方式来安排一个新Stage的计算:default execution、default asynchronous execution(方法后缀都带有async)或者custom(自定义一个executor)。默认和异步模式的执行属性由CompletionStage实现而不是此接口指定。
小结:CompletionStage确保了CompletableFuture能够进行链式调用。
下面开始介绍CompletableFuture的几个核心方法:
postComplete
final void postComplete() {
        CompletableFuture<?> f = this; Completion h;    //this表示当前的CompletableFuture
        while ((h = f.stack) != null ||                                  //判断stack栈是否为空
               (f != this && (h = (f = this).stack) != null)) {
            CompletableFuture<?> d; Completion t;
            if (f.casStack(h, t = h.next)) {                          //通过CAS出栈,
                if (t != null) {
                    if (f != this) {
                        pushStack(h);             //如果f不是this,将刚出栈的h入this的栈顶
                        continue;
                    }
                    h.next = null;    // detach   帮助GC
                }
                f = (d = h.tryFire(NESTED)) == null ? this : d;        //调用tryFire
            }
        }
    }
postComplete()方法可以理解为当任务完成之后,调用的一个“后完成”方法,主要用于触发其他依赖任务。
uniAccept
final <S> boolean uniAccept(CompletableFuture<S> a,
                                Consumer<? super S> f, UniAccept<S> c) {
        Object r; Throwable x;
        if (a == null || (r = a.result) == null || f == null)    //判断当前CompletableFuture是否已完成,如果没完成则返回false;如果完成了则执行下面的逻辑。
            return false;
        tryComplete: if (result == null) {
            if (r instanceof AltResult) {   //判断任务结果是否是AltResult类型
                if ((x = ((AltResult)r).ex) != null) {
                    completeThrowable(x, r);
                    break tryComplete;
                }
                r = null;
            }
            try {
                if (c != null && !c.claim()) //判断当前任务是否可以执行
                    return false;
                @SuppressWarnings("unchecked") S s = (S) r;   //获取任务结果
                f.accept(s);    //执行Comsumer
                completeNull();
            } catch (Throwable ex) {
                completeThrowable(ex);
            }
        }
        return true;
    }
这里有一个很巧妙的地方,就是uniAccept的入参中,CompletableFuture a表示的是源任务,UniAccept c中报装有依赖的任务,这点需要清除。
pushStack
	final void pushStack(Completion c) {
        do {} while (!tryPushStack(c));      //使用CAS自旋方式压入栈,避免了加锁竞争
    }

	final boolean tryPushStack(Completion c) {
        Completion h = stack;
        lazySetNext(c, h);   //将当前stack设置为c的next
        return UNSAFE.compareAndSwapObject(this, STACK, h, c); //尝试把当前栈(h)更新为新值(c)
    }

	static void lazySetNext(Completion c, Completion next) {
        UNSAFE.putOrderedObject(c, NEXT, next);
    }
光分析源码也没法深入理解其代码原理,下面结合一段示例代码来对代码原理进行分析。
	@Test
    public void thenApply() throws Exception {
        ExecutorService executorService = Executors.newFixedThreadPool(2);

        CompletableFuture cf = CompletableFuture.supplyAsync(() -> {
            try {
                 //休眠200秒
                Thread.sleep(200000);
            } catch (Exception e) {
                e.printStackTrace();
            }
            System.out.println("supplyAsync " + Thread.currentThread().getName());
            return "hello ";
        },executorService).thenAccept(s -> {
            try {
                thenApply_test(s + "world");
            } catch (Exception e) {
                e.printStackTrace();
            }
        });

        System.out.println(Thread.currentThread().getName());
        while (true) {
            if (cf.isDone()) {
                System.out.println("CompletedFuture...isDown");
                break;
            }
        }
    }
	/** 运行结果:
     main
     supplyAsync pool-1-thread-1
     thenApply_test hello world
     thenApply_test pool-1-thread-1
     CompletedFuture...isDown
     */
这段示例代码所做的事情就是supplyAsync(Supplier supplier)休眠200秒之后,返回一个字符串,thenAccept(Consumer<? super T> action)等到任务完成之后接收这个字符串,并且调用thenApply_test()方法,随后输出 hello world。
代码中让线程休眠200秒是为了方便观察CompletableFuture的传递过程。
下面就描述下程序的整个运作流程。
① 主线程调用CompletableFuture的supplyAsync()方法,传入Supplier和Executor。在supplyAsync()中又继续调用CompletableFuture的asyncSupplyStage(Executor, Supplier)方法。

来到asyncSupplyStage()方法中,调用指定的线程池,并执行execute(new AsyncSupply(d,f)),这里d就是我们的“源任务”,接下来thenApply()要依赖着这个源任务进行后续逻辑操作,f就是Supplier的函数式编程。
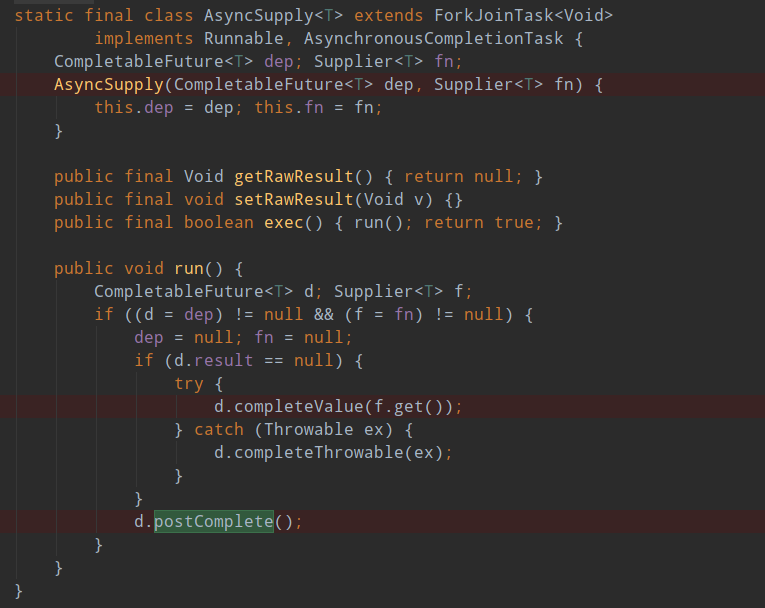
AsyncSupply实现了Runnable的run()方法,核心逻辑就在run()方法里。在run()方法里,先判断d.result == null,判断该任务是否已经完成,防止并发情况下其他线程完成此任务了。f.get()就是调用的Supplier的函数式编程,这里会休眠200秒,所以executor线程池开启的线程会在这里阻塞200秒。
② 虽然executor线程池线程阻塞了,但是main线程任然会继续执行接下来的代码。

main线程会在asyncSupplyStage()方法中返回d,就是我们的“依赖任务”,而这个任务此时还处在阻塞中。接下来main线程会继续执行CompletableFuture的thenAccept(Comsumer<? super T> action)方法,然后调用CompletableFuture的uniAcceptStage()方法。
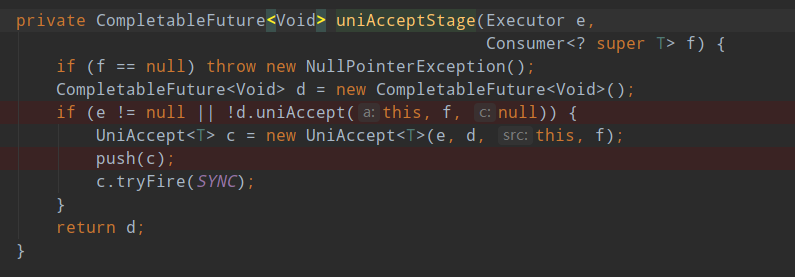
在uniAcceptStage()方法中,会将“依赖任务”、“源任务”、线程池以及Comsumer报装程一个UniAccept对象,然后调用push()压入stack的栈顶中。随后调用UniAccept的tryFire()方法。

其中的CompletableFuture的uniAccept()方法会判断任务是否完成,判断依据是a.result 是否为空,这里的a就是之前传入的“源任务”,等到“源任务”阻塞200秒过后,就会完成任务,并将字符串存入到 result中。
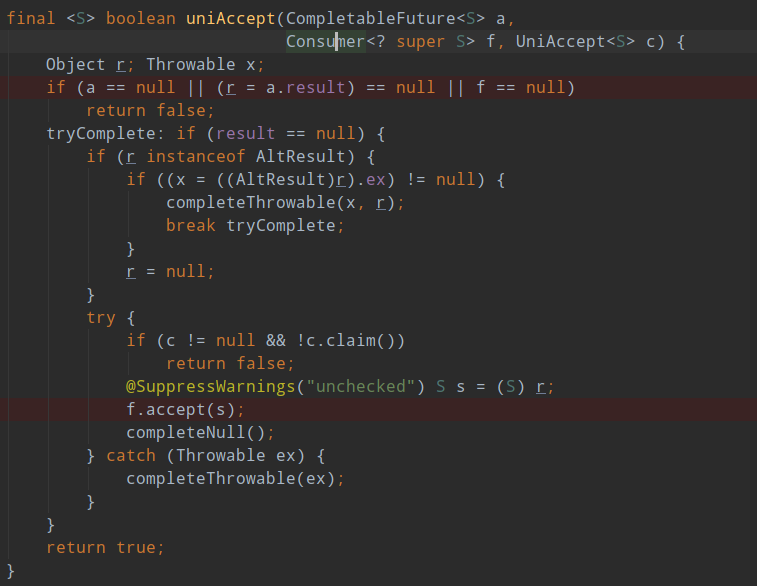
判断到“源任务”完成之后,就会调用接下来的逻辑。s拿到的值就是“源”任务返回的字符串,并且传入到了Comsumer.accept()方法中。然而“源任务”还在阻塞中,main线程会跳出uniAccept(),继续执行接下来的逻辑。接下来就是输出当前线程的名字,然后调用while(true),结束条件为CompletableFuture.isDone(),当任务完成时则结束while(true)循环。
③ 回到“源任务”,虽然main线程已经结束了整个生命周期,但是executor线程池的线程任然阻塞着的,休眠了200秒之后,继续执行任务。
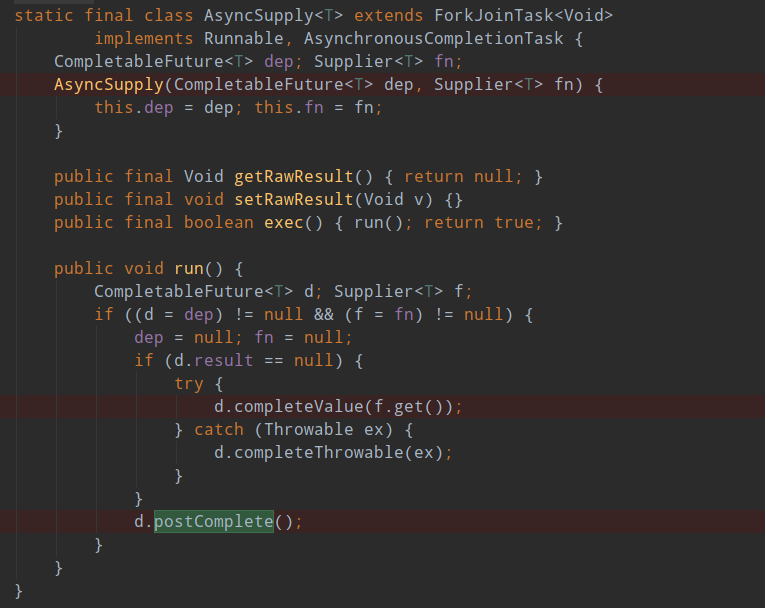
然后来到了postComplete()方法。这个方法在前面已经介绍到了,它是CompletableFuture的核心方法之一,做了许多事情。最重要的一件事情就是触发其他依赖任务,接下来调用的方法依次为:UniAccept.tryFire(mode) ——> CompletableFuture.uniAccept(…) ——> Comsumer.accept(s) ——> 输出“hello world”,并输出当前调用线程的线程名。因这个调用链已经在②中介绍过了,所以就不再详细介绍其运作逻辑。
小结: 通过这个小示例,终于理解到了“源任务”和“依赖任务”之间的调用关系,以及CompletableFuture的基本运作原理。然而CompletableFuture还有其他的方法需要去深入分析,由于篇幅所限就不再赘述,感兴趣的读者可以以debug的模式去一点一点分析CompletableFuture其他方法的底层原理。这里不得不说Java并发包作者Doug Lea大神真的太厉害了,阅读他的源码之后,可以发现他写的代码不能以技术来形容,而应该使用“艺术”来形容。
总结
- CompletableFuture底层由于借助了魔法类Unsafe的相关CAS方法,除了get或join结果之外,其他方法都实现了无锁操作。
- CompletableFuture实现了CompletionStage接口,因而具备了链式调用的能力,CompletionStage提供了either、apply、run以及then等相关方法,使得CompletableFuture可以使用各种应用场景。
- CompletableFuture中有“源任务”和“依赖任务”,“源任务”的完成能够触发“依赖任务”的执行,这里的完成可以是返回正常结果或者是异常。
- CompletableFuture默认使用ForkJoinPool,也可以使用指定线程池来执行任务。
文中的测试用例都在下列源码的JdkLearn模块的test目录下。
本篇博文以及测试源码已存放到以下GITHUB中:https://github.com/coderbruis/JavaSourceCodeLearning
参考文档:
- 《JDK8官方文档》
- 《Java魔法类:Unsafe应用解析》
最后
以上就是朴实枕头最近收集整理的关于深入解读CompletableFuture源码与原理的全部内容,更多相关深入解读CompletableFuture源码与原理内容请搜索靠谱客的其他文章。


发表评论 取消回复