1,在android中使用GridLayout布局来编写计算器,首先了解一下GridLayout网格布局。
GridLayout网格布局
android4.0(API在14及其以上)以上版本出现的GridLayout布局解决了以上问题。
GridLayout布局使用虚细线将布局划分为行、列和单元格,也支持一个控件在行、列上都有交错排列。而GridLayout使用的其实是跟LinearLayout类似的API,只不过是修改了一下相关的标签而已,所以对于开发者来说,掌握GridLayout还是很容易的事情。GridLayout的布局策略简单分为以下三个部分:
首先它与LinearLayout布局一样,也分为水平和垂直两种方式,默认是水平布局,一个控件挨着一个控件从左到右依次排列,但是通过指定android:columnCount设置列数的属性后,控件会自动换行进行排列。另一方面,对于GridLayout布局中的子控件,默认按照wrap_content的方式设置其显示,这只需要在GridLayout布局中显式声明即可。
其次,若要指定某控件显示在固定的行或列,只需设置该子控件的android:layout_row和android:layout_column属性即可,但是需要注意:android:layout_row=”0”表示从第一行开始,android:layout_column=”0”表示从第一列开始,这与编程语言中一维数组的赋值情况类似。
最后,如果需要设置某控件跨越多行或多列,只需将该子控件的android:layout_rowSpan或者layout_columnSpan属性设置为数值,再设置其layout_gravity属性为fill即可,前一个设置表明该控件跨越的行数或列数,后一个设置表明该控件填满所跨越的整行或整列。
所以使用xml文件来编写一下
<?xml version="1.0" encoding="utf-8"?>
<GridLayout xmlns:android="http://schemas.android.com/apk/res/android"
    android:layout_width="fill_parent"
    android:layout_height="wrap_content"
    android:orientation="horizontal"
    android:rowCount="7"
    android:columnCount="4" >
    <com.eulav.calculate.EditTextWithDel
    android:id="@+id/input"
     android:layout_columnSpan="4"
      android:layout_gravity="fill"
       android:hint="显示计算"
    />
      <com.eulav.calculate.EditTextWithDel
    android:id="@+id/output"
     android:layout_columnSpan="4"
      android:layout_gravity="fill"
      android:hint="显示结果"
    />
<Button android:id="@+id/one"
      android:text="1"/>
<Button
      android:id="@+id/two"
      android:text="2"/>
 <Button
      android:id="@+id/three"
      android:text="3"/>
<Button
      android:id="@+id/devide"
      android:text="/"/>
<Button
      android:id="@+id/four"
      android:text="4"/>
<Button
      android:id="@+id/five"
      android:text="5"/>
<Button
      android:id="@+id/six"
      android:text="6"/>
<Button
      android:id="@+id/multiply"
      android:text="×"/>
<Button
      android:id="@+id/seven"
      android:text="7"/>
<Button
      android:id="@+id/eight"
      android:text="8"/>
<Button
      android:id="@+id/nine"
      android:text="9"/>
  <Button
      android:id="@+id/minus"

      android:text="-"/>
  <Button
      android:id="@+id/zero"
      android:layout_columnSpan="2"
      android:layout_gravity="fill"
      android:text="0"/>
<Button
      android:id="@+id/clear"
      android:layout_rowSpan="2"
      android:layout_gravity="fill"
      android:text="Clear"/>
  <Button
      android:id="@+id/plus"
          android:layout_rowSpan="3"
      android:layout_gravity="fill_vertical"
      android:text="+"/>
  <Button
      android:id="@+id/result"
      android:layout_columnSpan="3"
      android:layout_gravity="fill"
      android:text="="/>
      </GridLayout>
xml效果图如下: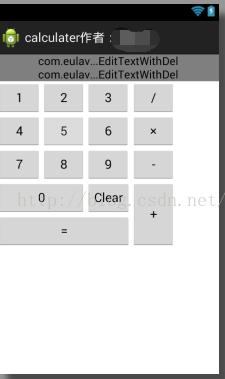
这里面用到了EditTextWithDel就是可以使在没有写文字的时候是暗的,不能删除,有文字的时候就显示亮的可以删除的效果。
效果如下GIF显示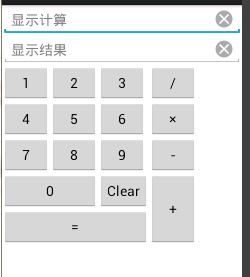
再就是java代码如下:
package com.eulav.calculate;


import android.app.Activity;
import android.os.Bundle;
import android.view.View;
import android.widget.Button;
import android.widget.EditText;
import android.widget.Toast;


public class MainActivity extends Activity  implements View.OnClickListener {
    private EditText input;
    private EditText output;
    private Button btn0;
    private Button btn1;
    private Button btn2;
    private Button btn3;
    private Button btn4;
    private Button btn5;
    private Button btn6;
    private Button btn7;
    private Button btn8;
    private Button btn9;
    private Button btnplus;
    private Button btnsubtract;
    private Button btnmultiply;
    private Button btndivide;
    private Button btnclear;
    private Button btnresult;

    private String str;//保存数字
    private String strold;
    private char act;//记录符号
    private int count;//判断要计算的次数,如果超过一个符号,先算出来一部分
    private int result;//计算的结果

    private int error;//无错误的时候为0就可以开始计算,如果为1就不能计算
    private int flag;//一个标志,如果为1,可以响应运算消息,如果为0,不响应运算消息,只有前面是数字才可以响应运算消息


    @Override
    public void onCreate(Bundle savedInstanceState) {
        super.onCreate(savedInstanceState);
        setContentView(R.layout.gridlayout);

        input=(EditText)findViewById(R.id.input);
        output=(EditText)findViewById(R.id.output);
        btn0=(Button)findViewById(R.id.zero);

        btn1=(Button)findViewById(R.id.one);

        btn2=(Button)findViewById(R.id.two);

        btn3=(Button)findViewById(R.id.three);

        btn4=(Button)findViewById(R.id.four);

        btn5=(Button)findViewById(R.id.five);

        btn6=(Button)findViewById(R.id.six);

        btn7=(Button)findViewById(R.id.seven);

        btn8=(Button)findViewById(R.id.eight);

        btn9=(Button)findViewById(R.id.nine);

        btnplus=(Button)findViewById(R.id.plus);

        btnsubtract=(Button)findViewById(R.id.minus);

        btnmultiply=(Button)findViewById(R.id.multiply);

        btndivide=(Button)findViewById(R.id.devide);

        btnclear=(Button)findViewById(R.id.clear);

        btnresult=(Button)findViewById(R.id.result);


        btn0.setOnClickListener(this);
        btn1.setOnClickListener(this);
        btn2.setOnClickListener(this);
        btn3.setOnClickListener(this);
        btn4.setOnClickListener(this);
        btn5.setOnClickListener(this);
        btn6.setOnClickListener(this);
        btn7.setOnClickListener(this);
        btn8.setOnClickListener(this);
        btn9.setOnClickListener(this);
        btnplus.setOnClickListener(this);
        btnsubtract.setOnClickListener(this);
        btnmultiply.setOnClickListener(this);
        btndivide.setOnClickListener(this);
        btnclear.setOnClickListener(this);
        btnresult.setOnClickListener(this);

        act=' ';
        str="";
        strold="";
        count=0;
        result=0;
        error=0;//处理异常,默认无异常
        flag=0;//默认不能响应,按下第一个数字后改为1,可以响应


    }
    public void onClick(View view) {
        switch(view.getId()){
        case R.id.zero:  num(0) ;
            break;
        case R.id.one:  num(1) ;
            break;
        case R.id.two:  num(2) ;
            break;
        case R.id.three:  num(3) ;
            break;
        case R.id.four:  num(4) ;
            break;
        case R.id.five:  num(5) ;
            break;
        case R.id.six:  num(6) ;
            break;
        case R.id.seven:  num(7) ;
            break;
        case R.id.eight:  num(8) ;
            break;
        case R.id.nine:  num(9) ;
            break;


        case R.id.plus:  add() ;
            break;
        case R.id.minus:  sub() ;
            break;
        case R.id.multiply:  multiply() ;
            break;
        case R.id.devide:  divide() ;
            break;
        case R.id.clear: clear();
            break;
        case R.id.result:
            result() ;
            if(error!=1&&flag!=0)
            output.setText(String.valueOf(result));
            break;
        default:
            break;
        }
        input.setText(strold+act+str);
    }
    public void num(int n){
        str=str+String.valueOf(n);
        flag=1;  //每次输入数字之后就可以计算
    }
    public void add(){
        if(flag!=0)
            {
        check();
        act='+';
        flag=0;
        }
    }
    public void sub(){
        if(flag!=0)
        {
        check();
        act='-';
        flag=0;
    }

    }
    public void multiply(){
        if(flag!=0)
        {
        check();
        act='*';
        flag=0;
        }
    }
    public void divide(){
        if(flag!=0)
        {
        check();
        act='/';
        flag=0;
        }
    }
    public void clear(){
        str=strold="";
        count=0;
        act=' ';
        result=0;
        flag=0;
        input.setText(strold+act+str);
        output.setText("");
    }
    public void check(){
    	//count不为0之后这个就可以开始计算
        if(count>=1)
        {
            result();
            str=String.valueOf(result);

        }
        strold=str;
        str="";
        count++;

    }
    public void result(){
        int a,b;
        a=Integer.parseInt(strold);
        b=Integer.parseInt(str);
        if(flag!=0)
        {
        if(b==0&&act=='/') {
            clear();
            Toast.makeText(MainActivity.this, "除数不能为零",
					Toast.LENGTH_LONG).show();
            error=0;
        }
        result=0;
        if(error!=1){
        switch(act){
        case '+':
            result=a+b;
            break;
        case '-':
            result=a-b;
            break;
        case '*':
            result=a*b;
            break;
        case '/':
            result=a/b;
            break;
        default:
            break;
        }
     }
    }
   }


} 最后
以上就是兴奋猫咪最近收集整理的关于自己编写的一个简单的计算器的全部内容,更多相关自己编写内容请搜索靠谱客的其他文章。


发表评论 取消回复