下面看一下在iOS如何拍照和录制视频。在iOS中要拍照和录制视频最简单的方法就是使用UIImagePickerController。UIImagePickerController继承于UINavigationController,前面的文章中主要使用它来选取照片,其实UIImagePickerController的功能不仅如此,它还可以用来拍照和录制视频。首先看一下这个类常用的属性和方法:
| 属性 | 说明 |
| @property(nonatomic) UIImagePickerControllerSourceType sourceType | 拾取源类型,sourceType是枚举类型: UIImagePickerControllerSourceTypePhotoLibrary:照片库 ,默认值 UIImagePickerControllerSourceTypeCamera:摄像头 UIImagePickerControllerSourceTypeSavedPhotosAlbum:相簿 |
| @property(nonatomic,copy) NSArray *mediaTypes | 媒体类型,默认情况下此数组包含kUTTypeImage,所以拍照时可以不用设置;但是当要录像的时候必须设置,可以设置为kUTTypeVideo(视频,但不带声音)或者kUTTypeMovie(视频并带有声音) |
| @property(nonatomic) NSTimeInterval videoMaximumDuration | 视频最大录制时长,默认为10 s |
| @property(nonatomic) UIImagePickerControllerQualityType videoQuality | 视频质量,枚举类型: UIImagePickerControllerQualityTypeHigh:高清质量 UIImagePickerControllerQualityTypeMedium:中等质量,适合WiFi传输 UIImagePickerControllerQualityTypeLow:低质量,适合蜂窝网传输 UIImagePickerControllerQualityType640x480:640*480 UIImagePickerControllerQualityTypeIFrame1280x720:1280*720 UIImagePickerControllerQualityTypeIFrame960x540:960*540 |
| @property(nonatomic) BOOL showsCameraControls | 是否显示摄像头控制面板,默认为YES |
| @property(nonatomic,retain) UIView *cameraOverlayView | 摄像头上覆盖的视图,可用通过这个视频来自定义拍照或录像界面 |
| @property(nonatomic) CGAffineTransform cameraViewTransform | 摄像头形变 |
| @property(nonatomic) UIImagePickerControllerCameraCaptureMode cameraCaptureMode | 摄像头捕获模式,捕获模式是枚举类型: UIImagePickerControllerCameraCaptureModePhoto:拍照模式 UIImagePickerControllerCameraCaptureModeVideo:视频录制模式 |
| @property(nonatomic) UIImagePickerControllerCameraDevice cameraDevice | 摄像头设备,cameraDevice是枚举类型: UIImagePickerControllerCameraDeviceRear:前置摄像头 UIImagePickerControllerCameraDeviceFront:后置摄像头 |
| @property(nonatomic) UIImagePickerControllerCameraFlashMode cameraFlashMode | 闪光灯模式,枚举类型: UIImagePickerControllerCameraFlashModeOff:关闭闪光灯 UIImagePickerControllerCameraFlashModeAuto:闪光灯自动 UIImagePickerControllerCameraFlashModeOn:打开闪光灯 |
| 类方法 | 说明 |
| + (BOOL)isSourceTypeAvailable:(UIImagePickerControllerSourceType)sourceType | 指定的源类型是否可用,sourceType是枚举类型: UIImagePickerControllerSourceTypePhotoLibrary:照片库 UIImagePickerControllerSourceTypeCamera:摄像头 UIImagePickerControllerSourceTypeSavedPhotosAlbum:相簿 |
| + (NSArray *)availableMediaTypesForSourceType:(UIImagePickerControllerSourceType)sourceType | 指定的源设备上可用的媒体类型,一般就是图片和视频 |
| + (BOOL)isCameraDeviceAvailable:(UIImagePickerControllerCameraDevice)cameraDevice | 指定的摄像头是否可用,cameraDevice是枚举类型: UIImagePickerControllerCameraDeviceRear:前置摄像头 UIImagePickerControllerCameraDeviceFront:后置摄像头 |
| + (BOOL)isFlashAvailableForCameraDevice:(UIImagePickerControllerCameraDevice)cameraDevice | 指定摄像头的闪光灯是否可用 |
| + (NSArray *)availableCaptureModesForCameraDevice:(UIImagePickerControllerCameraDevice)cameraDevice | 获得指定摄像头上的可用捕获模式,捕获模式是枚举类型: UIImagePickerControllerCameraCaptureModePhoto:拍照模式 UIImagePickerControllerCameraCaptureModeVideo:视频录制模式 |
| 对象方法 | 说明 |
| - (void)takePicture | 编程方式拍照 |
| - (BOOL)startVideoCapture | 编程方式录制视频 |
| - (void)stopVideoCapture | 编程方式停止录制视频 |
| 代理方法 | 说明 |
| - (void)imagePickerController:(UIImagePickerController *)picker didFinishPickingMediaWithInfo:(NSDictionary *)info | 媒体拾取完成 |
| - (void)imagePickerControllerDidCancel:(UIImagePickerController *)picker | 取消拾取 |
| 扩展方法(主要用于保存照片、视频到相簿) | 说明 |
| UIImageWriteToSavedPhotosAlbum(UIImage *image, id completionTarget, SEL completionSelector, void *contextInfo) | 保存照片到相簿 |
| UIVideoAtPathIsCompatibleWithSavedPhotosAlbum(NSString *videoPath) | 能否将视频保存到相簿 |
| void UISaveVideoAtPathToSavedPhotosAlbum(NSString *videoPath, id completionTarget, SEL completionSelector, void *contextInfo) | 保存视频到相簿 |
要用UIImagePickerController来拍照或者录制视频通常可以分为如下步骤:
- 创建UIImagePickerController对象。
- 指定拾取源,平时选择照片时使用的拾取源是照片库或者相簿,此刻需要指定为摄像头类型。
- 指定摄像头,前置摄像头或者后置摄像头。
- 设置媒体类型mediaType,注意如果是录像必须设置,如果是拍照此步骤可以省略,因为mediaType默认包含kUTTypeImage(注意媒体类型定义在MobileCoreServices.framework中)
- 指定捕获模式,拍照或者录制视频。(视频录制时必须先设置媒体类型再设置捕获模式
- )
- 展示UIImagePickerController(通常以模态窗口形式打开)。
- 拍照和录制视频结束后在代理方法中展示/保存照片或视频。
当然这个过程中有很多细节可以设置,例如是否显示拍照控制面板,拍照后是否允许编辑等等,通过上面的属性/方法列表相信并不难理解。下面就以一个示例展示如何使用UIImagePickerController来拍照和录制视频,下面的程序中只要将_isVideo设置为YES就是视频录制模式,录制完后在主视图控制器中自动播放;如果将_isVideo设置为NO则为拍照模式,拍照完成之后在主视图控制器中显示拍摄的照片:
//
//  ViewController.m
//  UIImagePickerController
//
//  Created by Kenshin Cui on 14/04/05.
//  Copyright (c) 2014年 cmjstudio. All rights reserved.
//

#import "ViewController.h"
#import <MobileCoreServices/MobileCoreServices.h>
#import <AVFoundation/AVFoundation.h>

@interface ViewController ()<UIImagePickerControllerDelegate,UINavigationControllerDelegate>
@property (assign,nonatomic) int isVideo;//是否录制视频,如果为1表示录制视频,0代表拍照
@property (strong,nonatomic) UIImagePickerController *imagePicker;
@property (weak, nonatomic) IBOutlet UIImageView *photo;//照片展示视图
@property (strong ,nonatomic) AVPlayer *player;//播放器,用于录制完视频后播放视频

@end

@implementation ViewController

#pragma mark - 控制器视图事件
- (void)viewDidLoad {
    [super viewDidLoad];
    //通过这里设置当前程序是拍照还是录制视频
    _isVideo=YES;
}

#pragma mark - UI事件
//点击拍照按钮
- (IBAction)takeClick:(UIButton *)sender {
    [self presentViewController:self.imagePicker animated:YES completion:nil];
}

#pragma mark - UIImagePickerController代理方法
//完成
-(void)imagePickerController:(UIImagePickerController *)picker didFinishPickingMediaWithInfo:(NSDictionary *)info{
    NSString *mediaType=[info objectForKey:UIImagePickerControllerMediaType];
    if ([mediaType isEqualToString:(NSString *)kUTTypeImage]) {//如果是拍照
        UIImage *image;
        //如果允许编辑则获得编辑后的照片,否则获取原始照片
        if (self.imagePicker.allowsEditing) {
            image=[info objectForKey:UIImagePickerControllerEditedImage];//获取编辑后的照片
        }else{
            image=[info objectForKey:UIImagePickerControllerOriginalImage];//获取原始照片
        }
        [self.photo setImage:image];//显示照片
        UIImageWriteToSavedPhotosAlbum(image, nil, nil, nil);//保存到相簿
    }else if([mediaType isEqualToString:(NSString *)kUTTypeMovie]){//如果是录制视频
        NSLog(@"video...");
        NSURL *url=[info objectForKey:UIImagePickerControllerMediaURL];//视频路径
        NSString *urlStr=[url path];
        if (UIVideoAtPathIsCompatibleWithSavedPhotosAlbum(urlStr)) {
            //保存视频到相簿,注意也可以使用ALAssetsLibrary来保存
            UISaveVideoAtPathToSavedPhotosAlbum(urlStr, self, @selector(video:didFinishSavingWithError:contextInfo:), nil);//保存视频到相簿
        }

    }

    [self dismissViewControllerAnimated:YES completion:nil];
}
-(void)imagePickerControllerDidCancel:(UIImagePickerController *)picker{
    NSLog(@"取消");
}

#pragma mark - 私有方法
-(UIImagePickerController *)imagePicker{
    if (!_imagePicker) {
        _imagePicker=[[UIImagePickerController alloc]init];
        _imagePicker.sourceType=UIImagePickerControllerSourceTypeCamera;//设置image picker的来源,这里设置为摄像头
        _imagePicker.cameraDevice=UIImagePickerControllerCameraDeviceRear;//设置使用哪个摄像头,这里设置为后置摄像头
        if (self.isVideo) {
            _imagePicker.mediaTypes=@[(NSString *)kUTTypeMovie];
            _imagePicker.videoQuality=UIImagePickerControllerQualityTypeIFrame1280x720;
            _imagePicker.cameraCaptureMode=UIImagePickerControllerCameraCaptureModeVideo;//设置摄像头模式(拍照,录制视频)

        }else{
            _imagePicker.cameraCaptureMode=UIImagePickerControllerCameraCaptureModePhoto;
        }
        _imagePicker.allowsEditing=YES;//允许编辑
        _imagePicker.delegate=self;//设置代理,检测操作
    }
    return _imagePicker;
}

//视频保存后的回调
- (void)video:(NSString *)videoPath didFinishSavingWithError:(NSError *)error contextInfo:(void *)contextInfo{
    if (error) {
        NSLog(@"保存视频过程中发生错误,错误信息:%@",error.localizedDescription);
    }else{
        NSLog(@"视频保存成功.");
        //录制完之后自动播放
        NSURL *url=[NSURL fileURLWithPath:videoPath];
        _player=[AVPlayer playerWithURL:url];
        AVPlayerLayer *playerLayer=[AVPlayerLayer playerLayerWithPlayer:_player];
        playerLayer.frame=self.photo.frame;
        [self.photo.layer addSublayer:playerLayer];
        [_player play];

    }
}
@end
运行效果(视频录制):
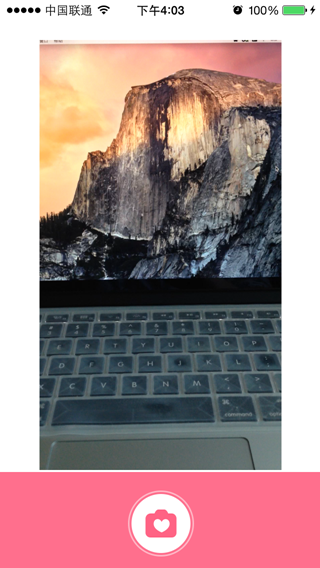
AVFoundation拍照和录制视频
不得不说UIImagePickerController确实强大,但是与MPMoviePlayerController类似,由于它的高度封装性,要进行某些自定义工作就比较复杂了。例如要做出一款类似于美颜相机的拍照界面就比较难以实现了,此时就可以考虑使用AVFoundation来实现。AVFoundation中提供了很多现成的播放器和录音机,但是事实上它还有更加底层的内容可以供开发者使用。因为AVFoundation中抽了很多和底层输入、输出设备打交道的类,依靠这些类开发人员面对的不再是封装好的音频播放器AVAudioPlayer、录音机(AVAudioRecorder)、视频(包括音频)播放器AVPlayer,而是输入设备(例如麦克风、摄像头)、输出设备(图片、视频)等。首先了解一下使用AVFoundation做拍照和视频录制开发用到的相关类:
AVCaptureSession:媒体(音、视频)捕获会话,负责把捕获的音视频数据输出到输出设备中。一个AVCaptureSession可以有多个输入输出:
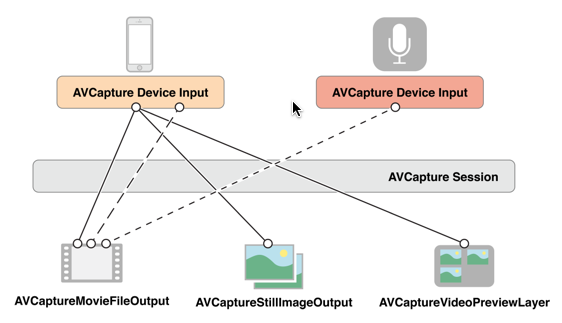
AVCaptureDevice:输入设备,包括麦克风、摄像头,通过该对象可以设置物理设备的一些属性(例如相机聚焦、白平衡等)。
AVCaptureDeviceInput:设备输入数据管理对象,可以根据AVCaptureDevice创建对应的AVCaptureDeviceInput对象,该对象将会被添加到AVCaptureSession中管理。
AVCaptureOutput:输出数据管理对象,用于接收各类输出数据,通常使用对应的子类AVCaptureAudioDataOutput、AVCaptureStillImageOutput、AVCaptureVideoDataOutput、AVCaptureFileOutput,该对象将会被添加到AVCaptureSession中管理。注意:前面几个对象的输出数据都是NSData类型,而AVCaptureFileOutput代表数据以文件形式输出,类似的,AVCcaptureFileOutput也不会直接创建使用,通常会使用其子类:AVCaptureAudioFileOutput、AVCaptureMovieFileOutput。当把一个输入或者输出添加到AVCaptureSession之后AVCaptureSession就会在所有相符的输入、输出设备之间建立连接(AVCaptionConnection):
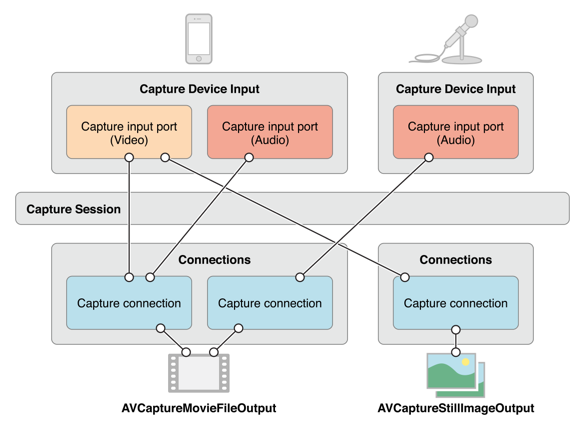
AVCaptureVideoPreviewLayer:相机拍摄预览图层,是CALayer的子类,使用该对象可以实时查看拍照或视频录制效果,创建该对象需要指定对应的AVCaptureSession对象。
使用AVFoundation拍照和录制视频的一般步骤如下:
- 创建AVCaptureSession对象。
- 使用AVCaptureDevice的静态方法获得需要使用的设备,例如拍照和录像就需要获得摄像头设备,录音就要获得麦克风设备。
- 利用输入设备AVCaptureDevice初始化AVCaptureDeviceInput对象。
- 初始化输出数据管理对象,如果要拍照就初始化AVCaptureStillImageOutput对象;如果拍摄视频就初始化AVCaptureMovieFileOutput对象。
- 将数据输入对象AVCaptureDeviceInput、数据输出对象AVCaptureOutput添加到媒体会话管理对象AVCaptureSession中。
- 创建视频预览图层AVCaptureVideoPreviewLayer并指定媒体会话,添加图层到显示容器中,调用AVCaptureSession的startRuning方法开始捕获。
- 将捕获的音频或视频数据输出到指定文件。
拍照
下面看一下如何使用AVFoundation实现一个拍照程序,在这个程序中将实现摄像头预览、切换前后摄像头、闪光灯设置、对焦、拍照保存等功能。应用大致效果如下:
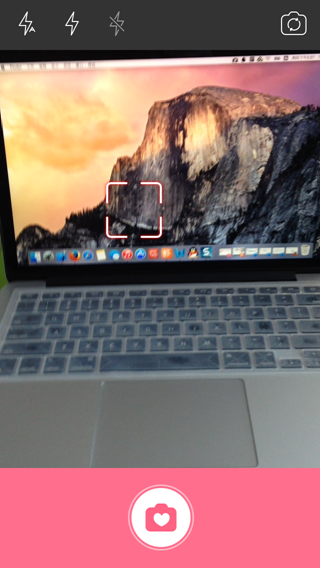
在程序中定义会话、输入、输出等相关对象。
@interface ViewController ()
@property (strong,nonatomic) AVCaptureSession *captureSession;//负责输入和输出设备之间的数据传递
@property (strong,nonatomic) AVCaptureDeviceInput *captureDeviceInput;//负责从AVCaptureDevice获得输入数据
@property (strong,nonatomic) AVCaptureStillImageOutput *captureStillImageOutput;//照片输出流
@property (strong,nonatomic) AVCaptureVideoPreviewLayer *captureVideoPreviewLayer;//相机拍摄预览图层
@property (weak, nonatomic) IBOutlet UIView *viewContainer;
@property (weak, nonatomic) IBOutlet UIButton *takeButton;//拍照按钮
@property (weak, nonatomic) IBOutlet UIButton *flashAutoButton;//自动闪光灯按钮
@property (weak, nonatomic) IBOutlet UIButton *flashOnButton;//打开闪光灯按钮
@property (weak, nonatomic) IBOutlet UIButton *flashOffButton;//关闭闪光灯按钮
@property (weak, nonatomic) IBOutlet UIImageView *focusCursor; //聚焦光标
@end
在控制器视图将要展示时创建并初始化会话、摄像头设备、输入、输出、预览图层,并且添加预览图层到视图中,除此之外还做了一些初始化工作,例如添加手势(点击屏幕进行聚焦)、初始化界面等。
-(void)viewWillAppear:(BOOL)animated{
    [super viewWillAppear:animated];
    //初始化会话
    _captureSession=[[AVCaptureSession alloc]init];
    if ([_captureSession canSetSessionPreset:AVCaptureSessionPreset1280x720]) {//设置分辨率
        _captureSession.sessionPreset=AVCaptureSessionPreset1280x720;
    }
    //获得输入设备
    AVCaptureDevice *captureDevice=[self getCameraDeviceWithPosition:AVCaptureDevicePositionBack];//取得后置摄像头
    if (!captureDevice) {
        NSLog(@"取得后置摄像头时出现问题.");
        return;
    }

    NSError *error=nil;
    //根据输入设备初始化设备输入对象,用于获得输入数据
    _captureDeviceInput=[[AVCaptureDeviceInput alloc]initWithDevice:captureDevice error:&error];
    if (error) {
        NSLog(@"取得设备输入对象时出错,错误原因:%@",error.localizedDescription);
        return;
    }
    //初始化设备输出对象,用于获得输出数据
    _captureStillImageOutput=[[AVCaptureStillImageOutput alloc]init];
    NSDictionary *outputSettings = @{AVVideoCodecKey:AVVideoCodecJPEG};
    [_captureStillImageOutput setOutputSettings:outputSettings];//输出设置

    //将设备输入添加到会话中
    if ([_captureSession canAddInput:_captureDeviceInput]) {
        [_captureSession addInput:_captureDeviceInput];
    }

    //将设备输出添加到会话中
    if ([_captureSession canAddOutput:_captureStillImageOutput]) {
        [_captureSession addOutput:_captureStillImageOutput];
    }

    //创建视频预览层,用于实时展示摄像头状态
    _captureVideoPreviewLayer=[[AVCaptureVideoPreviewLayer alloc]initWithSession:self.captureSession];

    CALayer *layer=self.viewContainer.layer;
    layer.masksToBounds=YES;

    _captureVideoPreviewLayer.frame=layer.bounds;
    _captureVideoPreviewLayer.videoGravity=AVLayerVideoGravityResizeAspectFill;//填充模式
    //将视频预览层添加到界面中
    //[layer addSublayer:_captureVideoPreviewLayer];
    [layer insertSublayer:_captureVideoPreviewLayer below:self.focusCursor.layer];

    [self addNotificationToCaptureDevice:captureDevice];
    [self addGenstureRecognizer];
    [self setFlashModeButtonStatus];
}
在控制器视图展示和视图离开界面时启动、停止会话。
-(void)viewDidAppear:(BOOL)animated{
    [super viewDidAppear:animated];
    [self.captureSession startRunning];
}

-(void)viewDidDisappear:(BOOL)animated{
    [super viewDidDisappear:animated];
    [self.captureSession stopRunning];
}
定义闪光灯开闭及自动模式功能,注意无论是设置闪光灯、白平衡还是其他输入设备属性,在设置之前必须先锁定配置,修改完后解锁。
/**
 *  改变设备属性的统一操作方法
 *
 *  @param propertyChange 属性改变操作
 */
-(void)changeDeviceProperty:(PropertyChangeBlock)propertyChange{
    AVCaptureDevice *captureDevice= [self.captureDeviceInput device];
    NSError *error;
    //注意改变设备属性前一定要首先调用lockForConfiguration:调用完之后使用unlockForConfiguration方法解锁
    if ([captureDevice lockForConfiguration:&error]) {
        propertyChange(captureDevice);
        [captureDevice unlockForConfiguration];
    }else{
        NSLog(@"设置设备属性过程发生错误,错误信息:%@",error.localizedDescription);
    }
}

/**
 *  设置闪光灯模式
 *
 *  @param flashMode 闪光灯模式
 */
-(void)setFlashMode:(AVCaptureFlashMode )flashMode{
    [self changeDeviceProperty:^(AVCaptureDevice *captureDevice) {
        if ([captureDevice isFlashModeSupported:flashMode]) {
            [captureDevice setFlashMode:flashMode];
        }
    }];
}
定义切换摄像头功能,切换摄像头的过程就是将原有输入移除,在会话中添加新的输入,但是注意动态修改会话需要首先开启配置,配置成功后提交配置。
#pragma mark 切换前后摄像头
- (IBAction)toggleButtonClick:(UIButton *)sender {
    AVCaptureDevice *currentDevice=[self.captureDeviceInput device];
    AVCaptureDevicePosition currentPosition=[currentDevice position];
    [self removeNotificationFromCaptureDevice:currentDevice];
    AVCaptureDevice *toChangeDevice;
    AVCaptureDevicePosition toChangePosition=AVCaptureDevicePositionFront;
    if (currentPosition==AVCaptureDevicePositionUnspecified||currentPosition==AVCaptureDevicePositionFront) {
        toChangePosition=AVCaptureDevicePositionBack;
    }
    toChangeDevice=[self getCameraDeviceWithPosition:toChangePosition];
    [self addNotificationToCaptureDevice:toChangeDevice];
    //获得要调整的设备输入对象
    AVCaptureDeviceInput *toChangeDeviceInput=[[AVCaptureDeviceInput alloc]initWithDevice:toChangeDevice error:nil];

    //改变会话的配置前一定要先开启配置,配置完成后提交配置改变
    [self.captureSession beginConfiguration];
    //移除原有输入对象
    [self.captureSession removeInput:self.captureDeviceInput];
    //添加新的输入对象
    if ([self.captureSession canAddInput:toChangeDeviceInput]) {
        [self.captureSession addInput:toChangeDeviceInput];
        self.captureDeviceInput=toChangeDeviceInput;
    }
    //提交会话配置
    [self.captureSession commitConfiguration];

    [self setFlashModeButtonStatus];
}
添加点击手势操作,点按预览视图时进行聚焦、白平衡设置。
/**
 *  设置聚焦点
 *
 *  @param point 聚焦点
 */
-(void)focusWithMode:(AVCaptureFocusMode)focusMode exposureMode:(AVCaptureExposureMode)exposureMode atPoint:(CGPoint)point{
    [self changeDeviceProperty:^(AVCaptureDevice *captureDevice) {
        if ([captureDevice isFocusModeSupported:focusMode]) {
            [captureDevice setFocusMode:AVCaptureFocusModeAutoFocus];
        }
        if ([captureDevice isFocusPointOfInterestSupported]) {
            [captureDevice setFocusPointOfInterest:point];
        }
        if ([captureDevice isExposureModeSupported:exposureMode]) {
            [captureDevice setExposureMode:AVCaptureExposureModeAutoExpose];
        }
        if ([captureDevice isExposurePointOfInterestSupported]) {
            [captureDevice setExposurePointOfInterest:point];
        }
    }];
}

/**
 *  添加点按手势,点按时聚焦
 */
-(void)addGenstureRecognizer{
    UITapGestureRecognizer *tapGesture=[[UITapGestureRecognizer alloc]initWithTarget:self action:@selector(tapScreen:)];
    [self.viewContainer addGestureRecognizer:tapGesture];
}
-(void)tapScreen:(UITapGestureRecognizer *)tapGesture{
    CGPoint point= [tapGesture locationInView:self.viewContainer];
    //将UI坐标转化为摄像头坐标
    CGPoint cameraPoint= [self.captureVideoPreviewLayer captureDevicePointOfInterestForPoint:point];
    [self setFocusCursorWithPoint:point];
    [self focusWithMode:AVCaptureFocusModeAutoFocus exposureMode:AVCaptureExposureModeAutoExpose atPoint:cameraPoint];
}
定义拍照功能,拍照的过程就是获取连接,从连接中获得捕获的输出数据并做保存操作。
#pragma mark 拍照
- (IBAction)takeButtonClick:(UIButton *)sender {
    //根据设备输出获得连接
    AVCaptureConnection *captureConnection=[self.captureStillImageOutput connectionWithMediaType:AVMediaTypeVideo];
    //根据连接取得设备输出的数据
    [self.captureStillImageOutput captureStillImageAsynchronouslyFromConnection:captureConnection completionHandler:^(CMSampleBufferRef imageDataSampleBuffer, NSError *error) {
        if (imageDataSampleBuffer) {
            NSData *imageData=[AVCaptureStillImageOutput jpegStillImageNSDataRepresentation:imageDataSampleBuffer];
            UIImage *image=[UIImage imageWithData:imageData];
            UIImageWriteToSavedPhotosAlbum(image, nil, nil, nil);
//            ALAssetsLibrary *assetsLibrary=[[ALAssetsLibrary alloc]init];
//            [assetsLibrary writeImageToSavedPhotosAlbum:[image CGImage] orientation:(ALAssetOrientation)[image imageOrientation] completionBlock:nil];
        }

    }];
}
最后附上完整代码:
//
//  ViewController.m
//  AVFoundationCamera
//
//  Created by Kenshin Cui on 14/04/05.
//  Copyright (c) 2014年 cmjstudio. All rights reserved.
//

#import "ViewController.h"
#import <AVFoundation/AVFoundation.h>
#import <AssetsLibrary/AssetsLibrary.h>
typedef void(^PropertyChangeBlock)(AVCaptureDevice *captureDevice);

@interface ViewController ()

@property (strong,nonatomic) AVCaptureSession *captureSession;//负责输入和输出设备之间的数据传递
@property (strong,nonatomic) AVCaptureDeviceInput *captureDeviceInput;//负责从AVCaptureDevice获得输入数据
@property (strong,nonatomic) AVCaptureStillImageOutput *captureStillImageOutput;//照片输出流
@property (strong,nonatomic) AVCaptureVideoPreviewLayer *captureVideoPreviewLayer;//相机拍摄预览图层
@property (weak, nonatomic) IBOutlet UIView *viewContainer;
@property (weak, nonatomic) IBOutlet UIButton *takeButton;//拍照按钮
@property (weak, nonatomic) IBOutlet UIButton *flashAutoButton;//自动闪光灯按钮
@property (weak, nonatomic) IBOutlet UIButton *flashOnButton;//打开闪光灯按钮
@property (weak, nonatomic) IBOutlet UIButton *flashOffButton;//关闭闪光灯按钮
@property (weak, nonatomic) IBOutlet UIImageView *focusCursor; //聚焦光标


@end

@implementation ViewController

#pragma mark - 控制器视图方法
- (void)viewDidLoad {
    [super viewDidLoad];

}

-(void)viewWillAppear:(BOOL)animated{
    [super viewWillAppear:animated];
    //初始化会话
    _captureSession=[[AVCaptureSession alloc]init];
    if ([_captureSession canSetSessionPreset:AVCaptureSessionPreset1280x720]) {//设置分辨率
        _captureSession.sessionPreset=AVCaptureSessionPreset1280x720;
    }
    //获得输入设备
    AVCaptureDevice *captureDevice=[self getCameraDeviceWithPosition:AVCaptureDevicePositionBack];//取得后置摄像头
    if (!captureDevice) {
        NSLog(@"取得后置摄像头时出现问题.");
        return;
    }

    NSError *error=nil;
    //根据输入设备初始化设备输入对象,用于获得输入数据
    _captureDeviceInput=[[AVCaptureDeviceInput alloc]initWithDevice:captureDevice error:&error];
    if (error) {
        NSLog(@"取得设备输入对象时出错,错误原因:%@",error.localizedDescription);
        return;
    }
    //初始化设备输出对象,用于获得输出数据
    _captureStillImageOutput=[[AVCaptureStillImageOutput alloc]init];
    NSDictionary *outputSettings = @{AVVideoCodecKey:AVVideoCodecJPEG};
    [_captureStillImageOutput setOutputSettings:outputSettings];//输出设置

    //将设备输入添加到会话中
    if ([_captureSession canAddInput:_captureDeviceInput]) {
        [_captureSession addInput:_captureDeviceInput];
    }

    //将设备输出添加到会话中
    if ([_captureSession canAddOutput:_captureStillImageOutput]) {
        [_captureSession addOutput:_captureStillImageOutput];
    }

    //创建视频预览层,用于实时展示摄像头状态
    _captureVideoPreviewLayer=[[AVCaptureVideoPreviewLayer alloc]initWithSession:self.captureSession];

    CALayer *layer=self.viewContainer.layer;
    layer.masksToBounds=YES;

    _captureVideoPreviewLayer.frame=layer.bounds;
    _captureVideoPreviewLayer.videoGravity=AVLayerVideoGravityResizeAspectFill;//填充模式
    //将视频预览层添加到界面中
    //[layer addSublayer:_captureVideoPreviewLayer];
    [layer insertSublayer:_captureVideoPreviewLayer below:self.focusCursor.layer];

    [self addNotificationToCaptureDevice:captureDevice];
    [self addGenstureRecognizer];
    [self setFlashModeButtonStatus];
}

-(void)viewDidAppear:(BOOL)animated{
    [super viewDidAppear:animated];
    [self.captureSession startRunning];
}

-(void)viewDidDisappear:(BOOL)animated{
    [super viewDidDisappear:animated];
    [self.captureSession stopRunning];
}

-(void)dealloc{
    [self removeNotification];
}
#pragma mark - UI方法
#pragma mark 拍照
- (IBAction)takeButtonClick:(UIButton *)sender {
    //根据设备输出获得连接
    AVCaptureConnection *captureConnection=[self.captureStillImageOutput connectionWithMediaType:AVMediaTypeVideo];
    //根据连接取得设备输出的数据
    [self.captureStillImageOutput captureStillImageAsynchronouslyFromConnection:captureConnection completionHandler:^(CMSampleBufferRef imageDataSampleBuffer, NSError *error) {
        if (imageDataSampleBuffer) {
            NSData *imageData=[AVCaptureStillImageOutput jpegStillImageNSDataRepresentation:imageDataSampleBuffer];
            UIImage *image=[UIImage imageWithData:imageData];
            UIImageWriteToSavedPhotosAlbum(image, nil, nil, nil);
//            ALAssetsLibrary *assetsLibrary=[[ALAssetsLibrary alloc]init];
//            [assetsLibrary writeImageToSavedPhotosAlbum:[image CGImage] orientation:(ALAssetOrientation)[image imageOrientation] completionBlock:nil];
        }

    }];
}
#pragma mark 切换前后摄像头
- (IBAction)toggleButtonClick:(UIButton *)sender {
    AVCaptureDevice *currentDevice=[self.captureDeviceInput device];
    AVCaptureDevicePosition currentPosition=[currentDevice position];
    [self removeNotificationFromCaptureDevice:currentDevice];
    AVCaptureDevice *toChangeDevice;
    AVCaptureDevicePosition toChangePosition=AVCaptureDevicePositionFront;
    if (currentPosition==AVCaptureDevicePositionUnspecified||currentPosition==AVCaptureDevicePositionFront) {
        toChangePosition=AVCaptureDevicePositionBack;
    }
    toChangeDevice=[self getCameraDeviceWithPosition:toChangePosition];
    [self addNotificationToCaptureDevice:toChangeDevice];
    //获得要调整的设备输入对象
    AVCaptureDeviceInput *toChangeDeviceInput=[[AVCaptureDeviceInput alloc]initWithDevice:toChangeDevice error:nil];

    //改变会话的配置前一定要先开启配置,配置完成后提交配置改变
    [self.captureSession beginConfiguration];
    //移除原有输入对象
    [self.captureSession removeInput:self.captureDeviceInput];
    //添加新的输入对象
    if ([self.captureSession canAddInput:toChangeDeviceInput]) {
        [self.captureSession addInput:toChangeDeviceInput];
        self.captureDeviceInput=toChangeDeviceInput;
    }
    //提交会话配置
    [self.captureSession commitConfiguration];

    [self setFlashModeButtonStatus];
}

#pragma mark 自动闪光灯开启
- (IBAction)flashAutoClick:(UIButton *)sender {
    [self setFlashMode:AVCaptureFlashModeAuto];
    [self setFlashModeButtonStatus];
}
#pragma mark 打开闪光灯
- (IBAction)flashOnClick:(UIButton *)sender {
    [self setFlashMode:AVCaptureFlashModeOn];
    [self setFlashModeButtonStatus];
}
#pragma mark 关闭闪光灯
- (IBAction)flashOffClick:(UIButton *)sender {
    [self setFlashMode:AVCaptureFlashModeOff];
    [self setFlashModeButtonStatus];
}

#pragma mark - 通知
/**
 *  给输入设备添加通知
 */
-(void)addNotificationToCaptureDevice:(AVCaptureDevice *)captureDevice{
    //注意添加区域改变捕获通知必须首先设置设备允许捕获
    [self changeDeviceProperty:^(AVCaptureDevice *captureDevice) {
        captureDevice.subjectAreaChangeMonitoringEnabled=YES;
    }];
    NSNotificationCenter *notificationCenter= [NSNotificationCenter defaultCenter];
    //捕获区域发生改变
    [notificationCenter addObserver:self selector:@selector(areaChange:) name:AVCaptureDeviceSubjectAreaDidChangeNotification object:captureDevice];
}
-(void)removeNotificationFromCaptureDevice:(AVCaptureDevice *)captureDevice{
    NSNotificationCenter *notificationCenter= [NSNotificationCenter defaultCenter];
    [notificationCenter removeObserver:self name:AVCaptureDeviceSubjectAreaDidChangeNotification object:captureDevice];
}
/**
 *  移除所有通知
 */
-(void)removeNotification{
    NSNotificationCenter *notificationCenter= [NSNotificationCenter defaultCenter];
    [notificationCenter removeObserver:self];
}

-(void)addNotificationToCaptureSession:(AVCaptureSession *)captureSession{
    NSNotificationCenter *notificationCenter= [NSNotificationCenter defaultCenter];
    //会话出错
    [notificationCenter addObserver:self selector:@selector(sessionRuntimeError:) name:AVCaptureSessionRuntimeErrorNotification object:captureSession];
}

/**
 *  设备连接成功
 *
 *  @param notification 通知对象
 */
-(void)deviceConnected:(NSNotification *)notification{
    NSLog(@"设备已连接...");
}
/**
 *  设备连接断开
 *
 *  @param notification 通知对象
 */
-(void)deviceDisconnected:(NSNotification *)notification{
    NSLog(@"设备已断开.");
}
/**
 *  捕获区域改变
 *
 *  @param notification 通知对象
 */
-(void)areaChange:(NSNotification *)notification{
    NSLog(@"捕获区域改变...");
}

/**
 *  会话出错
 *
 *  @param notification 通知对象
 */
-(void)sessionRuntimeError:(NSNotification *)notification{
    NSLog(@"会话发生错误.");
}

#pragma mark - 私有方法

/**
 *  取得指定位置的摄像头
 *
 *  @param position 摄像头位置
 *
 *  @return 摄像头设备
 */
-(AVCaptureDevice *)getCameraDeviceWithPosition:(AVCaptureDevicePosition )position{
    NSArray *cameras= [AVCaptureDevice devicesWithMediaType:AVMediaTypeVideo];
    for (AVCaptureDevice *camera in cameras) {
        if ([camera position]==position) {
            return camera;
        }
    }
    return nil;
}

/**
 *  改变设备属性的统一操作方法
 *
 *  @param propertyChange 属性改变操作
 */
-(void)changeDeviceProperty:(PropertyChangeBlock)propertyChange{
    AVCaptureDevice *captureDevice= [self.captureDeviceInput device];
    NSError *error;
    //注意改变设备属性前一定要首先调用lockForConfiguration:调用完之后使用unlockForConfiguration方法解锁
    if ([captureDevice lockForConfiguration:&error]) {
        propertyChange(captureDevice);
        [captureDevice unlockForConfiguration];
    }else{
        NSLog(@"设置设备属性过程发生错误,错误信息:%@",error.localizedDescription);
    }
}

/**
 *  设置闪光灯模式
 *
 *  @param flashMode 闪光灯模式
 */
-(void)setFlashMode:(AVCaptureFlashMode )flashMode{
    [self changeDeviceProperty:^(AVCaptureDevice *captureDevice) {
        if ([captureDevice isFlashModeSupported:flashMode]) {
            [captureDevice setFlashMode:flashMode];
        }
    }];
}
/**
 *  设置聚焦模式
 *
 *  @param focusMode 聚焦模式
 */
-(void)setFocusMode:(AVCaptureFocusMode )focusMode{
    [self changeDeviceProperty:^(AVCaptureDevice *captureDevice) {
        if ([captureDevice isFocusModeSupported:focusMode]) {
            [captureDevice setFocusMode:focusMode];
        }
    }];
}
/**
 *  设置曝光模式
 *
 *  @param exposureMode 曝光模式
 */
-(void)setExposureMode:(AVCaptureExposureMode)exposureMode{
    [self changeDeviceProperty:^(AVCaptureDevice *captureDevice) {
        if ([captureDevice isExposureModeSupported:exposureMode]) {
            [captureDevice setExposureMode:exposureMode];
        }
    }];
}
/**
 *  设置聚焦点
 *
 *  @param point 聚焦点
 */
-(void)focusWithMode:(AVCaptureFocusMode)focusMode exposureMode:(AVCaptureExposureMode)exposureMode atPoint:(CGPoint)point{
    [self changeDeviceProperty:^(AVCaptureDevice *captureDevice) {
        if ([captureDevice isFocusModeSupported:focusMode]) {
            [captureDevice setFocusMode:AVCaptureFocusModeAutoFocus];
        }
        if ([captureDevice isFocusPointOfInterestSupported]) {
            [captureDevice setFocusPointOfInterest:point];
        }
        if ([captureDevice isExposureModeSupported:exposureMode]) {
            [captureDevice setExposureMode:AVCaptureExposureModeAutoExpose];
        }
        if ([captureDevice isExposurePointOfInterestSupported]) {
            [captureDevice setExposurePointOfInterest:point];
        }
    }];
}

/**
 *  添加点按手势,点按时聚焦
 */
-(void)addGenstureRecognizer{
    UITapGestureRecognizer *tapGesture=[[UITapGestureRecognizer alloc]initWithTarget:self action:@selector(tapScreen:)];
    [self.viewContainer addGestureRecognizer:tapGesture];
}
-(void)tapScreen:(UITapGestureRecognizer *)tapGesture{
    CGPoint point= [tapGesture locationInView:self.viewContainer];
    //将UI坐标转化为摄像头坐标
    CGPoint cameraPoint= [self.captureVideoPreviewLayer captureDevicePointOfInterestForPoint:point];
    [self setFocusCursorWithPoint:point];
    [self focusWithMode:AVCaptureFocusModeAutoFocus exposureMode:AVCaptureExposureModeAutoExpose atPoint:cameraPoint];
}

/**
 *  设置闪光灯按钮状态
 */
-(void)setFlashModeButtonStatus{
    AVCaptureDevice *captureDevice=[self.captureDeviceInput device];
    AVCaptureFlashMode flashMode=captureDevice.flashMode;
    if([captureDevice isFlashAvailable]){
        self.flashAutoButton.hidden=NO;
        self.flashOnButton.hidden=NO;
        self.flashOffButton.hidden=NO;
        self.flashAutoButton.enabled=YES;
        self.flashOnButton.enabled=YES;
        self.flashOffButton.enabled=YES;
        switch (flashMode) {
            case AVCaptureFlashModeAuto:
                self.flashAutoButton.enabled=NO;
                break;
            case AVCaptureFlashModeOn:
                self.flashOnButton.enabled=NO;
                break;
            case AVCaptureFlashModeOff:
                self.flashOffButton.enabled=NO;
                break;
            default:
                break;
        }
    }else{
        self.flashAutoButton.hidden=YES;
        self.flashOnButton.hidden=YES;
        self.flashOffButton.hidden=YES;
    }
}

/**
 *  设置聚焦光标位置
 *
 *  @param point 光标位置
 */
-(void)setFocusCursorWithPoint:(CGPoint)point{
    self.focusCursor.center=point;
    self.focusCursor.transform=CGAffineTransformMakeScale(1.5, 1.5);
    self.focusCursor.alpha=1.0;
    [UIView animateWithDuration:1.0 animations:^{
        self.focusCursor.transform=CGAffineTransformIdentity;
    } completion:^(BOOL finished) {
        self.focusCursor.alpha=0;

    }];
}
@end
运行效果:
视频录制
其实有了前面的拍照应用之后要在此基础上做视频录制功能并不复杂,程序只需要做如下修改:
- 添加一个音频输入到会话(使用[[AVCaptureDevice devicesWithMediaType:AVMediaTypeAudio] firstObject]获得输入设备,然后根据此输入设备创建一个设备输入对象),在拍照程序中已经添加了视频输入所以此时不需要添加视频输入。
- 创建一个音乐播放文件输出对象AVCaptureMovieFileOutput取代原来的照片输出对象。
- 将捕获到的视频数据写入到临时文件并在停止录制之后保存到相簿(通过AVCaptureMovieFileOutput的代理方法)。
相比拍照程序,程序的修改主要就是以上三点。当然为了让程序更加完善在下面的视频录制程序中加入了屏幕旋转视频、自动布局和后台保存任务等细节。下面是修改后的程序:
//
//  ViewController.m
//  AVFoundationCamera
//
//  Created by Kenshin Cui on 14/04/05.
//  Copyright (c) 2014年 cmjstudio. All rights reserved.
//  视频录制

#import "ViewController.h"
#import <AVFoundation/AVFoundation.h>
#import <AssetsLibrary/AssetsLibrary.h>
typedef void(^PropertyChangeBlock)(AVCaptureDevice *captureDevice);

@interface ViewController ()<AVCaptureFileOutputRecordingDelegate>//视频文件输出代理

@property (strong,nonatomic) AVCaptureSession *captureSession;//负责输入和输出设备之间的数据传递
@property (strong,nonatomic) AVCaptureDeviceInput *captureDeviceInput;//负责从AVCaptureDevice获得输入数据
@property (strong,nonatomic) AVCaptureMovieFileOutput *captureMovieFileOutput;//视频输出流
@property (strong,nonatomic) AVCaptureVideoPreviewLayer *captureVideoPreviewLayer;//相机拍摄预览图层
@property (assign,nonatomic) BOOL enableRotation;//是否允许旋转(注意在视频录制过程中禁止屏幕旋转)
@property (assign,nonatomic) CGRect *lastBounds;//旋转的前大小
@property (assign,nonatomic) UIBackgroundTaskIdentifier backgroundTaskIdentifier;//后台任务标识
@property (weak, nonatomic) IBOutlet UIView *viewContainer;
@property (weak, nonatomic) IBOutlet UIButton *takeButton;//拍照按钮
@property (weak, nonatomic) IBOutlet UIImageView *focusCursor; //聚焦光标


@end

@implementation ViewController

#pragma mark - 控制器视图方法
- (void)viewDidLoad {
    [super viewDidLoad];
}

-(void)viewWillAppear:(BOOL)animated{
    [super viewWillAppear:animated];
    //初始化会话
    _captureSession=[[AVCaptureSession alloc]init];
    if ([_captureSession canSetSessionPreset:AVCaptureSessionPreset1280x720]) {//设置分辨率
        _captureSession.sessionPreset=AVCaptureSessionPreset1280x720;
    }
    //获得输入设备
    AVCaptureDevice *captureDevice=[self getCameraDeviceWithPosition:AVCaptureDevicePositionBack];//取得后置摄像头
    if (!captureDevice) {
        NSLog(@"取得后置摄像头时出现问题.");
        return;
    }
    //添加一个音频输入设备
    AVCaptureDevice *audioCaptureDevice=[[AVCaptureDevice devicesWithMediaType:AVMediaTypeAudio] firstObject];


    NSError *error=nil;
    //根据输入设备初始化设备输入对象,用于获得输入数据
    _captureDeviceInput=[[AVCaptureDeviceInput alloc]initWithDevice:captureDevice error:&error];
    if (error) {
        NSLog(@"取得设备输入对象时出错,错误原因:%@",error.localizedDescription);
        return;
    }
    AVCaptureDeviceInput *audioCaptureDeviceInput=[[AVCaptureDeviceInput alloc]initWithDevice:audioCaptureDevice error:&error];
    if (error) {
        NSLog(@"取得设备输入对象时出错,错误原因:%@",error.localizedDescription);
        return;
    }
    //初始化设备输出对象,用于获得输出数据
    _captureMovieFileOutput=[[AVCaptureMovieFileOutput alloc]init];

    //将设备输入添加到会话中
    if ([_captureSession canAddInput:_captureDeviceInput]) {
        [_captureSession addInput:_captureDeviceInput];
        [_captureSession addInput:audioCaptureDeviceInput];
        AVCaptureConnection *captureConnection=[_captureMovieFileOutput connectionWithMediaType:AVMediaTypeVideo];
        if ([captureConnection isVideoStabilizationSupported ]) {
            captureConnection.preferredVideoStabilizationMode=AVCaptureVideoStabilizationModeAuto;
        }
    }

    //将设备输出添加到会话中
    if ([_captureSession canAddOutput:_captureMovieFileOutput]) {
        [_captureSession addOutput:_captureMovieFileOutput];
    }

    //创建视频预览层,用于实时展示摄像头状态
    _captureVideoPreviewLayer=[[AVCaptureVideoPreviewLayer alloc]initWithSession:self.captureSession];

    CALayer *layer=self.viewContainer.layer;
    layer.masksToBounds=YES;

    _captureVideoPreviewLayer.frame=layer.bounds;
    _captureVideoPreviewLayer.videoGravity=AVLayerVideoGravityResizeAspectFill;//填充模式
    //将视频预览层添加到界面中
    //[layer addSublayer:_captureVideoPreviewLayer];
    [layer insertSublayer:_captureVideoPreviewLayer below:self.focusCursor.layer];

    _enableRotation=YES;
    [self addNotificationToCaptureDevice:captureDevice];
    [self addGenstureRecognizer];
}

-(void)viewDidAppear:(BOOL)animated{
    [super viewDidAppear:animated];
    [self.captureSession startRunning];
}

-(void)viewDidDisappear:(BOOL)animated{
    [super viewDidDisappear:animated];
    [self.captureSession stopRunning];
}

-(BOOL)shouldAutorotate{
    return self.enableRotation;
}

屏幕旋转时调整视频预览图层的方向
//-(void)willTransitionToTraitCollection:(UITraitCollection *)newCollection withTransitionCoordinator:(id<UIViewControllerTransitionCoordinator>)coordinator{
//    [super willTransitionToTraitCollection:newCollection withTransitionCoordinator:coordinator];
    NSLog(@"%i,%i",newCollection.verticalSizeClass,newCollection.horizontalSizeClass);
//    UIInterfaceOrientation orientation = [[UIApplication sharedApplication] statusBarOrientation];
//    NSLog(@"%i",orientation);
//    AVCaptureConnection *captureConnection=[self.captureVideoPreviewLayer connection];
//    captureConnection.videoOrientation=orientation;
//
//}
//屏幕旋转时调整视频预览图层的方向
-(void)willRotateToInterfaceOrientation:(UIInterfaceOrientation)toInterfaceOrientation duration:(NSTimeInterval)duration{
    AVCaptureConnection *captureConnection=[self.captureVideoPreviewLayer connection];
    captureConnection.videoOrientation=(AVCaptureVideoOrientation)toInterfaceOrientation;
}
//旋转后重新设置大小
-(void)didRotateFromInterfaceOrientation:(UIInterfaceOrientation)fromInterfaceOrientation{
    _captureVideoPreviewLayer.frame=self.viewContainer.bounds;
}

-(void)dealloc{
    [self removeNotification];
}
#pragma mark - UI方法
#pragma mark 视频录制
- (IBAction)takeButtonClick:(UIButton *)sender {
    //根据设备输出获得连接
    AVCaptureConnection *captureConnection=[self.captureMovieFileOutput connectionWithMediaType:AVMediaTypeVideo];
    //根据连接取得设备输出的数据
    if (![self.captureMovieFileOutput isRecording]) {
        self.enableRotation=NO;
        //如果支持多任务则则开始多任务
        if ([[UIDevice currentDevice] isMultitaskingSupported]) {
            self.backgroundTaskIdentifier=[[UIApplication sharedApplication] beginBackgroundTaskWithExpirationHandler:nil];
        }
        //预览图层和视频方向保持一致
        captureConnection.videoOrientation=[self.captureVideoPreviewLayer connection].videoOrientation;
        NSString *outputFielPath=[NSTemporaryDirectory() stringByAppendingString:@"myMovie.mov"];
        NSLog(@"save path is :%@",outputFielPath);
        NSURL *fileUrl=[NSURL fileURLWithPath:outputFielPath];
        [self.captureMovieFileOutput startRecordingToOutputFileURL:fileUrl recordingDelegate:self];
    }
    else{
        [self.captureMovieFileOutput stopRecording];//停止录制
    }
}
#pragma mark 切换前后摄像头
- (IBAction)toggleButtonClick:(UIButton *)sender {
    AVCaptureDevice *currentDevice=[self.captureDeviceInput device];
    AVCaptureDevicePosition currentPosition=[currentDevice position];
    [self removeNotificationFromCaptureDevice:currentDevice];
    AVCaptureDevice *toChangeDevice;
    AVCaptureDevicePosition toChangePosition=AVCaptureDevicePositionFront;
    if (currentPosition==AVCaptureDevicePositionUnspecified||currentPosition==AVCaptureDevicePositionFront) {
        toChangePosition=AVCaptureDevicePositionBack;
    }
    toChangeDevice=[self getCameraDeviceWithPosition:toChangePosition];
    [self addNotificationToCaptureDevice:toChangeDevice];
    //获得要调整的设备输入对象
    AVCaptureDeviceInput *toChangeDeviceInput=[[AVCaptureDeviceInput alloc]initWithDevice:toChangeDevice error:nil];

    //改变会话的配置前一定要先开启配置,配置完成后提交配置改变
    [self.captureSession beginConfiguration];
    //移除原有输入对象
    [self.captureSession removeInput:self.captureDeviceInput];
    //添加新的输入对象
    if ([self.captureSession canAddInput:toChangeDeviceInput]) {
        [self.captureSession addInput:toChangeDeviceInput];
        self.captureDeviceInput=toChangeDeviceInput;
    }
    //提交会话配置
    [self.captureSession commitConfiguration];

}

#pragma mark - 视频输出代理
-(void)captureOutput:(AVCaptureFileOutput *)captureOutput didStartRecordingToOutputFileAtURL:(NSURL *)fileURL fromConnections:(NSArray *)connections{
    NSLog(@"开始录制...");
}
-(void)captureOutput:(AVCaptureFileOutput *)captureOutput didFinishRecordingToOutputFileAtURL:(NSURL *)outputFileURL fromConnections:(NSArray *)connections error:(NSError *)error{
    NSLog(@"视频录制完成.");
    //视频录入完成之后在后台将视频存储到相簿
    self.enableRotation=YES;
    UIBackgroundTaskIdentifier lastBackgroundTaskIdentifier=self.backgroundTaskIdentifier;
    self.backgroundTaskIdentifier=UIBackgroundTaskInvalid;
    ALAssetsLibrary *assetsLibrary=[[ALAssetsLibrary alloc]init];
    [assetsLibrary writeVideoAtPathToSavedPhotosAlbum:outputFileURL completionBlock:^(NSURL *assetURL, NSError *error) {
        if (error) {
            NSLog(@"保存视频到相簿过程中发生错误,错误信息:%@",error.localizedDescription);
        }
        if (lastBackgroundTaskIdentifier!=UIBackgroundTaskInvalid) {
            [[UIApplication sharedApplication] endBackgroundTask:lastBackgroundTaskIdentifier];
        }
        NSLog(@"成功保存视频到相簿.");
    }];

}

#pragma mark - 通知
/**
 *  给输入设备添加通知
 */
-(void)addNotificationToCaptureDevice:(AVCaptureDevice *)captureDevice{
    //注意添加区域改变捕获通知必须首先设置设备允许捕获
    [self changeDeviceProperty:^(AVCaptureDevice *captureDevice) {
        captureDevice.subjectAreaChangeMonitoringEnabled=YES;
    }];
    NSNotificationCenter *notificationCenter= [NSNotificationCenter defaultCenter];
    //捕获区域发生改变
    [notificationCenter addObserver:self selector:@selector(areaChange:) name:AVCaptureDeviceSubjectAreaDidChangeNotification object:captureDevice];
}
-(void)removeNotificationFromCaptureDevice:(AVCaptureDevice *)captureDevice{
    NSNotificationCenter *notificationCenter= [NSNotificationCenter defaultCenter];
    [notificationCenter removeObserver:self name:AVCaptureDeviceSubjectAreaDidChangeNotification object:captureDevice];
}
/**
 *  移除所有通知
 */
-(void)removeNotification{
    NSNotificationCenter *notificationCenter= [NSNotificationCenter defaultCenter];
    [notificationCenter removeObserver:self];
}

-(void)addNotificationToCaptureSession:(AVCaptureSession *)captureSession{
    NSNotificationCenter *notificationCenter= [NSNotificationCenter defaultCenter];
    //会话出错
    [notificationCenter addObserver:self selector:@selector(sessionRuntimeError:) name:AVCaptureSessionRuntimeErrorNotification object:captureSession];
}

/**
 *  设备连接成功
 *
 *  @param notification 通知对象
 */
-(void)deviceConnected:(NSNotification *)notification{
    NSLog(@"设备已连接...");
}
/**
 *  设备连接断开
 *
 *  @param notification 通知对象
 */
-(void)deviceDisconnected:(NSNotification *)notification{
    NSLog(@"设备已断开.");
}
/**
 *  捕获区域改变
 *
 *  @param notification 通知对象
 */
-(void)areaChange:(NSNotification *)notification{
    NSLog(@"捕获区域改变...");
}

/**
 *  会话出错
 *
 *  @param notification 通知对象
 */
-(void)sessionRuntimeError:(NSNotification *)notification{
    NSLog(@"会话发生错误.");
}

#pragma mark - 私有方法

/**
 *  取得指定位置的摄像头
 *
 *  @param position 摄像头位置
 *
 *  @return 摄像头设备
 */
-(AVCaptureDevice *)getCameraDeviceWithPosition:(AVCaptureDevicePosition )position{
    NSArray *cameras= [AVCaptureDevice devicesWithMediaType:AVMediaTypeVideo];
    for (AVCaptureDevice *camera in cameras) {
        if ([camera position]==position) {
            return camera;
        }
    }
    return nil;
}

/**
 *  改变设备属性的统一操作方法
 *
 *  @param propertyChange 属性改变操作
 */
-(void)changeDeviceProperty:(PropertyChangeBlock)propertyChange{
    AVCaptureDevice *captureDevice= [self.captureDeviceInput device];
    NSError *error;
    //注意改变设备属性前一定要首先调用lockForConfiguration:调用完之后使用unlockForConfiguration方法解锁
    if ([captureDevice lockForConfiguration:&error]) {
        propertyChange(captureDevice);
        [captureDevice unlockForConfiguration];
    }else{
        NSLog(@"设置设备属性过程发生错误,错误信息:%@",error.localizedDescription);
    }
}

/**
 *  设置闪光灯模式
 *
 *  @param flashMode 闪光灯模式
 */
-(void)setFlashMode:(AVCaptureFlashMode )flashMode{
    [self changeDeviceProperty:^(AVCaptureDevice *captureDevice) {
        if ([captureDevice isFlashModeSupported:flashMode]) {
            [captureDevice setFlashMode:flashMode];
        }
    }];
}
/**
 *  设置聚焦模式
 *
 *  @param focusMode 聚焦模式
 */
-(void)setFocusMode:(AVCaptureFocusMode )focusMode{
    [self changeDeviceProperty:^(AVCaptureDevice *captureDevice) {
        if ([captureDevice isFocusModeSupported:focusMode]) {
            [captureDevice setFocusMode:focusMode];
        }
    }];
}
/**
 *  设置曝光模式
 *
 *  @param exposureMode 曝光模式
 */
-(void)setExposureMode:(AVCaptureExposureMode)exposureMode{
    [self changeDeviceProperty:^(AVCaptureDevice *captureDevice) {
        if ([captureDevice isExposureModeSupported:exposureMode]) {
            [captureDevice setExposureMode:exposureMode];
        }
    }];
}
/**
 *  设置聚焦点
 *
 *  @param point 聚焦点
 */
-(void)focusWithMode:(AVCaptureFocusMode)focusMode exposureMode:(AVCaptureExposureMode)exposureMode atPoint:(CGPoint)point{
    [self changeDeviceProperty:^(AVCaptureDevice *captureDevice) {
        if ([captureDevice isFocusModeSupported:focusMode]) {
            [captureDevice setFocusMode:AVCaptureFocusModeAutoFocus];
        }
        if ([captureDevice isFocusPointOfInterestSupported]) {
            [captureDevice setFocusPointOfInterest:point];
        }
        if ([captureDevice isExposureModeSupported:exposureMode]) {
            [captureDevice setExposureMode:AVCaptureExposureModeAutoExpose];
        }
        if ([captureDevice isExposurePointOfInterestSupported]) {
            [captureDevice setExposurePointOfInterest:point];
        }
    }];
}

/**
 *  添加点按手势,点按时聚焦
 */
-(void)addGenstureRecognizer{
    UITapGestureRecognizer *tapGesture=[[UITapGestureRecognizer alloc]initWithTarget:self action:@selector(tapScreen:)];
    [self.viewContainer addGestureRecognizer:tapGesture];
}
-(void)tapScreen:(UITapGestureRecognizer *)tapGesture{
    CGPoint point= [tapGesture locationInView:self.viewContainer];
    //将UI坐标转化为摄像头坐标
    CGPoint cameraPoint= [self.captureVideoPreviewLayer captureDevicePointOfInterestForPoint:point];
    [self setFocusCursorWithPoint:point];
    [self focusWithMode:AVCaptureFocusModeAutoFocus exposureMode:AVCaptureExposureModeAutoExpose atPoint:cameraPoint];
}

/**
 *  设置聚焦光标位置
 *
 *  @param point 光标位置
 */
-(void)setFocusCursorWithPoint:(CGPoint)point{
    self.focusCursor.center=point;
    self.focusCursor.transform=CGAffineTransformMakeScale(1.5, 1.5);
    self.focusCursor.alpha=1.0;
    [UIView animateWithDuration:1.0 animations:^{
        self.focusCursor.transform=CGAffineTransformIdentity;
    } completion:^(BOOL finished) {
        self.focusCursor.alpha=0;

    }];
}
@end
运行效果:
总结
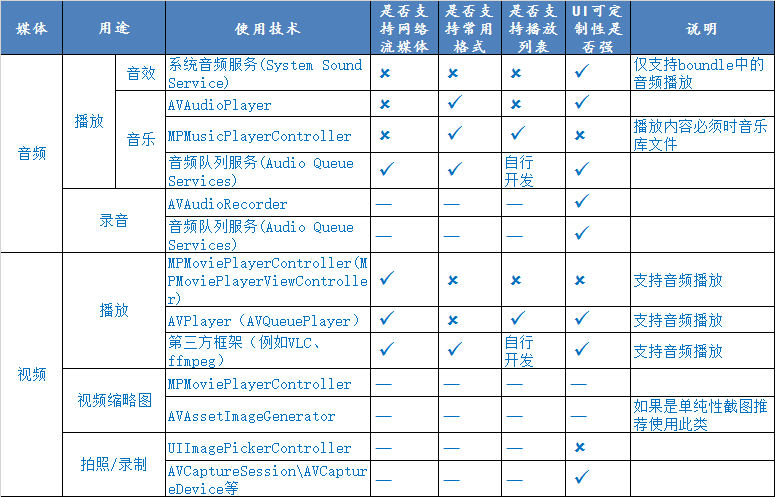
前面用了大量的篇幅介绍了iOS中的音、视频播放和录制,有些地方用到了封装好的播放器、录音机直接使用,有些是直接调用系统服务自己组织封装,正如本篇开头所言,iOS对于多媒体支持相当灵活和完善,那么开放过程中如何选择呢,下面就以一个表格简单对比一下各个开发技术的优缺点。
最后
以上就是包容小海豚最近收集整理的关于摄像头 UIImagePickerController拍照和视频录制 总结的全部内容,更多相关摄像头内容请搜索靠谱客的其他文章。


发表评论 取消回复