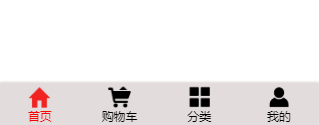
vue封装底部导航栏
TabBarItem子组件
<template>
  <div class="tab-bar-item" @click="TabBarBtn">
    <div v-if="!RouteIsActive"><slot name="item-icon"></slot></div>
    <div v-else><slot name="item-icon-active"></slot></div>
    <div :style="ItemActiveStyle"><slot name="item-text"></slot></div>
  </div>
</template>

<script>
export default {
  name: 'TabBarItem',
  data() {
    return{
    }
  },
  props: {
    link:String,
  },
  computed: {
    RouteIsActive() {//判断当前哪个路由处于活跃状态
      return this.$route.path.indexOf(this.link) !== -1
    },
    ItemActiveStyle() {
      return this.RouteIsActive ? {color: "red"} : {}
    }
  },
  methods: {
    TabBarBtn() {
      this.$router.push(this.link)
    }
  }
}
</script>
<style>
  .tab-bar-item{
    flex: 1;
    text-align: center ;
  }
  .tab-bar-item img{
     width: 27px;
     height: 27px;
     margin-top: 2px;
     vertical-align: middle;
   }
  .tab-bar-item span{
    display: block;
    font-size: 14px;
  }
</style>
TabBar组件
<template>
  <div id="tab-bar">
    <slot></slot>
  </div>
</template>

<script>
export default {
  name: 'TabBar',

}
</script>
<style>
  #tab-bar {
    display: flex;
    height: 49px;
    background-color: rgb(226, 220, 220);
    position: fixed;
    right: 0;
    left: 0;
    bottom: 0;
    box-shadow: 0 -2px 2px 0 rgba(226, 220, 220,0.9);
  }
</style>
MainTabBar父组件封装
<template>
  <TabBar>
    <TabBarItem link="/home">
      <img slot="item-icon" src="~@/assets/img/tabbar/home.png" alt="">
      <img slot="item-icon-active" src="~@/assets/img/tabbar/home-red.png" alt="">
      <span slot="item-text">首页</span>
    </TabBarItem>
    <TabBarItem link="/shop">
      <img slot="item-icon" src="~@/assets/img/tabbar/shop.png" alt="">
      <img slot="item-icon-active" src="../../../assets/img/tabbar/shop-red.png" alt="">
      <span slot="item-text">购物车</span>
    </TabBarItem>
    <TabBarItem link="/category">
      <img slot="item-icon" src="~@/assets/img/tabbar/category.png" alt="">
      <img slot="item-icon-active" src="~@/assets/img/tabbar/category-red.png" alt="">
      <span slot="item-text">分类</span>
    </TabBarItem>
    <TabBarItem link="/profile">
      <img slot="item-icon" src="~@/assets/img/tabbar/profile.png" alt="">
      <img slot="item-icon-active" src="~@/assets/img/tabbar/profile-red.png" alt="">
      <span slot="item-text">我的</span>
    </TabBarItem>
  </TabBar>
</template>

<script>

import TabBar from '../../common/TabBar/TabBar'
import TabBarItem from '../../common/TabBarItem/TabBarItem'
export default {
  name: 'MainTabBar',
  components:{
    TabBar,
    TabBarItem
  },
}
</script>
<style>

</style>
效果图

最后
以上就是激动老虎最近收集整理的关于vue封装底部导航栏的全部内容,更多相关vue封装底部导航栏内容请搜索靠谱客的其他文章。
本图文内容来源于网友提供,作为学习参考使用,或来自网络收集整理,版权属于原作者所有。


发表评论 取消回复