call:
在python中,类的__call__方法可以使得类对象具有类似函数的功能,这一点在pytorch经常有应用,理解这一点才能理解pytorch中forward函数等的作用。
__call__方法的使用示例:
class A():
    def __call__(self):
        print("this __call__ makes object called like a function")

a=A()
a()

输出:
this __call__ makes object called like a function
在pytorch中,pytorch的基类nn.Module就实现了这个__call__方法,并且在__call__中调用了forward函数。
简化的nn.Module说明例子:
class demo():
    def __init__(self,para_1):
        print("the first parameter is:",para_1)
        self.f_p=para_1

    def __call__(self,para_2):
        ret=self.forward(para_2)
        return ret

    def forward(self,para_2):
        print("the second parameter used by forward:",para_2)
        return self.f_p+para_2

test=demo(1)
output=test(2)
print("the output is:",output)

输出:
the first parameter is: 1
the second parameter used by forward: 2
the output is: 3
nn.Module
关于这个模块,明确两点就可以:
- nn.Module是所有神经网络单元的基类
- pytorch在nn.Module中,实现了__call__方法,而在__call__方法中调用了forward函数
nn.Linear
Linear的forward函数:

执行过程:
代码举例:
import torch
from torch import nn

m=nn.Linear(20,30)
input=torch.randn(128,20)
output=m(input)

print(output.size())

输出:
torch.Size([128, 30])
这段代码的执行过程是首先创建类对象m,然后通过m(input)实际上调用__call__(input),然后__call__(input)调用forward()函数,最后返回计算结果。自己创建神经网络模块的时候,以nn.Module为基类,实现__init__和forward就可以。
以下为代码举例:
import torch
from torch import nn

class simpleNet(nn.Module):

    def __init__(self, in_dim, n_hidden_1, n_hidden_2, out_dim):
        super().__init__()
        self.layer1 = nn.Linear(in_dim, n_hidden_1)
        self.layer2 = nn.Linear(n_hidden_1, n_hidden_2)
        self.layer3 = nn.Linear(n_hidden_2, out_dim)

    def forward(self, x):
        x = self.layer1(x)
        x = self.layer2(x)
        x = self.layer3(x)

        return x

demo=simpleNet(20,30,40,50)
input=torch.randn(128,20)
output=demo(input)
print(output.size())

输出:
torch.Size([128, 50])
关于linear类中weight的转置问题探讨:
import torch
from torch import nn

m=nn.Linear(20,30)
input=torch.randn(128,20)
output=m(input)

print(output.size())
print(m.weight.shape)

输出:
torch.Size([128, 30])
torch.Size([30, 20])
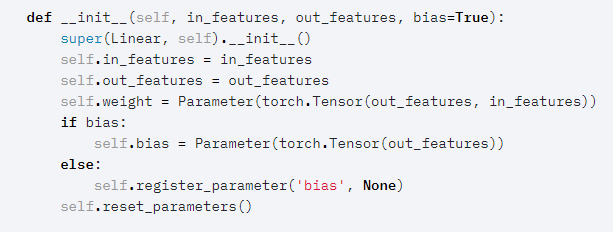
这里可以注意到weight的形状为[30,20]而不是[20,30],因为在进行矩阵乘法前,pytorch首先进行了一步转置。
pytorch中nn.Linear源码:

注意下这一句:
self.weight=Parameter(torch.Tensor(out_features, in_features))
接着forward函数如下:

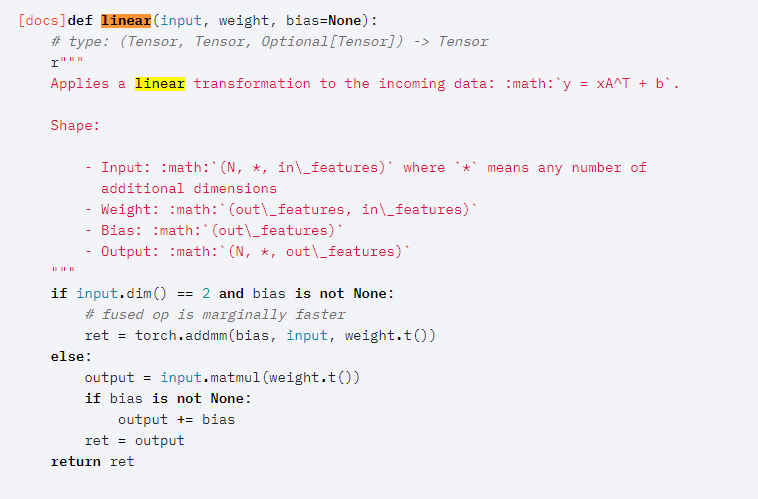
其中forward函数调用了F.linear函数,F.Linear函数源码如下:

其中这一句:
ret=torch.addmm(bias, input, weight.t())
可以看出在进行矩阵乘法的时候使用了矩阵转置
nn.Sequential:
这是一个有序的容器,神经网络模块将按照传入构造器的顺序依次被添加到计算图中执行,同时以神经网络模块为元素的有序字典也可以作为传入参数。
以下是两个执行过程的例子:
import torch.nn as nn
import collections.OrderDict as OrderedDict

model=nn.Sequential(
    nn.Conv2d(1,20,5),
    nn.ReLU(),
    nn.Conv2d(20,64,5),
    nn.ReLU()
)

model = nn.Sequential(OrderedDict([
    ('conv1', nn.Conv2d(1,20,5)),
    ('relu1', nn.ReLU()),
    ('conv2', nn.Conv2d(20,64,5)),
    ('relu2', nn.ReLU())
]))
Sequential的__init__()源码如下所示:

从上面的源码可以看出传入两种类型参数的不同构造方式。
Sequential的forward函数:

forward函数通过for循环依次调用添加到self._module中的模块,最后输出经过所有神经网络层的结果
以下是一个三层网络的例子:
import torch
from torch import nn

class simpleNet(nn.Module):

    def __init__(self, in_dim, n_hidden_1, n_hidden_2, out_dim):
        super().__init__()
        self.layer=nn.Sequential(
            nn.Linear(in_dim,n_hidden_1),
            nn.ReLU(True),
            nn.Linear(n_hidden_1,n_hidden_2),
            nn.ReLU(True),
            nn.Linear(n_hidden_2,out_dim)
        )

    def forward(self, x):
        x = self.layer(x)

        return x

demo=simpleNet(20,30,40,50)
input=torch.randn(128,20)
output=demo(input)
print(output.size())

输出:
torch.Size([128, 50])
参考:
pytorch __call__方法
nn.Module源码
nn.Linear源码
nn.Linear理解
nn.Sequential源码
nn.Sequential理解
functional源码
最后
以上就是动听大船最近收集整理的关于pytorch 神经网络构造的全部内容,更多相关pytorch内容请搜索靠谱客的其他文章。


发表评论 取消回复