目录
1 前言
2 新建module
2.1 pom.xml
2.2 application.yml
2.3 启动类
2.4 启动项目
2.5 监控
1 前言
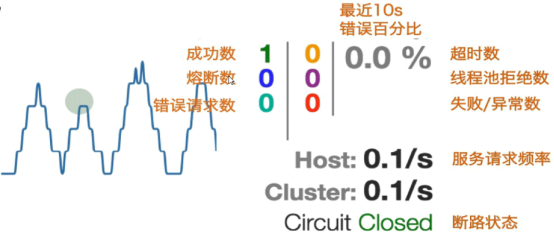
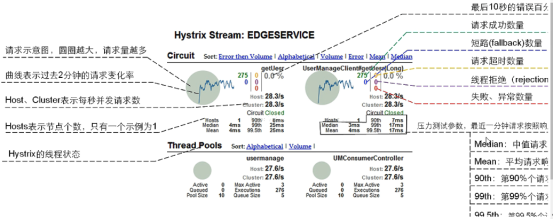
除了隔离依赖服务的调用以外,Hystrix还提供了准实时调用监控(Hystrix Dashboard),Hystrix会持续记录所有通过Hystrix发起请求的执行信息,并以统计报表和图形的形式展示给用户,包括每秒执行多少请求,有多少是成功的,有多少是失败的。
Netflix通过hystrix-metrics-event-stream项目实现了对以上项目的监控。SpringCloud提供了对Hystrix Dashboard的整合,将监控内容转换为可视化页面。
2 新建module
2.1 pom.xml
<?xml version="1.0" encoding="UTF-8"?>
<project xmlns="http://maven.apache.org/POM/4.0.0"
         xmlns:xsi="http://www.w3.org/2001/XMLSchema-instance"
         xsi:schemaLocation="http://maven.apache.org/POM/4.0.0 http://maven.apache.org/xsd/maven-4.0.0.xsd">
    <parent>
        <artifactId>cloud2020</artifactId>
        <groupId>com.bighuan.springcloud</groupId>
        <version>1.0-SNAPSHOT</version>
    </parent>
    <modelVersion>4.0.0</modelVersion>

    <artifactId>cloud-consumer-hystrix-dashboard9001</artifactId>

    <dependencies>
        <!--hystrix-dashboard-->
        <dependency>
            <groupId>org.springframework.cloud</groupId>
            <artifactId>spring-cloud-starter-netflix-hystrix-dashboard</artifactId>
        </dependency>
        <dependency>
            <groupId>org.springframework.boot</groupId>
            <artifactId>spring-boot-starter-actuator</artifactId>
        </dependency>
        <dependency>
            <groupId>org.springframework.boot</groupId>
            <artifactId>spring-boot-devtools</artifactId>
            <scope>runtime</scope>
            <optional>true</optional>
        </dependency>
        <dependency>
            <groupId>org.projectlombok</groupId>
            <artifactId>lombok</artifactId>
            <optional>true</optional>
        </dependency>
        <dependency>
            <groupId>org.springframework.boot</groupId>
            <artifactId>spring-boot-starter-test</artifactId>
            <scope>test</scope>
        </dependency>
    </dependencies>

    <build>
        <plugins>
            <plugin>
                <groupId>org.springframework.boot</groupId>
                <artifactId>spring-boot-maven-plugin</artifactId>
                <configuration>
                    <mainClass>com.bighuan.springcloud.HystrixDashboardMain9001</mainClass>
                </configuration>
                <executions>
                    <execution>
                        <goals>
                            <goal>repackage</goal>
                        </goals>
                    </execution>
                </executions>
            </plugin>
        </plugins>
    </build>


</project>
2.2 application.yml
只指定端口为9001,没有其他配置。
2.3 启动类
通过@EnableHystrixDashboard开启Hystrix Dashboard
@SpringBootApplication
@EnableHystrixDashboard // 开启hystrix dashboard
public class HystrixDashboardMain9001 {
    public static void main(String[] args) {
        SpringApplication.run(HystrixDashboardMain9001.class, args);
    }
}
2.4 启动项目
访问hystrix:http://127.0.0.1:9001/hystrix

2.5 监控
1)在新版本Hystrix监控的项目主启动类中需要指定监控路径,否则会报错。如下被监控服务的主启动类:
@SpringBootApplication
@EnableEurekaClient
@EnableCircuitBreaker
public class PaymentHystrixMain8001 {
public static void main(String[] args) {
SpringApplication.run(PaymentHystrixMain8001.class, args);
}
/**
* 此配置是为了hystrix服务监控而配置,与服务容错本身无关,SpringCloud升级后的坑
*ServletRegistrationBean因为SpringBoot的默认路径不是/hystrix.stream
* 只要在自己的项目上配置好下面的servlet即可
*/
@Bean
public ServletRegistrationBean getServlet(){
HystrixMetricsStreamServlet streamServlet=new HystrixMetricsStreamServlet();
ServletRegistrationBean registrationBean=new ServletRegistrationBean(streamServlet);
registrationBean.setLoadOnStartup(1);
registrationBean.addUrlMappings("/hystrix.stream");
registrationBean.setName("HystrixMetricsStreamServlet");
return registrationBean;
}
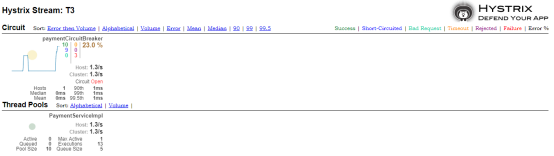
}启动被监控的服务类,在Hystrix Dashboard页面进行监控:
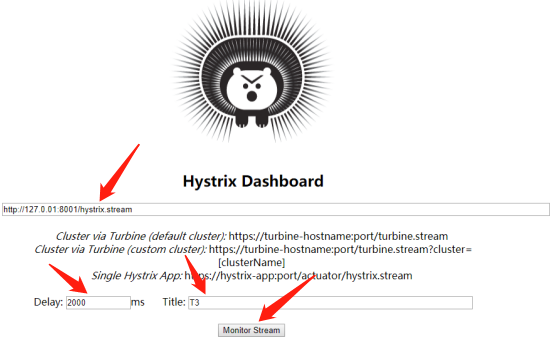
点击Monitor Stream,进入信息监控页面(并访问被监控的8001项目):
说明:

最后
以上就是包容灯泡最近收集整理的关于微服务学习之Hystrix图形化DashBoard监控【Hoxton.SR1版】1 前言2 新建module的全部内容,更多相关微服务学习之Hystrix图形化DashBoard监控【Hoxton.SR1版】1内容请搜索靠谱客的其他文章。
本图文内容来源于网友提供,作为学习参考使用,或来自网络收集整理,版权属于原作者所有。


发表评论 取消回复