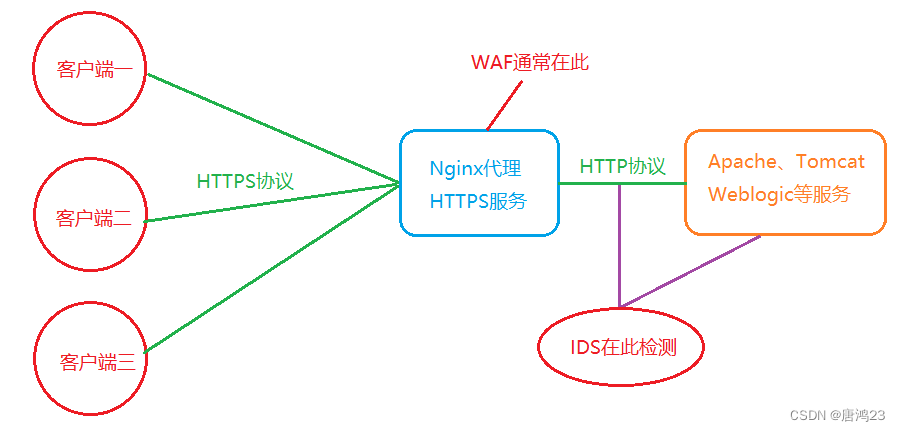
 访问代理的192.168.194.141,即可获得192.168.194.132资源
实验之前先检查,关闭防火墙。特别是iptables,已踩坑
systemctl stop firewalld
yum remove iptables
一、服务环境
1、apache:集成环境
yum install -y wget
wget https://sourceforge.net/projects/xampp/files/latest/download
./ xampp-linux-x64-8.1.6-0-installer.run
/opt/lampp/lampp restart
1、tomcat
wget https://archive.apache.org/dist/tomcat/tomcat-10/v10.0.0/bin/apache-tomcat-10.0.0.tar.gz
tar -zxvf apache-tomcat-10.0.0.tar.gz
cd apache-tomcat-10.0.0/bin
./startup.sh
2、安装suricata
二进制安装(推荐)
https://www.cnblogs.com/eveplw/p/16602047.html
yum -y install epel-release yum-plugin-copr
yum -y copr enable @oisf/suricata-7.0
yum -y install suricata
二、代理
这里只用于反向代理,获取https内容,所以基础配置nginx就行
1、安装nginx
下载nginx压缩包,版本:nginx-1.21.2
yum -y install wget
wget http://nginx.org/download/nginx-1.21.2.tar.gz
先安装GCC编译器:yum -y install gcc pcre-devel zlib-devel openssl openssl-devel
解压
tar -zxvf nginx-1.21.0.tar.gz
进入到nginx源码文件中
cd nginx-1.21.0
配置:[root@localhost nginx-1.21.0]# /opt/nginx-1.21.0/configure --prefix=/usr/local/nginx --with-http_ssl_module
编译C语言的源代码为二进制文件:make
安装:make install
启动nginx:/usr/local/nginx/sbin/nginx
浏览器访问:http://192.168.112.188,默认80端口,如果看到Welcome说明安装成功
2、配置代理
查看版本
openssl version
生成私钥-设置密码类123456
openssl genrsa -des3 -out server.pass.key 2048
去除私钥密码
openssl rsa -in server.pass.key -out server.key
生成csr证书
openssl req -new -key server.key -out server.csr -subj “/C=CN/ST=BeiJing/L=BeiJing/O=dev/OU= dev/CN=localhost”
生成ssl证书
openssl x509 -req -days 365 -in server.csr -signkey server.key -out server.crt
移动到配置目录
cp server.crt /usr/local/nginx/conf/server.crt
cp server.csr /usr/local/nginx/conf/server.csr
cp server.key /usr/local/nginx/conf/server.key
cp server.pass.key /usr/local/nginx/conf/server.pass.key
开启nginx
/usr/local/nginx/sbin/nginx
3、修改配置文件
vi /usr/local/nginx/conf
在server 节点外添加服务器的ip端口
upstream mytomcat {
    server 192.168.194.132:80 weight=1;
}
在server内添加,重要的proxy_pass后面服务器ip必须跟上路径,也就是说格式必须完全一致
listen       443 ssl;
        server_name  localhost;
    ssl_certificate      server.crt;
        ssl_certificate_key  server.key;
        ssl_session_cache    shared:SSL:1m;
        ssl_session_timeout  5m;
        ssl_ciphers  HIGH:!aNULL:!MD5;
        ssl_prefer_server_ciphers  on;

        location / {
            root   html;
            index  index.html index.htm;
        }
    location /upload-labs-master/ {
            proxy_pass http://mytomcat/upload-labs-master/;
            proxy_redirect default;
        }
3、重启,代理跟服务器内服务都要重启
/usr/local/nginx/sbin/nginx -s reload
/opt/lampp/lampp restart
4、访问,这里就相当于server 节点外添加服务器的ip跟上路径
192.168.194.132/upload-labs-master/
5、完成,可以抓包查看追踪
最后
以上就是无限电脑最近收集整理的关于配置nginx反向代理,监控https流量的全部内容,更多相关配置nginx反向代理内容请搜索靠谱客的其他文章。


发表评论 取消回复