Nginx
- 1. Nginx介绍
- 2. Nginx安装(二进制免编译安装)
- 3. Nginx安装(yum安装)
- 4. 安装Nginx虚拟主机
- 1. 二进制免编译安装Nginx默认虚拟主机方法
- 2. yum安装Nginx默认虚拟主机方法
- 5. 安装wordpress(php写的博客)
- 6. 安装Discuz
- 7. Nginx域名重定向
- 8. Nginx用户认证
- 9. Nginx访问日志
- 10. Nginx日志切割
- 方法一(脚本切割日志)
- 方法二(logrotate工具切割)
- 11. 静态文件不记录日志和过期时间
- 1. 日志里面不记录静态文件
- 2. 静态文件的过期时间
- 12. Nginx防盗链
- 13. Nginx访问控制
- 14. Nginx解析php相关配置
- 操作步骤模板:
- 操作步骤示例:
- 1. 先创建一个 3.php 文件:
- 2. 测试这个 3.php 文件,此时不能够解析:
- 3. 解析 php 文件的配置文件,把此代码,放入虚拟主机配置中:
- 4. 检查语句,并加载配置文件:
- 15. Nginx反向代理
- 16. Nginx负载均衡
- 17. 配置Nginx的SSL
1. Nginx介绍
Nginx (engine x) 是一个高性能的HTTP和反向代理服务器,也是一个IMAP/POP3/SMTP服务器。Nginx是由伊戈尔·赛索耶夫为俄罗斯访问量第二的Rambler.ru站点(俄文:Рамблер)开发的,第一个公开版本0.1.0发布于2004年10月4日。
其将源代码以类BSD许可证的形式发布,因它的稳定性、丰富的功能集、示例配置文件和低系统资源的消耗而闻名。2011年6月1日,nginx 1.0.4发布。
Nginx是一款轻量级的Web 服务器/反向代理服务器及电子邮件(IMAP/POP3)代理服务器,并在一个BSD-like 协议下发行。其特点是占有内存少,并发能力强,事实上nginx的并发能力确实在同类型的网页服务器中表现较好,中国大陆使用nginx网站用户有:百度、京东、新浪、网易、腾讯、淘宝等。
Nginx 可以在大多数 UnixLinux OS 上编译运行,并有 Windows 移植版。 Nginx 的1.4.0稳定版已经于2013年4月24日发布,一般情况下,对于新建站点,建议使用最新稳定版作为生产版本,已有站点的升级急迫性不高。Nginx 的源代码使用 2-clause BSD-like license。
2. Nginx安装(二进制免编译安装)
Nginx包:wget http://nginx.org/download/nginx-1.17.2.tar.gz
讲义

1. cd /usr/local/src
2. wget http://nginx.org/download/nginx-1.12.1.tar.gz
3. tar zxf nginx-1.12.1.tar.gz
4. ./configure --prefix=/usr/local/nginx
5. make &&  make install
6. vim /etc/init.d/nginx //复制如下内容(参考https://coding.net/u/aminglinux/p/aminglinux-book/git/blob/master/D15Z/etc_init.d_nginx )
7. chmod 755 /etc/init.d/nginx
8. chkconfig --add nginx
9. chkconfig nginx on
10. cd /usr/local/nginx/conf/; mv nginx.conf nginx.conf.bak
11. vim nginx.conf //写入如下内容(参考https://coding.net/u/aminglinux/p/aminglinux-book/git/blob/master/D15Z/nginx.conf)
12. /usr/local/nginx/sbin/nginx -t
13. /etc/init.d/nginx  start
14. netstat -lntp |grep 80
- 下载源码包,下载命令
[root@sc src]# wget http://nginx.org/download/nginx-1.17.2.tar.gz
- 下载好后解压
[root@test01 src]# tar zxvf nginx-1.17.2.tar.gz
- 进入解压后的目录
[root@test01 src]# cd nginx-1.17.2/
- 查看 nginx 安装文档
[root@sc-01 src]# cd nginx-1.18.0/
[root@sc-01 nginx-1.18.0]# vim README


Documentation is available at http://nginx.org                   #去访问这个网址

右侧-documentation-Installing nginx-Building nginx from Sources  #里面有编译参数的介绍

Example of parameters usage (all of this needs to be typed in one line):

./configure                                                      #安装示例
    --sbin-path=/usr/local/nginx/nginx
    --conf-path=/usr/local/nginx/nginx.conf
    --pid-path=/usr/local/nginx/nginx.pid
    --with-http_ssl_module
    --with-pcre=../pcre-8.44
    --with-zlib=../zlib-1.2.11
- ./configure --prefix=/usr/local/nginx 检查编译环境,参数方面根据自己的需求去配置
[root@sc-01 nginx-1.18.0]# ./configure --prefix=/usr/local/nginx --with-http_ssl_module

Configuration summary
  + using system PCRE library
  + OpenSSL library is not used
  + using system zlib library

  nginx path prefix: "/usr/local/nginx"
  nginx binary file: "/usr/local/nginx/sbin/nginx"
  nginx modules path: "/usr/local/nginx/modules"
  nginx configuration prefix: "/usr/local/nginx/conf"
  nginx configuration file: "/usr/local/nginx/conf/nginx.conf"
  nginx pid file: "/usr/local/nginx/logs/nginx.pid"
  nginx error log file: "/usr/local/nginx/logs/error.log"
  nginx http access log file: "/usr/local/nginx/logs/access.log"
  nginx http client request body temporary files: "client_body_temp"
  nginx http proxy temporary files: "proxy_temp"
  nginx http fastcgi temporary files: "fastcgi_temp"
  nginx http uwsgi temporary files: "uwsgi_temp"
  nginx http scgi temporary files: "scgi_temp"

[root@test01 nginx-1.17.2]# echo $?
0
- 执行成功后编译安装
[root@sc nginx-1.16.0]# make && make install
[root@sc nginx-1.16.0]# echo $?
0
- 查看 nginx
[root@test01 nginx-1.17.2]# cd /usr/local/nginx/
[root@test01 nginx]# ls
conf  html  logs  sbin

nginx目录下有4个目录分别是:

conf:配置文件目录
html:索引页样例目录
logs:日志目录
sbin:核心文件目录
- 安装成功后,编辑 nginx 启动脚本
[root@sc nginx]# vim /etc/init.d/nginx

编辑内容:
#!/bin/bash
# chkconfig: - 30 21
# description: http service.
# Source Function Library
. /etc/init.d/functions
# Nginx Settings

NGINX_SBIN="/usr/local/nginx/sbin/nginx"
NGINX_CONF="/usr/local/nginx/conf/nginx.conf"
NGINX_PID="/usr/local/nginx/logs/nginx.pid"
RETVAL=0
prog="Nginx"

start()
{
    echo -n $"Starting $prog: "
    mkdir -p /dev/shm/nginx_temp
    daemon $NGINX_SBIN -c $NGINX_CONF
    RETVAL=$?
    echo
    return $RETVAL
}

stop()
{
    echo -n $"Stopping $prog: "
    killproc -p $NGINX_PID $NGINX_SBIN -TERM
    rm -rf /dev/shm/nginx_temp
    RETVAL=$?
    echo
    return $RETVAL
}

reload()
{
    echo -n $"Reloading $prog: "
    killproc -p $NGINX_PID $NGINX_SBIN -HUP
    RETVAL=$?
    echo
    return $RETVAL
}

restart()
{
    stop
    start
}

configtest()
{
    $NGINX_SBIN -c $NGINX_CONF -t
    return 0
}

case "$1" in
  start)
        start
        ;;
  stop)
        stop
        ;;
  reload)
        reload
        ;;
  restart)
        restart
        ;;
  configtest)
        configtest
        ;;
  *)
        echo $"Usage: $0 {start|stop|reload|restart|configtest}"
        RETVAL=1
esac

exit $RETVAL
- 编辑完成后,给这个启动脚本文件设置 755 权限
[root@sc nginx]# chmod 755 /etc/init.d/nginx
- 把 nginx 服务添加到服务列表,并设置开机启动
[root@sc nginx]# chkconfig --add nginx
[root@sc nginx]# chkconfig nginx on
[root@sc nginx]# chkconfig --list

Note: This output shows SysV services only and does not include native
      systemd services. SysV configuration data might be overridden by native
      systemd configuration.

      If you want to list systemd services use 'systemctl list-unit-files'.
      To see services enabled on particular target use
      'systemctl list-dependencies [target]'.

mysqld         	0:off	1:off	2:on	3:on	4:on	5:on	6:off
netconsole     	0:off	1:off	2:off	3:off	4:off	5:off	6:off
network        	0:off	1:off	2:on	3:on	4:on	5:on	6:off
nginx          	0:off	1:off	2:off	3:off	4:off	5:off	6:off
php-fpm        	0:off	1:off	2:on	3:on	4:on	5:on	6:off
[root@sc nginx]#
- 如果添加到服务列表出现这个错误:
service nginx does not support chkconfig
那么就检查一下你的启动脚本文件里的这两行有没有问题:
LNMP架构介绍与搭建一般都是因为这两行没有写,或者写错了

- 进入 nginx 的 conf 目录,然后重命名一下配置文件
[root@sc nginx]# cd /usr/local/nginx/conf
[root@sc conf]# mv nginx.conf nginx.conf.1
- 因为不使用 nginx 自带的配置文件,所以需要编辑一个配置文件
[root@sc conf]# vim nginx.conf

编辑内容:
user nobody nobody;
worker_processes 2;
error_log /usr/local/nginx/logs/nginx_error.log crit;
pid /usr/local/nginx/logs/nginx.pid;
worker_rlimit_nofile 51200;

events
{
    use epoll;
    worker_connections 6000;
}

http
{
    include mime.types;
    default_type application/octet-stream;
    server_names_hash_bucket_size 3526;
    server_names_hash_max_size 4096;
    log_format combined_realip '$remote_addr $http_x_forwarded_for [$time_local]'
    ' $host "$request_uri" $status'
    ' "$http_referer" "$http_user_agent"';
    sendfile on;
    tcp_nopush on;
    keepalive_timeout 30;
    client_header_timeout 3m;
    client_body_timeout 3m;
    send_timeout 3m;
    connection_pool_size 256;
    client_header_buffer_size 1k;
    large_client_header_buffers 8 4k;
    request_pool_size 4k;
    output_buffers 4 32k;
    postpone_output 1460;
    client_max_body_size 10m;
    client_body_buffer_size 256k;
    client_body_temp_path /usr/local/nginx/client_body_temp;
    proxy_temp_path /usr/local/nginx/proxy_temp;
    fastcgi_temp_path /usr/local/nginx/fastcgi_temp;
    fastcgi_intercept_errors on;
    tcp_nodelay on;
    gzip on;
    gzip_min_length 1k;
    gzip_buffers 4 8k;
    gzip_comp_level 5;
    gzip_http_version 1.1;
    gzip_types text/plain application/x-javascript text/css text/htm
    application/xml;

    server
    {
        listen 80;
        server_name localhost;
        index index.html index.htm index.php;
        root /usr/local/nginx/html;

        location ~ .php$
        {
            include fastcgi_params;
            fastcgi_pass unix:/tmp/php-fcgi.sock;
            fastcgi_index index.php;
            fastcgi_param SCRIPT_FILENAME /usr/local/nginx/html$fastcgi_script_name;
        }
    }
}
- 检查配置文件有没有错误
[root@sc conf]# /usr/local/nginx/sbin/nginx -t
nginx: the configuration file /usr/local/nginx/conf/nginx.conf syntax is ok
nginx: configuration file /usr/local/nginx/conf/nginx.conf test is successful
- 显示没有 nginx.pid
问题:

[root@master conf]# /usr/local/nginx/sbin/nginx -s reload
nginx: [error] invalid PID number "" in "/usr/local/nginx/logs/nginx.pid"


解决方法:

[root@master logs]# /usr/local/nginx/sbin/nginx -c /usr/local/nginx/conf/nginx.conf
[root@master logs]# ls
access.log  error.log  nginx_error.log  nginx.pid
- 没有问题就可以启动 nginx 了
[root@sc conf]# /etc/init.d/nginx start
- 查看一下进程

- 检查一下有没有在监听 80 端口

- 确认启动成功后,使用 curl 测试一下是否能访问 nginx
[root@sc conf]# curl localhost
<!DOCTYPE html>
<html>
<head>
<title>Welcome to nginx!</title>
<style>
    body {
        width: 35em;
        margin: 0 auto;
        font-family: Tahoma, Verdana, Arial, sans-serif;
    }
</style>
</head>
<body>
<h1>Welcome to nginx!</h1>
<p>If you see this page, the nginx web server is successfully installed and
working. Further configuration is required.</p>

<p>For online documentation and support please refer to
<a href="http://nginx.org/">nginx.org</a>.<br/>
Commercial support is available at
<a href="http://nginx.com/">nginx.com</a>.</p>

<p><em>Thank you for using nginx.</em></p>
</body>
</html>
[root@sc conf]#
- 在 nginx 的 html 目录下创建一个 php 文件
[root@sc conf]# vim /usr/local/nginx/html/1.php
- 编辑内容如下
<?php
echo "This is nginx test page.";
?>
- 使用 curl 去访问 php 文件,如图则是能够成功解析
[root@sc conf]# curl localhost/1.php
This is nginx test page.[root@sc conf]#
3. Nginx安装(yum安装)
- 文档
http://nginx.org/en/linux_packages.html
- 编辑yum仓库
vi /etc/yum.repos.d/nginx.repo

粘贴:

[nginx]
name=nginx repo
baseurl=http://nginx.org/packages/centos/7/$basearch/
gpgcheck=0
enabled=1
- 安装 nginx
yum install -y nginx
- 配置文件路径
/etc/nginx
- 查看配置文件有没有语法错误
nginx -t
- 重启 nginx 服务
systemctl start nginx 或者 /usr/sbin/nginx
- 补充
pkill 杀死一个进程,如 pkill nginx
4. 安装Nginx虚拟主机
虚拟主机定义:所谓虚拟主机就是在一台服务器上虚拟出多台主机

HTTP1.1 --> host (域名) 一个WEB服务可以有多个站点

定义虚拟主机配置文件,以域名为命名。
- iptables -nvL 查看防火墙规则,CentOS7 firewalld
测试在网页输入本机的ip地址看下通不通
不通需要关闭防火墙
自带firewalld服务,开启状态。
做实验可以关闭firewalld服务:        systemctl stop firewalld
生产环境不建议关闭,在防火墙开启80端口:firewall-cmd --add-port=80/tcp --permanent
最后防火墙加载:                    firewall-cmd --reload
1. 二进制免编译安装Nginx默认虚拟主机方法
讲义

1. vim /usr/local/nginx/conf/nginx.conf
2. include vhost/ *.conf                    #增加这一段
3. mkdir /usr/local/nginx/conf/vhost
4. cd /usr/local/nginx/conf/vhost;  vim default.conf           #加入如下内容
server
{
    listen 80 default_server;               #有这个标记的就是默认虚拟主机
    server_name aaa.com;
    index index.html index.htm index.php;
    root /data/wwwroot/default;
}
5. mkdir -p /data/wwwroot/default/
6. echo “This is a default site.”>/data/wwwroot/default/index.html
7. /usr/local/nginx/sbin/nginx -t
8. /usr/local/nginx/sbin/nginx -s reload
9. curl localhost
10. curl -x127.0.0.1:80 123.com
在 Nginx 中也有默认虚拟主机,跟 httpd 类似,第一个被 Nginx 加载的虚拟主机就是默认主机,但和 httpd 不相同的地方是,它还有一个配置用来标记默认虚拟主机,也就是说,如果没有这个标记,第一个虚拟主机为默认虚拟主机。
- 编辑 nginx.conf 主配置文件
[root@sc conf]# vim /usr/local/nginx/conf/nginx.conf
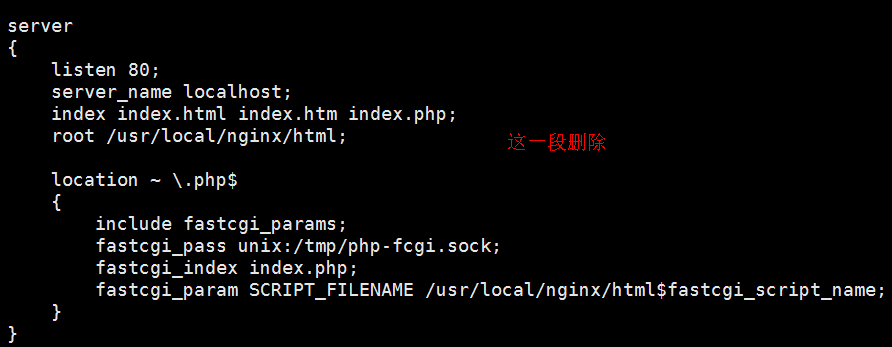

include vhost/*.conf;
- 创建 vhost 目录,并新建 aaa.com.conf 默认虚拟主机配置内容
[root@sc conf]# pwd
/usr/local/nginx/conf
[root@sc conf]# mkdir vhost
[root@sc conf]# cd vhost/
[root@sc vhost]# ls
[root@sc vhost]# vim aaa.com.conf

以下为aaa.com.conf内容:

server
{
        listen 80  default_server;              #有这个 default_server 标记的就是默认虚拟主机
        server_name aaa.com;                    #主机名 aaa.com
        index index.html index.htm index.php;   #定义索引页
        root /data/wwwroot/default;             #默认虚拟主机网站目录

        location ~ .php$
        {
            include fastcgi_params;
            fastcgi_pass unix:/tmp/php-fcgi.sock;
            fastcgi_index index.php;
            fastcgi_param SCRIPT_FILENAME /data/wwwroot/default$fastcgi_script_name;
        }
}
- 创建默认的网站目录
[root@sc vhost]# mkdir -p /data/wwwroot/default
[root@sc vhost]# cd /data/wwwroot/default/
[root@sc default]# vim index.html

以下为index.html 内容:

This is the default site.
- 检测语法,重新加载配置文件;测试相关网站;任意的域名,都会指向默认主机的网站名
[root@sc default]# /usr/local/nginx/sbin/nginx -t  #检查语法是否有错误
nginx: the configuration file /usr/local/nginx/conf/nginx.conf syntax is ok
nginx: configuration file /usr/local/nginx/conf/nginx.conf test is successful

[root@sc default]# /usr/local/nginx/sbin/nginx -s reload  #重新加载配置文件
nginx: [error] invalid PID number "" in "/usr/local/nginx/logs/nginx.pid"  #遇到报错了,在日志里没有nginx.pidz这个文件


[root@sc default]# /usr/local/nginx/sbin/nginx -s reload   #重新加载配置文件
[root@sc default]# curl localhost
This is the default site.
[root@sc default]# curl -x127.0.0.1:80 aaa.com
This is the default site.
[root@sc default]# curl -x127.0.0.1:80 ddd.com
This is the default site.
[root@sc default]# curl -x127.0.0.1:80 dddccc.com
This is the default site.
- 查看主配置文件
[root@sc default]# tail /usr/local/nginx/conf/nginx.conf
    tcp_nodelay on;
    gzip on;
    gzip_min_length 1k;
    gzip_buffers 4 8k;
    gzip_comp_level 5;
    gzip_http_version 1.1;
    gzip_types text/plain application/x-javascript text/css text/htm
    application/xml;
    include vhost/*.conf;
}
[root@sc default]#
2. yum安装Nginx默认虚拟主机方法
[root@master conf.d]# vim default.conf

server {
    listen       80;
    server_name  localhost;

    #charset koi8-r;
    #access_log  /var/log/nginx/host.access.log  main;

    location / {
        root   /usr/share/nginx/html;
        index index.php index.html index.htm;
    }

location ~ .php$ {
        root           html;
        fastcgi_pass   127.0.0.1:9000;
        fastcgi_index  index.php;
        fastcgi_param  SCRIPT_FILENAME  /scripts$fastcgi_script_name;
        include        fastcgi_params;
    }
}

nginx -t                     #查看配置文件是否有错误
nginx -s reload              #重载配置文件(推荐)
systemctl restart nginx      #重启
- /etc/hosts
vi /etc/hosts //增加
192.168.222.128  www.aaa.com
- 默认虚拟主机
就是Nginx的第一个虚拟主机。 默认虚拟主机需要加 default_server
泛解析
禁掉默认虚拟主机,加一行 deny all;
- 补充
快捷键 Ctrl z可以暂停一个进程。 比如,vi的时候,可以先退出vi,然后释放命令行出来。
按fg 就可以回到vi窗口里。

关闭centos7自带防火墙:systemctl stop firewalld

永久放行80端口:firewall-cmd --add-port=80/tcp --permanent
重新加载一下:  firewall-cmd --reload

[root@sc-01 ~]# telnet 192.168.231.129 80
Trying 192.168.231.129...
Connected to 192.168.231.129.
Escape character is '^]'.          #按 ctrl+]
^]
telnet> quit                       #输入 quit 退出
Connection closed.

Windows 的 hosts 一般在这个路径下 :c:windowssystem32driversetc
5. 安装wordpress(php写的博客)
- 下载wordpress,并解压
wget https://cn.wordpress.org/wordpress-5.0.2-zh_CN.tar.gz

tar zxvf wordpress-5.0.3-zh_CN.tar.gz
- 禁止默认虚拟主机
server
{
        listen 80  default_server;
        server_name aaa.com;
        index index.html index.htm index.php;
        root /data/wwwroot/default;
        deny all;                    #关闭默认虚拟主机 deny all 全部拒绝

        location ~ .php$
        {
            include fastcgi_params;
            fastcgi_pass unix:/tmp/php-fcgi.sock;
            fastcgi_index index.php;
            fastcgi_param SCRIPT_FILENAME /data/wwwroot/default$fastcgi_script_name;
        }
}
- 复制默认虚拟主机配置文件,创建一个新的虚拟主机
server
{
        listen 80;
        server_name wordpress.com;               #博客名字
        index index.html index.htm index.php;    #索引页
        root /data/wwwroot/wordpress;            #文件存放路径

        location ~ .php$     #打开PHP
        {
            include fastcgi_params;
            fastcgi_pass unix:/tmp/php-fcgi.sock;   #可以跟php-fpm通讯
            fastcgi_index index.php;
            fastcgi_param SCRIPT_FILENAME /data/wwwroot/wordpress$fastcgi_script_name;  #配置参数脚本文件名
        }
}
- 为博客创建目录存放目录
[root@test01 conf.d]# mkdir -p /data/wwwroot/blog.sc.cc/
- 检查配置文件并重载
/usr/local/nginx/sbin/nginx -t

/usr/local/nginx/sbin/nginx -s reload
- 需要把 wordpress/ 里所有的内容移动到当前目录下
[root@test01 blog.sc.cc]# mv wordpress/ * -t ./

[root@test01 blog.sc.cc]# ls
index.php    wordpress                     wp-admin              wp-config-sample.php  wp-includes        wp-login.php     wp-signup.php
license.txt  wordpress-5.0.2-zh_CN.tar.gz  wp-blog-header.php    wp-content            wp-links-opml.php  wp-mail.php      wp-trackback.php
readme.html  wp-activate.php               wp-comments-post.php  wp-cron.php           wp-load.php        wp-settings.php  xmlrpc.php

[root@test01 blog.sc.cc]# rm -fr wordpress wordpress-5.0.2-zh_CN.tar.gz

[root@test01 blog.sc.cc]# ls
index.php    wp-activate.php     wp-comments-post.php  wp-cron.php        wp-load.php   wp-settings.php   xmlrpc.php
license.txt  wp-admin            wp-config-sample.php  wp-includes        wp-login.php  wp-signup.php
readme.html  wp-blog-header.php  wp-content            wp-links-opml.php  wp-mail.php   wp-trackback.php
- 设置数据库
创建库:create database blog;
创建用户:grant all on blog.* to 'blog'@'127.0.0.1' identified by 'pbxfuej3LR4r';
切换某个库:use blog;
查询库里面有什么表:show tables;
- 补充
yum install -y expect  //为了安装 mkpasswd 命令,这个命令用来生产随机密码的
如, mkpasswd -s 0 -l 12

- 问题处理

在安装wordpress过程中,需要设定网站程序目录的权限,属主设定为php-fpm服务的那个用户
chown -R php-fpm  /data/wwwroot/blog.aminglinux.cc

6. 安装Discuz
discuz官网:http://www.discuz.net/forum.php
yum install -y git
git clone https://gitee.com/ComsenzDiscuz/DiscuzX.git
cp -r DiscuzX/upload/* /data/wwwroot/bbs.aminglinux.cc
- 定义虚拟主机配置文件
cd /etc/nginx/conf.d

cp blog.aminglinux.cc.conf  bbs.aminglinux.cc.conf

修改里面的目录

nginx -t && nginx -s reload
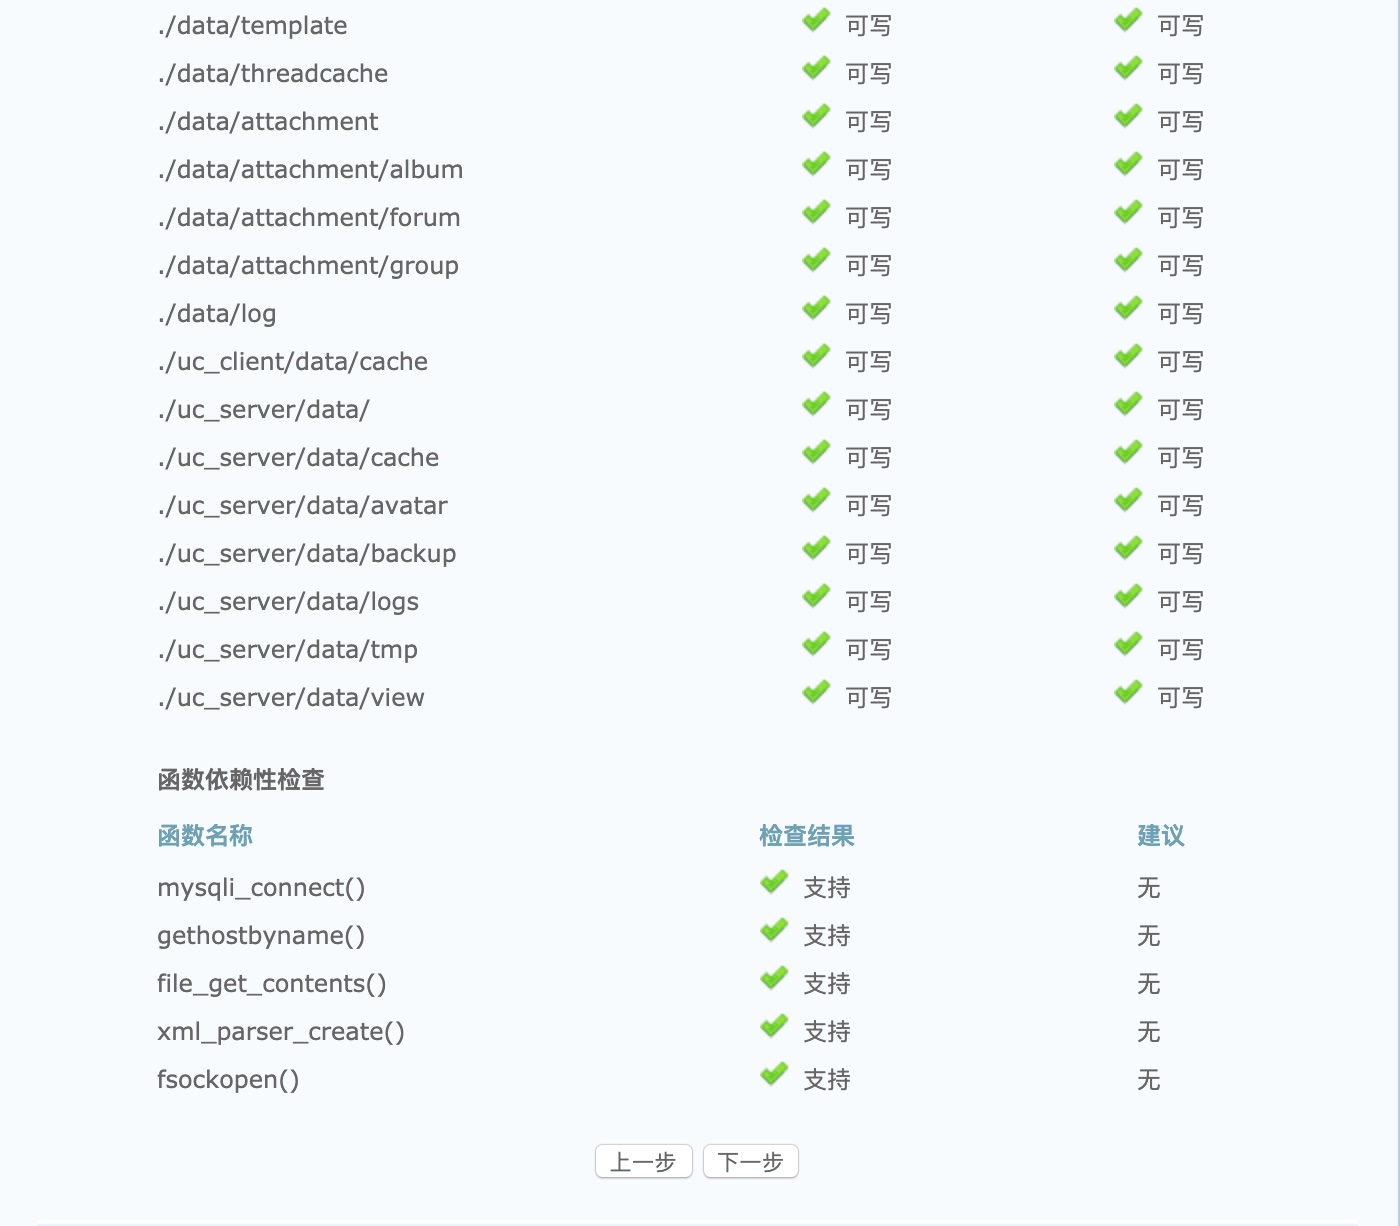
- 开始安装
改权限  cd /data/wwwroot/bbs.aminglinux.cc && chown -R php-fpm  config data uc_server/data  uc_client/data

数据库相关操作:
	create database bbs;
	grant all on bbs.* to 'bbs'@127.0.0.1 identified by 'li60rtvvHAfh';

定义数据库相关的信息

完成安装




- 补充
cp -r 复制目录

vi 批量查找替换,一般模式下输入 :1,$s/要被替换的字符/替换成的字符/g
	如果字符串中含有/,则需要脱义, 1,$s/home/123/home/abc/g
	还有一种方法:1,$s#home/123#home/abc#g
7. Nginx域名重定向
当我们站点有多个域名的时候,权重降低了,但是之前的域名已经被一部分人所依赖了,也不可能去通知大家新的站点,所以我们就会选择一个主域名其它的直接跳到主域名
- 配置第二个域名
vi /etc/nginx/conf.d/blog.aminglinux.cc.conf

在 server_name 那一行的域名后面再加一个域名,空格作为分隔。

nginx -t

nginx -s reload
- 域名重定向
从a域名跳转到b域名 以 www.discuz.com 举例说明

vim /usr/local/nginx/sbin/nginx/discuz.conf

###########################################

server
{
    listen 80;
    server_name www.discuz.com www.test.com;
    index index.html index.htm index.php;
    root /data/wwwroot/discuz;

    if ( $host = www.discuz.com )
    {
    rewrite /(.*) http://www.test.com/$1 permanent;
    }


    location ~ .php$ {
        root           /data/wwwroot/discuz;
        fastcgi_pass   127.0.0.1:9000;
        fastcgi_index  index.php;
        fastcgi_param  SCRIPT_FILENAME  /data/wwwroot/discuz$fastcgi_script_name;
        include        fastcgi_params;
    }
}

permanent;(重定向永久跳转301) redirect;(重定向临时跳转302)

nginx -t

nginx -s reload
- 测试
curl -x127.0.0.1:80 www.discuz.com/admin.php -I
HTTP/1.1 301 Moved Permanently                   #永久域名重定向显示301
Server: nginx/1.14.2
Date: Sat, 02 Nov 2019 06:06:30 GMT
Content-Type: text/html
Content-Length: 185
Connection: keep-alive
Location: http://www.test.com/admin.php          #输入 www.discuz.com 直接跳转到 www.test.com
- 补充
状态码:200(OK)  404(不存在)   304(缓存) 301(永久重定向)  302 (临时重定向)

如果是域名跳转,用301; 如果不涉及域名跳转用302
8. Nginx用户认证
讲义:

1. vim /usr/local/nginx/conf/vhost/test.com.conf //写入如下内容
server
{
    listen 80;
    server_name test.com;
    index index.html index.htm index.php;
    root /data/wwwroot/test.com;

location  /
    {
        auth_basic              "Auth";
        auth_basic_user_file   /usr/local/nginx/conf/htpasswd;
}
}
2. yum install -y httpd
3. htpasswd -c /usr/local/nginx/conf/htpasswd aming
4. -t &&  -s reload //测试配置并重新加载
5. mkdir /data/wwwroot/test.com
6. echo “test.com”>/data/wwwroot/test.com/index.html
7. curl -x127.0.0.1:80 test.com -I//状态码为401说明需要验证
8. curl -uaming:passwd 访问状态码变为200
9. 编辑windows的hosts文件,然后在浏览器中访问test.com会有输入用户、密码的弹窗
10. 针对目录的用户认证
location  /admin/
    {
        auth_basic              "Auth";
        auth_basic_user_file   /usr/local/nginx/conf/htpasswd;
}
- 用户认证的目的
实现二次认证,针对一些重要的目录(后台地址)
- 配置用户认证
vi  配置文件 //添加:

location ~ admin.php
{
	auth_basic "Auth";  #用户名
    auth_basic_user_file /etc/nginx/user_passwd;  #创建密码存放文件
    fastcgi_pass   127.0.0.1:9000;
    fastcgi_index  index.php;
    fastcgi_param  SCRIPT_FILENAME  /data/wwwroot/bbs.aminglinux.cc$fastcgi_script_name;
    include        fastcgi_params;
}
- 创建用户认证账号和密码
yum install httpd-tools
#安装包可以使用 htpasswd 命令创建账号密码


[root@master conf.d]# htpasswd -c /etc/nginx/user_passwd user1
#-c创建用户

New password:           #需要输入两次密码
Re-type new password:
Adding password for user user1
[root@master conf.d]# cat /etc/nginx/user_passwd        #查看账号密码文件
user1:$apr1$GY08sx4L$o/tx98e11oQWGeqJ5l0yR1            #显示是加密的结果
[root@master conf.d]# htpasswd -m /etc/nginx/user_passwd user2
#再创建新用户就不要加-c  用-m    m指的是MD5加密

New password:
Re-type new password:
Adding password for user user2
[root@master conf.d]# cat /etc/nginx/user_passwd
user1:$apr1$GY08sx4L$o/tx98e11oQWGeqJ5l0yR1
user2:$apr1$Gflvuzsx$x7f2vA9EfZZ3XxD3RCIyD1
- 需要对某个访问目录或者页面进行认证,而不是全站,对配置文件进行更改
[root@sc vhost]# vim test.com.conf

以下为更改的配置内容:

server
{
    listen 80;
    server_name test.com;
    index index.html index.htm index.php;
    root /data/wwwroot/test.com;

    location  /admin/
    {
        auth_basic              "Auth";
        auth_basic_user_file   /usr/local/nginx/conf/htpasswd;
    }
}

[root@sc vhost]# /usr/local/nginx/sbin/nginx -t
nginx: the configuration file /usr/local/nginx/conf/nginx.conf syntax is ok
nginx: configuration file /usr/local/nginx/conf/nginx.conf test is successful
[root@sc vhost]# /usr/local/nginx/sbin/nginx -s reload
- 补充
nginx location优先级:

location /  优先级比 location ~ 要低,也就是说,如果一个请求(如,aming.php)同时满足两个location

举例优先级:

location /amin.php
location ~ *.php$   #会选择下面的
nginx location 文档: https://github.com/aminglinux/nginx/tree/master/location
总结:
location /:针对整个目录做认证
也可以针对某一个目录或url做认证,比如:
location /admin/:针对admin目录做认证
location ~ admin.php:针对某个请求的url做认证
auth_basic_user_file:用户认证文件
9. Nginx访问日志
- Nginx访问日志
就是用户访问网站的记录。
- 配置访问日志
主配置文件:
    log_format  main  '$remote_addr - $remote_user [$time_local] "$request" '
                  '$status $body_bytes_sent "$http_referer" '
                  '"$http_user_agent" "$http_x_forwarded_for"';
- 虚拟主机配置文件
access_log /log/to/path main;
nginx内置变量: https://github.com/aminglinux/nginx/blob/master/rewrite/variable.md
- nginx 常用全局变量
| 变量 | 说明 |
|---|---|
| $args | 请求中的参数,如www.123.com/1.php?a=1&b=2的$args就是a=1&b=2 |
| $content_length | HTTP请求信息里的"Content-Length" |
| $conten_type | HTTP请求信息里的"Content-Type" |
| $document_root | nginx虚拟主机配置文件中的root参数对应的值 |
| $document_uri | $document_uri就是1.php,不包含后面的参数 |
| $host | 主机头,也就是域名 |
| $http_user_agent | 客户端的详细信息,也就是浏览器的标识,用curl -A可以指定 |
| $http_cookie | 客户端的cookie信息 |
| $limit_rate | 如果nginx服务器使用limit_rate配置了显示网络速率,则会显示,如果没有设置, 则显示0 |
| $remote_addr | 客户端的公网ip |
| $remote_port | 客户端的port |
| $remote_user | 如果nginx有配置认证,该变量代表客户端认证的用户名 |
| $request_body_file | 做反向代理时发给后端服务器的本地资源的名称 |
| $request_method | 请求资源的方式,GET/PUT/DELETE等 |
| $request_filename | 当前请求的资源文件的路径名称,相当于是 d o c u m e n t r o o t / document_root/ documentroot/document_uri的组合 |
| $request_uri | 请求的链接,包括 d o c u m e n t u r i 和 document_uri和 documenturi和args |
| $scheme | 请求的协议,如ftp,http,https |
| $server_protocol | 客户端请求资源使用的协议的版本,如HTTP/1.0,HTTP/1.1,HTTP/2.0等 |
| $server_addr | 服务器IP地址 |
| $server_name | 服务器的主机名 |
| $server_port | 服务器的端口号 |
| $uri | 和$document_uri相同 |
| $http_referer | 客户端请求时的referer,通俗讲就是该请求是通过哪个链接跳过来的,用curl -e可以指定 |
10. Nginx日志切割

讲义

自定义shell 脚本:
vim /usr/local/sbin/nginx_log_rotate.sh//写入如下内容
#! /bin/bash
## 假设nginx的日志存放路径为/data/logs/
d=`date -d "-1 day" +%Y%m%d`
logdir="/data/logs"
nginx_pid="/usr/local/nginx/logs/nginx.pid"
cd $logdir
for log in `ls *.log`
do
    mv $log $log-$d
done
/bin/kill -HUP `cat $nginx_pid`


任务计划:
0 0 * * * /bin/bash /usr/local/sbin/nginx_log_rotate.sh
方法一(脚本切割日志)
- 由于 Nginx 不像 Apache 有自己的切割工具,在此我们需要写个脚本完成需求
[root@sc ~]# vim /usr/local/sbin/nginx_logrotate.sh

以下为脚本内容:

#! /bin/bash
d=`date -d "-1 day" +%Y%m%d`  #生成昨天的日期
logdir="/tmp/"
nginx_pid="/usr/local/nginx/logs/nginx.pid"  #存放pid的文件路径
cd $logdir  #进入到 logdir 定义的日志目录下
for log in `ls *.log`  #进行 for 循环,将 log 文件全部列出来
do
    mv $log $log-$d  #后把列出来的 log 文件都重命名
done
/bin/kill -HUP `cat $nginx_pid`  #生成新的日志文件
- sh -x 脚本详细执行过程
[root@sc ~]# sh -x /usr/local/sbin/nginx_logrotate.sh
++ date -d '-1 day' +%Y%m%d
+ d=20190515
+ logdir=/tmp/
+ nginx_pid=/usr/local/nginx/logs/nginx.pid
+ cd /tmp/
++ ls test.com.log
+ for log in '`ls *.log`'
+ mv test.com.log test.com.log-20190515
++ cat /usr/local/nginx/logs/nginx.pid
+ /bin/kill -HUP 6760
- 查看生成的 test.com 日志

- 日志清理,删除超过一个月的日志(当然这个也可以写在脚本里面)
[root@sc ~]# find /tmp/ -name *.log-* -type f -mtime +30 |xargs rm
- 创建执行脚本的计划,比如:每天 0 时 0 分进行切割
[root@sc ~]# crontab -e
no crontab for root - using an empty one

以下为创建的crontab内容:

0 0 * * * /usr/local/sbin/nginx_log_rotate.sh  #每天的 0 时 0 分执行此脚本
方法二(logrotate工具切割)
- 为什么要做日志切割
/data/logs/ 里面有很多访问日志。 如果日志越来越大,可能有一天会把整个磁盘写满。你可以想象一下一个日志有100G
你如何查看这个日志? cat  less   tail  vi
- 系统里有一个日志切割的服务
logrotate  工具
配置文件: /etc/logrotate.conf
子配置文件:/etc/logrotate.d/*

查看配置文件:

[root@master ~]# cat /etc/logrotate.conf
# see "man logrotate" for details
# rotate log files weekly
weekly         #按周切割

# keep 4 weeks worth of backlogs
rotate 4       #可以切割四个文件,第五个就被覆盖了

# create new (empty) log files after rotating old ones
create         #建立一个新的文件

# use date as a suffix of the rotated file
dateext        #使用日期的后缀

# uncomment this if you want your log files compressed
#compress      #是否要压缩

# RPM packages drop log rotation information into this directory
include /etc/logrotate.d   #包含了 /etc/logrotate.d 的配置文件

# no packages own wtmp and btmp -- we'll rotate them here
/var/log/wtmp {            #针对/var/log/wtmp这个文件
    monthly                #按月来切割
    create 0664 root utmp  #创建新文件的权限和属主属组
        minsize 1M         #小于1M不进行切割,大于1M再切割
    rotate 1               #只保留一个
}

/var/log/btmp {            #针对/var/log/btmp这个文件
    missingok              #忽略错误
    monthly                #按月来切割
    create 0600 root utmp  #创建新文件 权限 属主 属组
    rotate 1               ##只保留一个
}

# system-specific logs may be also be configured here.
- Nginx的日志切割配置文件
/etc/logrotate.d/nginx

内容:

/var/log/nginx/*.log /data/logs/*.log {
daily                    #每天
dateext                  #增加日期作为后缀
missingok                #忽略错误
rotate 7                 #保留7个
compress                 #是否压缩
delaycompress            #延迟压缩
notifempty               #如果是空文件不进行切割
create 640 nginx adm     #创建回滚的文件 权限 属主 属组
sharedscripts            #所有文件归档完成后执行脚本
postrotate               #日志切割后执行的脚本命令
if [ -f /var/run/nginx.pid ]; then
        kill -USR1 `cat /var/run/nginx.pid`
fi
endscript                #结束脚本
}
- 测试执行
logrotate -vf /etc/logrotate.d/nginx
11. 静态文件不记录日志和过期时间
1. 日志里面不记录静态文件
在访问日志里,过滤掉一些图片、js、css类的请求日志。因为这样的请求日志没有多大用,而且会占用很大的磁盘空间
- 如何配置
location ~* .(png|jpeg|gif|js|css|bmp|flv)$
{
    access_log off;
}
2. 静态文件的过期时间
让图片之类的静态文件,缓存在客户端的浏览器中,在没有过期之前,浏览器不需要请求该图片。
就是为了让这些图片有一个时效性。
如果服务器上图片已经做了更新,但是客户端访问到的还是旧的。
- 如何配置
vi  虚拟主机配置文件,增加或更改

location ~* .(png|jpeg|gif|js|css|bmp|flv)$
{
   expires 1d;
   access_log off
}
- 补充
curl -x 用来指定目标服务器的IP和端口,例:curl -x127.0.0.1:80 -I www.aminglinux.cc

bc 是一个linux系统下面的计算器,yum install -y bc

tail -f /data/logs/bbs.access.log  //-f选型可以动态查看一个文件的内容

> 可以清空一个文件内容

~* 表示不区分大小写的匹配  后面跟正则表达式   .表示任意一个字符
- 虚拟主机配置文件location~可以指定对应的静态文件,expires配置过期时间,而access_log 配置为off就可以不记录访问日志了, 按以下设置虚拟主机配置文件
[root@sc ~]# vim /usr/local/nginx/conf/vhost/test.com.conf

以下为更改的配置内容:

server
{
    listen 80;
    server_name test.com test2.com test3.com;
    index index.html index.htm index.php;
    root /data/wwwroot/test.com;
    if ($host != 'test.com' ) {
        rewrite  ^/(.*)$  http://test.com/$1  permanent;
    }
    location ~ .*.(gif|jpg|jpeg|png|bmp|swf)$  #匹配.gif等格式的静态文件不计入日志
    {
          expires      7d;  #有效期7天
          access_log off;  #不记录日志
    }
    location ~ .*.(js|css)$  #匹配js或者css文件
    {
          expires      12h;  #有效期12小时
          access_log off;
    }

    access_log /tmp/test.com.log sc;  #访问日志
}


查看本机的图片过期失效:

[root@backup ~]# curl -x127.0.0.1:80 -I http://www.test.com/uc_server/images/noavatar_small.gif
HTTP/1.1 200 OK
Server: nginx/1.14.2
Date: Sat, 02 Nov 2019 09:18:40 GMT
Content-Type: image/gif
Content-Length: 1574
Last-Modified: Sat, 02 Nov 2019 05:52:08 GMT
Connection: keep-alive
ETag: "5dbd1988-626"
Expires: Sun, 03 Nov 2019 09:18:40 GMT
Cache-Control: max-age=86400           #过期失效
Accept-Ranges: bytes
12. Nginx防盗链
- 什么叫防盗链
两个网站 A 和 B, A网站引用了B网站上的图片,这种行为就叫做盗链。 防盗链,就是要防止A引用B的图片。
- 配置
location ~ .(png|gif|jpeg|bmp|mp3|mp4|flv)$
{
valid_referers none blocked server_names *.aming.com;
if ($invalid_referer) {
            return 403;
        }
}
- 补充
rz 上传文件,yum install lrzsz
sz filename  这样去把这个文件推送到windows上

测试防盗链: curl  -I -e "http://www.aaa.com/1.txt" http://www.aming.com/1.png
curl的-e指定自定义的referer
- 把此代码,放入虚拟主机配置中,防盗链代码,里面包含过期时间
[root@sc test.com]# vim /usr/local/nginx/conf/vhost/test.com.conf

以下为更改的配置内容:

server
{
    listen 80;
    server_name test.com test2.com test3.com;
    index index.html index.htm index.php;
    root /data/wwwroot/test.com;
    if ($host != 'test.com' ) {
        rewrite  ^/(.*)$  http://test.com/$1  permanent;
    }
#    location ~ .*.(gif|jpg|jpeg|png|bmp|swf)$
#    {
#          expires      7d;
#          access_log off;
#    }
    location ~* ^.+.(gif|jpg|png|swf|flv|rar|zip|doc|pdf|gz|bz2|jpeg|bmp|xls)$  #使用正则匹配包含这些后缀的文件,不区分大小写
   {
    expires 7d;  #过期时间为7天
    valid_referers none blocked server_names  *.test.com ;  #定义白名单的域名
    if ($invalid_referer) {  #条件语句,是否匹配白名单
        return 403;  #如果不是白名单的域名,就返回403
    }
    access_log off;  #不记录日志
   }

    location ~ .*.(js|css)$
    {
#          expires      12h;
          access_log off;
    }

    access_log /tmp/test.com.log sc;
}
13. Nginx访问控制
- 限制IP访问(使用场景:允许某个IP段的访问,或者限制某个IP段的访问)
1)白名单

allow 127.0.0.1;
dney all;


举例:

server
{
    listen 80;
    server_name www.discuz.com www.test.com;
    index index.html index.htm index.php;
    root /data/wwwroot/discuz;
    allow 127.0.0.1;      #设置白名单网段
    allow 192.168.1.0/24; #设置白名单网段
    deny all;             #其他IP网段都是黑名单


2)黑名单

deny 127.0.0.1;
deny 1.1.1.1;


举例:

server
{
    listen 80;
    server_name www.discuz.com www.test.com;
    index index.html index.htm index.php;
    root /data/wwwroot/discuz;
    deny 127.0.0.1;       #设置黑名单网段
    deny 192.168.1.0/24;  #设置黑名单网段
    ~~~~~~~~~~~~  #没设置的其他网段都是白名单,空着就行
- 限制某个目录(一般只限于内部人员的访问某个目录下的资源,其他外部人员访问都拒绝)
location /admin/ //在admin目录下操作

{
    allow 127.0.0.1;
    allow 192.168.112.136;
    deny all;
}


举例:

location ~ /admin.php               #针对某个目录做限制,只允许添加的IP段访问,其他都拒绝
{
	allow 127.0.0.1;
    allow 192.168.112.136;
    deny all;
    fastcgi_pass   127.0.0.1:9000;
    fastcgi_index  index.php;
    fastcgi_param  SCRIPT_FILENAME  /data/wwwroot/bbs.aminglinux.cc$fastcgi_script_name;
    include        fastcgi_params;
}
- 限制某个目录下的某类文件
location ~ .*(upload|image)/.*.php$
{
    deny all;
}
- 限制user-agent
if ($http_user_agent ~ 'Spider/3.0|YoudaoBot|Tomato')
{
    return 403;
}
- 限制uri
if ($request_uri ~ (abc|123))
{
    return 404;
}
- 补充
curl命令用法:
curl -v -A 'aaaaaspider/3.0' -e "1111"  -x127.0.0.1:80 bbs.aminglinux.cc -I
-A 指定user-agent  -e 指定referer  -x指定访问目标服务器的ip和port -I只显示 header信息,不显示具体的网页内容
-v 显示详细的通信过程
14. Nginx解析php相关配置
操作步骤模板:
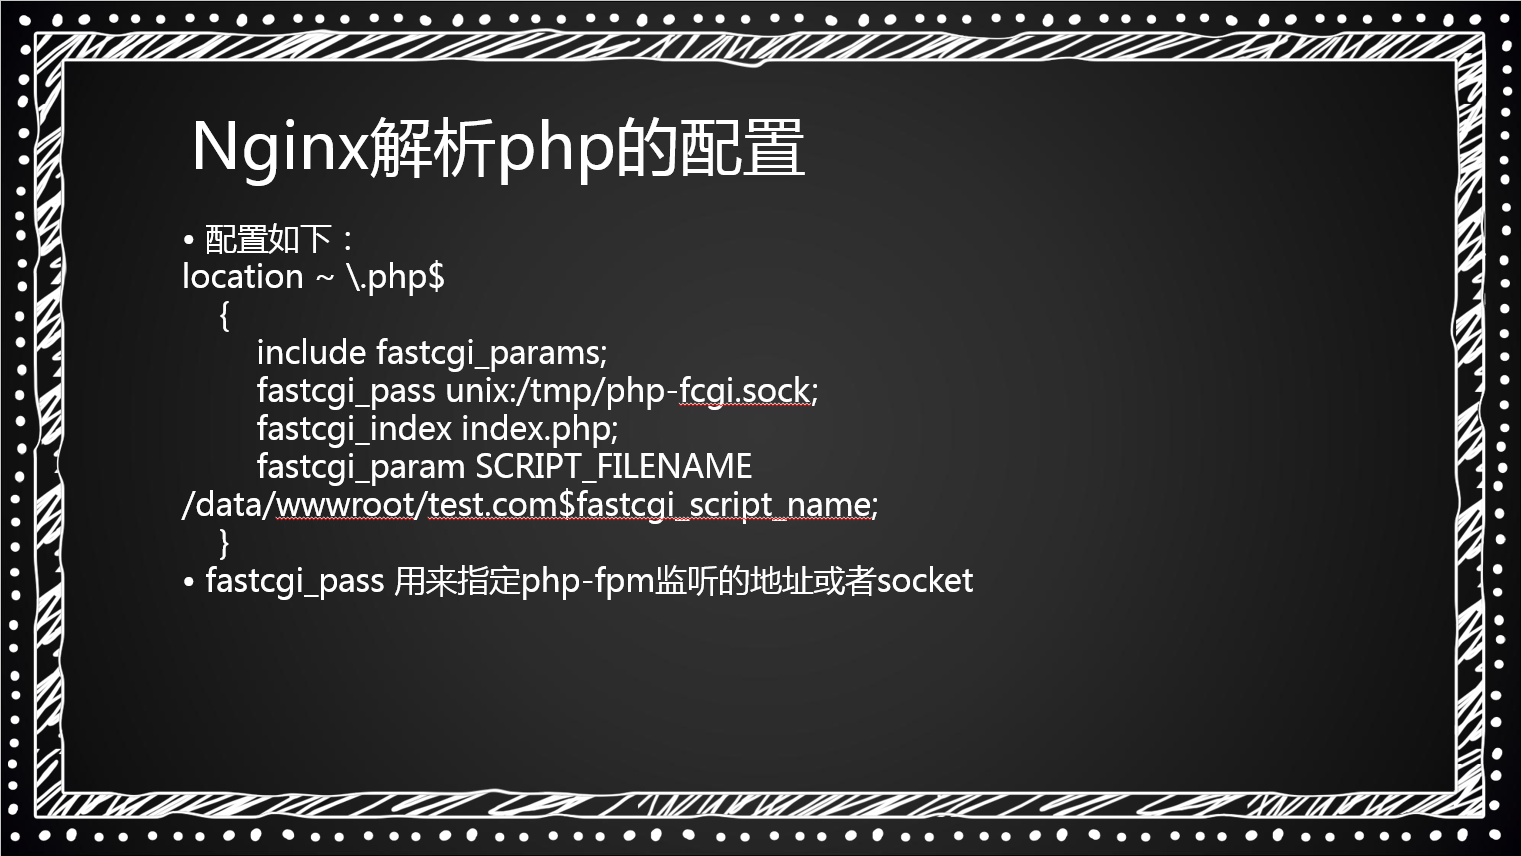
1. 配置如下:
location ~ .php$
    {
        include fastcgi_params;
        fastcgi_pass unix:/tmp/php-fcgi.sock;
        fastcgi_index index.php;
        fastcgi_param SCRIPT_FILENAME /data/wwwroot/test.com$fastcgi_script_name;
    }
2. fastcgi_pass 用来指定php-fpm监听的地址或者socket
操作步骤示例:
1. 先创建一个 3.php 文件:
[root@sc test.com]# vim /data/wwwroot/test.com/3.php

<?php
phpinfo();
2. 测试这个 3.php 文件,此时不能够解析:
[root@sc test.com]# curl -x192.168.85.132:80 test.com/3.php
<?php
phpinfo();
3. 解析 php 文件的配置文件,把此代码,放入虚拟主机配置中:
[root@sc test.com]# vim /usr/local/nginx/conf/vhost/test.com.conf

以下为更改的配置内容:

server
{
    listen 80;
    server_name test.com test2.com test3.com;
    index index.html index.htm index.php;
    root /data/wwwroot/test.com;
    if ($host != 'test.com' ) {
        rewrite  ^/(.*)$  http://test.com/$1  permanent;
    }
#    location ~ .*.(gif|jpg|jpeg|png|bmp|swf)$
#    {
#          expires      7d;
#          access_log off;
#    }
    location ~* ^.+.(gif|jpg|png|swf|flv|rar|zip|doc|pdf|gz|bz2|jpeg|bmp|xls)$
   {
    expires 7d;
    valid_referers none blocked server_names  *.test.com ;
    if ($invalid_referer) {
        return 403;
    }
    access_log off;
   }

    location ~ .*.(js|css)$
    {
#          expires      12h;
          access_log off;
    }
    location /admin/
    {
        allow 192.168.85.132;
#       allow 127.0.0.1;
        deny all;
    }

    location ~ .*(upload|image)/.*.php$
    {
        deny all;
    }

    if ($http_user_agent ~ 'Spider/3.0|YoudaoBot|Tomato')
    {
        return 403;
    }

    location ~ .php$
    {
        include fastcgi_params;
        fastcgi_pass unix:/tmp/php-fcgi.sock;
        fastcgi_index index.php;
        fastcgi_param SCRIPT_FILENAME /data/wwwroot/test.com$fastcgi_script_name;
    }

    access_log /tmp/test.com.log sc;
}
4. 检查语句,并加载配置文件:
[root@sc test.com]# /usr/local/nginx/sbin/nginx -t
nginx: the configuration file /usr/local/nginx/conf/nginx.conf syntax is ok
nginx: configuration file /usr/local/nginx/conf/nginx.conf test is successful
[root@sc test.com]# /usr/local/nginx/sbin/nginx -s reload
15. Nginx反向代理
- 什么叫反向代理
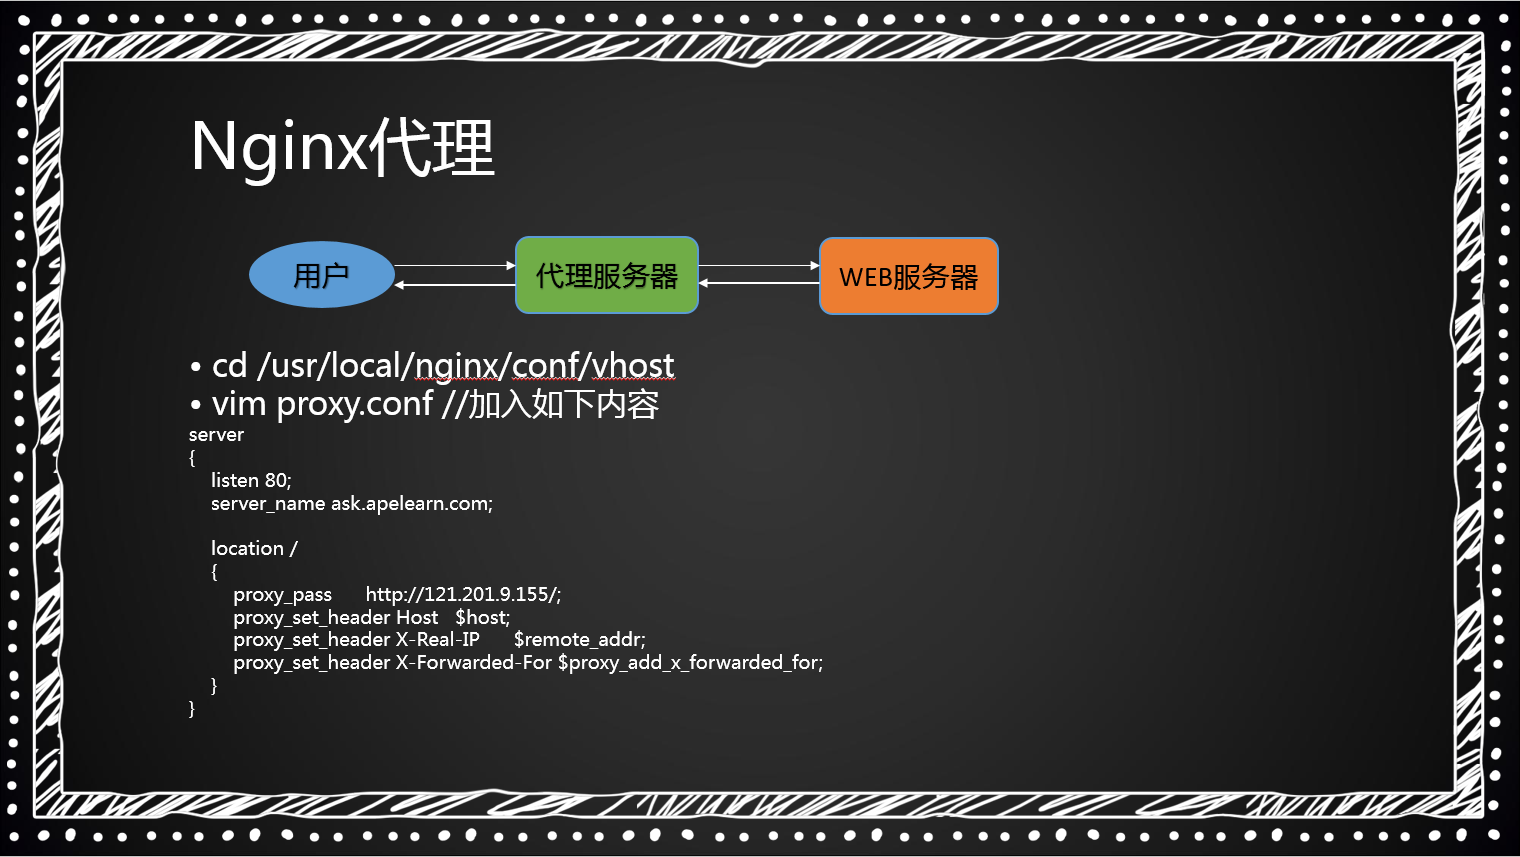
原理:Nginx代理是一种反向代理。反向代理(Reverse Proxy)方式是指以代理服务器来接受Internet上的连接请求,然后将请求转发给内部网络上的服务器;并将从服务器上得到的结果返回给Internet上请求连接的客户端,此时代理服务器对外就表现为一个服务器。
假如这家公司有很多台服务器,为了节省成本,不能为所有的服务器都分配公网 IP,而如果一个没有公网的 IP 的服务其要提供 web 服务,就可以通过代理来实现,这就是 Nginx 比 httpd 越来越受欢迎的原因。
什么叫反向代理

C(用户)-->  B(在和A同一个机房,并且有公网)-->  A(不带公网的机器)


什么场景会使用反向代理

1. 访问不带公网的内网机器

2. 解决两台机器之间通信有障碍的问题


场景设置

A B 两台机器,其中 A 只有内网,B 有内网和外网

A 的内网 ip 是 xxx.xxx.xxx.xx

B 的内网 ip 是 xxx.xxx.xxx.xx  B 的外网 IP 是 xxx.xxx.xxx.xx

C 为客户端,C 只能访问B的外网 IP,不能访问 A 或者B的内网 IP


需求目的

C 要访问到 A 的内网上的网站
- 在第二台虚拟机配置第二块网卡
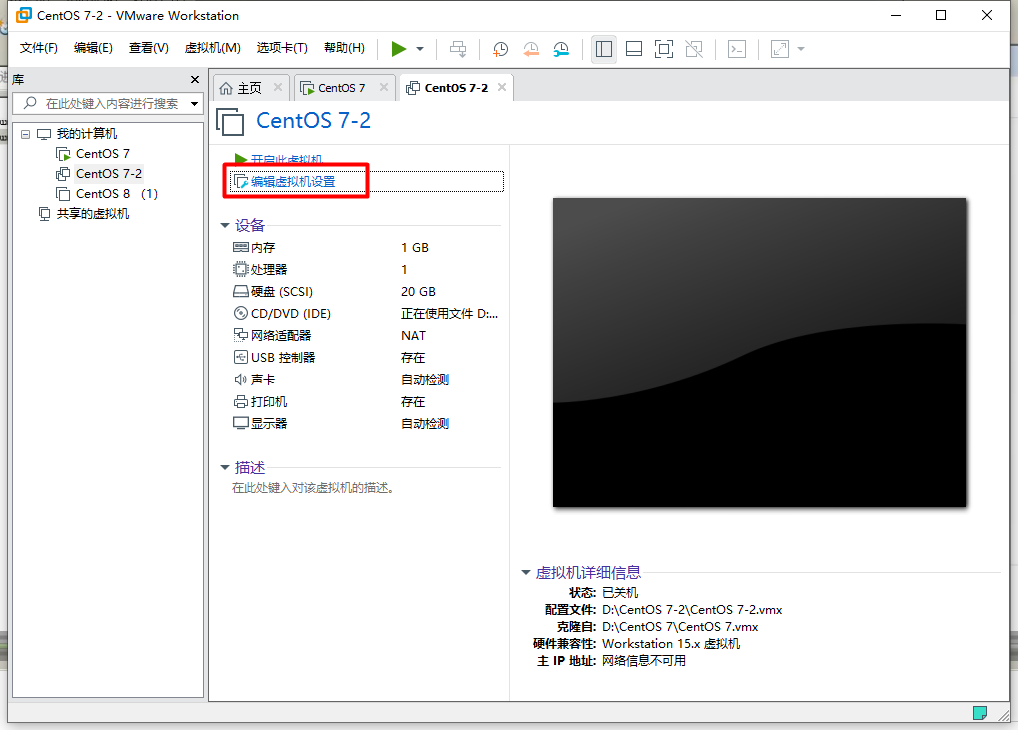
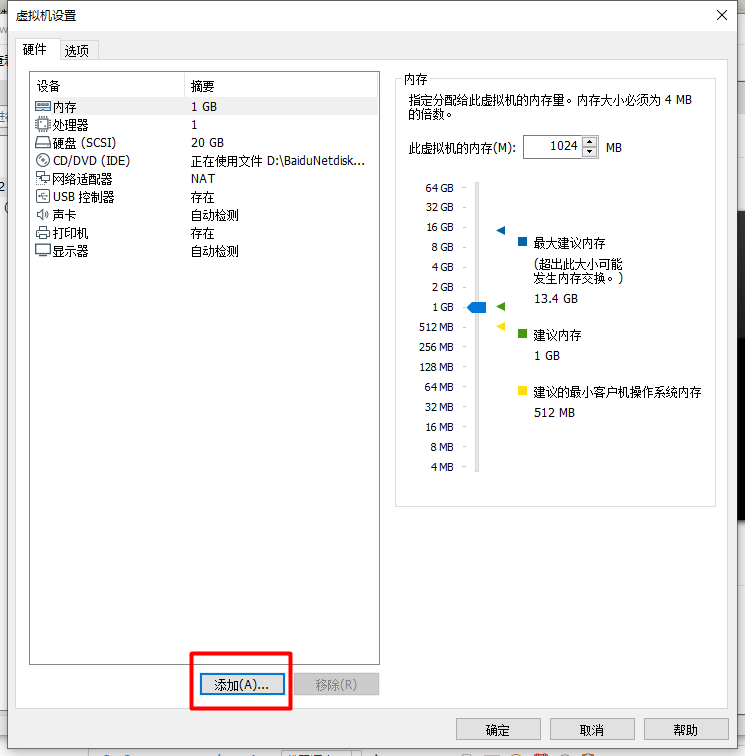
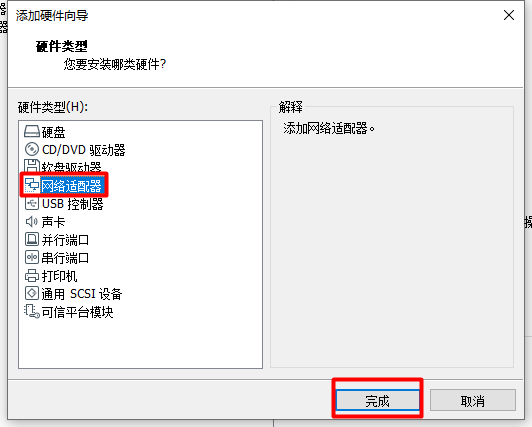
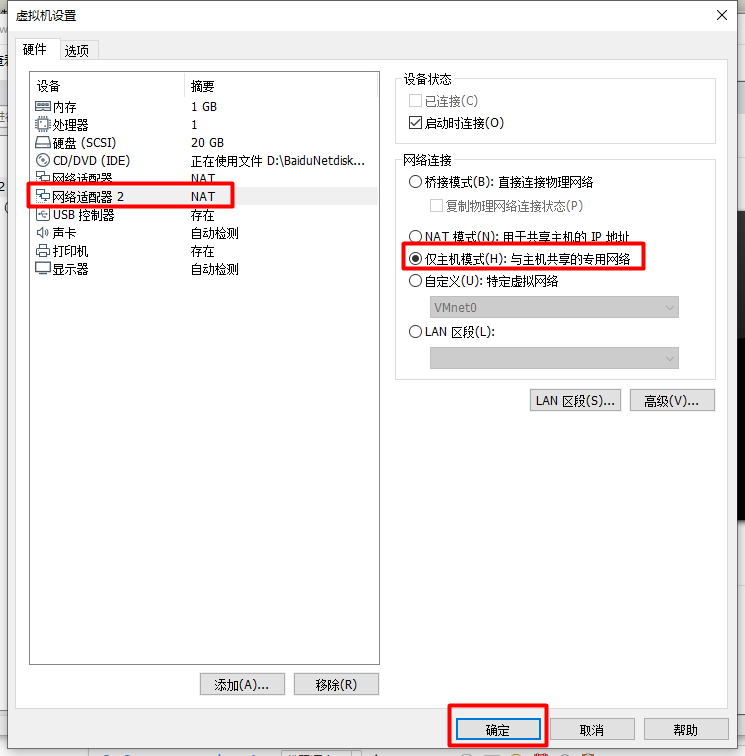
- 配置第二块网卡的内网ip
[root@centos7 ~]# cd /etc/sysconfig/network-scripts/
[root@centos7 network-scripts]# cp ifcfg-ens33 ifcfg-ens37
[root@centos7 network-scripts]# vim ifcfg-ens37

TYPE="Ethernet"
PROXY_METHOD="none"
BROWSER_ONLY="no"
BOOTPROTO=static
DEFROUTE="yes"
IPV4_FAILURE_FATAL="no"
IPV6INIT="yes"
IPV6_AUTOCONF="yes"
IPV6_DEFROUTE="yes"
IPV6_FAILURE_FATAL="no"
IPV6_ADDR_GEN_MODE="stable-privacy"
NAME="ens37"
UUID="4f50f77e-8e33-40c3-981e-c248b9135c1e"
DEVICE="ens37"
ONBOOT="yes"
IPADDR=192.168.161.128
NETMASK=255.255.255.0
- 配置
    location /
    {
        proxy_pass http://ip;                     #指定无法访问的内网服务器ip地址
        proxy_set_header Host $host;              #域名是什么
        proxy_set_header X-Real-IP $remote_addr;  #在日志当中显示源客户端的ip
        proxy_set_header X-Forwarded-For $proxy_add_x_forwarded_for;
    }
- 创建 proxy.conf 配置文件,写入以下代码
因为是代理服务器所以不需要访问本地服务器的任何文件;
ask.apelearn.com; 定义一个域名;
proxy_pass http://47.104.7.242/;真实WEB服务器的IP地址。
$host; 也就是咱们的server_name
[root@sc ~]# cd /usr/local/nginx/conf/vhost
[root@sc vhost]# vim proxy.conf

以下为更改的配置内容:

server
{
    listen 80;
    server_name ask.apelearn.com;

    location /
    {
        proxy_pass      http://47.104.7.242/;
        proxy_set_header Host   $host;
        proxy_set_header X-Real-IP      $remote_addr;
        proxy_set_header X-Forwarded-For $proxy_add_x_forwarded_for;
    }
}
- 检查语句,并加载配置文件
[root@sc vhost]# /usr/local/nginx/sbin/nginx -t
nginx: the configuration file /usr/local/nginx/conf/nginx.conf syntax is ok
nginx: configuration file /usr/local/nginx/conf/nginx.conf test is successful
[root@sc vhost]# /usr/local/nginx/sbin/nginx -s reload
- 开始测试 127.0.0.1 就是自己的代理机,访问论坛
[root@sc vhost]# curl -x127.0.0.1:80 ask.apelearn.com -I
HTTP/1.1 200 OK
Server: nginx/1.16.0
Date: Thu, 16 May 2019 07:16:33 GMT
Content-Type: text/html; charset=UTF-8
Connection: keep-alive
X-Powered-By: PHP/5.3.3
P3P: CP="CURa ADMa DEVa PSAo PSDo OUR BUS UNI PUR INT DEM STA PRE COM NAV OTC NOI DSP COR"
Set-Cookie: ape__Session=i1jg4pavnrq7oim0parimpatk2; path=/; domain=.apelearn.com
Expires: Thu, 19 Nov 1981 08:52:00 GMT
Cache-Control: no-store, no-cache, must-revalidate, post-check=0, pre-check=0
Pragma: no-cache
myheader: web1

[root@sc vhost]#
- 测试网站的 robots
[root@sc vhost]# curl ask.apelearn.com/robots.txt
#
# robots.txt for MiWen
#

User-agent: *

Disallow: /?/admin/
Disallow: /?/people/
Disallow: /?/question/
Disallow: /account/
Disallow: /app/
Disallow: /cache/
Disallow: /install/
Disallow: /models/
Disallow: /crond/run/
Disallow: /search/
Disallow: /static/
Disallow: /setting/
Disallow: /system/
Disallow: /tmp/
Disallow: /themes/
Disallow: /uploads/
Disallow: /url-*
Disallow: /views/
Disallow: /*/ajax/[root@sc vhost]#
16. Nginx负载均衡
- 什么是负载均衡?
负载均衡就是,把请求均衡地分发到后端的各个机器上面。
比如,A B C D 四台 WEB 服务器,现在 E 要访问这 4 台服务器,F 为 Nginx 反向代理服务器,可以让 F 把 E 的请求均衡地发送到 A B C D 4 台服务器上。
- 配置
    upstream qq_com
    {
	ip_hash;
	server 61.135.157.156:80;
	server 125.39.240.113:80;
    }
    server
    {
	listen 80;
	server_name www.qq.com;
	location /
	{
	    proxy_pass http://qq_com;
	    proxy_set_header Host $host;
	    proxy_set_header X-Real-IP $remote_addr;
	    proxy_set_header X-Forwarded-For $proxy_add_x_forwarded_for;
	}
    }


######################################################################################


    upstream apelearn
    {
        ip_hash;
        server 115.159.51.96:80 weight=100;  #weight 设置权重,那台服务器被访问更多一些
        server 47.104.7.242:80;

    }
    server
    {
        listen 80;
        server_name www.apelearn.com;
        location /
        {
            proxy_pass http://apelearn;
            proxy_set_header Host $host;
            proxy_set_header X-Real-IP $remote_addr;
            proxy_set_header X-Forwarded-For $proxy_add_x_forwarded_for;
        }
    }
17. 配置Nginx的SSL
- 配置ssl证书
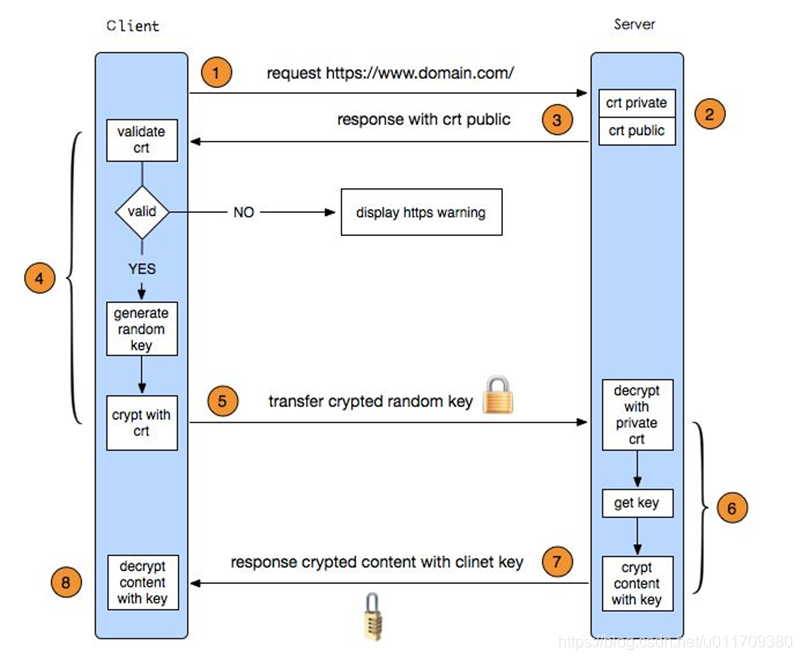
ssl原理

1)浏览器发送一个https的请求给服务器;
2)服务器要有一套数字证书,可以自己制作,也可以向组织申请,区别就是自己颁发的证书需要客户端验证通过,才可以继续访问,而使用受信任的公司申请的证书则不会弹出>提示页面,这套证书其实就是一对公钥和私钥;
3)服务器会把公钥传输给客户端;
4)客户端(浏览器)收到公钥后,会验证其是否合法有效,无效会有警告提醒,有效则会生成一串随机数,并用收到的公钥加密;
5)客户端把加密后的随机字符串传输给服务器;
6)服务器收到加密随机字符串后,先用私钥解密(公钥加密,私钥解密),获取到这一串随机数后,再用这串随机字符串加密传输的数据(该加密为对称加密,所谓对称加密,就是将数据和私钥也就是这个随机字符串>通过某种算法混合在一起,这样除非知道私钥,否则无法获取数据内容);
7)服务器把加密后的数据传输给客户端;
8)客户端收到数据后,再用自己的私钥也就是那个随机字符串解密;
- 生成ssl密钥对
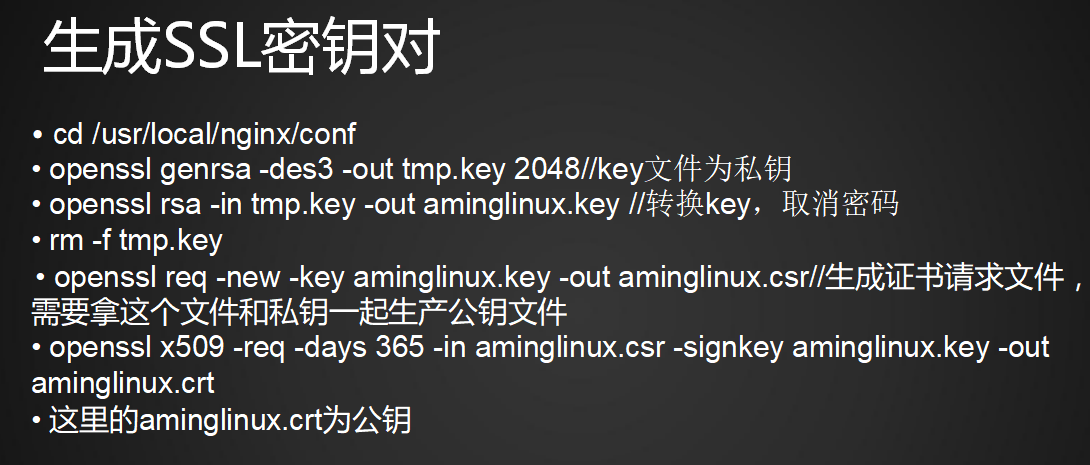
- 理解了ssl原理后,现在我们可以在虚拟机上去生成ssl密钥对,也就是自己制作证书。我们需要使用一个工具来生成密钥对,把密钥对放在nginx的conf目录下。
[root@centos7 ~]# cd /usr/local/nginx/conf/ #进入nginx的conf目录
- 我们需要使用到的工具是openssl,如果你虚拟机没有此命令,需要自己安装,安装命令:
[root@centos7 conf]# yum -y install openssl
- 准备完成后,第一步是生成一个私钥,命令如下:
[root@centos7 conf]# openssl genrsa -des3 -out tmp.key 2048      #key文件为私钥
Generating RSA private key, 2048 bit long modulus
........+++
.......+++
e is 65537 (0x10001)
Enter pass phrase for tmp.key:
Verifying - Enter pass phrase for tmp.key:

- 第二步,是把密码取消掉,如果不取消的话,会每次都要求客户端输入此密码,命令如下,实际上这时候aminglinux.key和tmp.key是同一个文件,只不过前者有密码,后者没密码。
[root@centos7 conf]# openssl rsa -in tmp.key -out aminglinux.key    #转换key,取消密码
Enter pass phrase for tmp.key:
writing RSA key

- 这时候就可以把tmp.key给删掉了:
[root@centos7 conf]# rm -f tmp.key
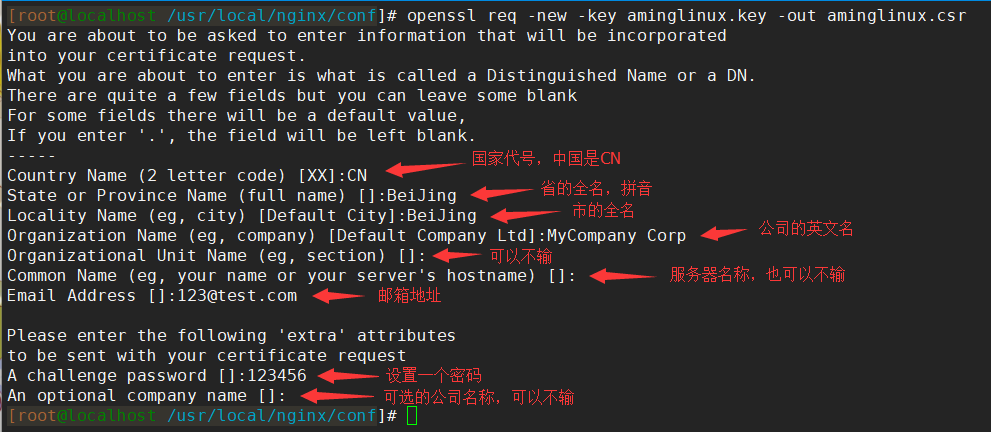
- 第三步就是去生成一个请求的文件,生成这个请求文件的目的是为了让这个请求文件和私钥一起去生成一个公钥,命令如下,会要求你输入一些信息,因为是自己制作的证书所以随便输入也是可以的,如果是正式的证书就不可以随便写了:
[root@centos7 conf]# openssl req -new -key aminglinux.key -out aminglinux.csr
You are about to be asked to enter information that will be incorporated
into your certificate request.
What you are about to enter is what is called a Distinguished Name or a DN.
There are quite a few fields but you can leave some blank
For some fields there will be a default value,
If you enter '.', the field will be left blank.
-----
Country Name (2 letter code) [XX]:CN
State or Province Name (full name) []:BeiJing
Locality Name (eg, city) [Default City]:BeiJing
Organization Name (eg, company) [Default Company Ltd]:MY
Organizational Unit Name (eg, section) []:
Common Name (eg, your name or your server's hostname) []:
Email Address []:sunchen88vip@163.com

Please enter the following 'extra' attributes
to be sent with your certificate request
A challenge password []:123456
An optional company name []:
- 第四步就是生成公钥了,命令如下:
[root@centos7 conf]# openssl x509 -req -days 365 -in aminglinux.csr -signkey aminglinux.key -out aminglinux.crt
Signature ok
subject=/C=CN/ST=x02ei/L=BeiJing/O=MY/emailAddress=sunchen88vip@163.com
Getting Private key

- 现在我们的证书就制作完成了,可以看到有这样的三个文件:
[root@centos7 conf]# ls aminglinux*
aminglinux.crt  aminglinux.csr  aminglinux.key
- Nginx配置ssl
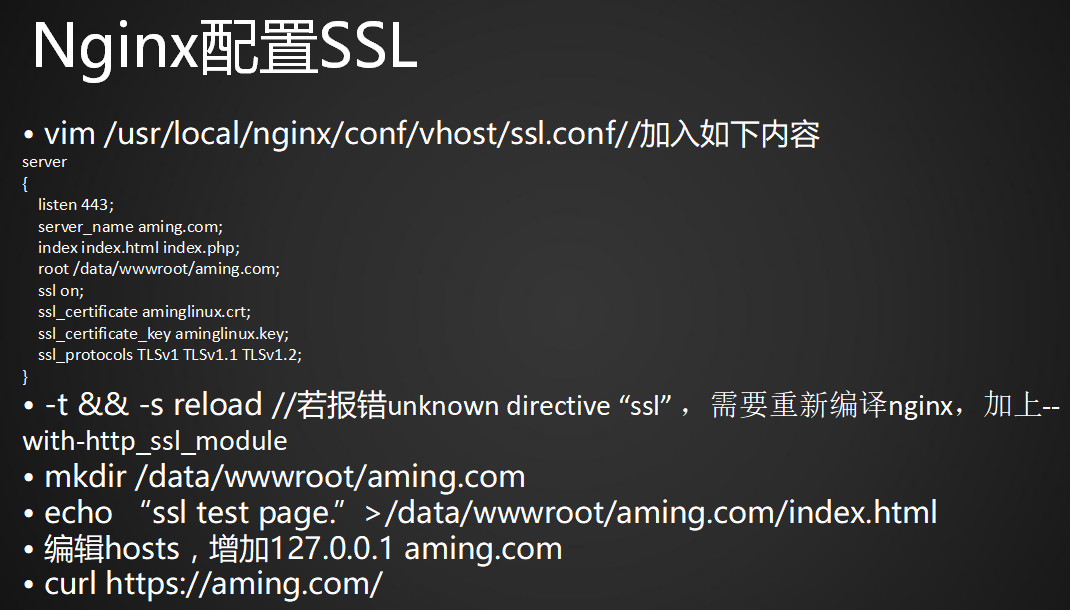
- 我们生成好密钥对也就是证书之后,就可以使用Nginx配置SSL了,先创建一个目录:
[root@centos7 ~]# mkdir /data/wwwroot/aming.com
- 然后创建一个文件
[root@centos7 ~]# vim /usr/local/nginx/conf/vhost/ssl.conf

server
{
listen 443;
server_name xihaji.com;
index index.html index.php;
root /data/wwwroot/xihaji.com;
ssl on;                                 #定义开启ssl
ssl_certificate aminglinux.crt;         #指定公钥
ssl_certificate_key aminglinux.key;     #指定私钥
ssl_protocols TLSv1 TLSv1.1 TLSv1.2;    #定义协议
}
- 编辑完ssl配置文件,此时检查语法,发现当前Nginx并不支持SSL,因为当时辑Nginx编译时并没有配置支持SSL的参数
[root@centos7 ~]# /usr/local/nginx/sbin/nginx -t
nginx: [warn] the "ssl" directive is deprecated, use the "listen ... ssl" directive instead in /usr/local/nginx/conf/vhost/ssl.conf:7
nginx: [emerg] cannot load certificate "/usr/local/nginx/conf/xhjlinux.crt": BIO_new_file() failed (SSL: error:02001002:system library:fopen:No such file or directory:fopen('/usr/local/nginx/conf/xhjlinux.crt','r') error:2006D080:BIO routines:BIO_new_file:no such file)
nginx: configuration file /usr/local/nginx/conf/nginx.conf test failed

我这里的问题是 没有指定对 公钥 和 私钥 所以显示不光没编译,还报错了
- 查找nginx的ssl模块,重新编译安装nginx
[root@centos7 ~]# cd /usr/local/src/nginx-1.18.0
[root@centos7 nginx-1.18.0]# ./configure --prefix=/usr/local/nginx --with-http_ssl_module

[root@centos7 nginx-1.18.0]# make && make install
- 重新编译安装后再测试一下配置文件,现在就没问题了:
[root@centos7 conf]# /usr/local/nginx/sbin/nginx -t
nginx: [warn] the "ssl" directive is deprecated, use the "listen ... ssl" directive instead in /usr/local/nginx/conf/vhost/ssl.conf:7
nginx: the configuration file /usr/local/nginx/conf/nginx.conf syntax is ok
nginx: configuration file /usr/local/nginx/conf/nginx.conf test is successful
- 重启nginx,查看监听端口可以发现监听了443端口:
[root@centos7 conf]# /etc/init.d/nginx restart
Restarting nginx (via systemctl):                          [  OK  ]
[root@centos7 conf]# ps aux |grep nginx
root      10252  0.0  0.1  45956  1152 ?        Ss   00:40   0:00 nginx: master process /usr/local/nginx/sbin/nginx -c /usr/local/nginx/conf/nginx.conf
nobody    10253  0.0  0.3  48400  3756 ?        S    00:40   0:00 nginx: worker process
nobody    10254  0.0  0.3  48400  3756 ?        S    00:40   0:00 nginx: worker process
root      10256  0.0  0.0 112812   972 pts/0    S+   00:41   0:00 grep --color=auto nginx
[root@centos7 conf]# netstat -lntp
Active Internet connections (only servers)
Proto Recv-Q Send-Q Local Address           Foreign Address         State       PID/Program name
tcp        0      0 0.0.0.0:80              0.0.0.0:*               LISTEN      10252/nginx: master
tcp        0      0 0.0.0.0:22              0.0.0.0:*               LISTEN      6914/sshd
tcp        0      0 127.0.0.1:25            0.0.0.0:*               LISTEN      7142/master
tcp        0      0 0.0.0.0:443             0.0.0.0:*               LISTEN      10252/nginx: master
tcp6       0      0 :::3306                 :::*                    LISTEN      7087/mariadbd
tcp6       0      0 :::22                   :::*                    LISTEN      6914/sshd
tcp6       0      0 ::1:25                  :::*                    LISTEN      7142/master
- 创建安测试文件
[root@centos7 ~]# cd /data/wwwroot/aming.com/
[root@centos7 aming.com]# vim index.html

ni hao 123
-
往hosts里添加aming.com:
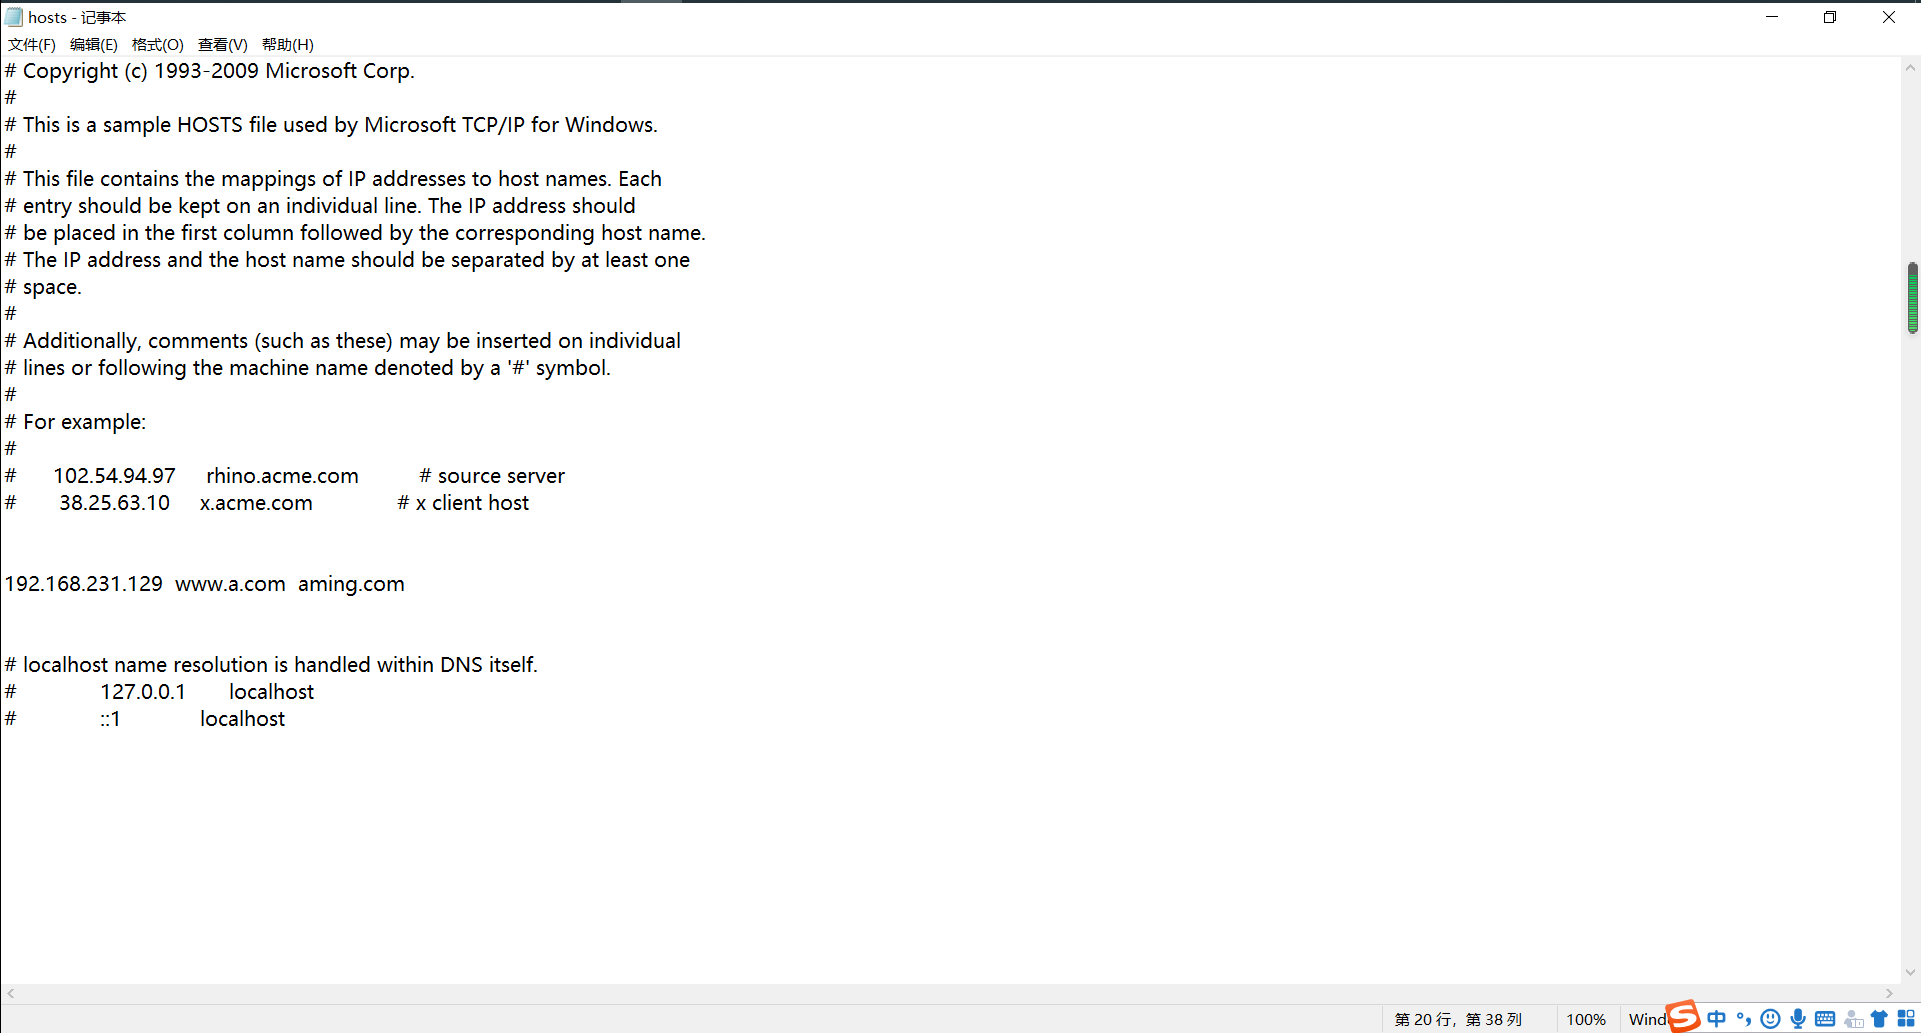
-
然后先临时清空Linux上的防火墙规则,命令如下:
[root@centos7 aming.com]# systemctl stop firewalld
[root@centos7 aming.com]# iptables -nvL
Chain INPUT (policy ACCEPT 269 packets, 30726 bytes)
 pkts bytes target     prot opt in     out     source               destination

Chain FORWARD (policy ACCEPT 0 packets, 0 bytes)
 pkts bytes target     prot opt in     out     source               destination

Chain OUTPUT (policy ACCEPT 179 packets, 47535 bytes)
 pkts bytes target     prot opt in     out     source               destination
- 完成以上操作后,才能够使用浏览器访问
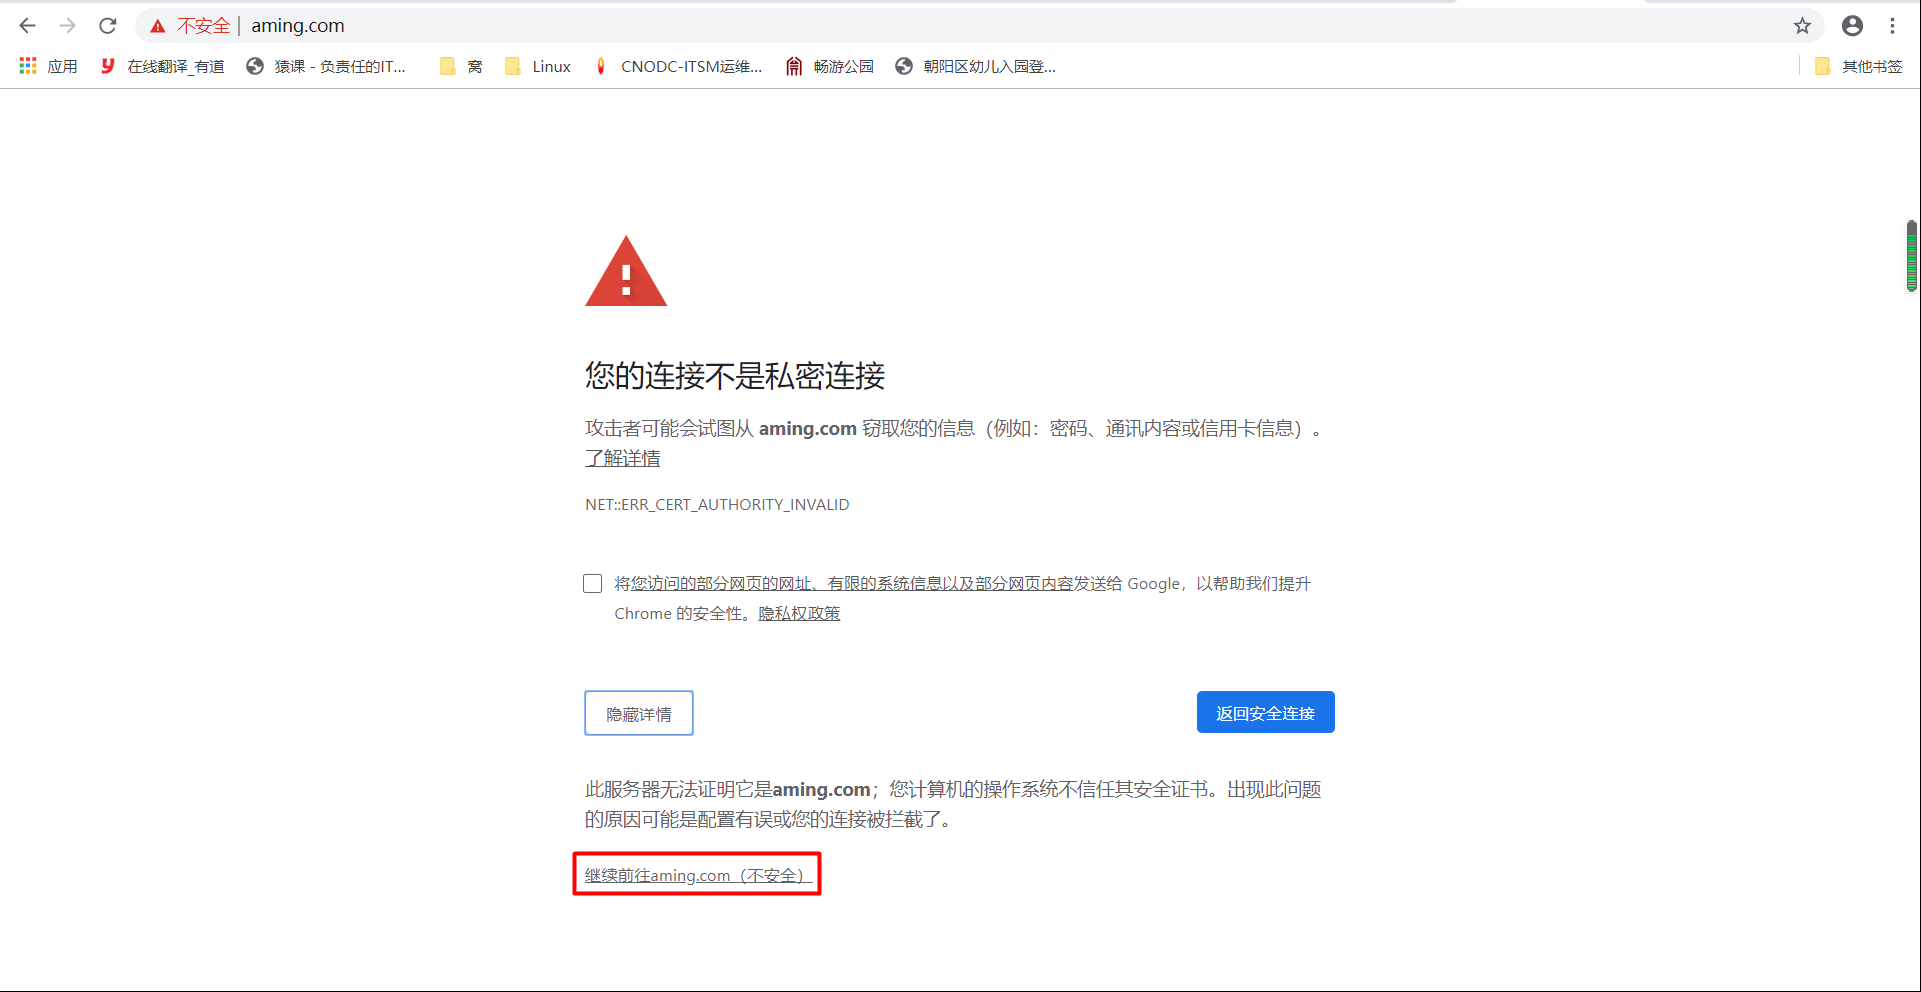

最后
以上就是光亮香烟最近收集整理的关于【图文教程】Nginx1. Nginx介绍2. Nginx安装(二进制免编译安装)3. Nginx安装(yum安装)4. 安装Nginx虚拟主机5. 安装wordpress(php写的博客)6. 安装Discuz7. Nginx域名重定向8. Nginx用户认证9. Nginx访问日志10. Nginx日志切割11. 静态文件不记录日志和过期时间12. Nginx防盗链13. Nginx访问控制14. Nginx解析php相关配置15. Nginx反向代理16. Nginx负载均衡17. 配置N的全部内容,更多相关【图文教程】Nginx1.内容请搜索靠谱客的其他文章。


发表评论 取消回复