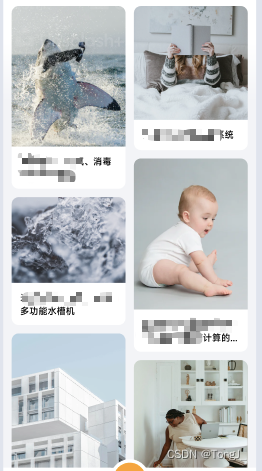
效果图

实现代码:
思路:
将双瀑布流分为left、right两个数据流,通过动态获取两边数据的动态高度来进行判断,下一条数据插入低的一方。
因为用户所上传图片高度不一致,所以image的mode属性分为两种,如果图片宽高比大于1.5倍,则使用aspectFill属性,如果正常图片比例,则使用widthFix属性。
数据分页处理,懒加载数据,使用微信小程序onPageScroll属性动态获取到滚动条高度,判断滚动条滚动位置,进行请求数据,实现数据加载。
html:
          <!-- 内容部分 -->
          <view class="container" >
            <view id="left">
              <view  class="listWrap" wx:for="{{leftList}}" catchtap="bottomButton" data-id="{{item.id}}" >
                  <image src="{{item.imglist[0]}}"mode='{{item.mode=="screenshot"?"aspectFill":"widthFix"}}' style="max-height:400rpx;height:340rpx;" ></image>
                  <text class="listText">{{item.title}}</text>
              </view>
            </view>
            <view id="right">
              <view class="listWrap" wx:for="{{rightList}}" wx:key="index" catchtap="bottomButton" data-id="{{item.id}}">
                  <image src="{{item.imglist[0]}}" mode='{{item.mode=="screenshot"?"aspectFill":"widthFix"}}' style="max-height:400rpx;height:340rpx;" ></image>
                  <text class="listText">{{item.title }}</text>
              </view>
            </view>
          </view>
js:
 // 1.调用接口获取信息
  getDataList() {
    let that = this;
    let timestamp = Date.parse(new Date()) / 1000;
    const data = {
      page: that.data.page.toString(),
      t: timestamp,
      openid: that.data.openId
    }
    // 调用秘钥方法
    let sign = CryptoJS.AesEncryptECB(JSON.stringify(data))
    wx.request({
      url: 'http://xxxxx?',
      data: { ...data, sign },
      method: 'GET',
      header: {
        'content-type': 'application/xml'
      },
      success: function (res) {
        let resData = res.data.data;
        // 获取图片信息
        that.getImgData(resData, 0);
      },
      fail: function (err) {
        console.log(err)
      },
    })
  },

  // 获取图片尺寸,判断image的mode属性,
  // 如果长宽比例 > 1.5 则使用aspectFill,否则使用widthFix
  getImgData(resData, index) {
    let that = this;
    if (index < resData.length) {
      wx.request({
        url: resData[index].imglist[0].split('@base')[0]+'@base@tag=imageInfo',
        method: 'GET',
        header: {
          'content-type': 'application/xml'
        },
        success: function (res) {
          if (res.data.height / res.data.width > 1.5) {
            resData[index].mode = 'screenshot';
            index += 1
            that.getImgData(resData, index)
          } else {
            resData[index].mode = '';
            index += 1
            that.getImgData(resData, index)
          }
        },
        fail: function (err) {
          console.log(err)
        },
      })
    } else {
      that.setData({
        dataList: that.data.dataList.concat(resData),
      })
      // 调用瀑布流布局方法
      that.isLeft();
    }
  },

  /* 首页瀑布流布局 */
  // 判断左右插入
  async isLeft() {
    const { dataList, leftList, rightList } = this.data;
    let newDataList = dataList.slice(-10);
    query = wx.createSelectorQuery();
    for (const item of newDataList) {
      leftHeight <= rightHeight ? leftList.push(item) : rightList.push(item);
      //判断两边高度,来觉得添加到那边
      await this.getBoxHeight(leftList, rightList);
    }
  },

  // 布局对比
  getBoxHeight(leftList, rightList) { //获取左右两边高度
    return new Promise((resolve, reject) => {
      this.setData({ leftList, rightList }, () => {
        query.select('#left').boundingClientRect();
        query.select('#right').boundingClientRect();
        query.exec((res) => {
          leftHeight = res[0].height; //获取左边列表的高度
          rightHeight = res[1].height; //获取右边列表的高度
          resolve();
        });
      });
    })
  },

  // 通过监听滚动条,动态加载数据
  /* onPageScroll: tools.throttle(function (res) { */ // 引入外部节流函数
  onPageScroll: function (res) {
    let scrollTop = res.scrollTop;
    if (scrollTop >= this.data.scrollHight) {
      console.log("加载下一页")
      this.setData({
        scrollHight: this.data.scrollHight + 800
      })
      this.getDataList()
    }
  },
最后
以上就是瘦瘦大象最近收集整理的关于微信小程序双瀑布流布局+动态懒加载的全部内容,更多相关微信小程序双瀑布流布局+动态懒加载内容请搜索靠谱客的其他文章。
本图文内容来源于网友提供,作为学习参考使用,或来自网络收集整理,版权属于原作者所有。


发表评论 取消回复