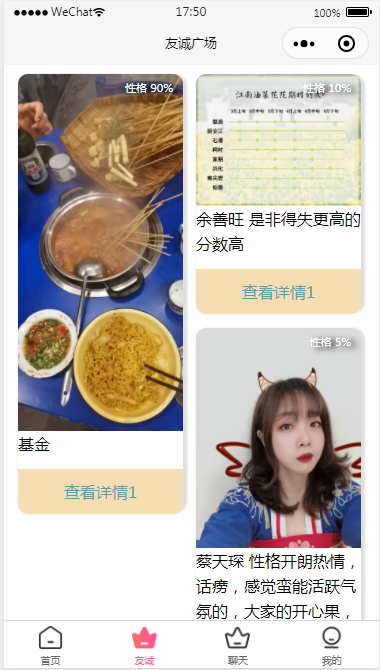
实现思路:把图片分成两排,创建两个数组,计算总数组中图片的宽高,对比上一个图片和当前的图片高度,低的就给另一个数组添加。效果图:

上代码:
// miniprogram/pages/find/index.js
const app = getApp();
var util = require('../../utils/util.js')
var userInfo,shang_height=0;
const DB = wx.cloud.database()
var that;
Page({
  data: {
    list: []
  },
  get_img_height(url){
    return new Promise(ress=>{
      wx.getImageInfo({
        src: url,
        success (res) {
          console.log(res.width)
          console.log(res.height)
          ress(res.height)
          return res.height
        }
      })
    })
  },
  onShow: function () {
    that = this
    DB.collection('user')
      .get({
        success: function (res) {
          console.log('有城列表', res.data)
          var see_list = wx.getStorageSync('see_list') || [];
          let fen = 0;
          var list = res.data;
            list.forEach((item, idx) => {
              console.log(item)
              that.get_img_height(item.userInfoDetail.hande).then(rr=>{
                item.img_height = rr
              })
              if (see_list.indexOf(item._openid) != -1) {
                item.seeStatus = true
              } else {
                item.seeStatus = false
              }
              if(item.character_list){
                for (var itt in item.character_list) {
                  if (item.character_list[itt] == wx.getStorageSync('userInfo').character_list[itt]) {
                    item.fen = (item.fen + 5) || 5
                  } else {}
                }
              }

            })
            console.log(list)
        var vList = [];
        var v2List = [];
        for (var i = 0; i < list.length; i++) {
          if (shang_height<list[i].img_height) {
            vList.push(list[i])
          } else {
            v2List.push(list[i])
          }
          shang_height =list[i].img_height
        }
          that.setData({
            list,vList,v2List,
            _openid: wx.getStorageSync('userInfo').openid
          })
        }
      })
  },

})
<view>
<view class='view_outer'>
<view>
<block wx:for="{{v2List}}" wx:key="index">
<view class='user_callingcard' wx:if='{{item.userInfoDetail.name&&item._openid!=_openid}}' catchtap="nav_detail" data-userinfo="{{item}}">
<view class="fen">性格 {{item.fen||0}}%</view>
<image class='view_li' mode="widthFix" src='{{item.userInfoDetail.hande}}'></image>
<view class='item_txt'>{{item.userInfoDetail.name}} {{item.userInfoDetail.nssmr}}</view>
<!-- <view class='item_txt'> -->
<!-- </view> -->
<view class='item_txt2'>{{item.seeStatus?"已查看":"查看详情1"}}
</view>
</view>
</block>
</view>
<view>
<block wx:for="{{vList}}" wx:key="index">
<view class='user_callingcard' wx:if='{{item.userInfoDetail.name&&item._openid!=_openid}}' catchtap="nav_detail" data-userinfo="{{item}}">
<view class="fen">性格 {{item.fen||0}}%</view>
<image class='view_li' mode="widthFix" src='{{item.userInfoDetail.hande}}'></image>
<view class='item_txt'>{{item.userInfoDetail.name}} {{item.userInfoDetail.nssmr}}</view>
<!-- <view class='item_txt'> -->
<!-- </view> -->
<view class='item_txt2'>{{item.seeStatus?"已查看":"查看详情2"}}
</view>
</view>
</block>
</view>
</view>
<!-- <view class='more' bindtap='to_arr' id='2'>点击查看更多</view> -->
</view>/* miniprogram/pages/find/index.wxss */
.p_r {
display: flex;
flex-direction: row;
text-align: center;
}
.top_block {
padding-top: 30rpx;
padding-bottom: 20rpx;
border-bottom: 1px solid darkblue;
}
.mg_bo {
flex: 1;
}
.col {
color: #757575
}
.da {
font-size: 26rpx;
margin-top: 16rpx;
}
.acaca {
color: darkblue;
}
.user_callingcard {
/* display: block;
border-radius: 20rpx;
width: 43%; */
box-shadow: 4rpx 4rpx 4rpx 4rpx #dfdfdf;
/* margin: 20rpx; */
width: 330rpx;
/* height: 550rpx; */
border-radius: 20rpx;
float: left;
margin: 4px 0 0 1px;
margin-right: 24rpx;
position: relative;
margin-bottom: 30rpx;
}
.user_callingcard image {
display: block;
width: 100%;
}
.view_outer {
padding-top: 10rpx;
margin-left: 26rpx;
display: flex;
flex-direction: row;
}
.view_li {
width: 300rpx;
border-radius: 20rpx 20rpx 0 0 ;
}
.fen{
position: absolute;
right: 20rpx;
top: 10rpx;
font-size: 22rpx;
/* background: #dfdfdf; */
color: white;
text-shadow:5px 2px 6px #000;
}
.more {
text-align: center;
margin: 20rpx auto;
width: 70%;
/* border: 1px solid #666; */
border-radius: 15rpx;
color: #999;
padding: 5rpx
}
.item_txt2 {
text-align: center;
width: 100%;
height: 90rpx;
position: relative;
top: 10rpx;
line-height: 90rpx;
background: wheat;
color: cadetblue;
margin-top: 16rpx;
border-radius: 0 0 20rpx 20rpx;
}
最后
以上就是昏睡盼望最近收集整理的关于小程序瀑布流实现的全部内容,更多相关小程序瀑布流实现内容请搜索靠谱客的其他文章。
本图文内容来源于网友提供,作为学习参考使用,或来自网络收集整理,版权属于原作者所有。


发表评论 取消回复